- 重要な情報
- はじめに
- 用語集
- Standard Attributes
- ガイド
- インテグレーション
- エージェント
- OpenTelemetry
- 開発者
- Administrator's Guide
- API
- Partners
- DDSQL Reference
- モバイルアプリケーション
- CoScreen
- CoTerm
- Remote Configuration
- Cloudcraft
- アプリ内
- ダッシュボード
- ノートブック
- DDSQL Editor
- Reference Tables
- Sheets
- Watchdog
- アラート設定
- メトリクス
- Bits AI
- Internal Developer Portal
- Error Tracking
- Change Tracking
- Service Management
- Actions & Remediations
- インフラストラクチャー
- Cloudcraft
- Resource Catalog
- ユニバーサル サービス モニタリング
- Hosts
- コンテナ
- Processes
- サーバーレス
- ネットワークモニタリング
- Cloud Cost
- アプリケーションパフォーマンス
- APM
- Continuous Profiler
- データベース モニタリング
- Data Streams Monitoring
- Data Jobs Monitoring
- Data Observability
- Digital Experience
- RUM & セッションリプレイ
- Synthetic モニタリング
- Continuous Testing
- Product Analytics
- Software Delivery
- CI Visibility (CI/CDの可視化)
- CD Visibility
- Deployment Gates
- Test Visibility
- Code Coverage
- Quality Gates
- DORA Metrics
- Feature Flags
- セキュリティ
- セキュリティの概要
- Cloud SIEM
- Code Security
- クラウド セキュリティ マネジメント
- Application Security Management
- Workload Protection
- Sensitive Data Scanner
- AI Observability
- ログ管理
- Observability Pipelines(観測データの制御)
- ログ管理
- CloudPrem
- 管理
ケースの表示と管理
This product is not supported for your selected Datadog site. ().
概要
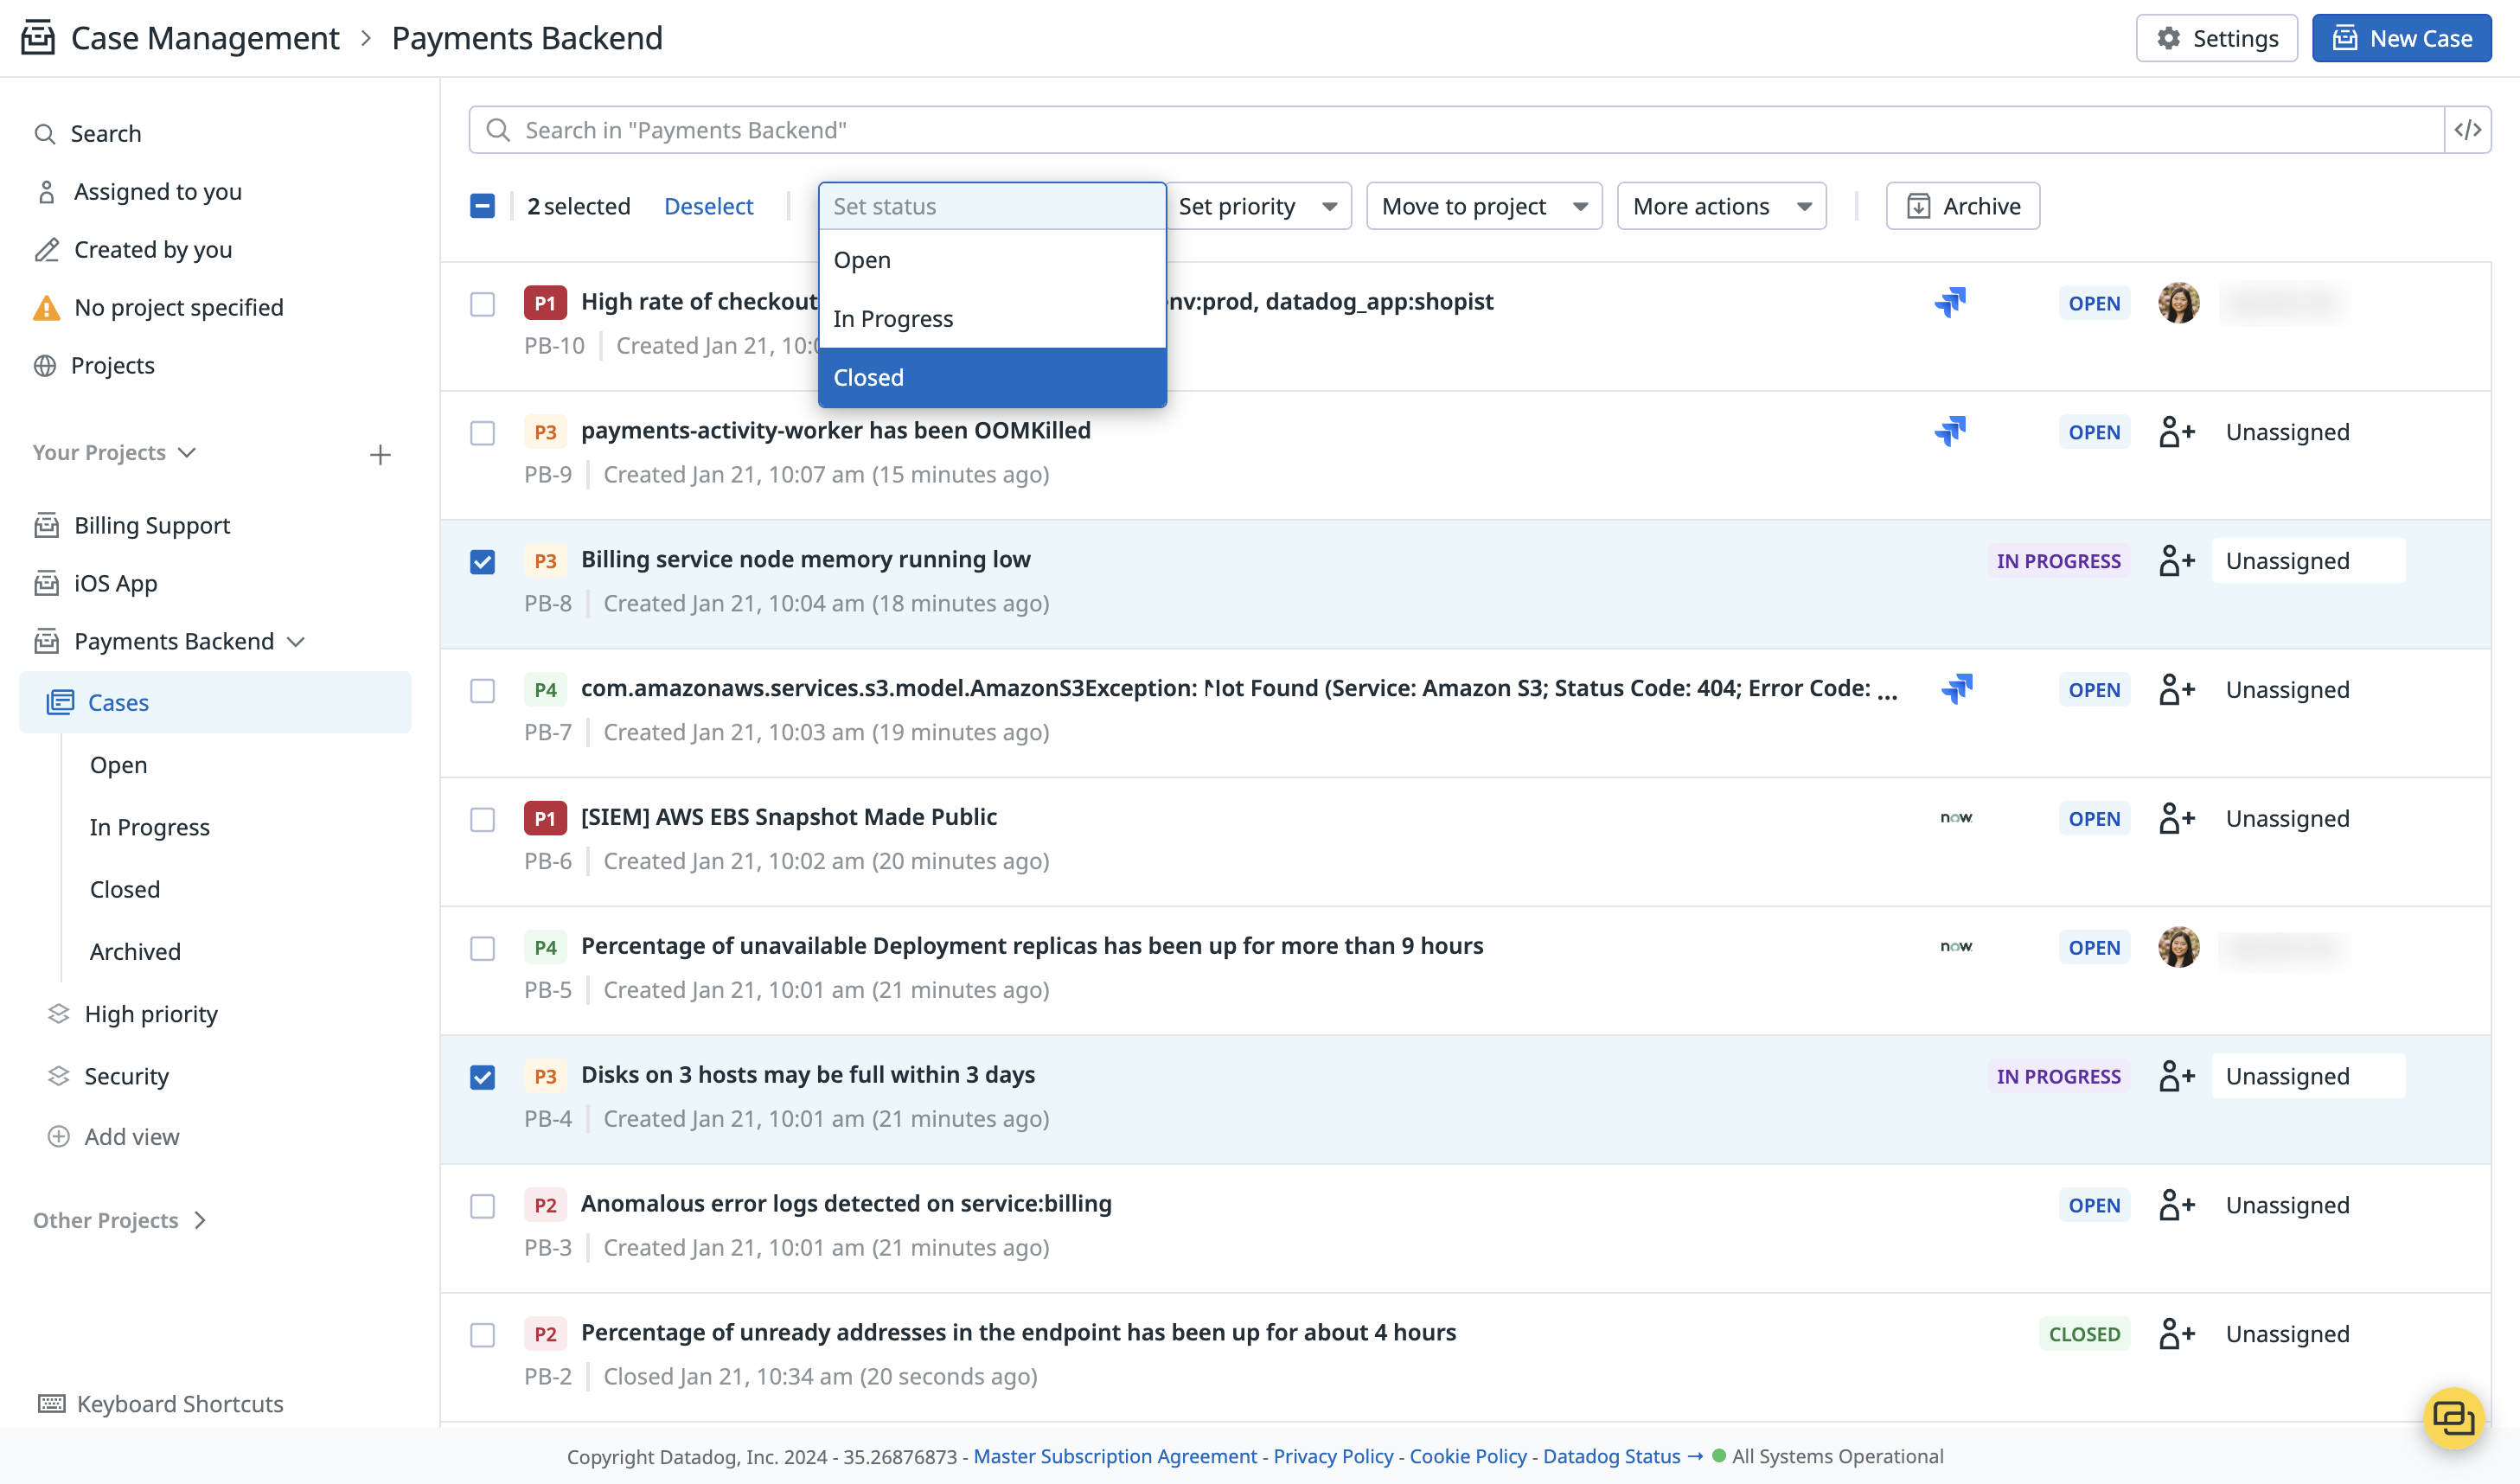
Case Management ページでは、ケースを作成日、ステータス、優先度で並べ替えることができます。デフォルトでは、ケースは作成日順に並べ替えられます。
プロジェクト内のケースを一括編集するには、チェックボックスを使用して 1 つ以上のケースを選択します。その後、ドロップダウンメニューを使用して、ステータス管理、割り当て、アーカイブなどのアクションを一括して実行します。ケースを別のプロジェクトに移動すると、ケースには新しいケース ID が割り当てられます。古いケースの URL は新しいケースにリダイレクトされません。
キーボードショートカット
以下のキーボードショートカットを使用すると、素早くナビゲーションを行うことができます。
| アクション | ショートカット |
|---|---|
| 上に移動 | ↑ または K |
| 下に移動 | ↓ または J |
| ケースを選択 | X |
| 選択したケースを表示 | Enter または O |
| ケースの作成 | C |
| ステータスを設定 | S |
| ユーザーに割り当てる | A |
| 優先度を設定 | P |
| プロジェクトへ移動 | V |
| アーカイブ/アーカイブ解除 | E |
ケースを検索
プロジェクト内では、以下でケースを検索できます。
- 属性キーと値のペア: 例えば、Event Correlation パターンから作成されたすべてのケースを見つけるには、
creation_source:Event Managementを検索します。個々のイベントから作成されたケースを見つけるには、creation_source:Eventを検索します。 - タイトル: 検索語を二重引用符で囲みます。例えば、タイトルに “kubernetes pods” という用語を含むすべてのケースを見つけるには、
"kubernetes pods."を検索します。
より複雑なクエリを作成するには、大文字と小文字を区別するブール演算子 AND、OR、- (除外) を使用できます。例えば、priority:(P2 OR P3) は優先度が P2 または P3 のケースを返します。
さらに、左上の検索バーを使うと、すべてのプロジェクトを横断してケースを検索できます。
ビューの作成
ビューとは、保存されたクエリフィルターのことで、これを使用することでケースのリストを自分に最も関係のあるものに絞り込むことができます。プロジェクトには、オープン、進行中、クローズ、アーカイブ済みのステータスごとにデフォルトのビューがあります。さらに、自分に割り当てられたケースと自分が作成したケースのデフォルトビューがあります。
カスタムビューを作成するには
- プロジェクト内から Add View を選択します。
- ビューに名前をつけます。
- 検索ボックスで、クエリを入力します。プレビューが更新され、現在の検索クエリに一致するケースが表示されます。
- (任意) Slack、Microsoft Teams、PagerDuty、または Webhooks などのサードパーティツールを使用して通知を送信できます。+ Add Recipient Type をクリックし、あらかじめ構成されたチャンネルまたは受信者を選択してください。利用可能なツールやオプションの詳細については、通知とチケットの作成を参照してください。
- Save view をクリックします。
ケースの詳細
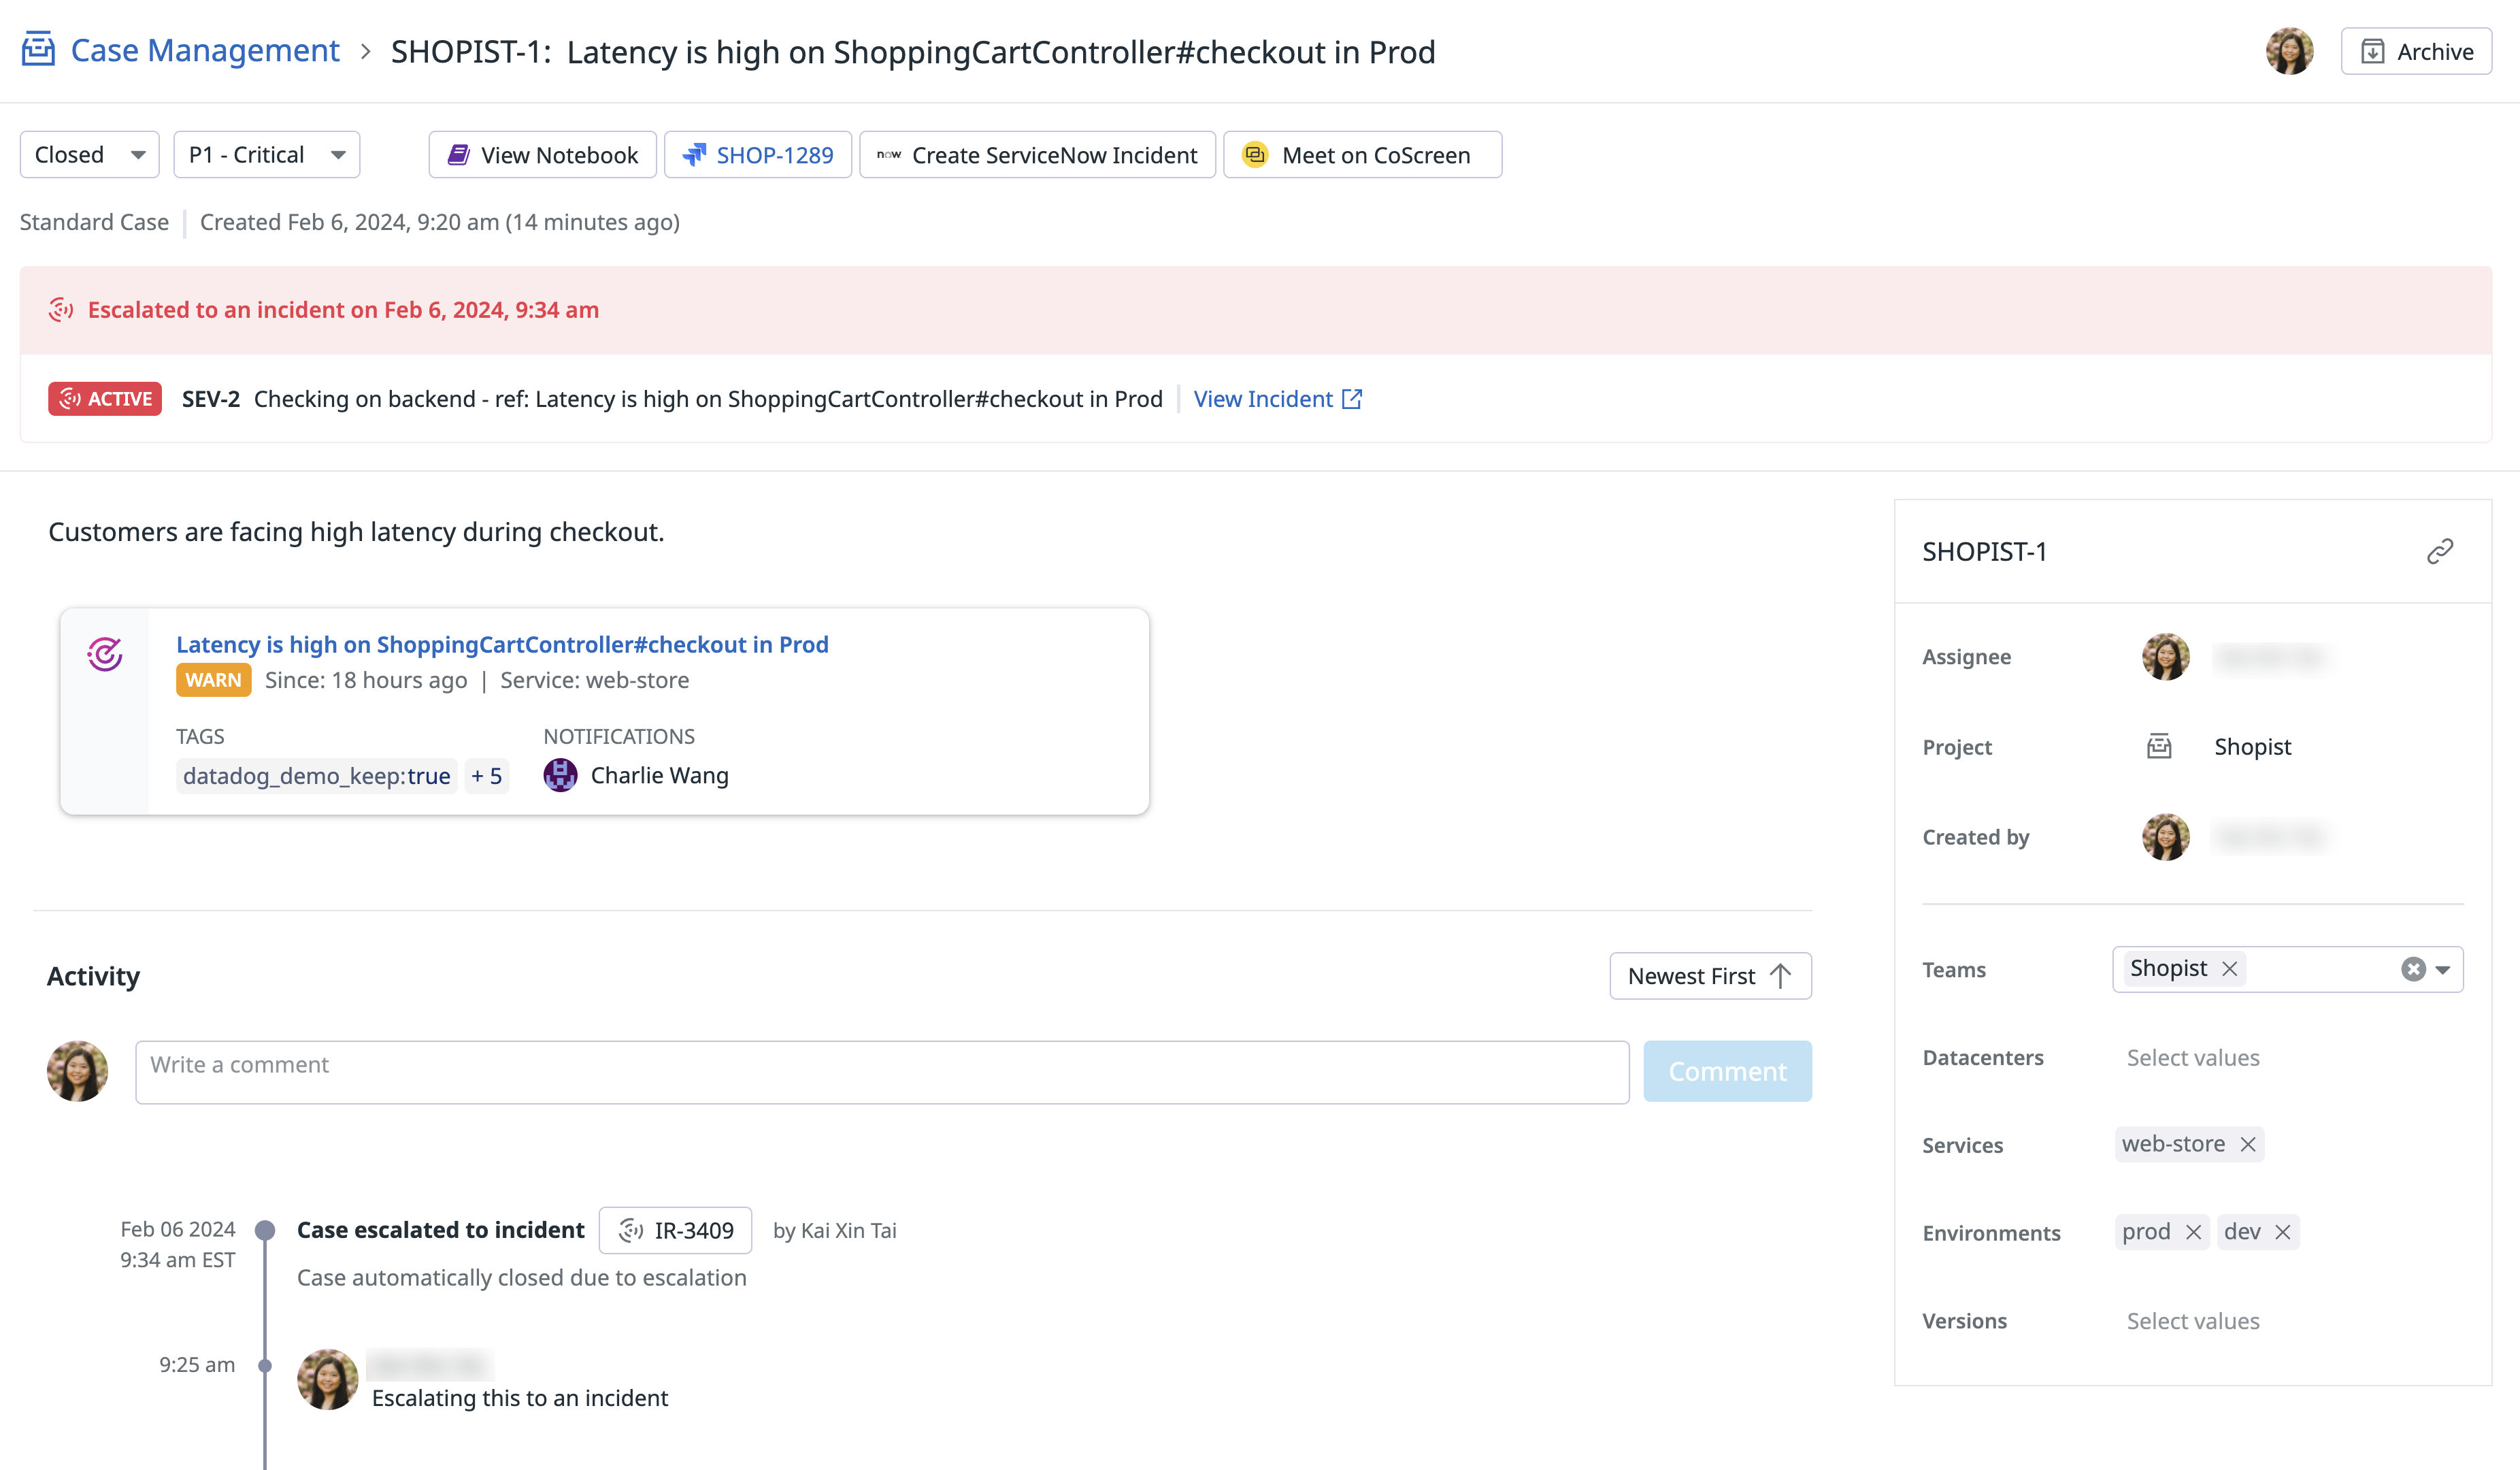
Case Details ページは、調査の進行に関する信頼できる唯一の情報源として機能します。各ケースには以下のプロパティがあります。
- Status
- すべてのケースは、作成時にデフォルトでオープンになっています。ケースを進めるにつれて、進行中やクローズに変更することができます。ケースのステータスを変更するには
Sと入力してください。 - Priority
- デフォルトでは、優先度は定義されていません。ケースの優先度は、P1 - 重大、P2 - 高、P3 - 中、P4 - 低、P5 - 情報に設定できます。ケースの優先度を設定するには
Pと入力してください。 - Assignee
- デフォルトでは未割り当てです。ユーザーに割り当てるには
Aと入力してください。自分に割り当てるにはIと入力してください。 - Attributes
- 属性を追加することで、整理とフィルタリングが可能になります。デフォルトでは、すべてのケースにチーム、データセンター、サービス、環境、およびバージョンの属性があります。
- Archiving
- ケースをアーカイブすると、検索から削除されます。ケースをアーカイブするには
Eと入力してください。 - Activity timeline
- 各ケースは自動的にアクティビティタイムラインを作成し、ステータス、担当者、優先度、シグナル、追加されたコメントの更新をリアルタイムでキャプチャします。コメントで自分がタグ付けされると、メールが届きます。コメントを追加するには
Mと入力し、送信するにはCmd + Enterと入力してください。
アクションを起こす
ケース管理を使用して、情報、状況、リソースを収集し、適切なアクションを決定します。これには、さらなる調査、インシデントへのエスカレーション、ケースのクローズなどが含まれます。
個別のケースから
- 調査ノートを作成する: 調査情報を収集し、チームメンバーと協力します。
- インシデントを宣言する: ケースをインシデントにエスカレーションし、インシデント対応プロセスを開始します。
- 手動で Jira 課題を作成する: Jira 課題を作成するには、
Shift + Jを使用します。Jira 課題の自動作成と双方向同期の構成方法の詳細については、設定ドキュメントを参照してください。 - 手動で ServiceNow インシデントを作成する: ServiceNow インシデントを作成するには、
Shift + Nを使用します。 - CoScreen でミーティングする: 共同デバッグのために画面を共有します
- ケースをクローズする: これ以上のアクションが必要ないことをチームに知らせます。ケースのステータスをクローズに更新します。
Case Analytics
Case Analytics は、集計されたケース統計のクエリ可能なデータソースです。ダッシュボードとノートブックの両方で、さまざまなグラフウィジェットを使用してこれらの分析をクエリし、チームの生産性を分析したり、問題のパターンを特定したりできます。
時系列、トップリスト、クエリ値、テーブル、ツリーマップ、円グラフ、変更、およびリストのウィジェットが、Case Analytics をサポートしています。
その他の参考資料
お役に立つドキュメント、リンクや記事:


