Locally
Install the Datadog CLI
npm install -g @datadog/datadog-ci @datadog/datadog-ci-plugin-container-app
Install the Azure CLI and authenticate with az login.
To set up the Datadog sidecar for your applications, configure the Datadog site and Datadog API key, and run the instrument command after your normal deployment:
export DD_SITE="<DATADOG_SITE>"
export DD_API_KEY="<DATADOG_API_KEY>"
datadog-ci container-app instrument -s <AZURE-SUBSCRIPTION-ID> -g <AZURE-RESOURCE-GROUP-NAME> -n <CONTAINER-APP-NAME>
You can also instrument multiple applications using the full resource IDs:
datadog-ci container-app instrument \
  --resource-id "/subscriptions/<subscription-id>/resourceGroups/<resource-group-name-1>/providers/Microsoft.App/containerApps/<container-app-name-1>" \
  --resource-id "/subscriptions/<subscription-id>/resourceGroups/<resource-group-name-2>/providers/Microsoft.App/containerApps/<container-app-name-2>"
Azure Cloud Shell
To use the Datadog CLI in Azure Cloud Shell, open a cloud shell, set your API key and site in the DD_API_KEY and DD_SITE environment variables, and use npx to run the CLI directly.
export DD_API_KEY=<DATADOG_API_KEY>
export DD_SITE=<DATADOG_SITE>
npx @datadog/datadog-ci container-app instrument -s <AZURE-SUBSCRIPTION-ID> -g <AZURE-RESOURCE-GROUP-NAME> -n <CONTAINER-APP-NAME>
Additional parameters can be found in the CLI documentation.
The Datadog Terraform module for Container Apps wraps the azurerm_container_app resource and automatically configures your Azure Container App for Datadog Serverless Monitoring by adding required environment variables and the serverless-init sidecar.
If you don’t already have Terraform set up, install Terraform, create a new directory, and make a file called main.tf.
Then, add the following to your Terraform configuration, updating it as necessary based on your needs:
variable "datadog_api_key" {
  description = "Your Datadog API key"
  type        = string
  sensitive   = true
}

provider "azurerm" {
  features {}
  subscription_id = "00000000-0000-0000-0000-000000000000" // Replace with your subscription ID
}

resource "azurerm_container_app_environment" "my_env" {
    name                = "my-container-app-env" // Replace with your container app environment name
    resource_group_name = "my-resource-group"    // Replace with your resource group name
    location            = "eastus"
}

module "my_container_app" {
  source  = "DataDog/container-app-datadog/azurerm"
  version = "~> 1.0"

  name                         = "my-container-app" // Replace with your container app name
  resource_group_name          = "my-resource-group" // Replace with your resource group name
  container_app_environment_id = azurerm_container_app_environment.my_env.id

  datadog_api_key = var.datadog_api_key
  datadog_site    = "datadoghq.com" // Replace with your Datadog site
  datadog_service = "my-service"    // Replace with your service name
  datadog_env     = "dev"           // Replace with your environment (e.g. prod, staging, dev)
  datadog_version = "0.1.0"         // Replace with your application version

  revision_mode         = "Single"
  workload_profile_name = "Consumption"
  ingress = {
    external_enabled = true
    target_port      = 8080
    traffic_weight = [{
      percentage      = 100
      latest_revision = true
    }]
  }
  template = {
    container = [{
      cpu    = 0.5
      memory = "1Gi"
      image  = "docker.io/your-docker-image:latest" // Replace with your Docker image
      name   = "main"
    }]
  }
}
Finally, run terraform apply, and follow any prompts.
The Datadog Container App module only deploys the Container App resource, so you need to build and push your container separately.
See the Environment Variables for more information on the configuration options available through the env.
Ensure the container port for the main container is the same as the one exposed in your Dockerfile/service.
If you haven’t already, initialize your Terraform project:
To deploy your app, run:
Configuration
Update your existing Container App bicep to include the necessary Datadog App Settings and sidecar, as follows:
@secure()
param datadogApiKey string
param datadogSite string
param service string = 'my-service'
param env string = 'dev'
param version string = '0.0.0'

resource containerApp 'Microsoft.App/containerApps@2024-03-01' = {
  // ...
  properties: {
    template: {
      volumes: [
        {
          name: 'shared-volume'
          storageType: 'EmptyDir'
        }
        // Additional volumes
      ]
      containers: [
        {
          name: 'main'
          image: 'index.docker.io/your/image:tag' // Replace with your Application Image
          resources: {
            cpu: 1
            memory: '2Gi'
          }
          env: [
            { name: 'DD_ENV', value: env }
            { name: 'DD_SERVICE', value: name }
            { name: 'DD_VERSION', value: version }
            { name: 'DD_LOGS_INJECTION', value: 'true' }
            // Additional tracing/application env vars
          ]
          volumeMounts: [
            { volumeName: 'shared-volume', mountPath: '/shared-volume' }
            // Additional volume mounts
          ]
        }
        {
          name: 'datadog-sidecar'
          image: 'index.docker.io/datadog/serverless-init:latest'
          resources: {
            cpu: '0.5'
            memory: '1Gi'
          }
          env: [
            { name: 'DD_AZURE_SUBSCRIPTION_ID', value: subscription().subscriptionId }
            { name: 'DD_AZURE_RESOURCE_GROUP', value: resourceGroup().name }
            { name: 'DD_API_KEY', value: datadogApiKey }
            { name: 'DD_SITE', value: datadogSite }
            { name: 'DD_SERVICE', value: service }
            { name: 'DD_ENV', value: env }
            { name: 'DD_VERSION', value: version }
            // set this to wherever you write logs in the shared volume:
            { name: 'DD_SERVERLESS_LOG_PATH', value: '/shared-volume/logs/app.log' }
          ]
          volumeMounts: [{ volumeName: 'shared-volume', mountPath: '/shared-volume' }]
        }
      ]
      scale: { minReplicas: 1, maxReplicas: 1, rules: [] }
    }
  }
}
Redeploy your updated template:
az deployment group create --resource-group <RESOURCE GROUP> --template-file <TEMPLATE FILE>
See the Manual tab for descriptions of all environment variables.
Configuration
Update your existing Container App ARM Template to include the necessary Datadog App Settings and sidecar, as follows:
{
  "$schema": "https://schema.management.azure.com/schemas/2019-04-01/deploymentTemplate.json#",
  "contentVersion": "1.0.0.0",
  "parameters": {
    "datadogApiKey": {
      "type": "securestring"
    },
    "datadogSite": {
      "type": "string"
    },
    "service": {
      "type": "string",
      "defaultValue": "my-service"
    },
    "env": {
      "type": "string",
      "defaultValue": "dev"
    },
    "version": {
      "type": "string",
      "defaultValue": "0.0.0"
    }
  },
  "resources": [
    {
      "type": "Microsoft.App/containerApps",
      "apiVersion": "2024-03-01",
      // ...
      "properties": {
        "template": {
          "volumes": [
            {
              "name": "shared-volume",
              "storageType": "EmptyDir"
            }
            // Additional volumes
          ],
          "containers": [
            {
              "name": "main",
              "image": "index.docker.io/your/image:tag", // Replace with your Application Image
              "resources": {
                "cpu": 1,
                "memory": "2Gi"
              },
              "env": [
                {
                  "name": "DD_ENV",
                  "value": "[parameters('env')]"
                },
                {
                  "name": "DD_SERVICE",
                  "value": "[parameters('service')]"
                },
                {
                  "name": "DD_VERSION",
                  "value": "[parameters('version')]"
                },
                // Additional tracing/application env vars
                {
                  "name": "DD_LOGS_INJECTION",
                  "value": "true"
                }
              ],
              "volumeMounts": [
                {
                  "volumeName": "shared-volume",
                  "mountPath": "/shared-volume"
                }
                // Additional volume mounts
              ]
            },
            {
              "name": "datadog-sidecar",
              "image": "index.docker.io/datadog/serverless-init:latest",
              "resources": {
                "cpu": "0.5",
                "memory": "1Gi"
              },
              "env": [
                {
                  "name": "DD_AZURE_SUBSCRIPTION_ID",
                  "value": "[subscription().subscriptionId]"
                },
                {
                  "name": "DD_AZURE_RESOURCE_GROUP",
                  "value": "[resourceGroup().name]"
                },
                {
                  "name": "DD_API_KEY",
                  "value": "[parameters('datadogApiKey')]"
                },
                {
                  "name": "DD_SITE",
                  "value": "[parameters('datadogSite')]"
                },
                {
                  "name": "DD_SERVICE",
                  "value": "[parameters('service')]"
                },
                {
                  "name": "DD_ENV",
                  "value": "[parameters('env')]"
                },
                {
                  "name": "DD_VERSION",
                  "value": "[parameters('version')]"
                },
                {
                  "name": "DD_SERVERLESS_LOG_PATH",
                  // set this to wherever you write logs in the shared volume:
                  "value": "/shared-volume/logs/app.log"
                }
              ],
              "volumeMounts": [
                {
                  "volumeName": "shared-volume",
                  "mountPath": "/shared-volume"
                }
              ]
            }
          ],
          "scale": {
            "minReplicas": 1,
            "maxReplicas": 1,
            "rules": []
          }
        }
      }
    }
  ]
}
Redeploy your updated template:
az deployment group create --resource-group <RESOURCE GROUP> --template-file <TEMPLATE FILE>
See the Manual tab for descriptions of all environment variables.
Application environment variables
Because Azure Container Apps is built on Kubernetes, you cannot share environment variables between containers.
| Name | Description |
|---|
DD_SERVICE | How you want to tag your service. For example, sidecar-azure. |
DD_ENV | How you want to tag your env. For example, prod. |
DD_VERSION | How you want to tag your application version. |
Sidecar container
- In the Azure Portal, navigate to Application > Revisions and replicas. Select Create new revision.
- On the Container tab, under Container image, select Add. Choose App container.
- In the Add a container form, provide the following:
- Name:
datadog - Image source: Docker Hub or other registries
- Image type:
Public - Registry login server:
docker.io - Image and tag:
datadog/serverless-init:<YOUR_TAG> - Define your container resource allocation based on your usage.
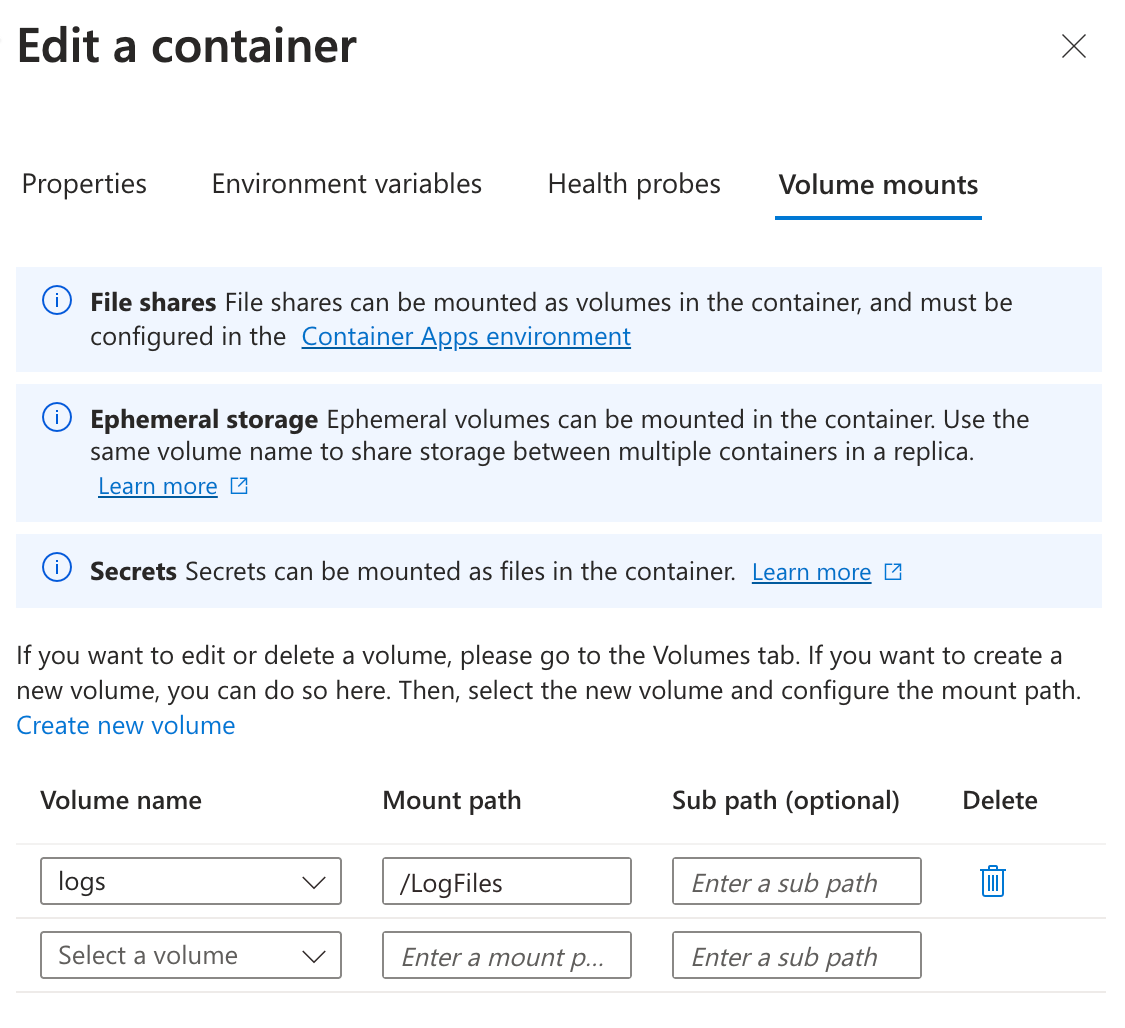
- Add a volume mount using replica-scoped storage. Use type “Ephemeral storage” when creating your volume. Ensure that the name and mount path matches the mount you configured in the application container.
- Set the environment variables in the following table:
Sidecar Environment variables
| Name | Description |
|---|
DD_AZURE_SUBSCRIPTION_ID | Required. Your Azure subscription ID. |
DD_AZURE_RESOURCE_GROUP | Required. Your Azure resource group. |
DD_API_KEY | Required. Your Datadog API key. |
DD_SITE | Your Datadog site. For example, datadoghq.com. |
DD_SERVICE | How you want to tag your service. For example, sidecar-azure. |
DD_ENV | How you want to tag your env. For example, prod. |
DD_VERSION | How you want to tag your application version. |
DD_SERVERLESS_LOG_PATH | If using the agent for log collection, where you write your logs. For example, /LogFiles/*.log. This must match the logging path set up in Application |
Logging
If using the Datadog Agent for log collection, add a volume mount to the sidecar container and your application containers using replica-scoped storage. Use type Ephemeral storage when creating your volume. The examples on this page use the volume name logs and the mount path /LogFiles.