- 重要な情報
- はじめに
- 用語集
- Standard Attributes
- ガイド
- インテグレーション
- エージェント
- OpenTelemetry
- 開発者
- Administrator's Guide
- API
- Partners
- DDSQL Reference
- モバイルアプリケーション
- CoScreen
- CoTerm
- Remote Configuration
- Cloudcraft
- アプリ内
- ダッシュボード
- ノートブック
- DDSQL Editor
- Reference Tables
- Sheets
- Watchdog
- アラート設定
- メトリクス
- Bits AI
- Internal Developer Portal
- Error Tracking
- Change Tracking
- Service Management
- Actions & Remediations
- インフラストラクチャー
- Cloudcraft
- Resource Catalog
- ユニバーサル サービス モニタリング
- Hosts
- コンテナ
- Processes
- サーバーレス
- ネットワークモニタリング
- Cloud Cost
- アプリケーションパフォーマンス
- APM
- Continuous Profiler
- データベース モニタリング
- Data Streams Monitoring
- Data Jobs Monitoring
- Data Observability
- Digital Experience
- RUM & セッションリプレイ
- Synthetic モニタリング
- Continuous Testing
- Product Analytics
- Software Delivery
- CI Visibility (CI/CDの可視化)
- CD Visibility
- Deployment Gates
- Test Visibility
- Code Coverage
- Quality Gates
- DORA Metrics
- Feature Flags
- セキュリティ
- セキュリティの概要
- Cloud SIEM
- Code Security
- クラウド セキュリティ マネジメント
- Application Security Management
- Workload Protection
- Sensitive Data Scanner
- AI Observability
- ログ管理
- Observability Pipelines(観測データの制御)
- ログ管理
- CloudPrem
- 管理
複数のクラウド アカウントを図示する
Cloudcraft はクラウド アーキテクチャをシームレスかつ効率的に可視化・設計するためのツールです。本ガイドでは Cloudcraft のレガシー エクスペリエンスを使用して複数のクラウド アカウントを図示する方法を説明します。以下の手順で複数のクラウド アカウントを 1 つの統合されたダイアグラムにまとめます。
1. レガシー エクスペリエンスを有効化する
複数のクラウド アカウントを扱うには、レガシー ダイアグラム エクスペリエンスを有効にする必要があります:
- Cloudcraft を開き、Live タブに移動します。
- New Live Experience トグルを探し、off になっていることを確認します。
2. 1 つめのアカウントをレイアウトする
レガシー エクスペリエンスを有効にしたら、最初のアカウントをレイアウトします:
- 可視化する最初のクラウド アカウントを選択します。
- このアカウントのスキャンを開始して、現在のアーキテクチャの詳細を取得します。
- Auto Layout ボタンを選択して、このアカウントのコンポーネントをダイアグラム内で自動的に配置します。
3. 2 つめのアカウントをレイアウトする
最初のアカウントのレイアウトが完了したら、さらにアカウントをダイアグラムに追加できます:
- 追加したい 2 つめのクラウド アカウントを選択します。
- 2 つめのアカウントをスキャンして、そのアーキテクチャを取得します。
- Auto Layout を選択します。
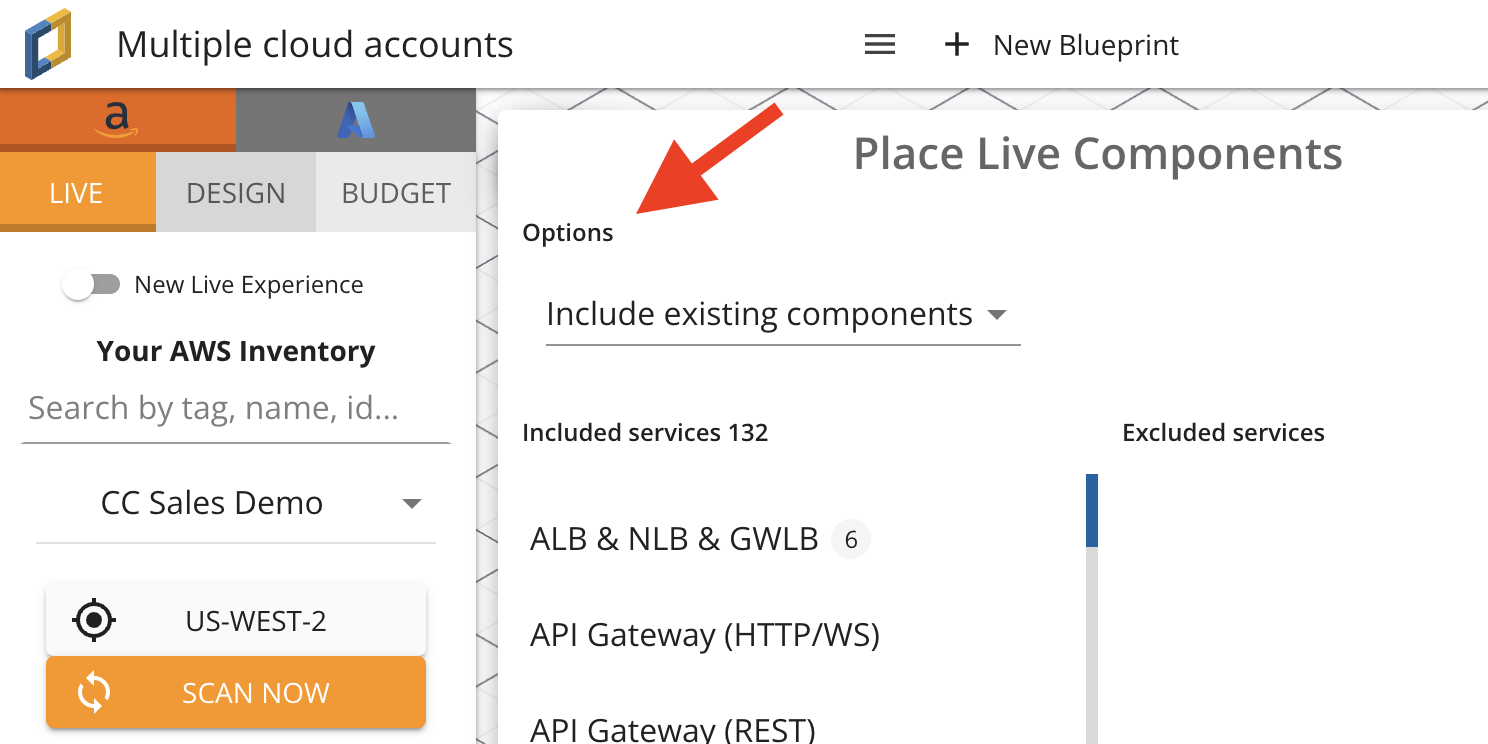
- Options ドロップダウンを開き、Include existing components を選択します。これにより 1 つめのアカウントのコンポーネントが表示されたままになり、両方のアカウントが 1 つのダイアグラムに統合されます。
この手順を繰り返すことで、さらに多くのアカウントをダイアグラムに含めることができます。
上記の手順に従うことで、複数のクラウド アカウントを 1 つの Cloudcraft ダイアグラムで統合して表示できます。必要なコンポーネントがすべて含まれ、適切な位置に配置されているかレイアウトを確認してください。見やすさやプレゼンテーションを向上させるために、必要に応じて手動で配置を調整します。


