- Essentials
- Getting Started
- Agent
- API
- APM Tracing
- Containers
- Dashboards
- Database Monitoring
- Datadog
- Datadog Site
- DevSecOps
- Incident Management
- Integrations
- Internal Developer Portal
- Logs
- Monitors
- OpenTelemetry
- Profiler
- Session Replay
- Security
- Serverless for AWS Lambda
- Software Delivery
- Synthetic Monitoring and Testing
- Tags
- Workflow Automation
- Learning Center
- Support
- Glossary
- Standard Attributes
- Guides
- Agent
- Integrations
- Developers
- Authorization
- DogStatsD
- Custom Checks
- Integrations
- Create an Agent-based Integration
- Create an API Integration
- Create a Log Pipeline
- Integration Assets Reference
- Build a Marketplace Offering
- Create a Tile
- Create an Integration Dashboard
- Create a Monitor Template
- Create a Cloud SIEM Detection Rule
- OAuth for Integrations
- Install Agent Integration Developer Tool
- Service Checks
- IDE Plugins
- Community
- Guides
- OpenTelemetry
- Administrator's Guide
- API
- Partners
- Datadog Mobile App
- DDSQL Reference
- CoScreen
- CoTerm
- Cloudcraft (Standalone)
- In The App
- Dashboards
- Notebooks
- DDSQL Editor
- Reference Tables
- Sheets
- Monitors and Alerting
- Metrics
- Watchdog
- Bits AI
- Internal Developer Portal
- Error Tracking
- Change Tracking
- Service Management
- Actions & Remediations
- Infrastructure
- Cloudcraft
- Resource Catalog
- Universal Service Monitoring
- Hosts
- Containers
- Processes
- Serverless
- Network Monitoring
- Cloud Cost
- Application Performance
- APM
- APM Terms and Concepts
- Application Instrumentation
- APM Metrics Collection
- Trace Pipeline Configuration
- Correlate Traces with Other Telemetry
- Trace Explorer
- Recommendations
- Code Origins for Spans
- Service Observability
- Endpoint Observability
- Dynamic Instrumentation
- Live Debugger
- Error Tracking
- Data Security
- Guides
- Troubleshooting
- Continuous Profiler
- Database Monitoring
- Agent Integration Overhead
- Setup Architectures
- Setting Up Postgres
- Setting Up MySQL
- Setting Up SQL Server
- Setting Up Oracle
- Setting Up Amazon DocumentDB
- Setting Up MongoDB
- Connecting DBM and Traces
- Data Collected
- Exploring Database Hosts
- Exploring Query Metrics
- Exploring Query Samples
- Exploring Database Schemas
- Exploring Recommendations
- Troubleshooting
- Guides
- Data Streams Monitoring
- Data Jobs Monitoring
- Data Observability
- Digital Experience
- Real User Monitoring
- Synthetic Testing and Monitoring
- Continuous Testing
- Product Analytics
- Software Delivery
- CI Visibility
- CD Visibility
- Deployment Gates
- Test Optimization
- Quality Gates
- DORA Metrics
- Security
- Security Overview
- Cloud SIEM
- Code Security
- Cloud Security
- App and API Protection
- Workload Protection
- Sensitive Data Scanner
- AI Observability
- Log Management
- Observability Pipelines
- Log Management
- Administration
ServiceNow
Integration version1.0.0
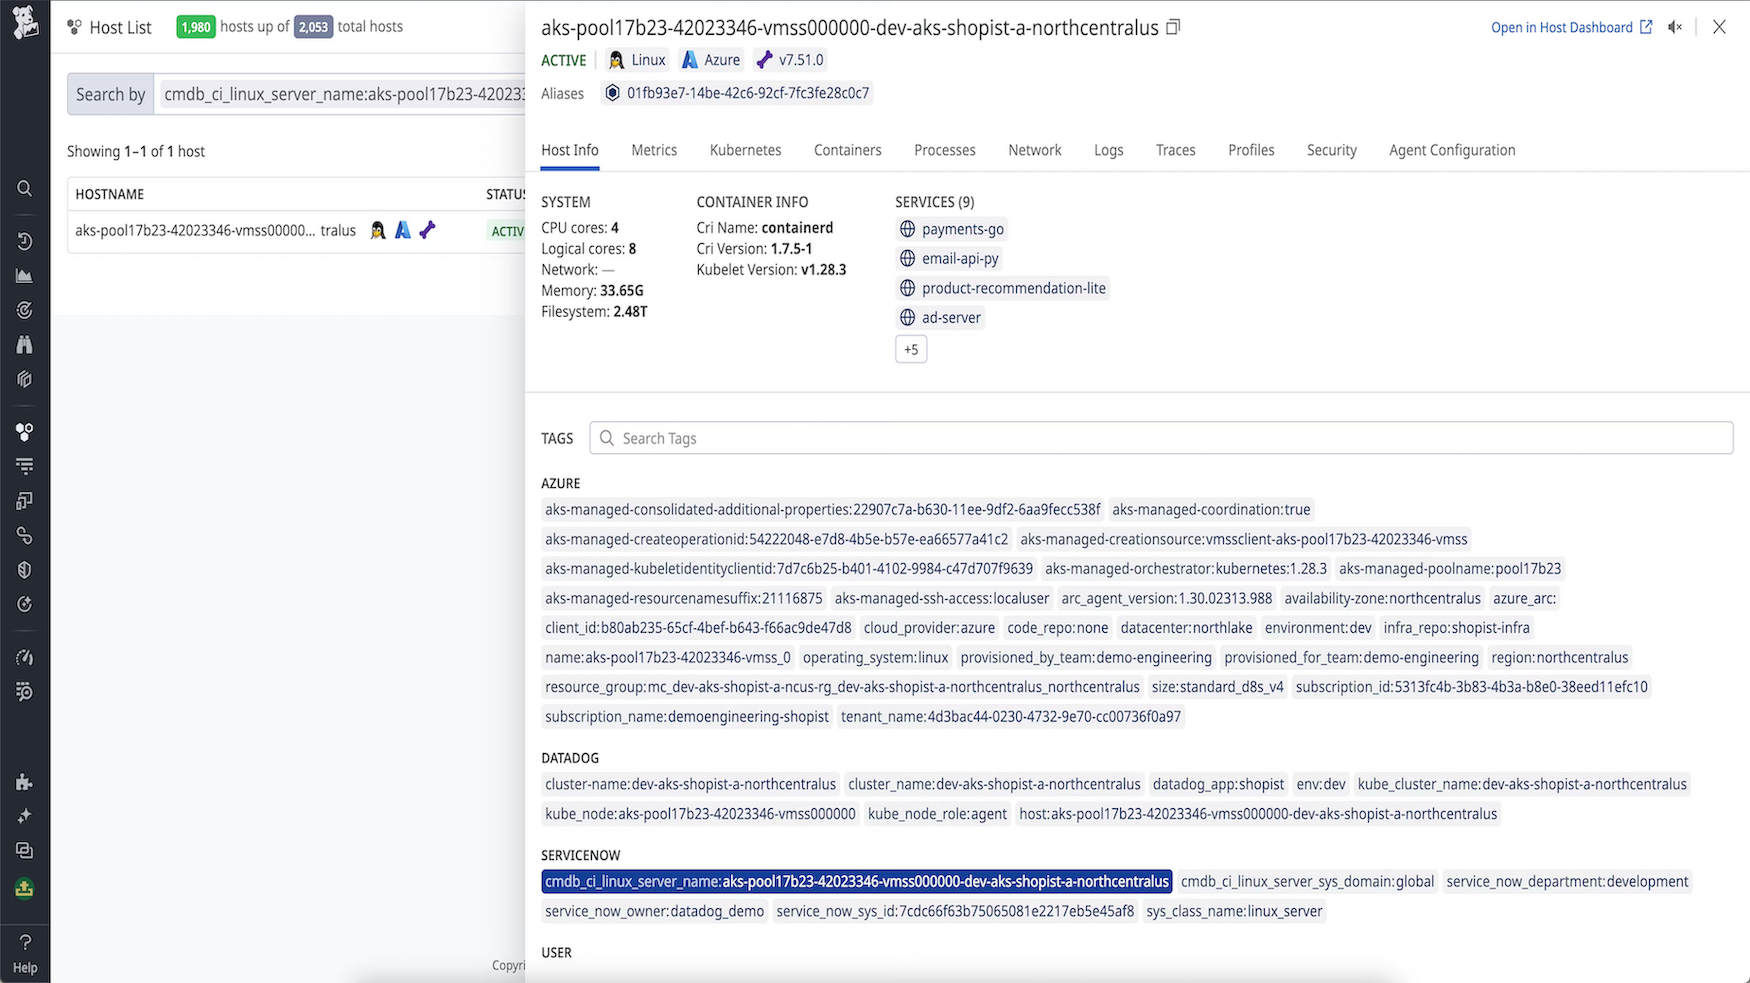
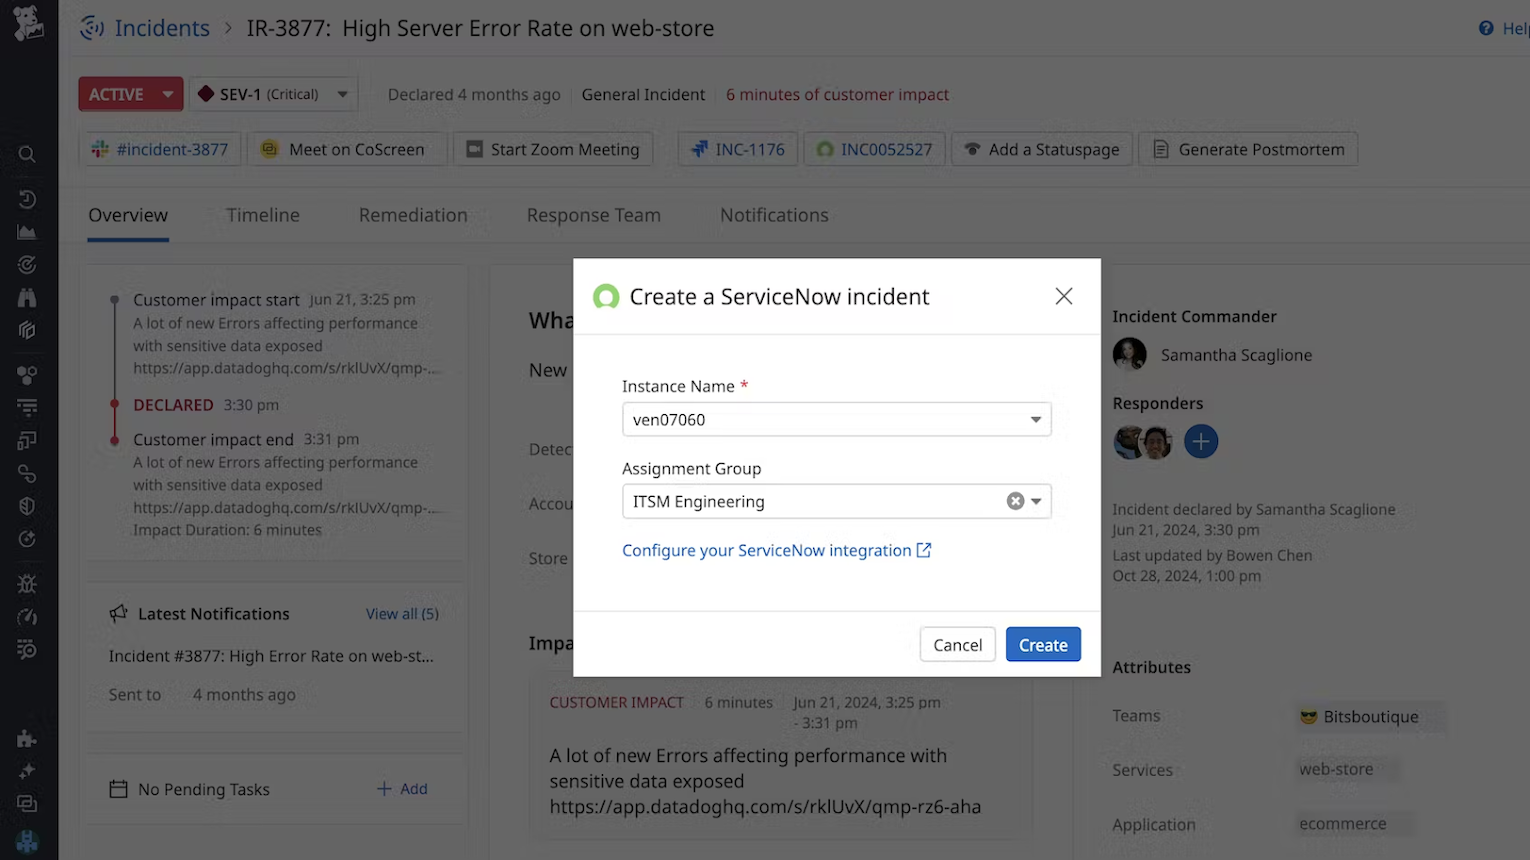
Enrich your Datadog hosts with CMDB metadata.
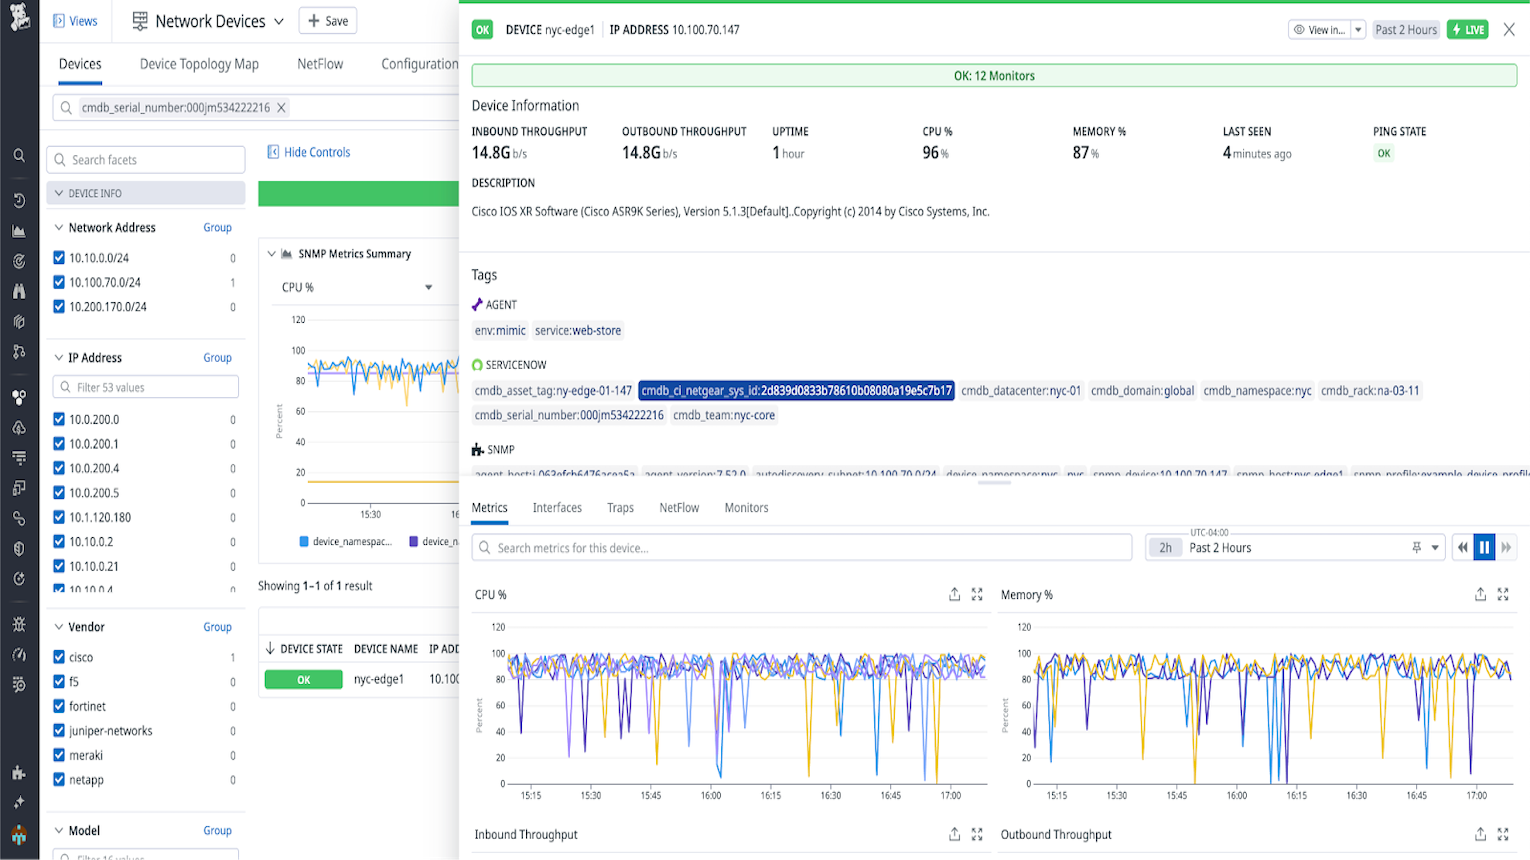
Enrich your Datadog network devices with CMDB metadata.
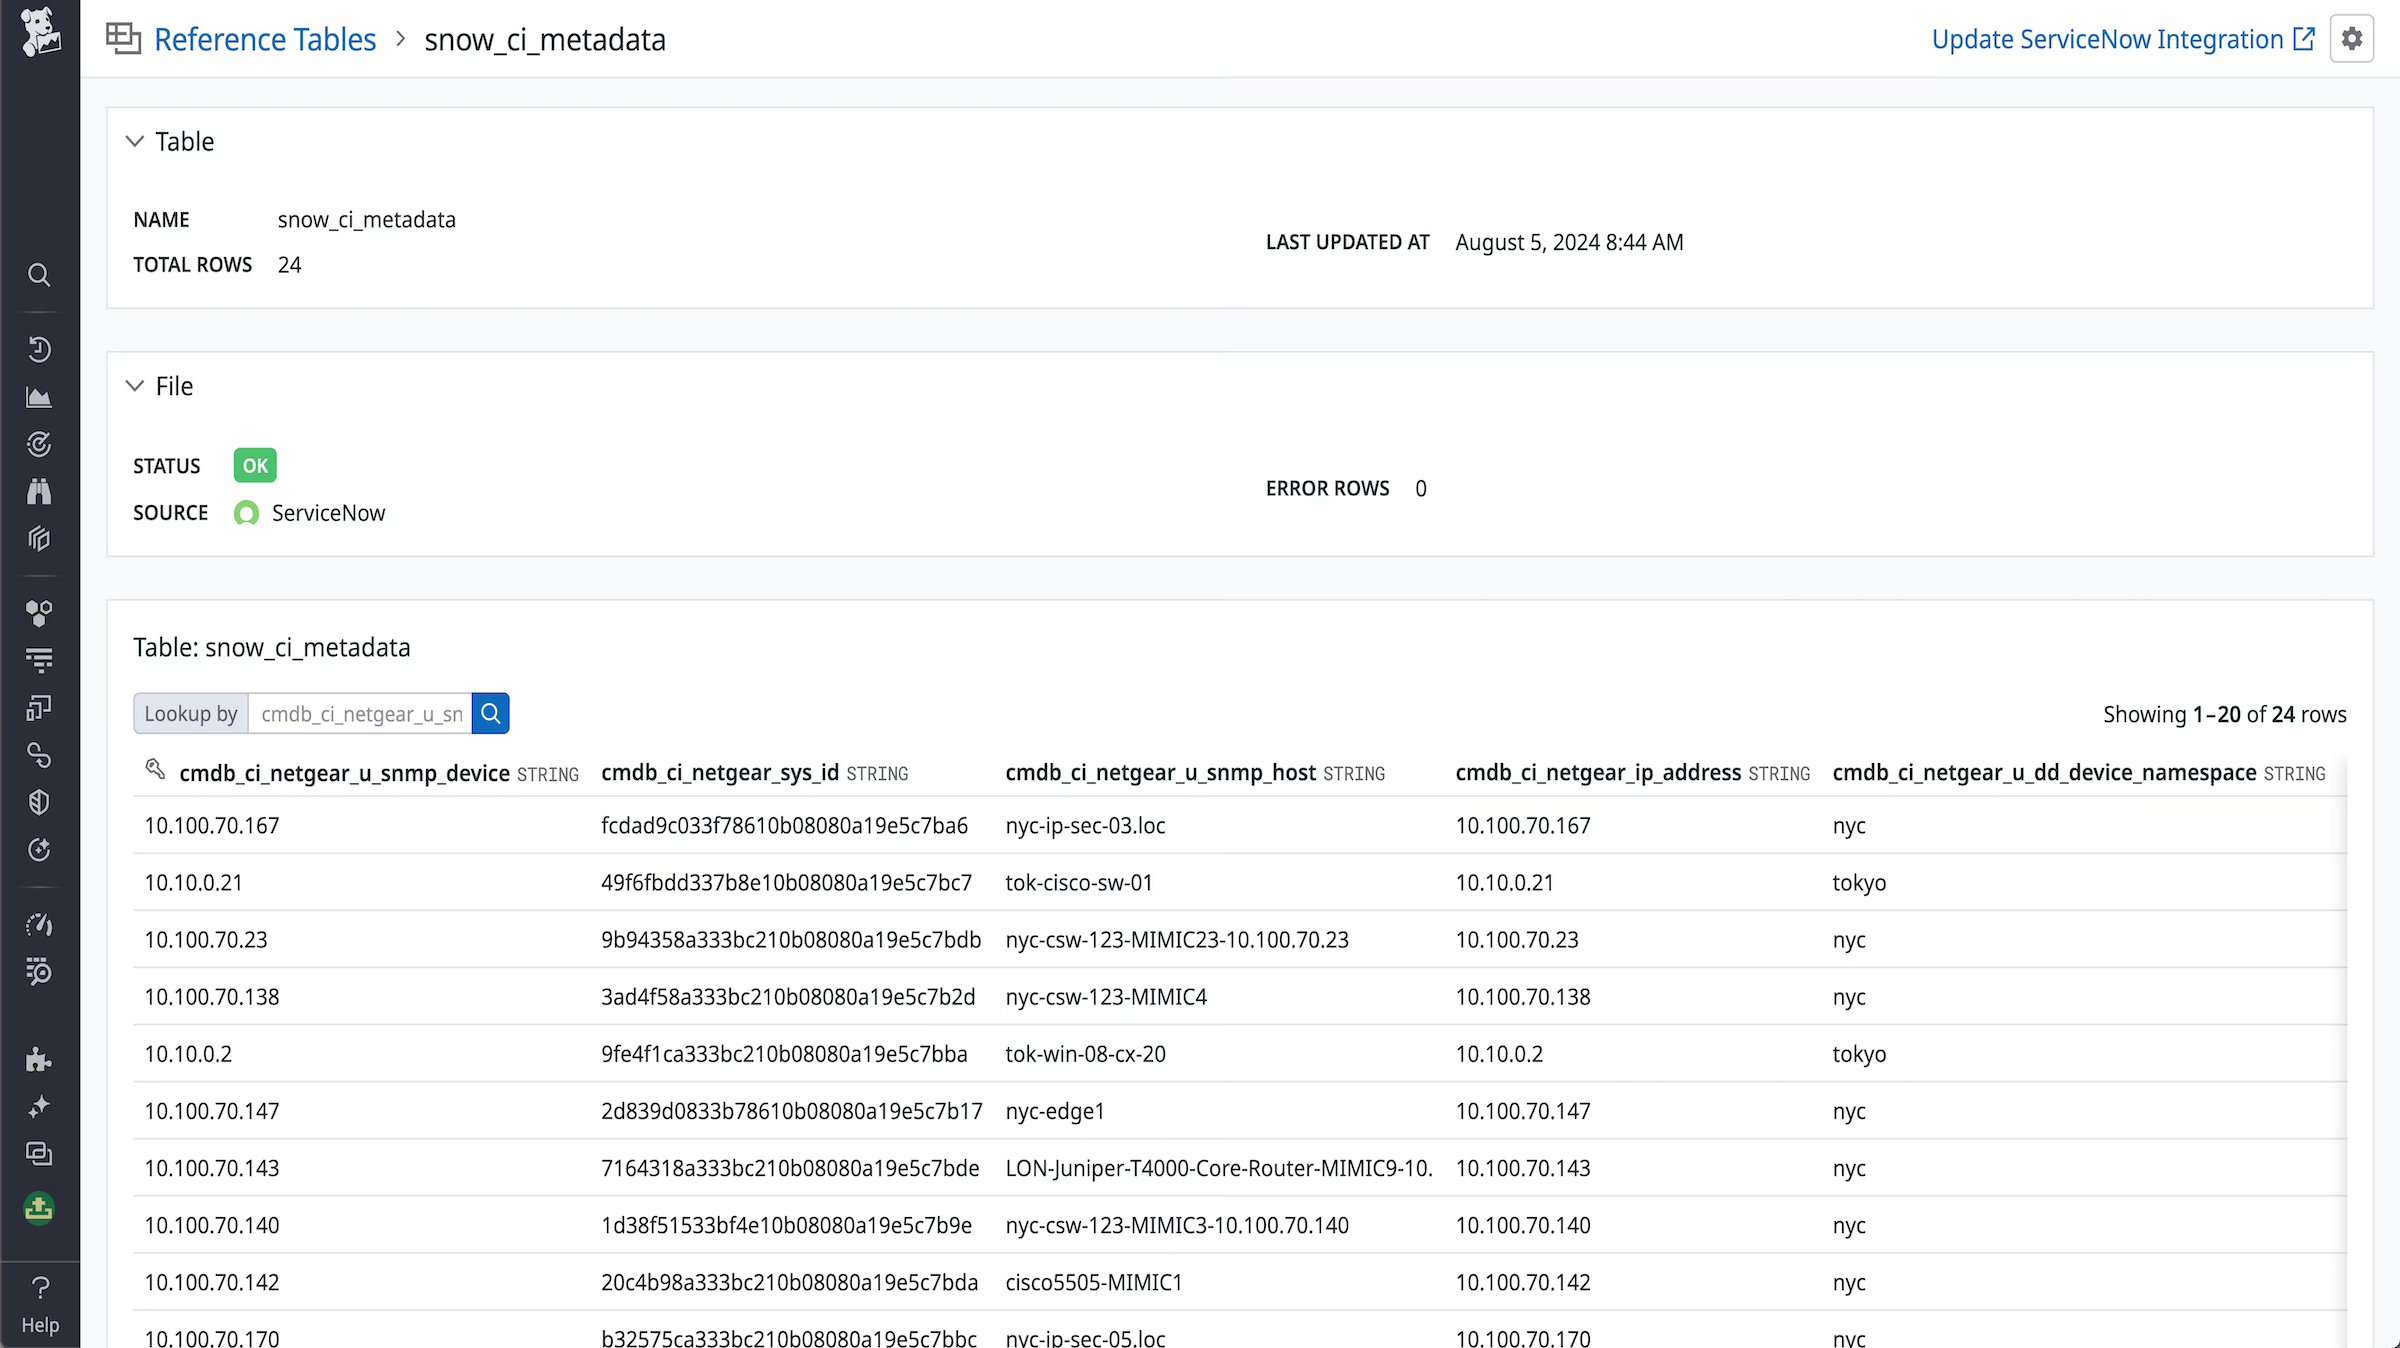
Enrich logs and events with CMDB reference tables.
Create ServiceNow tickets from Datadog Alerts.
Create ServiceNow incidents with Datadog Incident Management.
Overview
ServiceNow is an IT service management platform for recording, tracking, and managing a company’s enterprise-level IT processes in a single location. The Datadog ServiceNow integration is a two-way integration that allows you to:
ITOM/ITSM
- Push Datadog-generated events to ServiceNow tickets, as well as manage the resolution workflow from within Datadog through IT service management (ITSM) and IT operations management (ITOM).
Service Graph Connector
- Use Datadog as a discovery mechanism for ServiceNow Configuration Management Database (CMDB) Configuration Items (CIs) with the Datadog Service Graph Connector.
CMDB Enrichment
- Enrich business-specific information stored as CIs in ServiceNow CMDB with your hosts, services, and devices information from Datadog, enabling you to better understand your infrastructure usage, accelerate troubleshooting, and maximize resource utilization.
- Create Datadog Reference Tables to automatically enrich logs and events with additional fields from your ServiceNow CIs. Reference Tables let you map sets of value fields to a primary key (such as hostname) and automatically add these fields to all the logs or events that contain the key you specified.
Note: The Datadog ServiceNow integration supports ServiceNow releases that are not listed as end of life.
Install the App
The App can be installed two ways:
- Install the latest version of the
ITOM/ITSM Integration for Datadogapp from the ServiceNow store.

- Download the latest Update Set:
Datadog-Snow_Update_Set_v2.7.2.xmland upload it to your ServiceNow instance manually.
Changelog
- v2.4.0 >= One-Way sync with Case Management
- v2.5.0 >= BiDirectional sync with Case Management and ITSM table for integration with Incident Management. Furthermore, bidirectional syncing with Case Management is only supported for ServiceNow ITSM.
- v2.6.0 >= Templated Monitor Notifications with ITOM/ITSM
- v2.7.0 >= Enhanced Case Management with support for manually created incidents, ingestion of correlated alerts, and one-way syncing of additional attributes. Incident Management now supports bidirectional syncing. Lastly, a bug fix for monitor resolution state.
Installing the Update Set In ServiceNow:
Note: If you have custom modifications to the transform map, you are notified of any conflicts and can choose the appropriate changes based on your requirements. It is recommended to back up your existing transform map customizations before making any updates.
- Manually import the Update Set XML file that you downloaded to your ServiceNow instance.
- Once you import the XML file, the Update Set should show a state of
Loaded. Click the name of the Update Set to preview the changes. - After you preview the Update Set to ensure there are no errors, select Commit Update Set to merge the application into your system.
After you have installed the app, search for Datadog in the ServiceNow navigation menu to access all of the tables and the Configuration Page for bidirectional syncing setup.
ConfigurationDatadog Incidents ITSMCases ITOM, formerlyDatadog Cases ITOMCases ITSM, formerlyDatadog Cases ITSMLegacy Monitors ITOM, formerlyDatadog Monitors ITOMLegacy Monitors ITSM, formerlyDatadog Monitors ITSMTemplated Monitors ITOMTemplated Monitors ITSM
Create a ServiceNow Account with correct permissions for Datadog
To use the integration, create a ServiceNow user (for example, with username “datadog” or “datadog_integration”) and assign the user the following roles:
x_datad_datadog.userandimport_set_loaderandimport_transformer
Incident Resolution
Bidirectional syncing with Case Management is only supported for ServiceNow ITSM.
If you’d like to sync incident state for resolution, the ServiceNow user needs one of the following roles:
ITILorlist_updaterorsn_incident_write
Send Monitor Notifications directly to Incident and Event Table
If you’d like to send notifications directly to the ITOM module Event table or the ITSM module Incident table, the ServiceNow user needs one of the following roles:
ITILfor ITSMevt_mgmt_integrationfor ITOM
Note: Manual updates made to a ticket in ServiceNow by this ServiceNow user (“datadog” or “datadog_integration”) are not synced to Datadog.
Configure the ServiceNow tile in Datadog
- Navigate in Datadog to the ServiceNow integration tile on the Integrations page.
- Click on Add New Instance.
- Add the instance name, which is the subdomain of your ServiceNow domain:
<INSTANCE_NAME>.service-now.com. - Add the username and password for your ServiceNow instance.
Note: You can create a limited user in ServiceNow just for Datadog.

CMDB setup
Service Graph Connector for Datadog
Service Graph Connector for Observability - Datadog can automatically populate server and database configuration items (CIs) in the CMDB for new resources discovered by Datadog. The Service Graph connector is available through the ServiceNow store.
For configuration, follow the Service Graph Connector’s guided setup instructions.
Supported CI Types:
- Server
- Amazon RDS
The notes below only apply if you have already configured the integration for ServiceNow ITOM/ITSM:
- Service Graph Connector does not use the
Target tableandCustom tablevalues from the configuration tile. You can save the integration with the Target table default values. - The same ITOM/ITSM user can be used for Service Graph Connector by granting this user the role of
cmdb_import_api_adminas described in the Service Graph Connector’s guided setup instructions.
Customizing CI fields
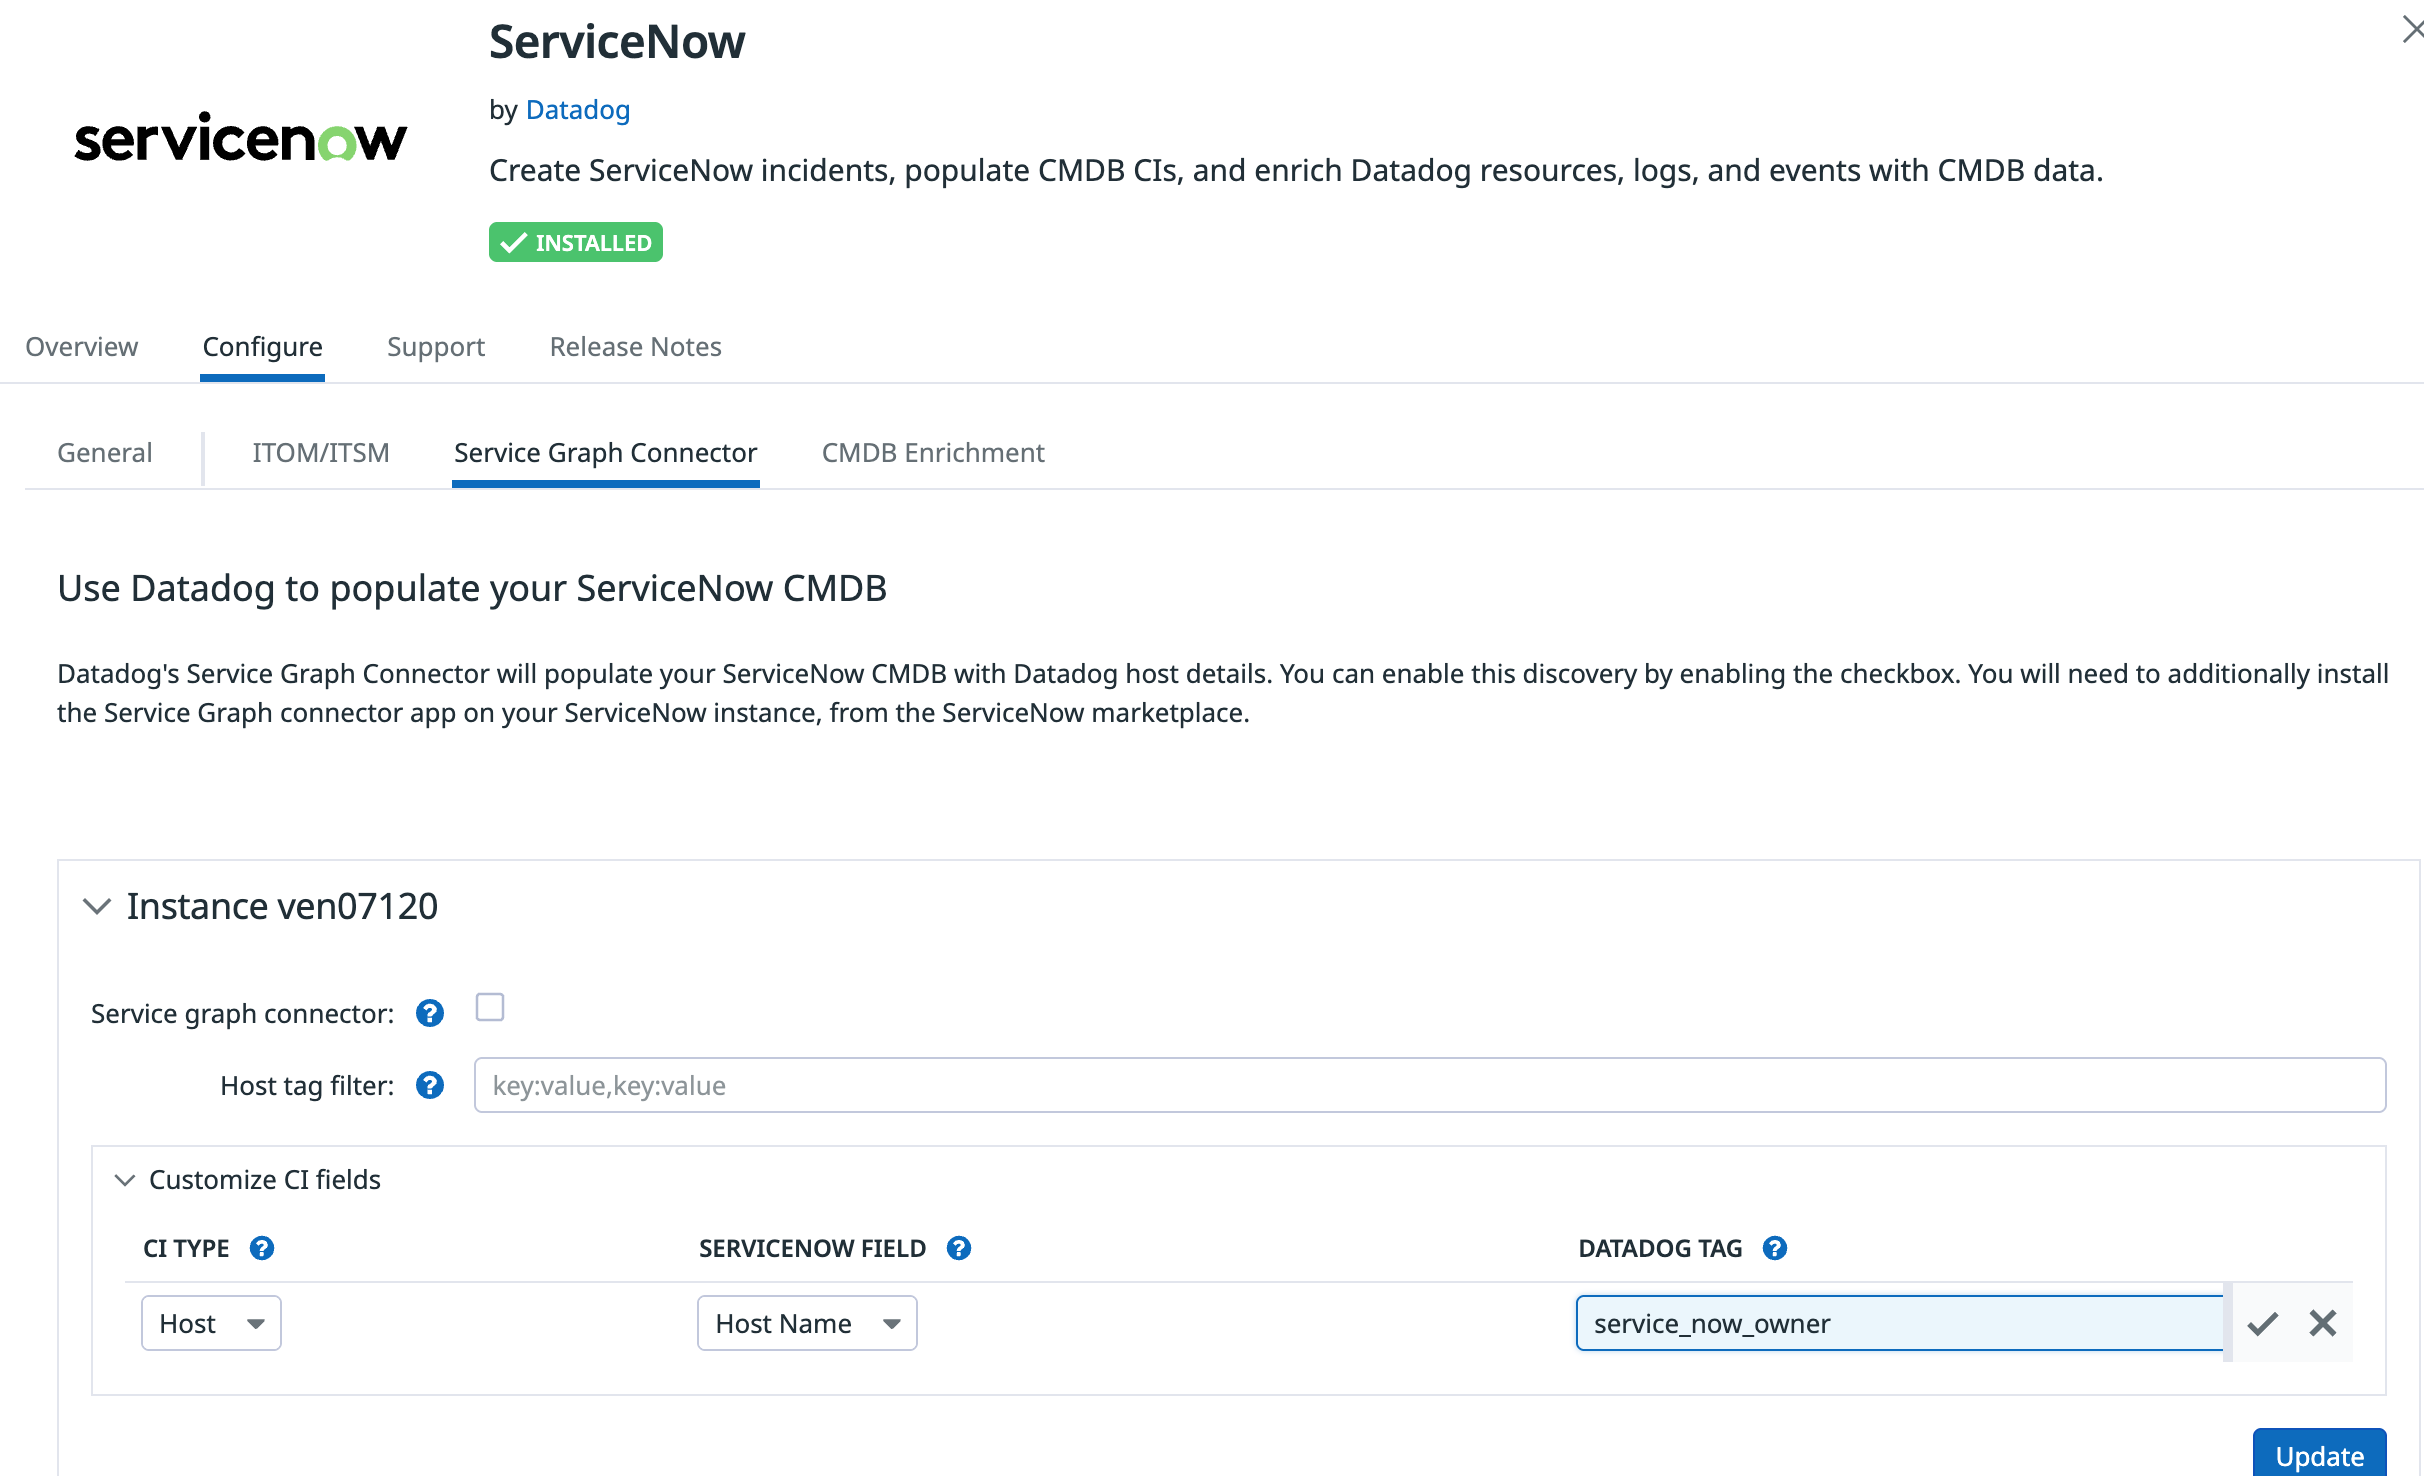
In the Datadog ServiceNow integration tile, click the Configure tab, then the Service Graph Connector tab. Expand the Customize CI fields section. The following options are available:
- CI Type
- The type of CI this field applies to.
- ServiceNow Field
- The field in ServiceNow to apply it to.
- Datadog Tag
- The tag to send from Datadog resources. (If multiple tags are found with the same name, they’ll be comma-separated.)
For example, to add a CI field with a CI Type of Host and a ServiceNow Field of Host Name, add any host tag attribute to the Datadog Tag field.
Note: The Datadog Tag field must be a host tag that exists on Datadog hosts, not an attribute tag on a host.
Host tagging
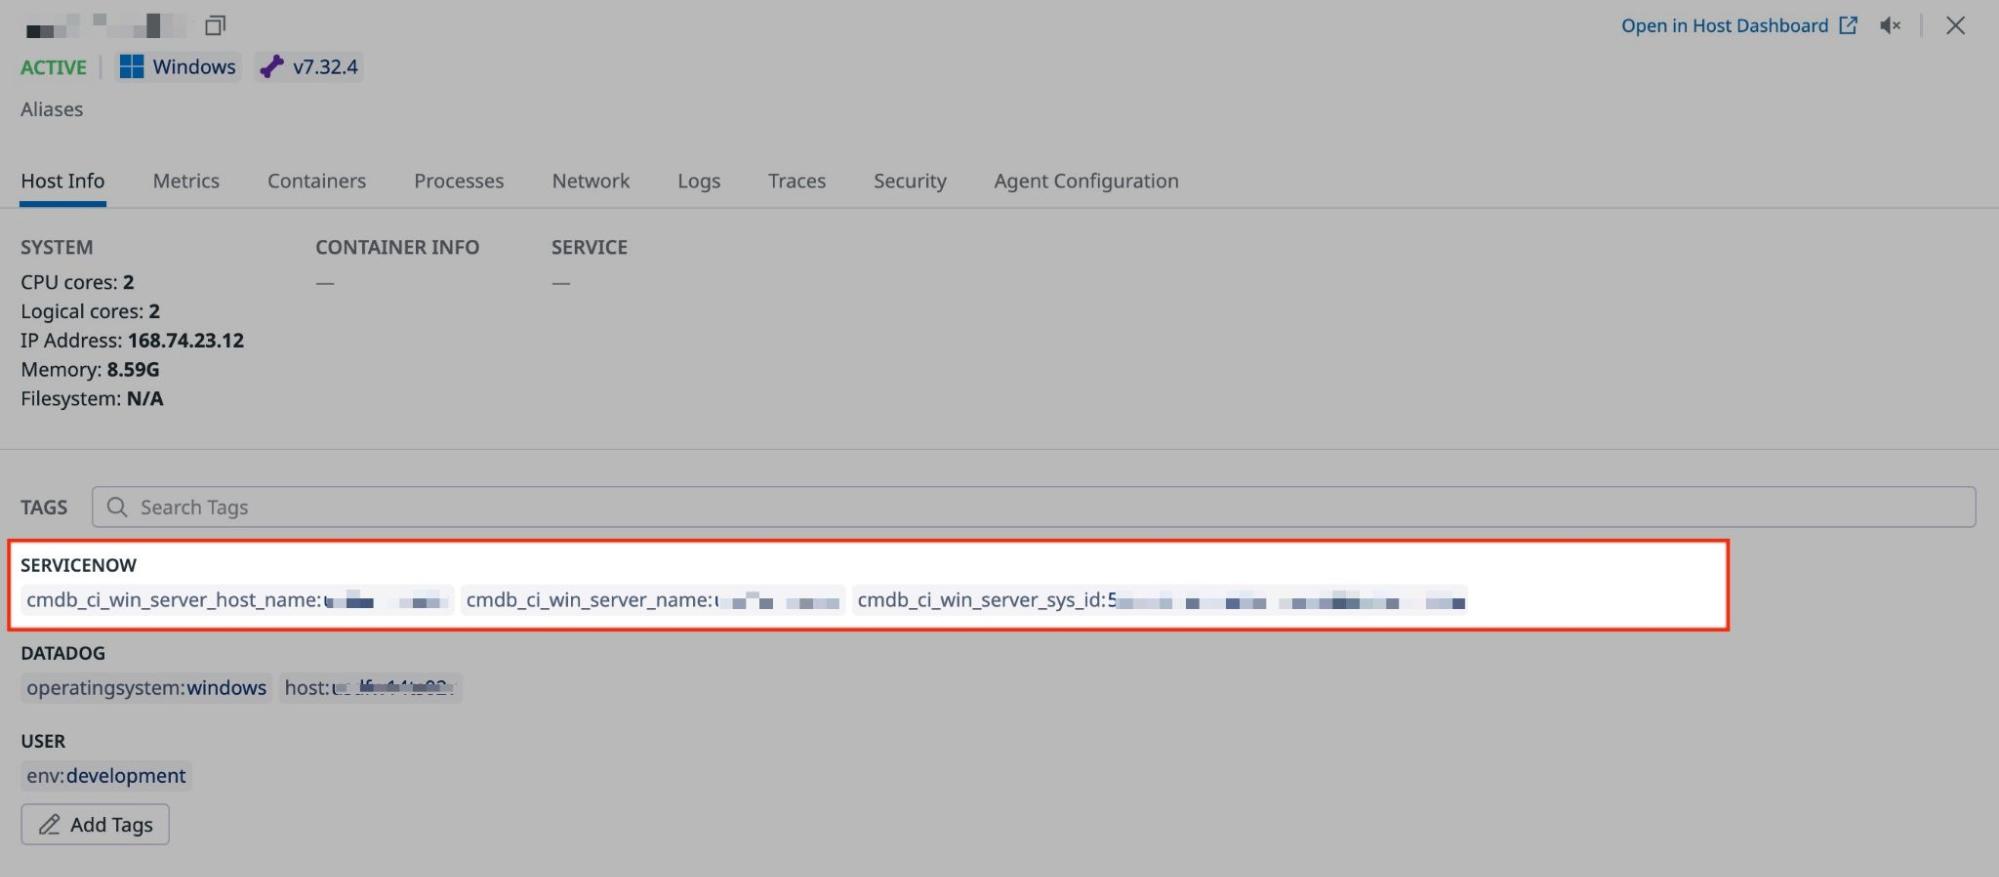
Enrich your Datadog hosts with ServiceNow CMDB metadata through host tagging.
To enable ingestion of host tags:
- Configure a Query Builder query in your ServiceNow instance that returns all of the hosts you wish to tag in Datadog.
- Schedule the query to execute at your desired refresh interval.
- Once the query has been saved in ServiceNow, go to Datadog’s ServiceNow integration tile. Select the Host Tagging in the CMDB Enrichment tab within *Configure.
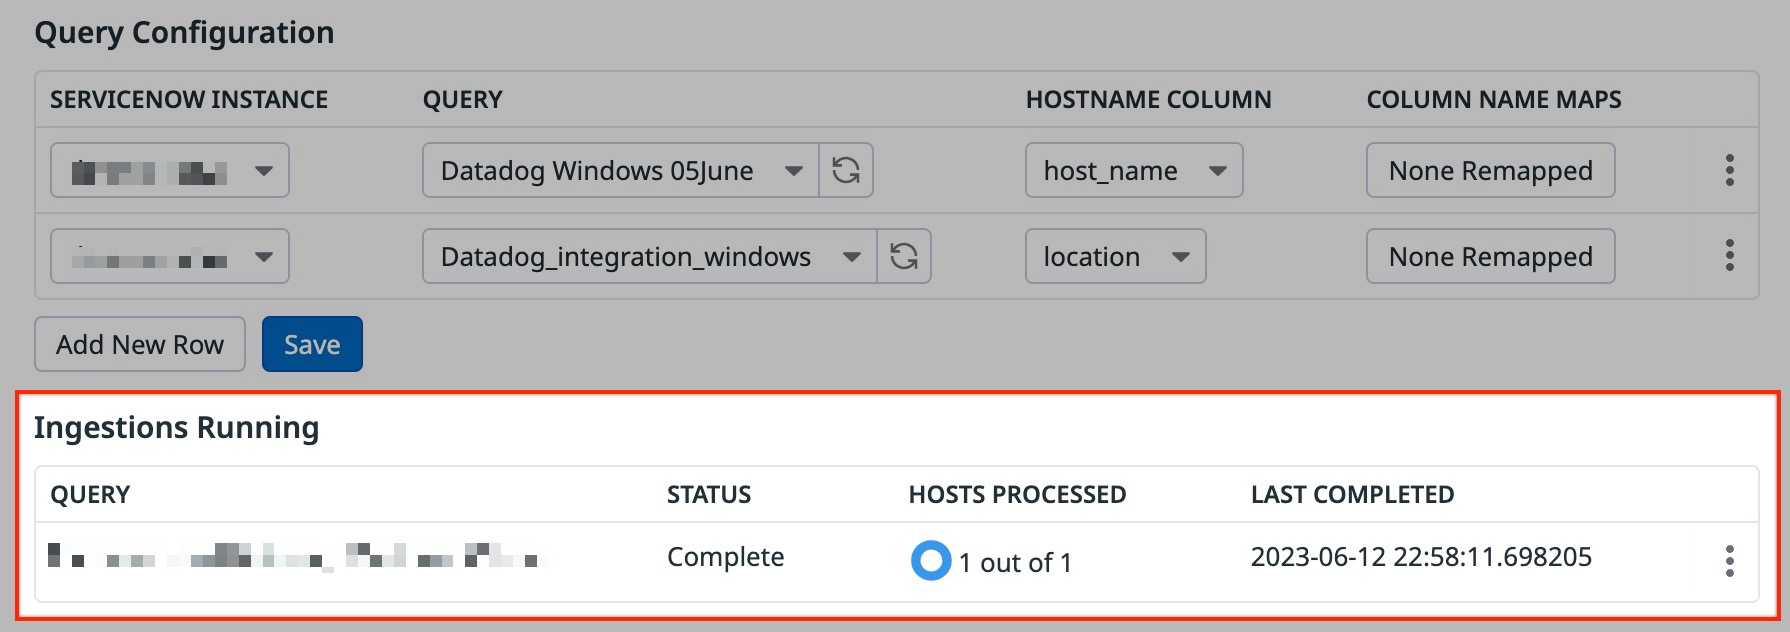
- Under Query Configuration, click the Add New Query button.
- Select the ServiceNow Instance and the Query from the dropdown menus.
- Select a value for the Hostname Column that maps your query’s root CI hostname field to Datadog’s hostname field.
- Select any optional field name remapping with Column Name Maps.
- Click Save.
Expect host tags to populate in Datadog shortly after your queries’ scheduled executions.
Monitor the ingestion process in the Datadog Events Explorer by scoping your search query on source:servicenow.
Additional Non-CMDB fields tagging
Some ServiceNow tables are non-CMDB and cannot be selected in the Query Builder. To enrich Datadog hosts with tags from these tables, click Additional Fields on the configuration tile and configure a host tagging query as described above, providing a full dot-walked path. Paths should start from the first attribute name on the root table configured for the query. For example, entering vendor.manufacturer.name for a query with root CI cmdb_ci_server populates hosts with the tag cmdb_ci_server_manufacturer_name.
Note: Only dot-walkable paths that are supported by the ServiceNow Table API are available for use in Additional Fields. Many-to-many relationships may not work out of the box and may require additional configuration.
Host tagging troubleshooting
For host tagging to work correctly, ensure that the following are true in your system:
- The user who created and executes the Query Builder query matches a username in your Datadog configuration. The user in ServiceNow must have the role
cmdb_query_builder_read. - The number of results returned by your query must be less than or equal to the
glide.cmdb.query.max_results_limitsetting in ServiceNow. By default, the maximum number of results is 10000. To change the setting, go to Configuration -> CMDB Properties -> Query Builder Properties. - All CIs configured in your Query Builder query must have a 1 label. This ensures you have not created any duplicate CIs, which the parser does not support.
Limitations
- Ingestion is limited to 100k hosts per execution.
- Updates to hosts are throttled to a few thousand per hour. Take this limit into consideration when choosing your schedule interval.
- Host aliases in Datadog are case sensitive. Your ingested CMDB hostnames must exactly match the corresponding hostnames in Datadog.
Service tagging
Enrich your Datadog Service Catalog with ServiceNow CMDB metadata through service tagging.
With service tagging, you can populate your Datadog Service Catalog with services from your ServiceNow CMDB.
Setup
To enable ingestion of service data:
- Configure a Query Builder query in your ServiceNow instance that returns all of the services with which you wish to enrich the Service Catalog.
- Schedule the query to execute at your desired refresh interval.
- Once the query is saved in ServiceNow, go to Datadog’s ServiceNow integration tile. Select Service Tagging in the CMDB Enrichment tab within Configure..
- Under Query Configuration, click the Add New Query button.
- Select the ServiceNow Instance and the Query from the dropdown menus.
- Select a value from the Service Name Column dropdown menu. The value matches the column name on your query’s root service CI, and populates the service name in the service catalog.
- Configure schema mappings to pull additional metadata about your service into the service catalog. See Service definitions for details. For Datadog to accept the ingestion, each field in the mapping needs to be of the correct type to map to the service catalog service definition schema.
- Click Save.
Expect to see service data populated in Datadog a few minutes after your queries’ scheduled executions. To view ingestion errors, go to the Events Explorer and search for events with source:servicenow.
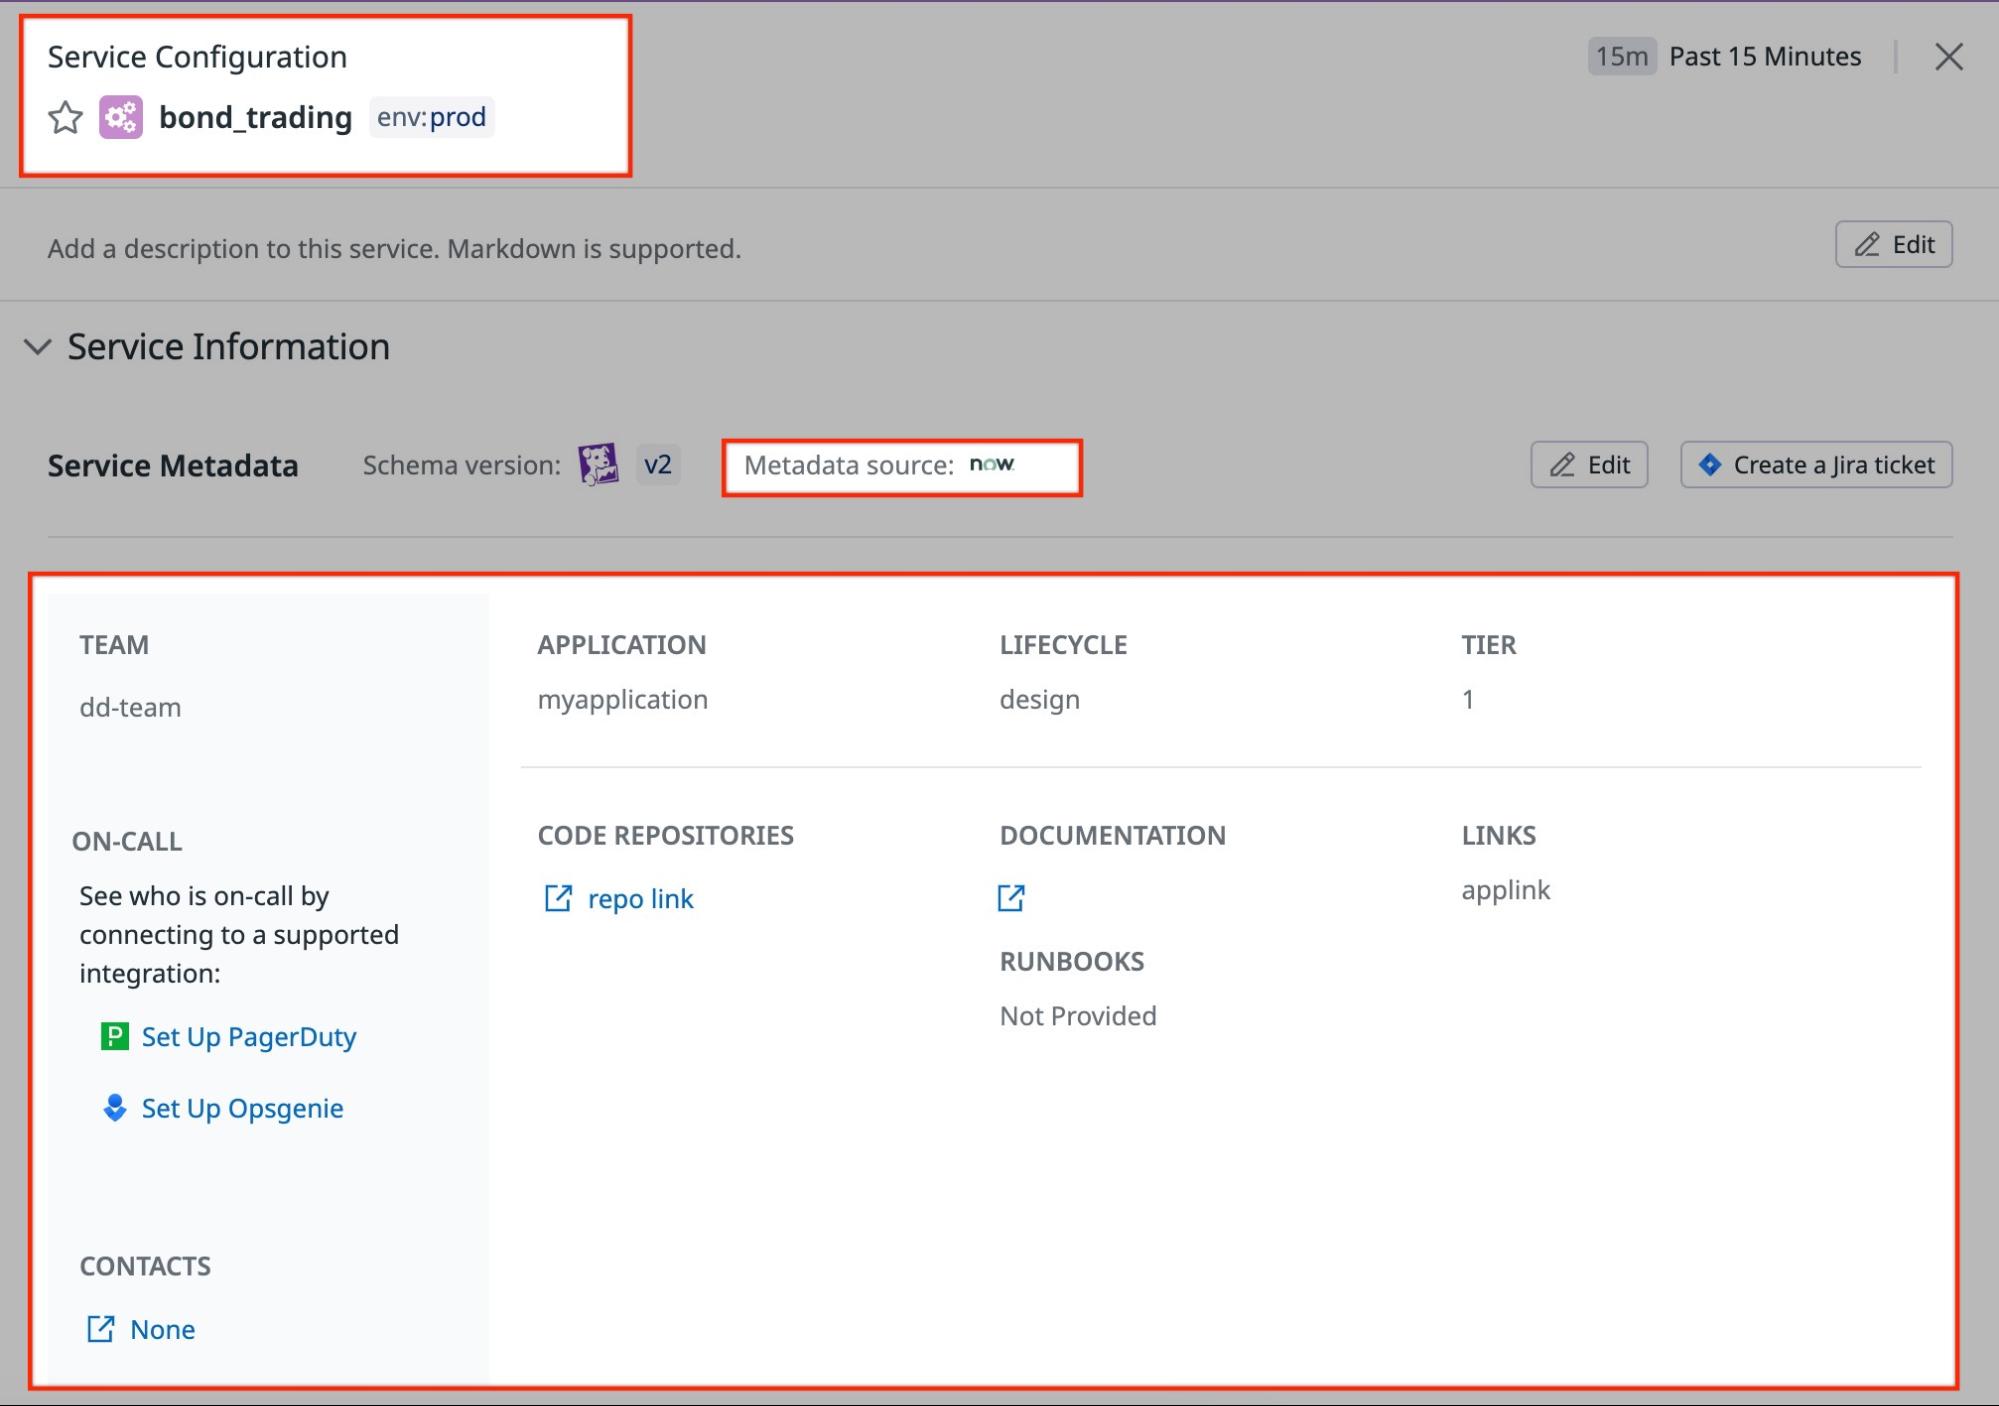
Setup troubleshooting
For service ingestion to work correctly, ensure that the following are true in your system:
- The user who created and executes the Query Builder query matches a username in your Datadog configuration. The user in ServiceNow must have the role
cmdb_query_builder_read. - The number of results returned by your query must be less than or equal to the
glide.cmdb.query.max_results_limitsetting in ServiceNow. By default, the maximum number of results is 10000. To change the setting, go to Configuration -> CMDB Properties -> Query Builder Properties. - All CIs configured in your Query Builder query must have a 1 label. This ensures you have not created any duplicate CIs, which the parser does not support.
Network device tagging
Add tags to your network devices in Datadog populated with data from your ServiceNow CMDB.
With device tagging, you can dynamically enrich network devices monitored by Datadog Network Device Monitoring with device metadata from your ServiceNow CMDB.
To enable ingestion of device tags:
- Configure a Query Builder query in your ServiceNow instance. Make sure it is returning the device IP Address.
- Schedule the query to execute at your desired refresh interval.
- If you are using a custom IP namespace in Datadog, you need to add it to ServiceNow. Create a column on the Network device CI called u_dd_device_namespace, populated by the corresponding namespace for each device. If this column is not present, the default namespace is used.
- Once the query is saved in ServiceNow, go to Datadog’s ServiceNow integration tile. Select Device Tagging in the CMDB Enrichment tab within Configure.
- Under Query Configuration, click the Add New Query button.
- Select the ServiceNow Instance and the Query from the dropdown menus.
- Select the IP Address column that maps your query’s IP Address field to Datadog’s IP Address field.
- Select any optional field name remappings.
- Click Save.
You can expect to see network device tags populated in Datadog within a few minutes after your queries’ scheduled executions. Any ingestion errors are reported through events viewable in your events explorer.
Monitor the ingestion process in the Datadog Events Explorer by scoping your search query on source:servicenow.

Network device tagging troubleshooting
- Verify that the user who created or is executing the querybuilder query is the same user in your Datadog configuration and has the role
cmdb_query_builder_read. - Check that your query isn’t returning more results than your
glide.cmdb.query.max_results_limitsetting in Servicenow is configured to allow. Make sure all CIs configured in your querybuilder query have a ‘1’ label. Ensure you did not create any duplicate CIs, as the parser doesn’t support them.
Limitations
- Ingestion is limited to 100k hosts per execution.
- Network device tagging is limited to SNMP devices.
- Updates to devices are throttled to a few thousand per hour. Take this into consideration when choosing your schedule interval.
Reference Tables
Use Reference Tables to automatically enrich logs and events with additional fields from your ServiceNow CIs. With Reference Tables, you can map sets of value fields to a primary key, such as a hostname, and automatically append these fields to all logs or events that contain the specified key.
To enable ingestion of Reference Tables:
- Configure a Query Builder query in your ServiceNow instance.
- Schedule the query to run at your desired refresh interval.
- Save the query.
- Select, Add New Query, and choose your query from the dropdown menu.
- In the primary key dropdown, select the column name you want to use as your primary key.
- Optionally, create a Processing Pipeline with this primary key to enrich and correlate logs and events.
- Enter a name for your reference table.
- Click Save.
The Reference Table will be populated with the data from the query shortly after saving.
Caveats and restrictions
- Reference Table name must be unique.
- Deletions and schema updates of existing tables are not supported.
ITOM and ITSM setup
Case Management integration is not supported in the
Incident Management integration is not supported in the
Templated Monitor Notifications are not supported in the
To use the Datadog integration for Monitors, Case Management, and Incident Management, follow the instructions for each product:
- Configure Datadog Templated Monitor Notifications
- Configure Datadog Case Management
- Configure Datadog Incident Management
Configure Templated Monitor Notifications
Note: App version >= v2.6.0 required for this functionality. You also must add an instance on the Configuration page of the ServiceNow tile in Datadog before completing the below steps.
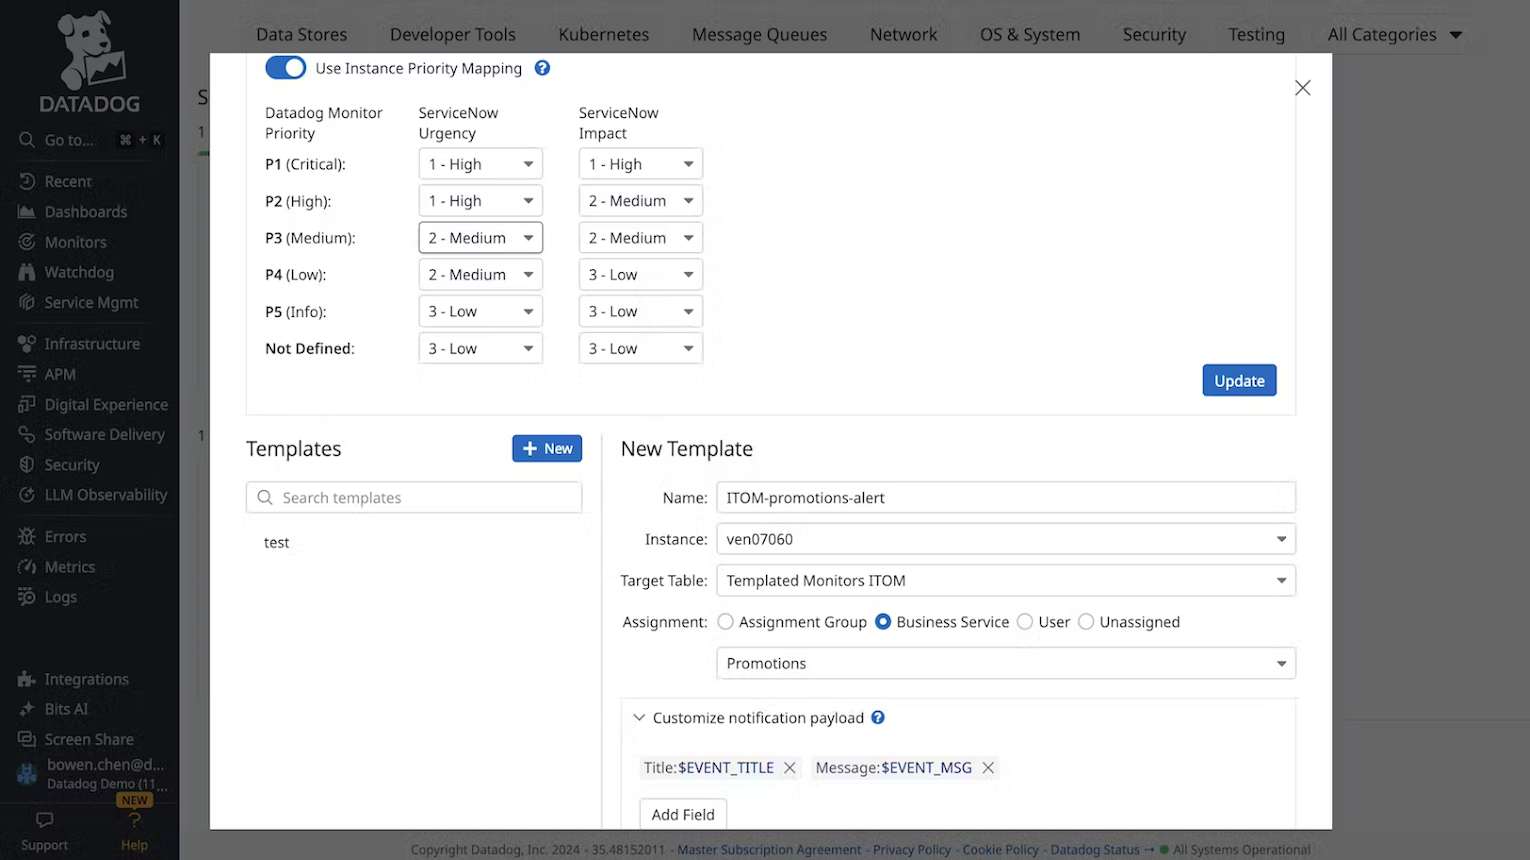
Configure Instance Priority Mapping
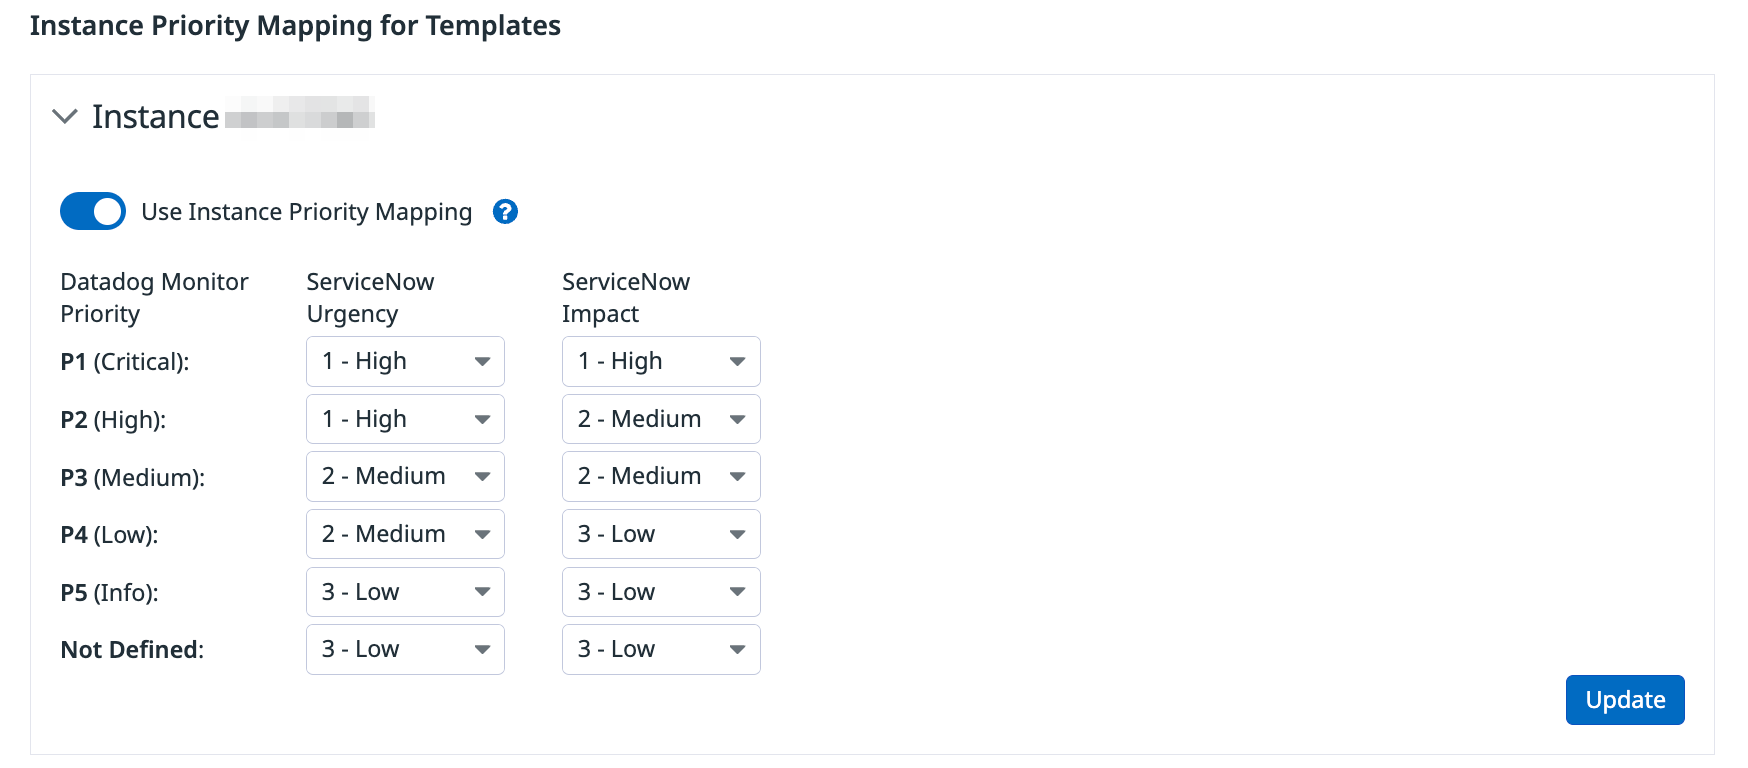
For all templated @-handles for a particular instance, Datadog now automatically maps Monitor Priority to Impact and Urgency in ServiceNow according to this mapping.
Toggling the Use Instance Priority Mapping off disables the setting Impact and Urgency on ServiceNow records.
Configure a monitor template
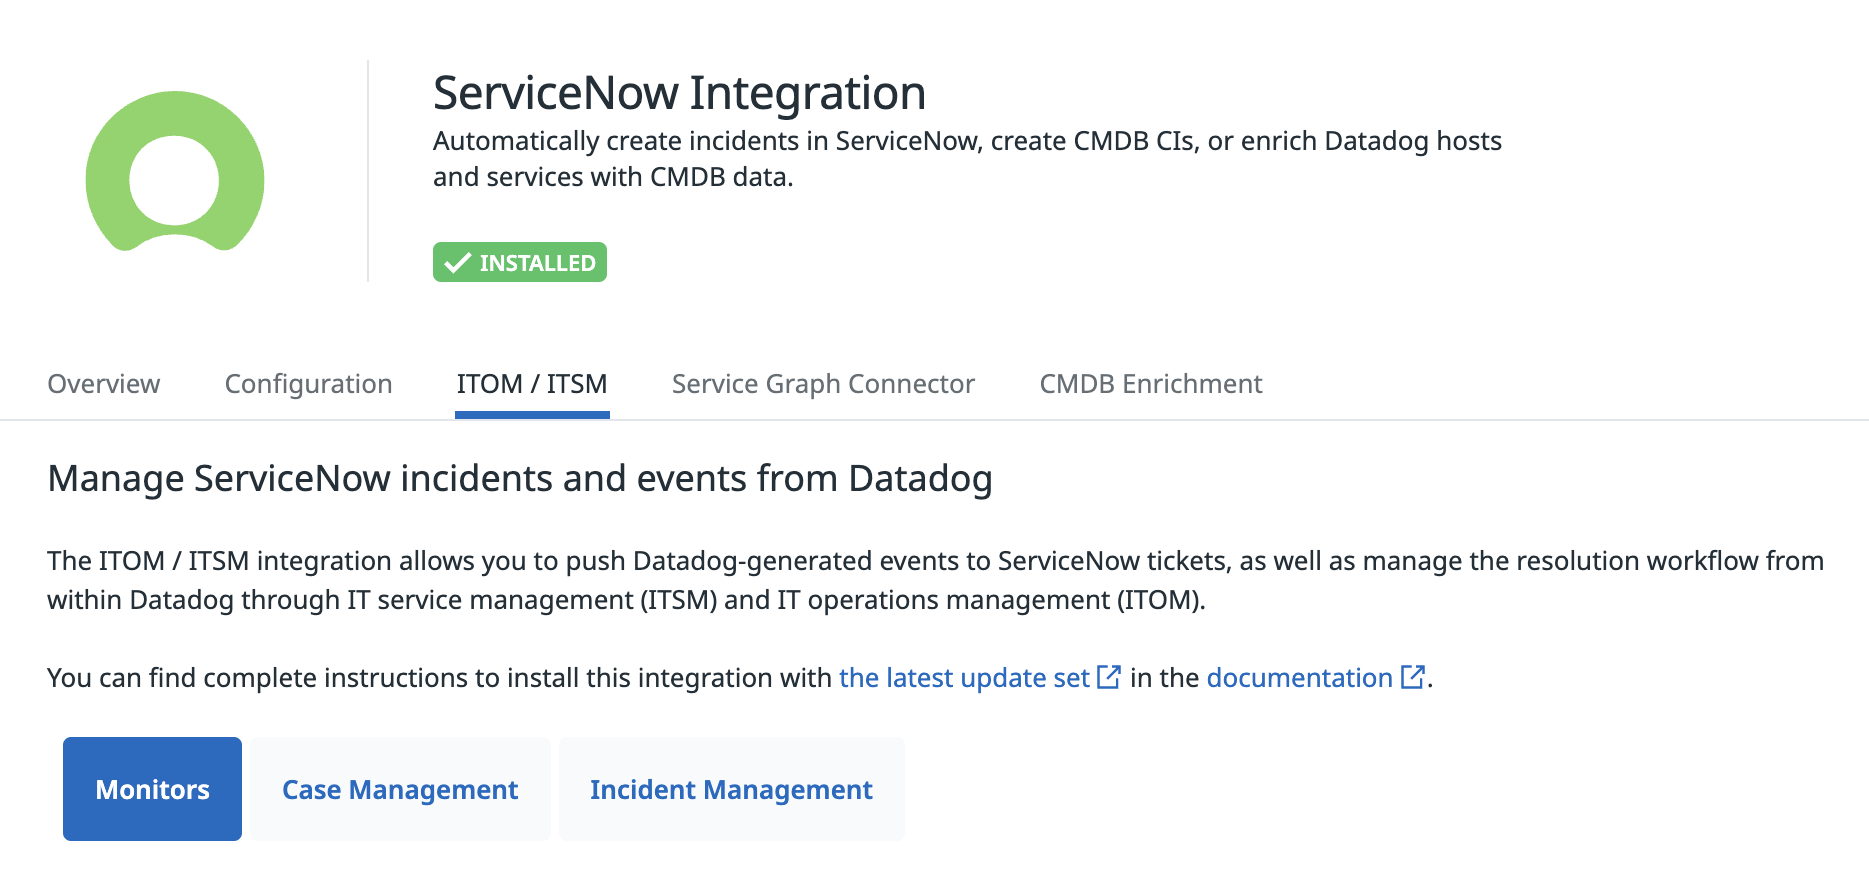
For Monitor Notifications using @servicenow-<TEMPLATE_NAME> in Datadog, use the new template creation UI in the ITOM/ITSM tab of the ServiceNow integration tile in Datadog to create a ServiceNow notification.
Note: This is only available for app versions >= 2.6.0.
Create custom ServiceNow @handle for Monitor Notifications
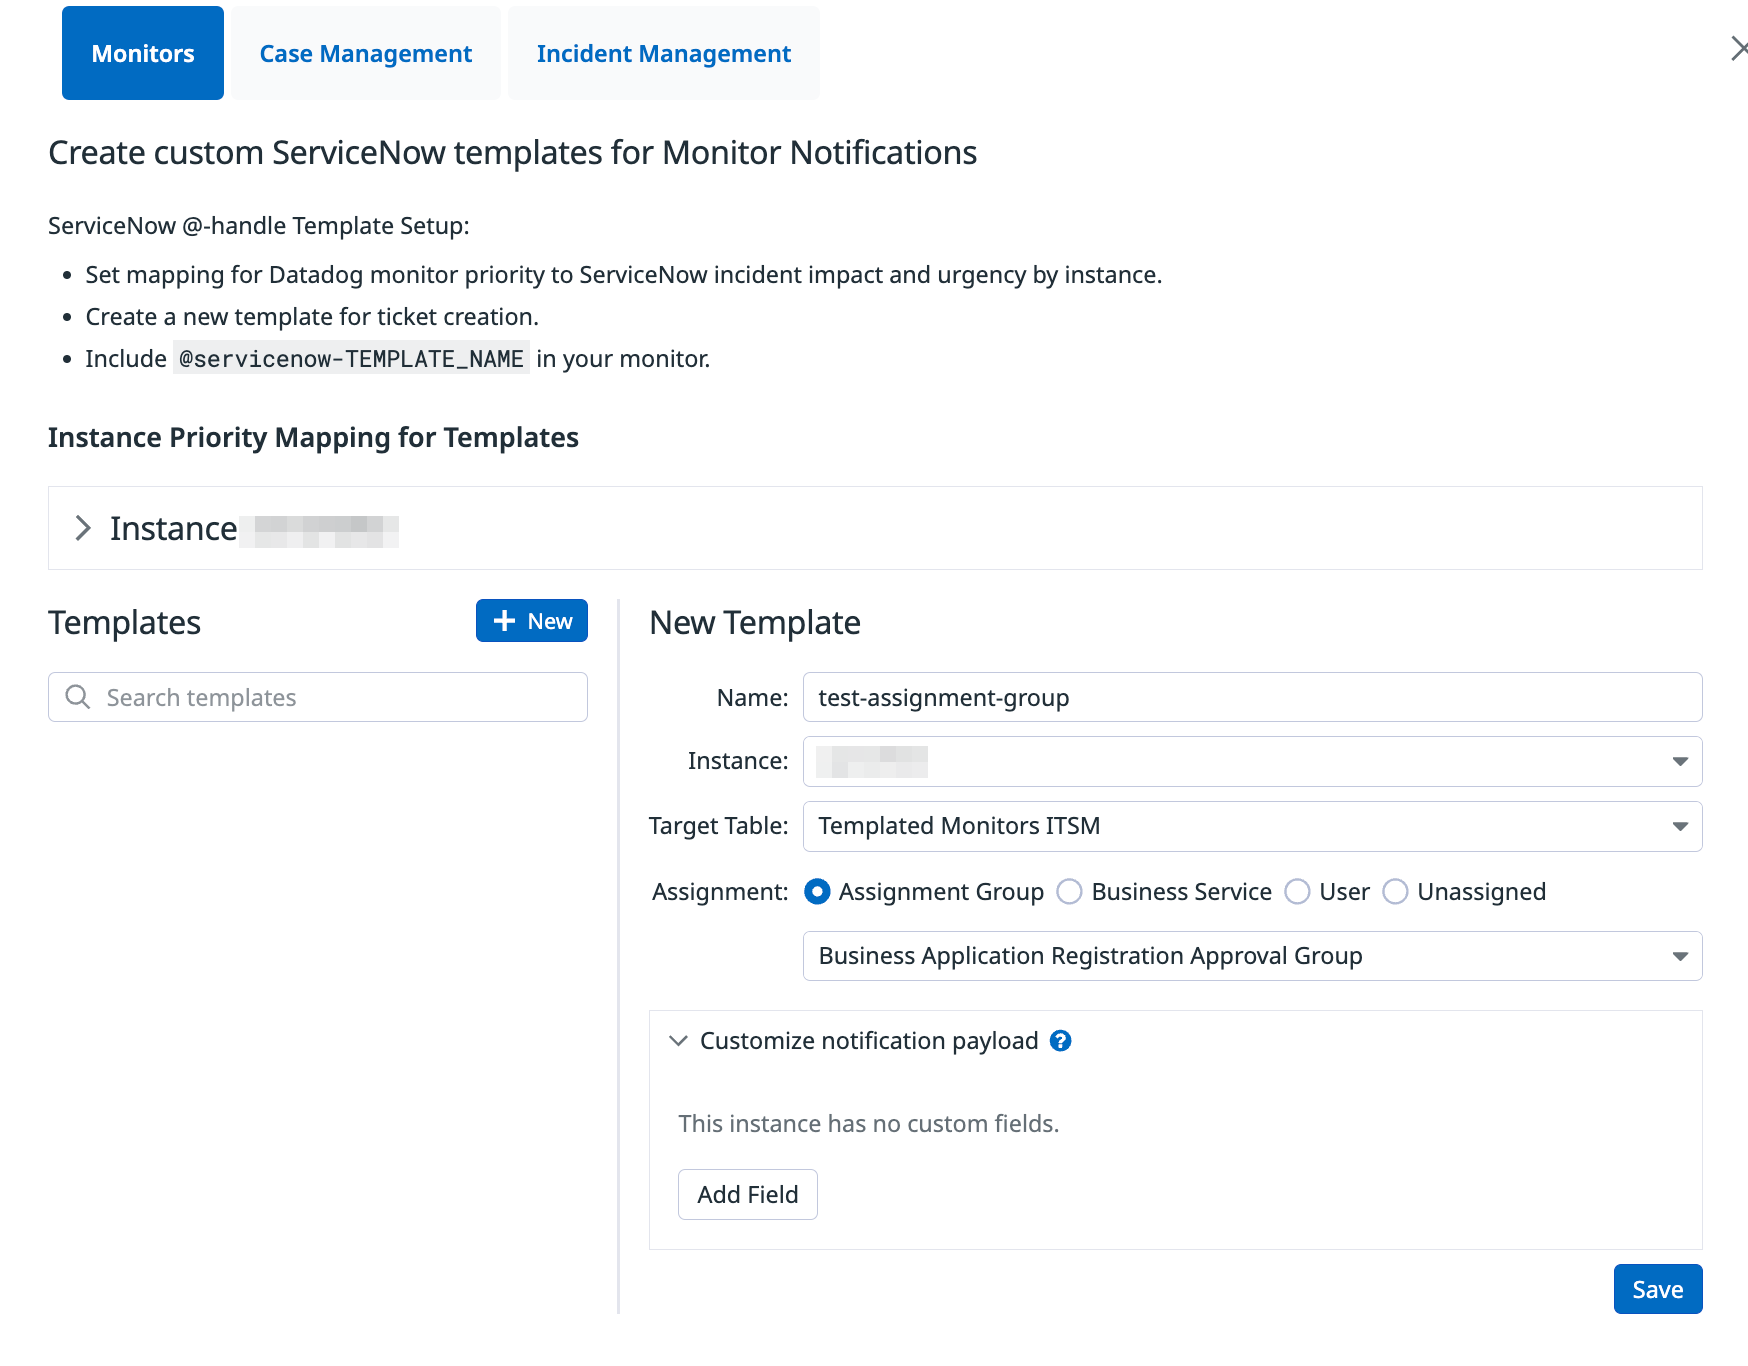
- Click the
+ Newbutton to create a new template. - Define an @-handle
Name,InstanceandTarget Tablefor the monitor notification to be delivered to. Then select one ofAssignment Group,Business Service,User, orUnassignedto assign the record. The transform map defined in 2.6.0 automatically populates the incidentINCrecord with the value you select here.
To use the new template, add @servicenow-<TEMPLATE_NAME> in a monitor description.
You can add custom fields to the payload by clicking Add Field in the Use variables in ticket payload and field mappings section.
Configure Case Management
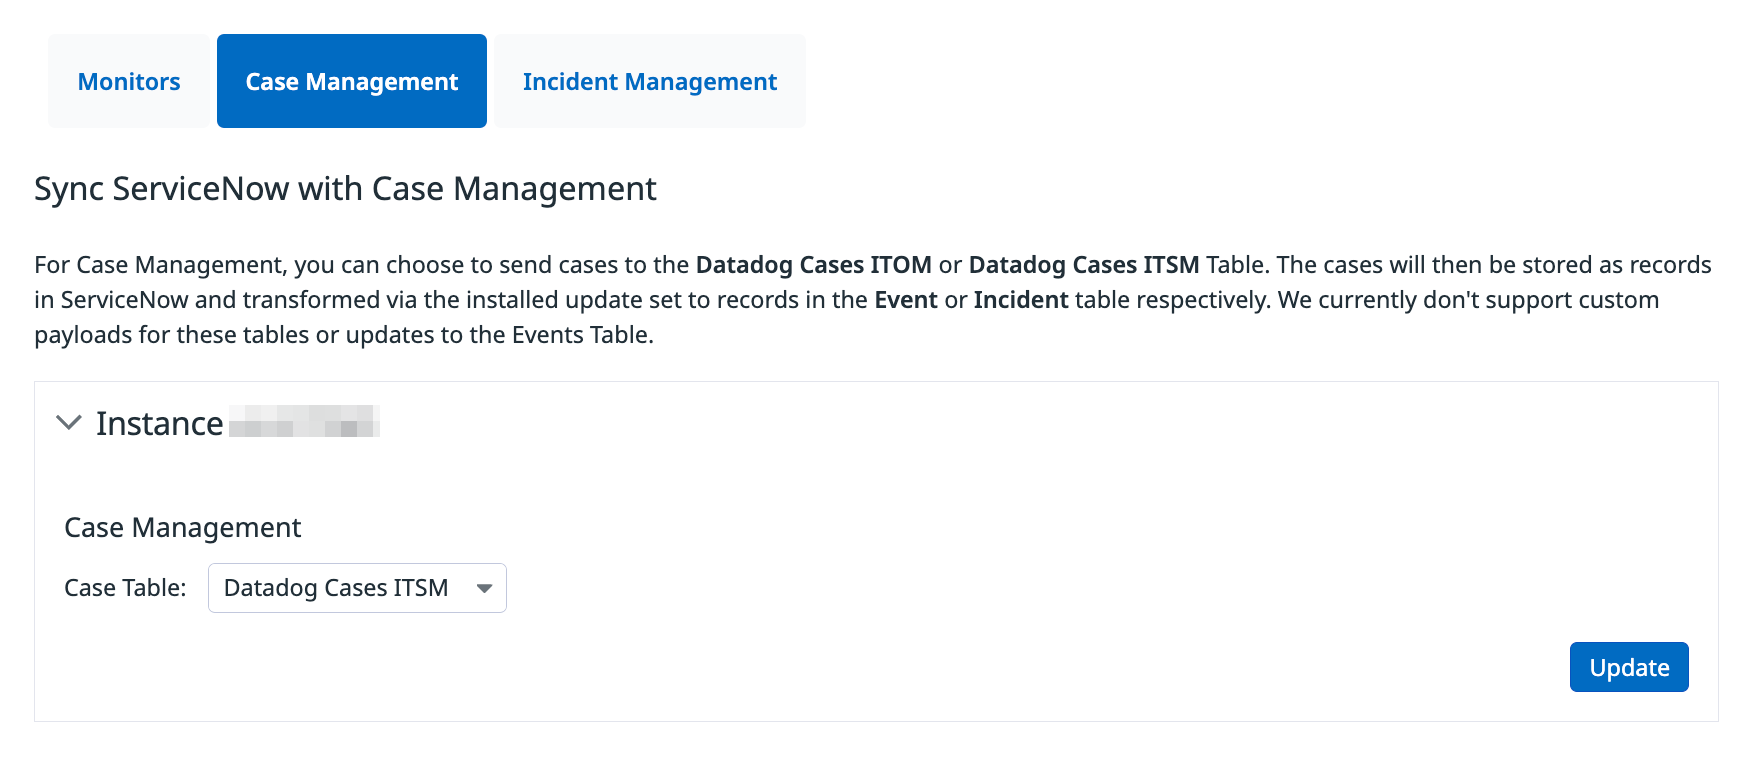
From the Case Management tab:
- Select the instance you want to configure for Case Management.
- Choose the table you want to send cases to:
Datadog Cases ITOMorDatadog Cases ITSM. Note: No table is selected by default. - Navigate to Case Management in Datadog.
- Select Create ServiceNow Incident.
- Choose the instance and optional assignment group, and then click Create.
Sync state and comments bidirectionally with Case Management
Bidirectional sync with Case Management is not supported in the site.
To allow edits in ServiceNow to update their associated cases in Datadog, a ServiceNow user with the x_datad_datadog.user role and admin role must configure the installation settings for the ITOM/ITSM Integration for Datadog app in ServiceNow:
Note: It is important to use a Service Account Application Key for this setup rather than a user’s Application Key. A user’s Application Key is tied to the user’s account permissions. If the user’s permissions are reduced or if the user is deactivated, bidirectional syncing between ServiceNow and Datadog will stop. A Service Account Application Key is not tied to an individual user, so bidirectional sync will not be impacted by user account changes.
- Navigate to the configuration settings page for the ITOM/ITSM Integration for Datadog app by clicking All in the upper-left hand corner, typing
ITOM/ITSM Integration for Datadoginto the filter, and clicking the Configuration link that appears in the filtered list. - Choose your Datadog Data Center site.
- Paste a Datadog API Key, which can be found in your Organization Settings, in the API Key field.
- Paste a Datadog Service Account Application Key, which can be found in your Organization Settings, in the Application Key field.
- Check the Enabled checkbox and save your configuration changes.
Note: Make sure the Application Scope (accessible through the globe icon in the top right) is set to ITOM/ITSM Integration for Datadog, not Global. Using the incorrect scope can cause permission errors when setting the fields above.

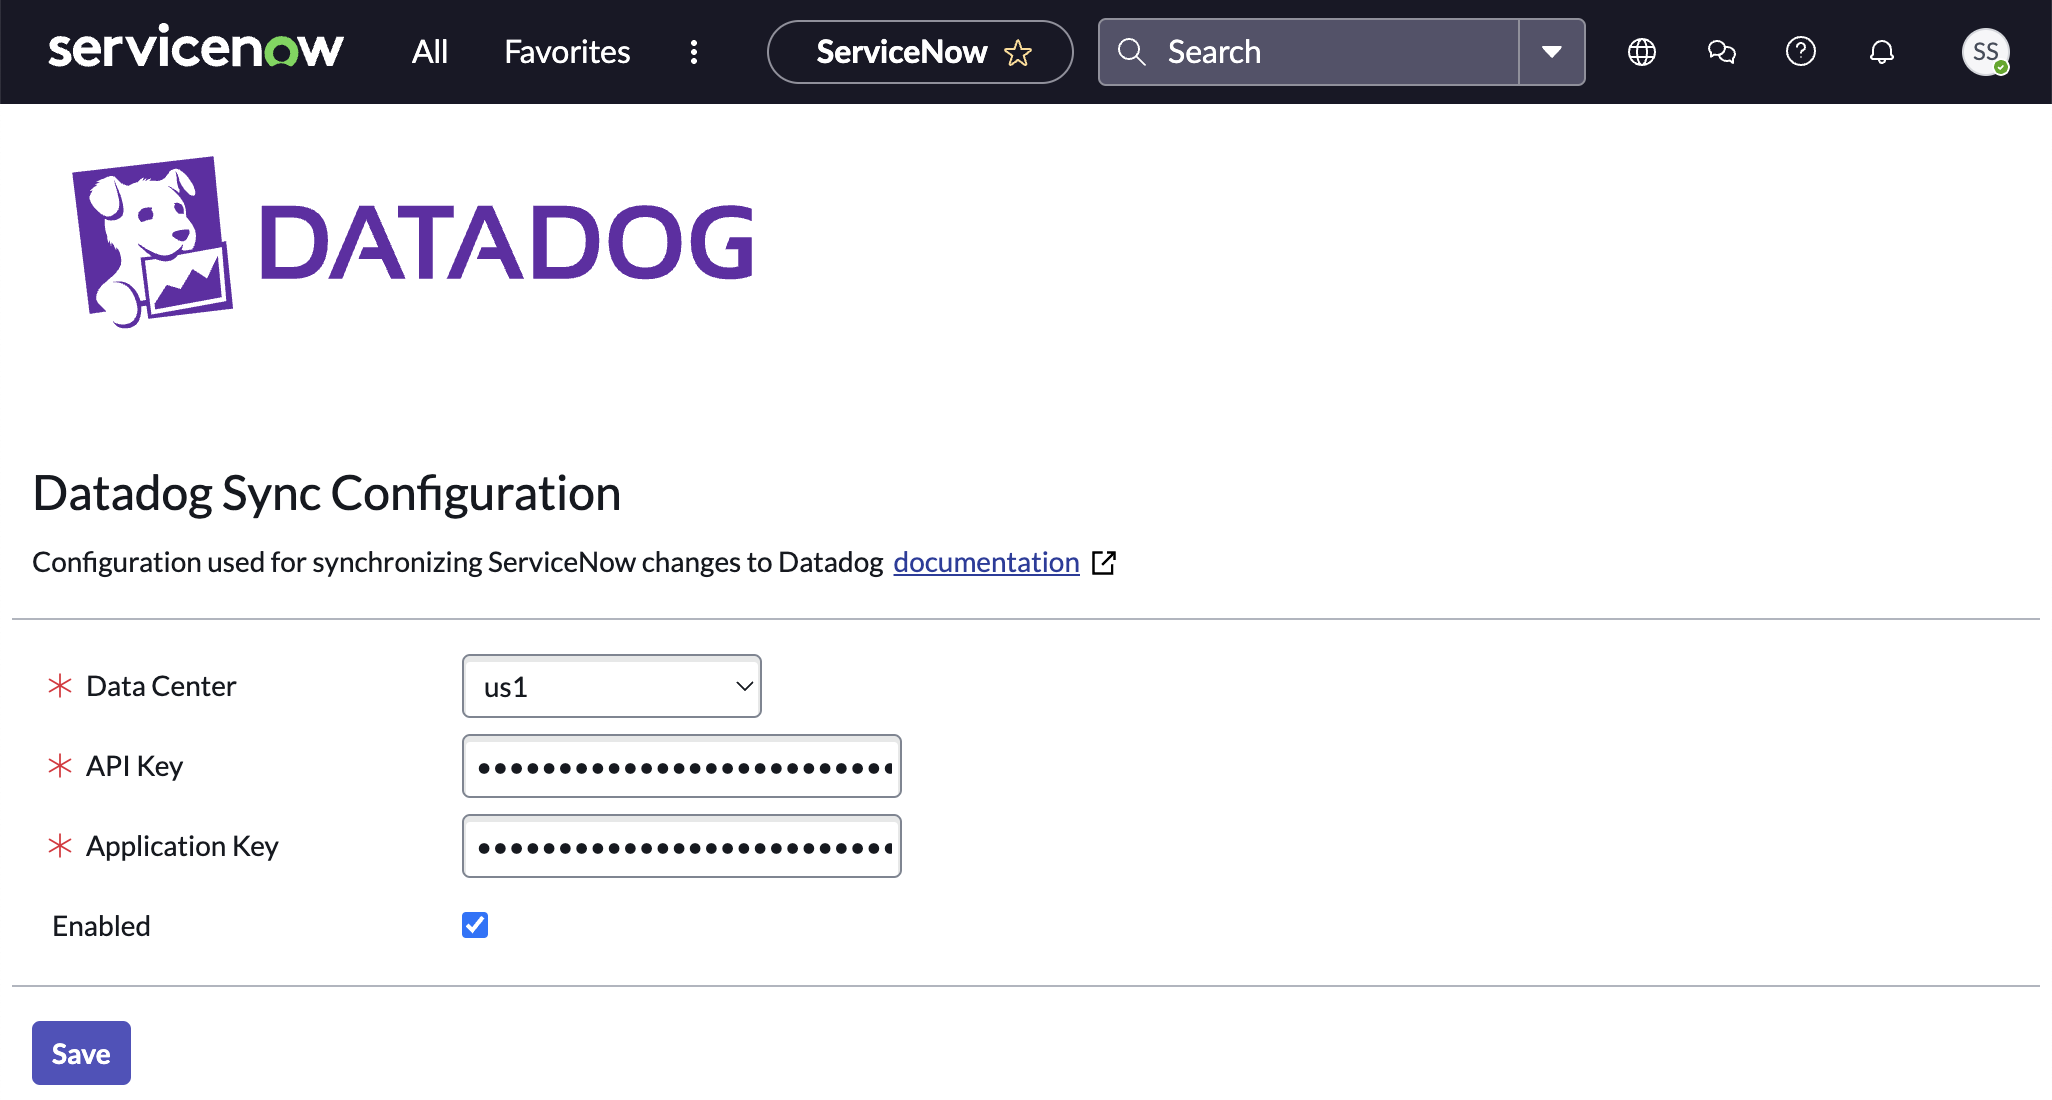
After configuring the installation settings in ServiceNow, return to Datadog Case Management to configure the integration.
Use correlated alerts to customize values in ServiceNow
Note: App version >= v2.7.0 required for this functionality.
To use information from correlated alerts to populate values in ServiceNow, an example transform script (runs onBefore) is included in the transform maps for Datadog Cases ITSM and ITOM tables. By default, the script is commented out. To enable it, uncomment and modify it to fit your use case. Modifications are required for the script to populate values in the ServiceNow Incident.
Configure Incident Management
After installing the app, visit the Integration Settings in Incident Management to finish setup. For more information about the fields that are synced between Incident Management and ServiceNow, see Incident Management Field Mappings.
Sync state, impact, and urgency bidirectionally with Incident Management
Bidirectional sync with Incident Management is not supported in the site.
To allow edits in ServiceNow to update their associated incidents in Datadog, a ServiceNow user with the x_datad_datadog.user role and admin role must configure the installation settings for the ITOM/ITSM Integration for Datadog app in ServiceNow:
Note: It is important to use a Service Account Application Key for this setup rather than a user’s Application Key. A user’s Application Key is tied to the user’s account permissions. If the user’s permissions are reduced or if the user is deactivated, bidirectional syncing between ServiceNow and Datadog will stop. A Service Account Application Key is not tied to an individual user, so bidirectional sync will not be impacted by user account changes.
- Navigate to the configuration settings page for the ITOM/ITSM Integration for Datadog app by clicking All in the upper-left hand corner, typing
ITOM/ITSM Integration for Datadoginto the filter, and clicking the Configuration link that appears in the filtered list. - Choose your Datadog Data Center site.
- Paste a Datadog API Key, which can be found in your Organization Settings, in the API Key field.
- Paste a Datadog Service Account Application Key, which can be found in your Organization Settings, in the Application Key field.
- Check the Enabled checkbox and save your configuration changes.
Note: Make sure the Application Scope (accessible through the globe icon in the top right) is set to ITOM/ITSM Integration for Datadog, not Global. Using the incorrect scope can cause permission errors when setting the fields above.

After configuring the installation settings in ServiceNow, return to Datadog Incident Management to configure the integration.
Legacy Monitor Notifications
For Legacy Monitor Notifications using @servicenow-<INSTANCE_NAME> in Datadog, select the interim table to send notifications to at the bottom of the ITOM/ITSM tile titled: “Manage Legacy Monitor Notifications”.
- Select the instance you want to configure notifications for, then select the table that legacy monitor notifications write to.
- To validate the integration is set up correctly, add
@servicenow-<INSTANCE_NAME>in a monitor or event notification. The raw data populates rows in the interim table and is forwarded to the ServiceNow table specified by the app. - Use transform maps in ServiceNow to customize the transformation of the data sent to the interim tables.
- Customize the notification payload with available Datadog variables or custom strings.
- To set priority in ServiceNow incidents, follow the instructions in Incident Priority field mapping
Customize data for Monitor Notifications with transform maps
The Templated Monitors ITSM, Legacy Monitors ITSM, and Datadog Cases ITSM tables use a transform map to transform Datadog records into ServiceNow incidents. Similarly, the Datadog Monitors ITOM and Datadog Cases ITOM transform Datadog records into ServiceNow events.
The Templated Monitors ITOM and Templated Monitors ITSM tables use transform maps to transform Datadog records into ServiceNow events and incidents respectively. You can customize the ServiceNow events and incidents information in these tables by customizing the notification payload in the New Template UI and extend the transform maps in ServiceNow.
Note: The Datadog Cases ITOM and Datadog Cases ITSM tables similarly use transform maps; however, transform map customization is not recommended for use with Case Management given the payload for Datadog cases is not customizable. The only case in which transform map customization is recommended is if data from correlated alerts are to be used. There are more instructions on how to do this above.
Troubleshooting
If you’re not seeing events in your ServiceNow tables and instead have
An error message in your Datadog integration tile or an
Error while trying to post to your ServiceNow instancenotification:- Verify only the subdomain was used when entering your instance name.
- Verify the user you created has the required permissions.
- Verify the username and password are correct.
The integration is configured, an alert triggered, and no ticket is created:
- Confirm that the interim table is populated. If so, the issue is with mappings and transformations. You can debug your mappings and scripts further by navigating to Transform Errors in ServiceNow.
- Confirm that you’re working with the interim table you specified in the tile.
The ServiceNow user needs
rest_serviceandx_datad_datadog.userroles so that it can access the import tables. If you’re using the legacy way of sending notifications directly to either the Incident table or Event table, you need the permissionsitilandevt_mgmt_integration.
If you’re seeing updates from Datadog Case Management to ServiceNow, but not seeing updates from ServiceNow to Datadog, this is expected behavior for ServiceNow ITOM. Bidirectional syncing with Case Management is only supported for ServiceNow ITSM.
Need additional help? Contact Datadog support.
Knowledge base
Templated Monitors ITXM table fields and transform maps
action- Type: String
The action being taken on the monitor:create,update,acknowledge, orresolve additional_information- Type: String
ITOM Transform:additional_info
Formatted string containing all event details aggreg_key- Type: String
Aggregation key representing a hash of the alerting monitor’s ID alert_cycle_key- Type: String
Key representing a hash of a single monitor’s alert cycle (tracks Alert → Warn → Resolve) alert_id- Type: String
ID of the alerting monitor alert_metric- Type: String
ITOM Transform:metric_name
Metric that triggered the alert alert_query- Type: String
Query that triggered the alert alert_scope- Type: String
Scope that triggered the alert alert_status- Type: String
Current state of the alert alert_title- Type: String
Name of the alert alert_transition- Type: String
ITSM Transform: (script) -> state
Alert transition state:Triggered,Warn, orRecovered assignment_group_sys_id- Type: Reference
ITSM Transform:assignment_group
Reference Table: Group
ServiceNow sys_id for the templated handle’s assignment group business_service_sys_id- Type: Reference
ITSM Transform:business_service
Reference Table: Service
ServiceNow sys_id for the templated handle’s business service custom_fields- Type: String
User-configured key-value fields formatted as JSON-convertible string datadog_tags- Type: String
Datadog tags from the alerting monitor description- Type: String
ITSM Transform:description
ITOM Transform:description
Summary description of the monitor alert event_details- Type: String
ITSM Transform:work_notes
Event details with formatted, clickable links to Datadog event_id- Type: String
Datadog ID of the event event_link- Type: String
Link to the event created from the monitor alert event_msg- Type: String
Message from the event event_title- Type: String
ITSM Transform:short_description
Title of the event event_type- Type: String
ITOM Transform:type
Type of event hostname- Type: String
ITSM Transform:cmdb_ci
ITOM Transform:node
Host of the affected monitor impact- Type: Integer
ITSM Transform:impact
Impact value based on user-defined mapping of monitor priority logs_sample- Type: String
Sample of relevant logs monitor_priority- Type: Integer
ITOM Transform:severity
Priority of the alerting monitor as an integer org_name- Type: String
Name of the alerting monitor’s organization sys_created_by- Type: String
ITSM Transform:caller_id
Creator of the record (usually the configured ServiceNow API account) ticket_state- Type: String
ITSM Transform:state, (script) -> close_code, (script) -> close_notes
ITOM Transform: (script) -> resolution_notes
State of the ServiceNow record:neworresolved u_correlation_id- Type: String
ITSM Transform:correlation_id
ITOM Transform:message_key
Combined alert_cycle_key and aggreg_key used to coalesce records to the same target incident urgency- Type: Integer
ITSM Transform:urgency
Urgency set from the user defined mapping on the integration tile based on monitor defined priority user_sys_id- Type: Reference
ITSM Transform:assigned_to
Reference Table: User
sys_id from the templated handle passed in for user.
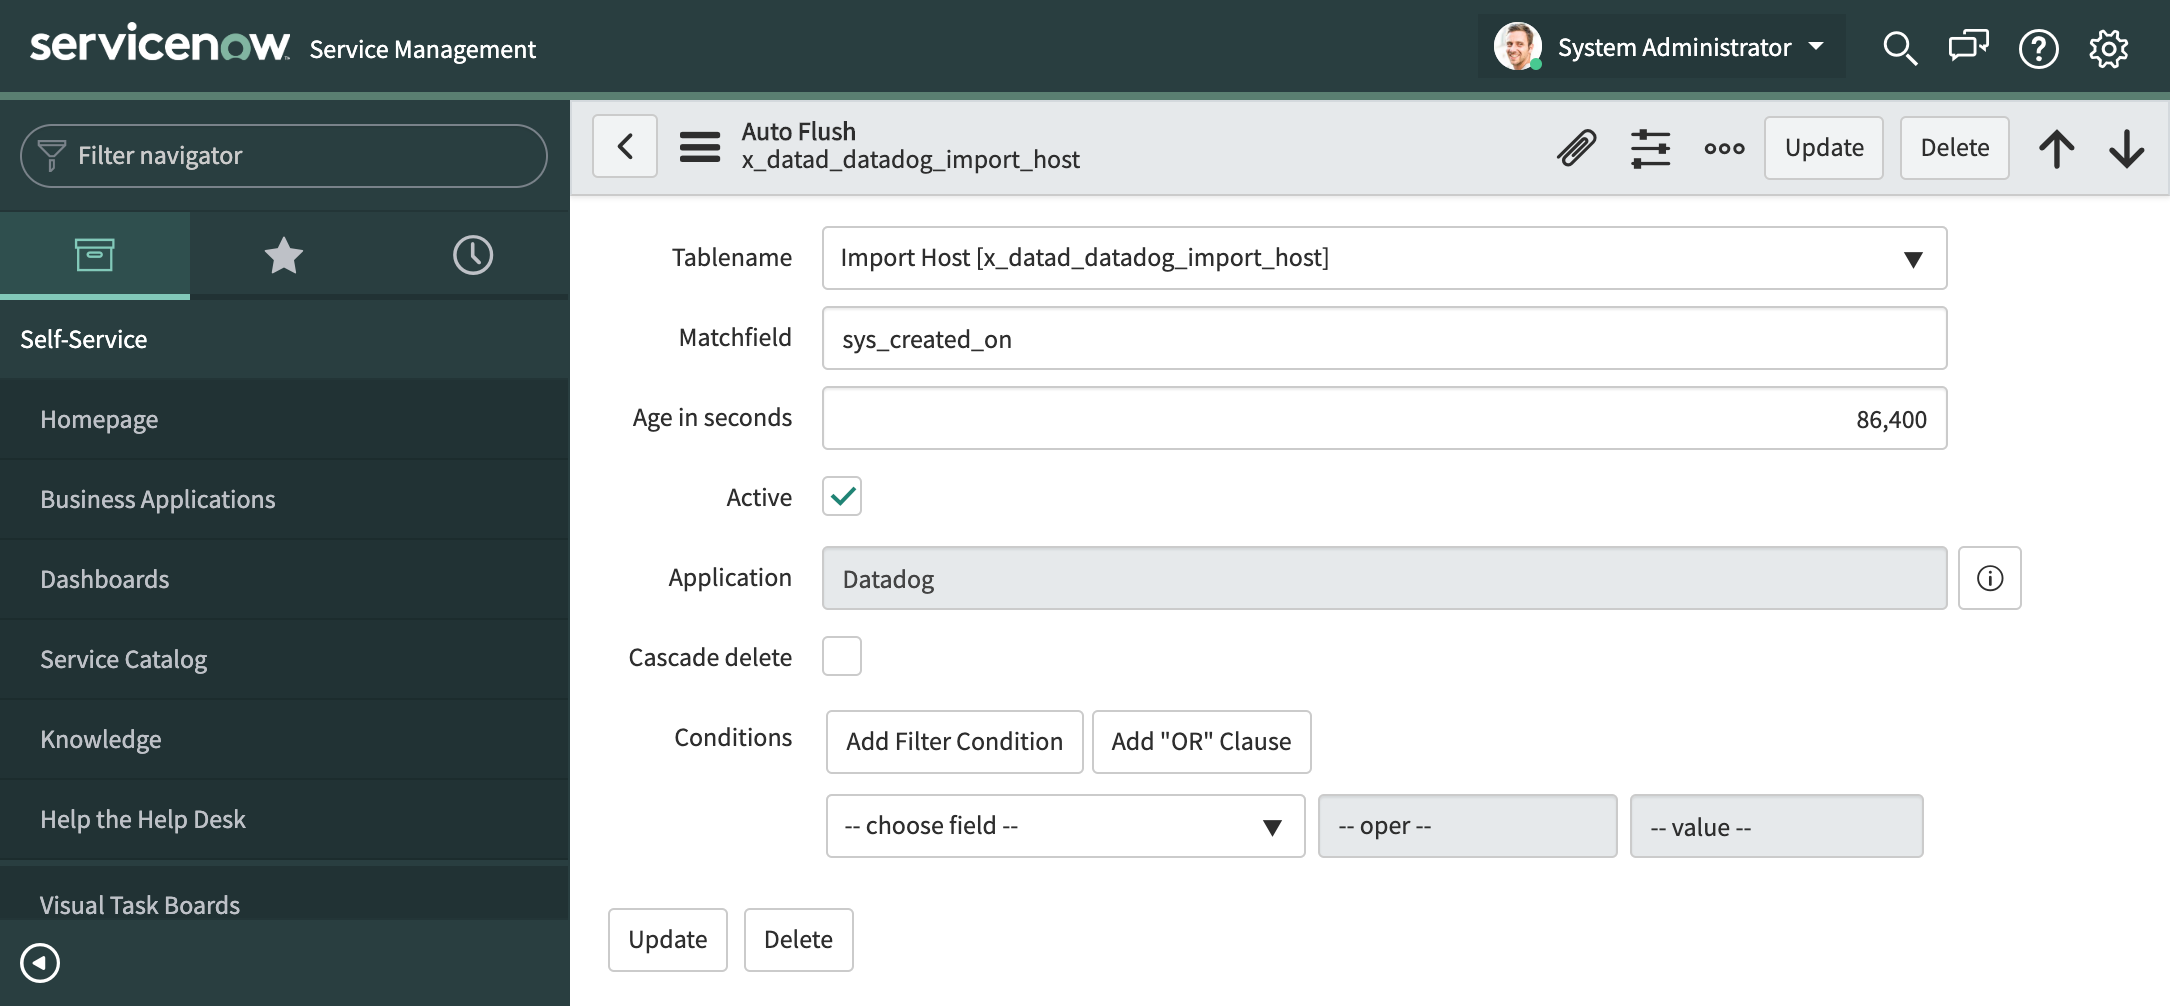
Datadog import host auto-flush rule
To prevent the import set table x_datad_datadog_import_host from accumulating too many rows, an auto-flush rule has been added to the Table Cleaner tool to keep only the last 24 hours of data. This configuration setting can be changed as needed by navigating to sys_auto_flush_list.do in the filter navigator and going into the rule for the x_datad_datadog_import_host table. The Age in seconds field can be updated accordingly.
Monitors duplicating incidents
To prevent a monitor from reopening the same incident instead of creating a new one for each warning, ensure it is not set as a simple alert. Convert the monitor to a multi-alert by grouping it using a tag in the metric. This way, each alert will trigger a separate incident.
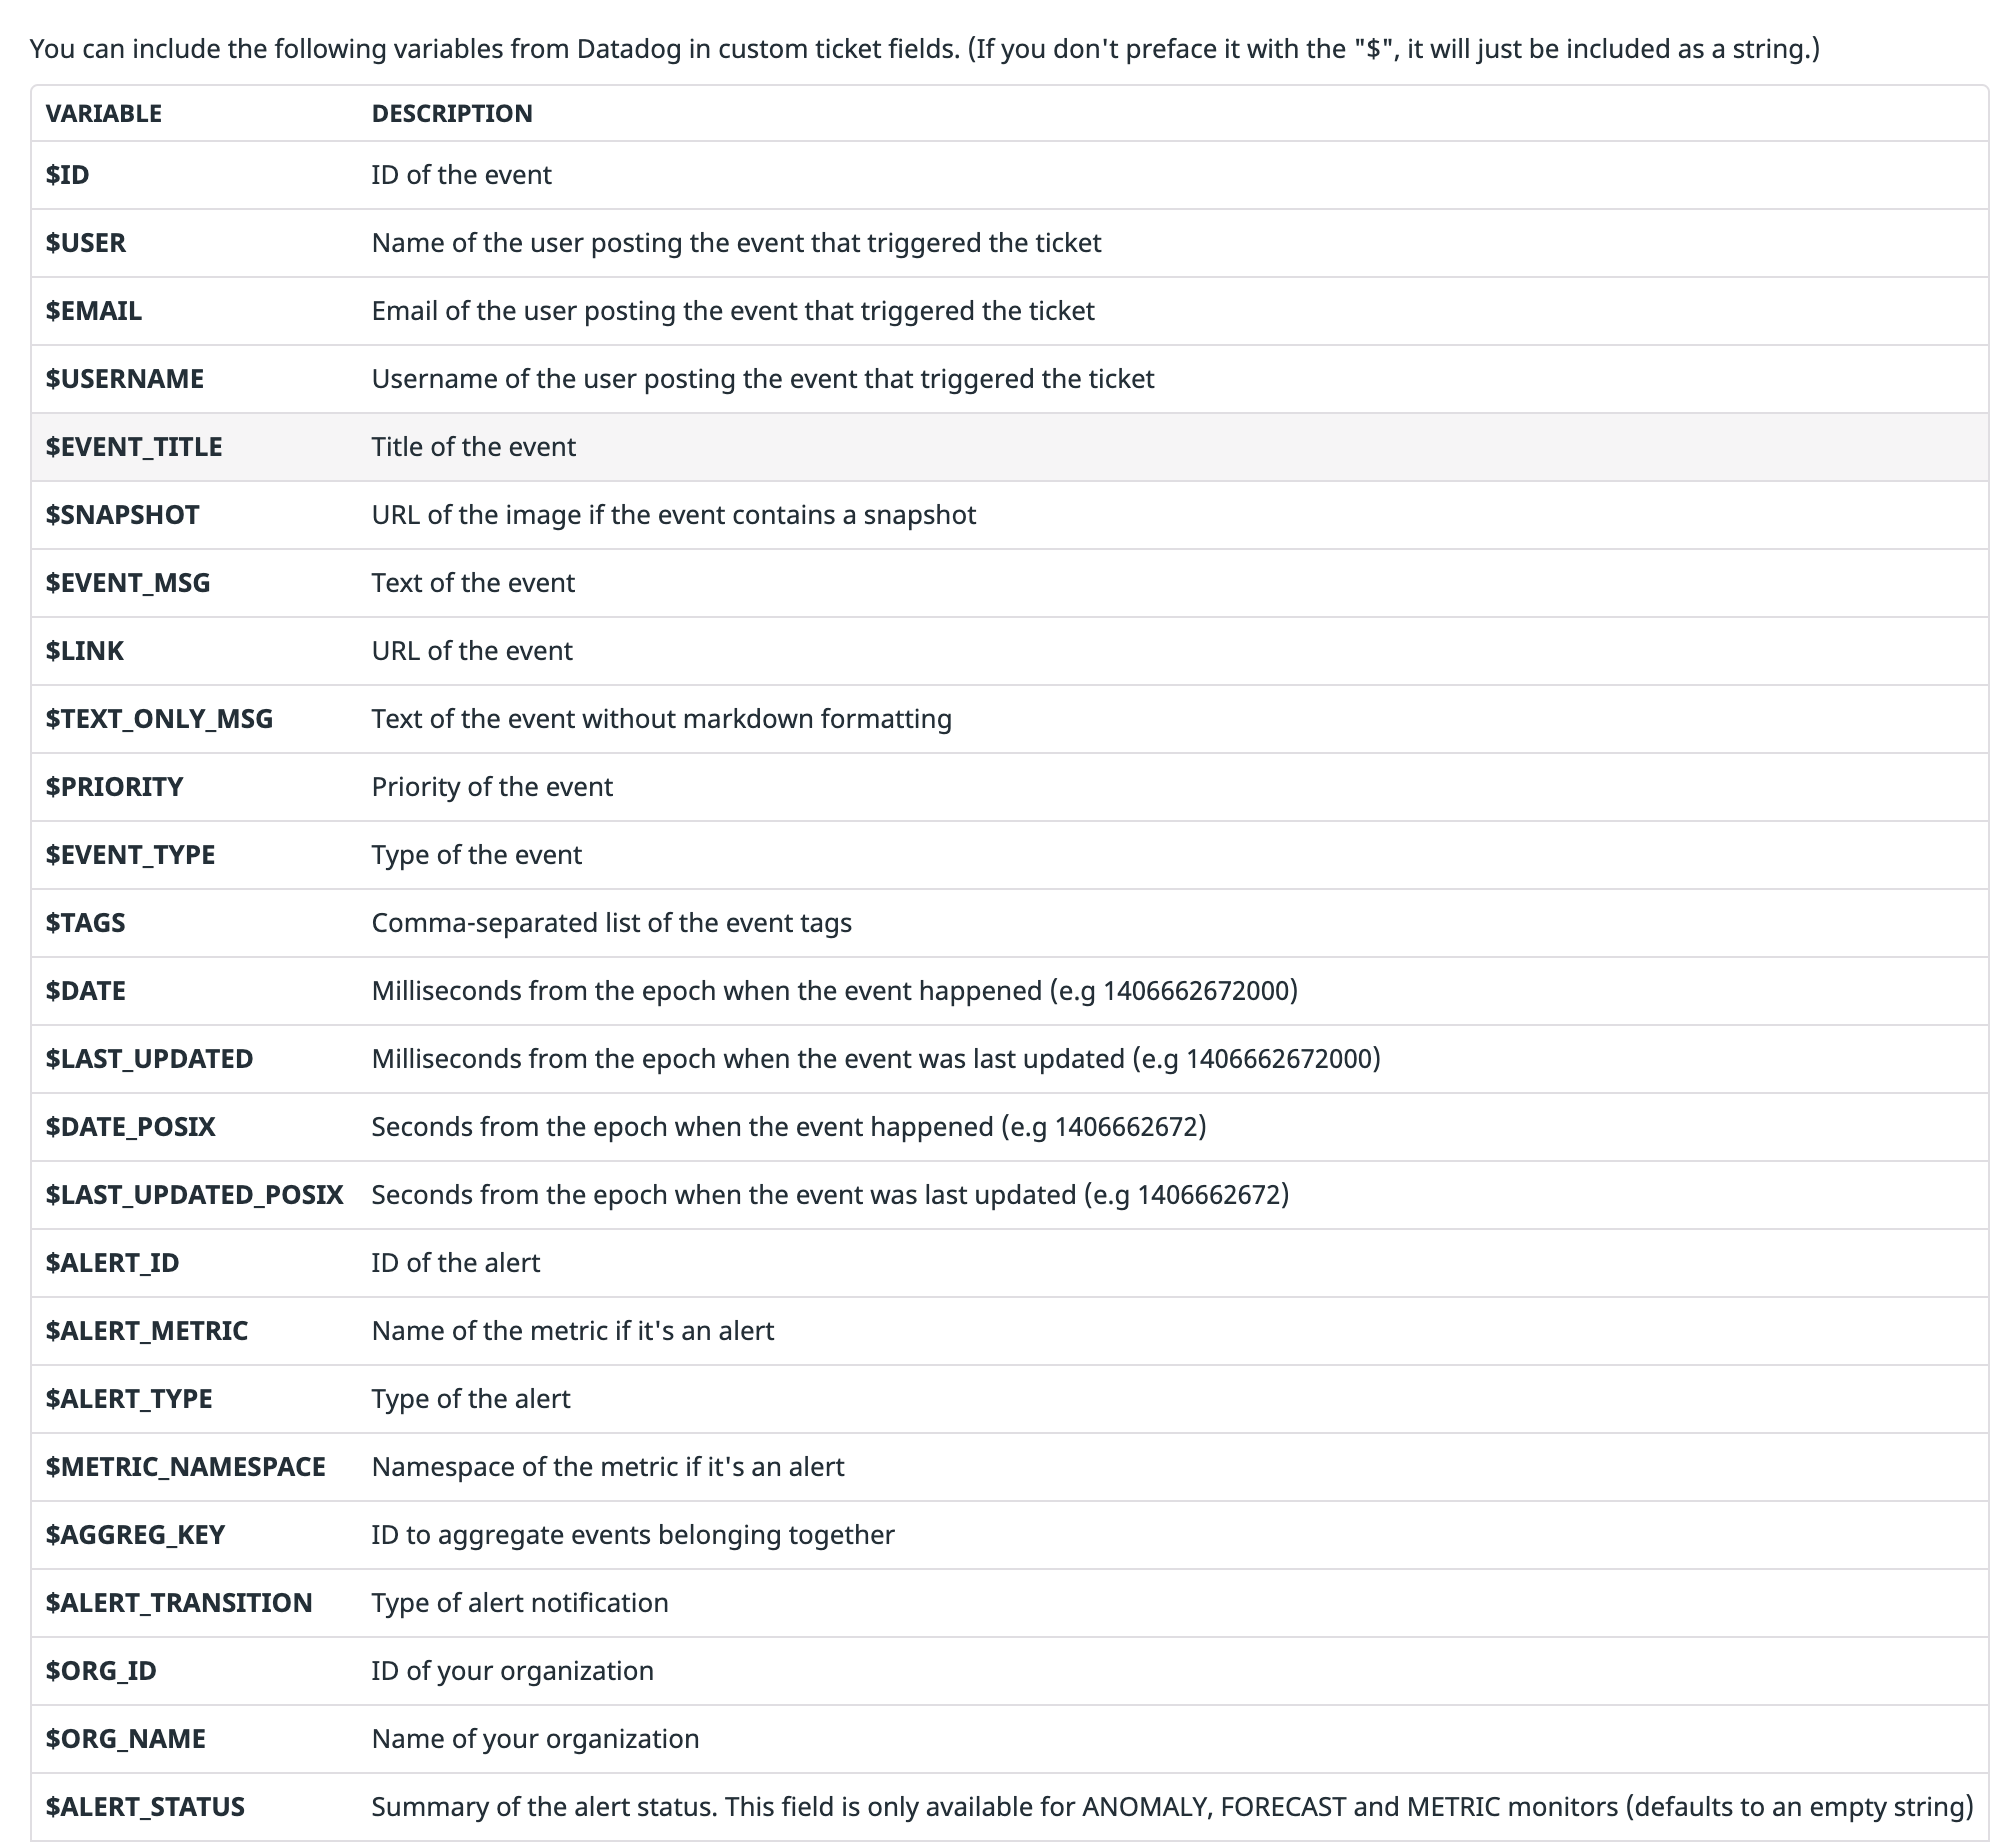
Use variables in ticket payload and field mappings
Variables can be used in the body of your alerts or in field mappings to ensure details from the event are included in ServiceNow. For example, you can include the title and severity in the appropriate ServiceNow field or you can include a link back to the specific incident in Datadog right from the ServiceNow ticket.

Legacy Incident Priority field mapping
Note: Impact and Urgency in monitor descriptions work only for legacy monitor configurations. For templated monitors, please configure instance priority mapping.
The priority field in ServiceNow incidents is read only and can only be updated using priority lookup rules.
Define Impact and Urgency in monitors to calculate the ServiceNow incident priority.
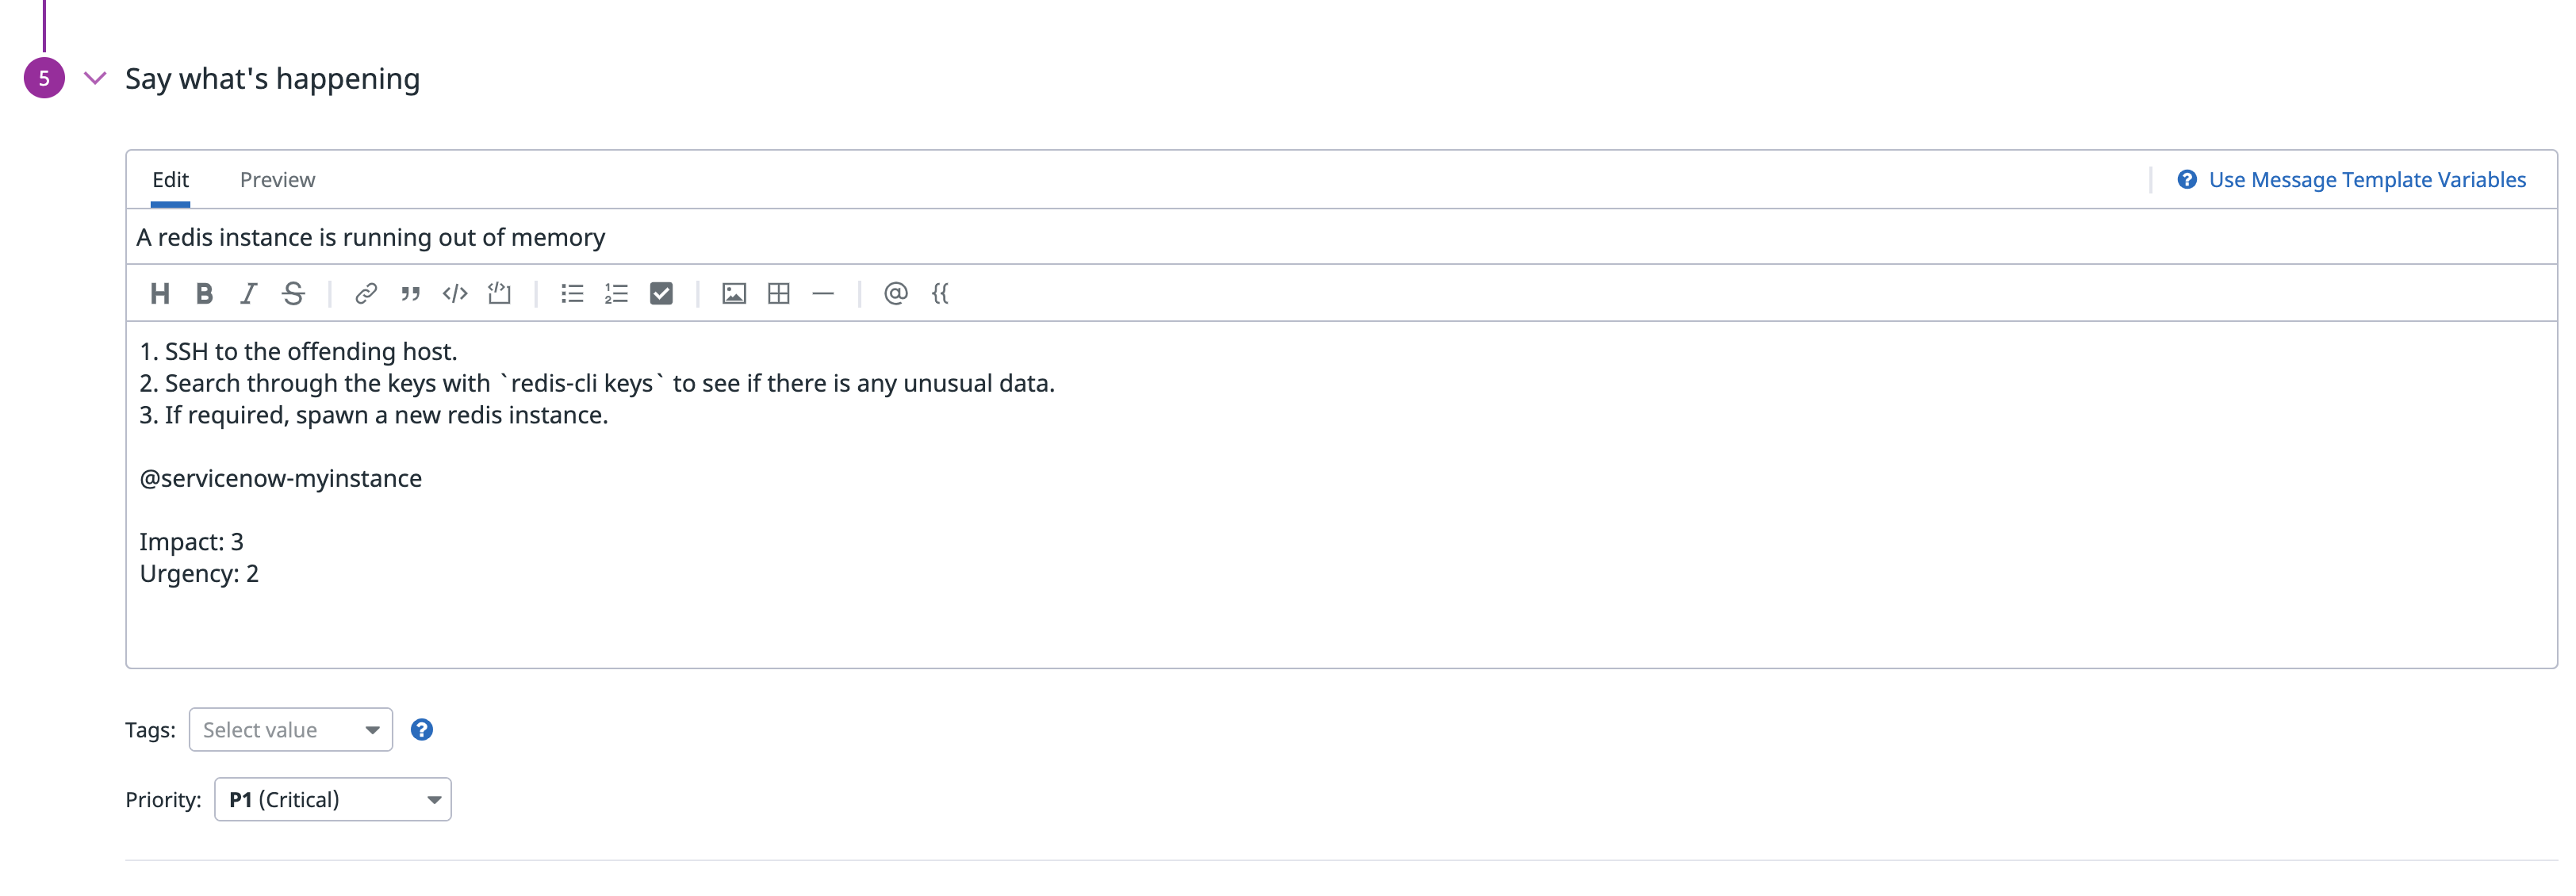
Automate support resolution workflow
Once the monitor state returns to normal, the associated support ticket is automatically marked as “resolved”.
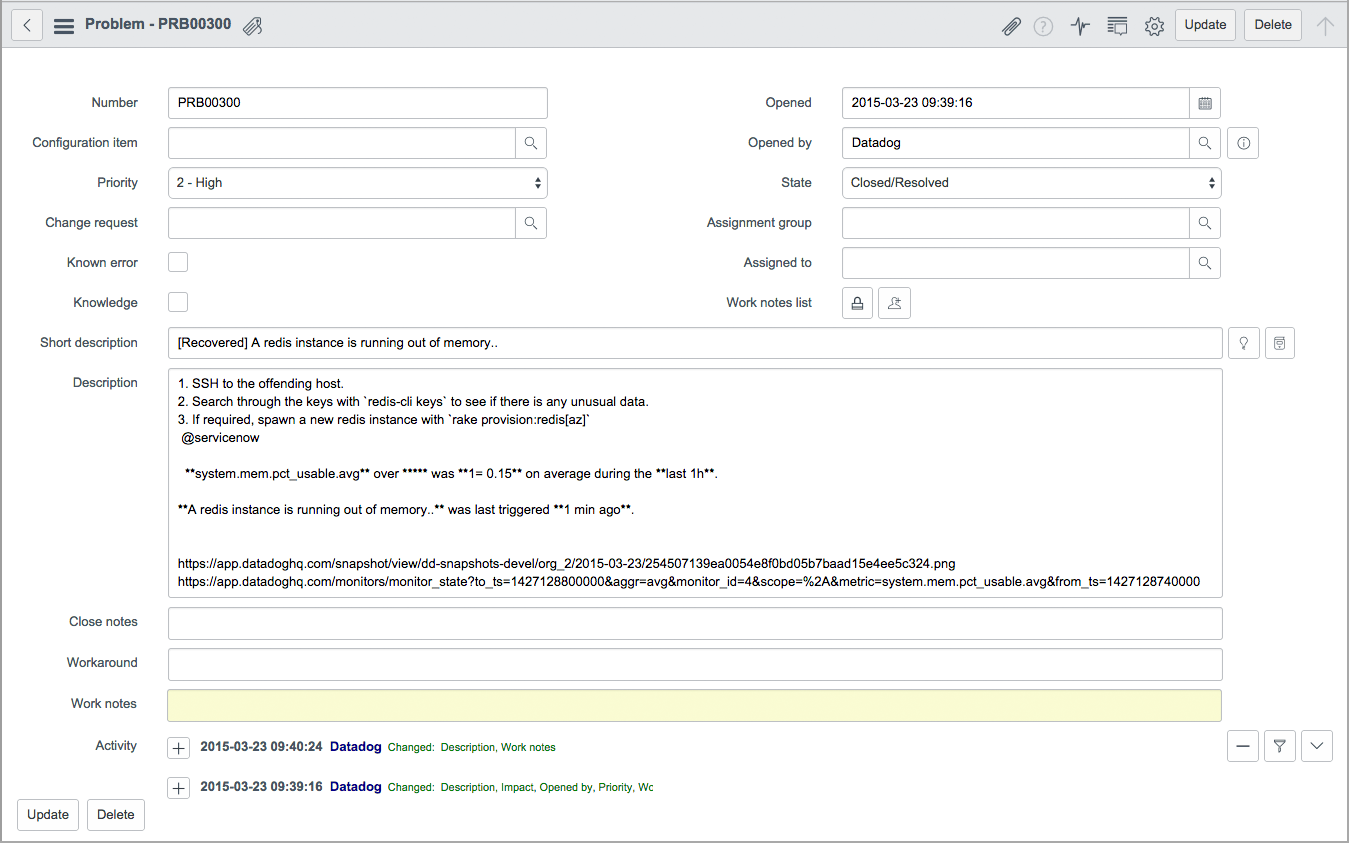
Defining custom mappings
Click one of the tables, for example Datadog Monitors ITSM Tables, and scroll to the bottom of the record to see the link for the associated transform map.
Understanding the mapping
Click on the name of the transform map to view the record:

At the top are two important fields on the Transform record - Source table and Target table:

Notes:
- The source is the import set table you selected (Datadog Monitors ITSM Tables) and the target is your actual incident table (or event table) where events are stored.
- The field mappings are at the bottom of the record. Some basic mappings are included. This is where you select the fields to include, define the format, and select the target fields in your ServiceNow instance.
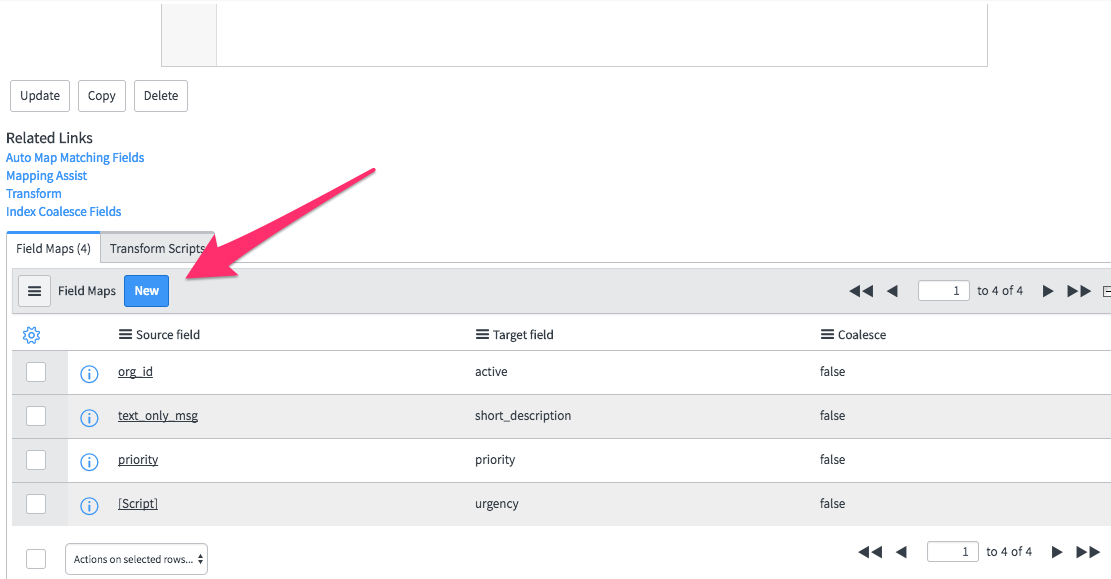
Add a new field mapping
Click New:
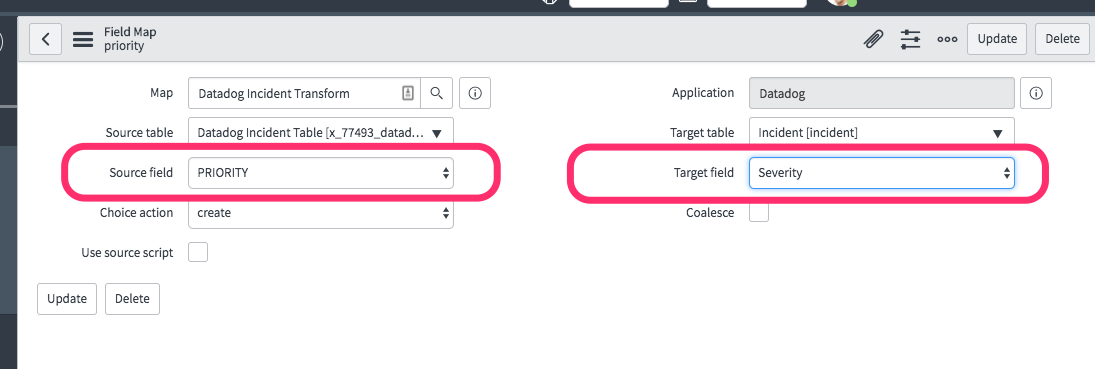
Select the source and target fields for one to one mappings:
Or, check the Use source script box and define transformations:
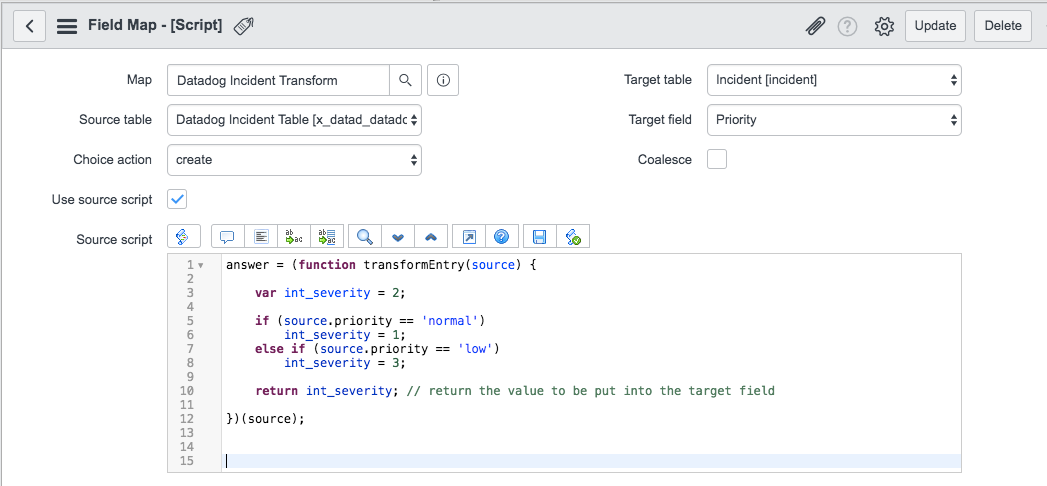
Note: For mapping any custom fields in the Integration Tile, you can use the following mapping script for either the Datadog Monitors ITOM and Datadog Monitors ITSM Transform maps. In this example, the field my_field was defined as a custom field in the integration tile:
answer = (function transformEntry(source)
{
    var additional_info = JSON.parse(source.additional_info);
    return additional_info.my_field;
})(source);
Validation
To validate the integration is set up correctly, add @servicenow-<your-template-name> in a monitor or event notification. The raw data populates rows in the interim table and is forwarded to the ServiceNow table specified in the mappings and transformations you created.
Incident Management Field Mappings
| Incident Management | ServiceNow Cases Table | ServiceNow Incident | Sync Status |
|---|---|---|---|
| Title | Title - String | Short Description | One way sync from Datadog -> ServiceNow |
| What Happened | Description - String | Description | One way sync from Datadog -> ServiceNow |
| State | State - String | State | Bi-directionally synced |
| DD Incident URL | Incident URL - String | Work Notes | One way sync from Datadog -> ServiceNow |
| Severity | Incident Urgency (int) | Urgency | Bi-directionally synced |
| Severity | Incident Impact (int) | Impact | Bi-directionally synced |
| Datadog Monitor State | ServiceNow Incident State |
|---|---|
| Alert | In Progress |
| Warn | In Progress |
| OK | Resolved |
| Completed (optional, configured in settings) | Resolved |
| Datadog Incident Severity | ServiceNow Urgency | ServiceNow Impact | ServiceNow Priority |
|---|---|---|---|
| SEV-1 | 1 | 1 | 1 - Critical |
| SEV-2 | 1 | 2 | 2 - High |
| SEV-2 | 2 | 1 | 2 - High |
| SEV-3 | 1 | 3 | 3 - Moderate |
| SEV-3 | 2 | 2 | 3 - Moderate |
| SEV-3 | 3 | 1 | 3 - Moderate |
| SEV-4 | 2 | 3 | 4 - Low |
| SEV-4 | 3 | 2 | 4 - Low |
| SEV-5 (Minor) | 3 | 3 | 5 - Planning |
| Unknown | 3 | 3 | 5 - Planning |
Note If Start at SEV-0 is enabled for in Incident Management Settings, the values in ServiceNow Urgency, ServiceNow Impact, and ServiceNow Priority will all stay the same but the Datadog Incident Severity will shift down by 1, e.g. the first row will be Datadog Incident Severity: SEV-0; ServiceNow Urgency: 1, ServiceNow Impact: 1, ServiceNow Priority: 1 - Critical.
Datadog collects Business Service, Assignment Group, email, name, sysID, and username to populate corresponding fields in ServiceNow. Processing of any personal data collected by Datadog in connection with this integration is subject to Datadog’s privacy policy.
