- Essentials
- Getting Started
- Agent
- API
- APM Tracing
- Containers
- Dashboards
- Database Monitoring
- Datadog
- Datadog Site
- DevSecOps
- Incident Management
- Integrations
- Internal Developer Portal
- Logs
- Monitors
- OpenTelemetry
- Profiler
- Search
- Session Replay
- Security
- Serverless for AWS Lambda
- Software Delivery
- Synthetic Monitoring and Testing
- Tags
- Workflow Automation
- Learning Center
- Support
- Glossary
- Standard Attributes
- Guides
- Agent
- Integrations
- Developers
- Authorization
- DogStatsD
- Custom Checks
- Integrations
- Build an Integration with Datadog
- Create an Agent-based Integration
- Create an API-based Integration
- Create a Log Pipeline
- Integration Assets Reference
- Build a Marketplace Offering
- Create an Integration Dashboard
- Create a Monitor Template
- Create a Cloud SIEM Detection Rule
- Install Agent Integration Developer Tool
- Service Checks
- IDE Plugins
- Community
- Guides
- OpenTelemetry
- Administrator's Guide
- API
- Partners
- Datadog Mobile App
- DDSQL Reference
- CoScreen
- CoTerm
- Remote Configuration
- Cloudcraft (Standalone)
- In The App
- Dashboards
- Notebooks
- DDSQL Editor
- Reference Tables
- Sheets
- Monitors and Alerting
- Watchdog
- Metrics
- Bits AI
- Internal Developer Portal
- Error Tracking
- Change Tracking
- Service Management
- Actions & Remediations
- Infrastructure
- Cloudcraft
- Resource Catalog
- Universal Service Monitoring
- Hosts
- Containers
- Processes
- Serverless
- Network Monitoring
- Cloud Cost
- Application Performance
- APM
- APM Terms and Concepts
- Application Instrumentation
- APM Metrics Collection
- Trace Pipeline Configuration
- Correlate Traces with Other Telemetry
- Trace Explorer
- Recommendations
- Code Origin for Spans
- Service Observability
- Endpoint Observability
- Dynamic Instrumentation
- Live Debugger
- Error Tracking
- Data Security
- Guides
- Troubleshooting
- Continuous Profiler
- Database Monitoring
- Agent Integration Overhead
- Setup Architectures
- Setting Up Postgres
- Setting Up MySQL
- Setting Up SQL Server
- Setting Up Oracle
- Setting Up Amazon DocumentDB
- Setting Up MongoDB
- Connecting DBM and Traces
- Data Collected
- Exploring Database Hosts
- Exploring Query Metrics
- Exploring Query Samples
- Exploring Database Schemas
- Exploring Recommendations
- Troubleshooting
- Guides
- Data Streams Monitoring
- Data Jobs Monitoring
- Data Observability
- Digital Experience
- Real User Monitoring
- Synthetic Testing and Monitoring
- Continuous Testing
- Product Analytics
- Software Delivery
- CI Visibility
- CD Visibility
- Deployment Gates
- Test Optimization
- Code Coverage
- PR Gates
- DORA Metrics
- Feature Flags
- Security
- Security Overview
- Cloud SIEM
- Code Security
- Cloud Security
- App and API Protection
- Workload Protection
- Sensitive Data Scanner
- AI Observability
- Log Management
- Observability Pipelines
- Log Management
- CloudPrem
- Administration
Managing the Azure Native Integration
This guide is for managing the Azure Native integration with the Datadog resource.
This guide is for managing the integration between Azure and Datadog in the Azure portal using the Datadog resource. The Datadog resource in Azure represents the connection between your Datadog organization and your Azure environment. You can configure a Datadog resource to link as many subscriptions as you wish to monitor. Create a Datadog resource in Azure before proceeding with this guide.
With the Datadog resource, you can manage the following within the associated Azure subscription:
- View or modify the scope of the Datadog resource to include the subscriptions to monitor
- Configure the collection of Azure metrics and platform logs
- Verify the Azure resources sending metrics and logs
- View API keys and set the key default for your Datadog resource Agent deployments
- Deploy the Datadog VM Agent to your Azure VMs and view details about running Agents
- Deploy the Datadog .NET extension to your Azure Web Apps and view details about installed extensions
- Reconfigure single sign-on
- Change the billing plan for your Datadog organization (Azure Marketplace only)
- Enable or disable the Azure integration
- Delete the Datadog resource
This page describes the Azure Portal experience. If you prefer to use CLI, see the Azure CLI for Datadog.
Overview
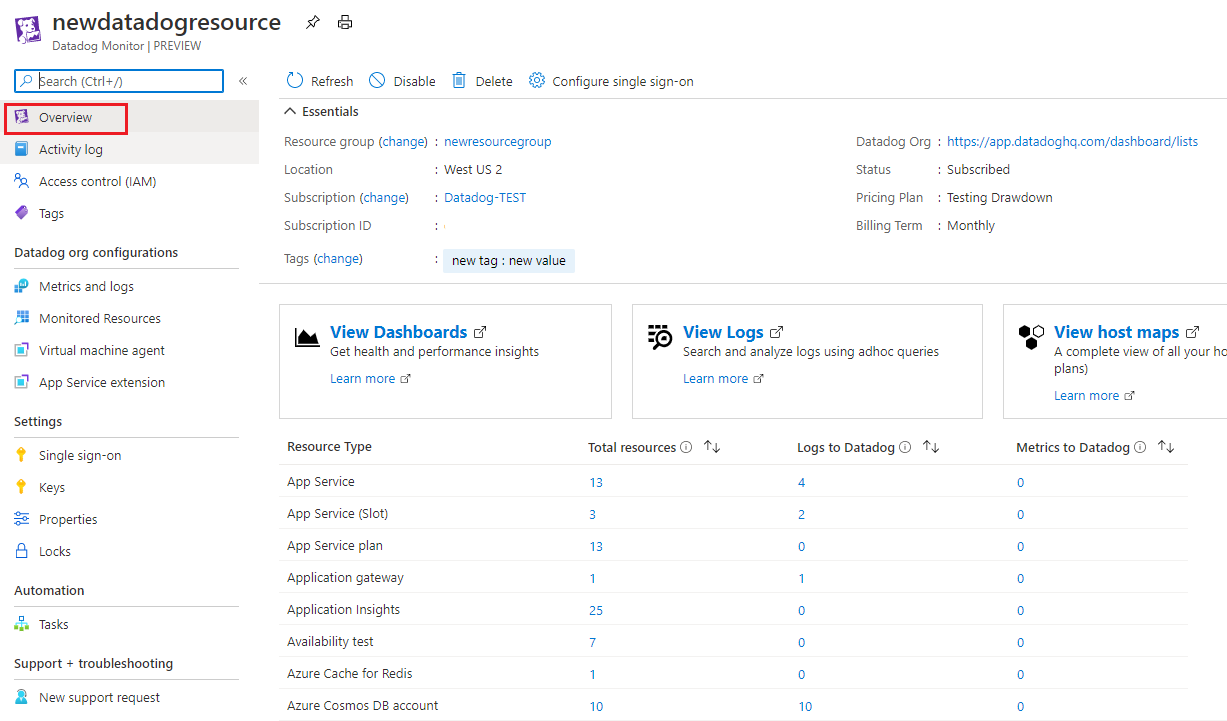
Select Overview in the left sidebar to view information for your Datadog resource.
Essentials
The overview page displays essential information about your Datadog resource including: resource group name, location (region), subscriptions, tags, Datadog organization link, status, pricing plan, and billing term.
Note: The Datadog organization link is a SAML link if SSO is enabled. If the Datadog organization was created with the Azure marketplace, set a password the first time you use this link.
Links
The overview page provides links to view Datadog dashboards, logs, and host maps.
Resource summary
The overview page provides a summary table of the resources sending logs and metrics to Datadog. This table includes the following columns:
| Column | Description |
|---|---|
| Resource type | The Azure resource type |
| Total resources | The count of all resources for the resource type |
| Logs to Datadog | The count of resources sending logs to Datadog through the integration |
| Metrics to Datadog | The count of resources sending metrics to Datadog through the integration |
Disable
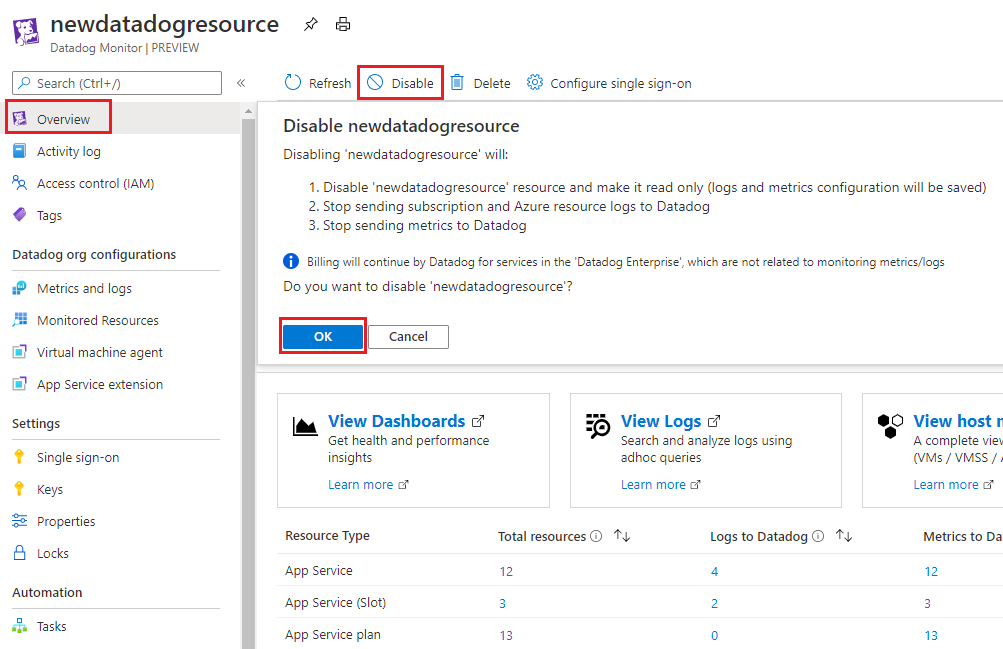
To stop sending logs and metrics from Azure to Datadog, select Disable on the overview page, then click OK.
Note: Disabling the Datadog resource stops the submission of metrics and platform logs to Datadog for the associated subscriptions. Any resources in the subscriptions submitting data directly to Datadog through the Agent or extension are unaffected.
Enable
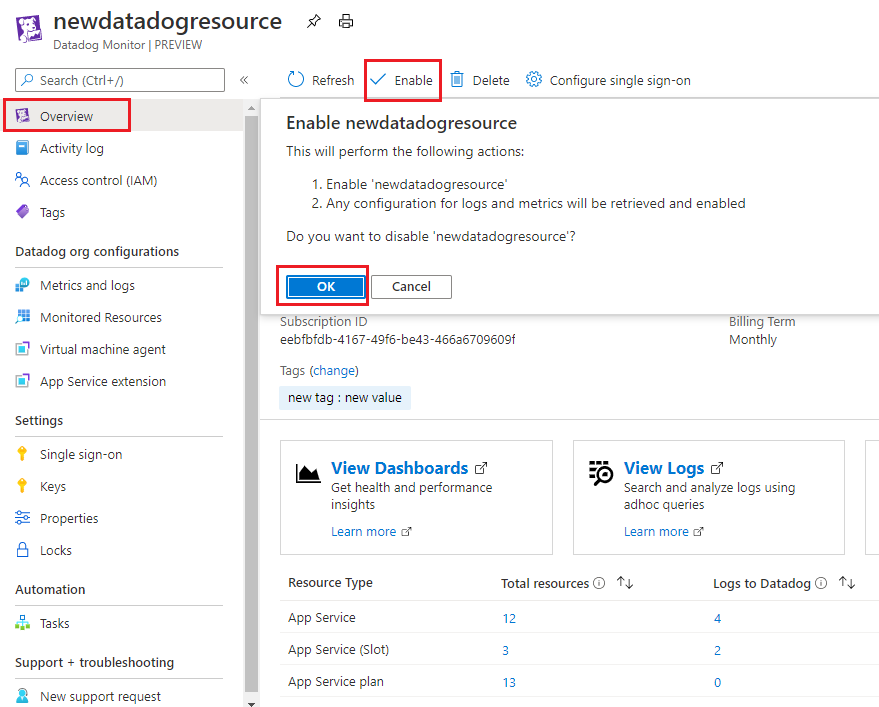
To start sending logs and metrics from Azure to Datadog, select Enable on the overview page, then click OK. Any previous configuration for logs and metrics is retrieved and enabled.
Delete
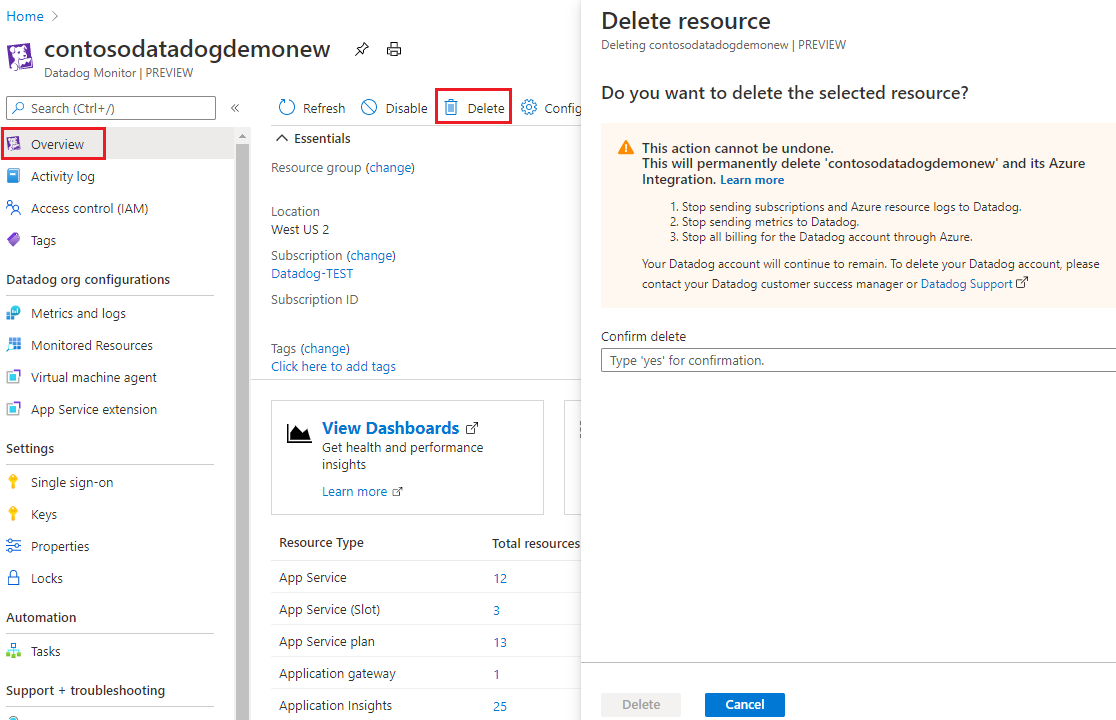
To delete the Datadog resource, select Delete on the overview page. Confirm deletion by typing yes, then click Delete.
For Datadog organizations billed through the Azure Marketplace:
- If the deleted Datadog resource is the only Datadog resource mapped to its associated Datadog organization, logs and metrics are no longer sent to Datadog and all billing stops for Datadog through Azure. Datadog support will reach out to confirm next steps with your account.
- If there are additional Datadog resources mapped to the associated Datadog organization, deleting a Datadog resource only stops sending logs and metrics for its associated Azure subscription.
If your Datadog organization is not billed through the Azure Marketplace, deleting a Datadog resource just removes the integration for that Azure subscription.
Change plan
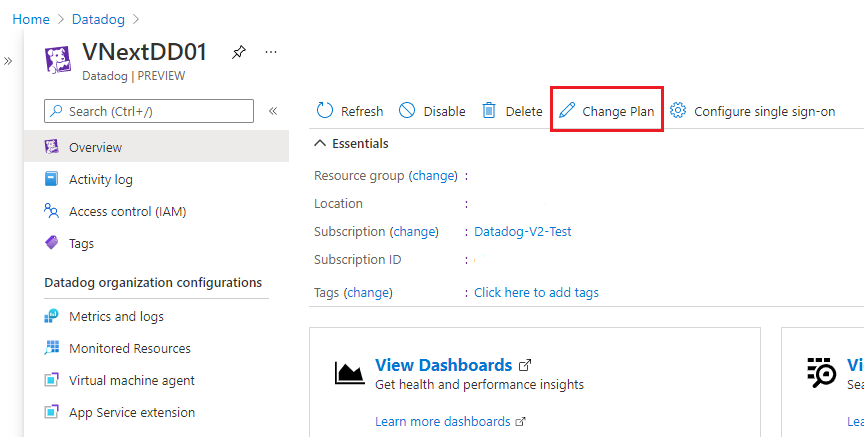
Select Change Plan on the overview page to change your Datadog billing plan.
The portal retrieves all the available Datadog plans for your tenant, including any private offers. Select the appropriate plan and click Change Plan.
Datadog org configurations
Monitored subscriptions
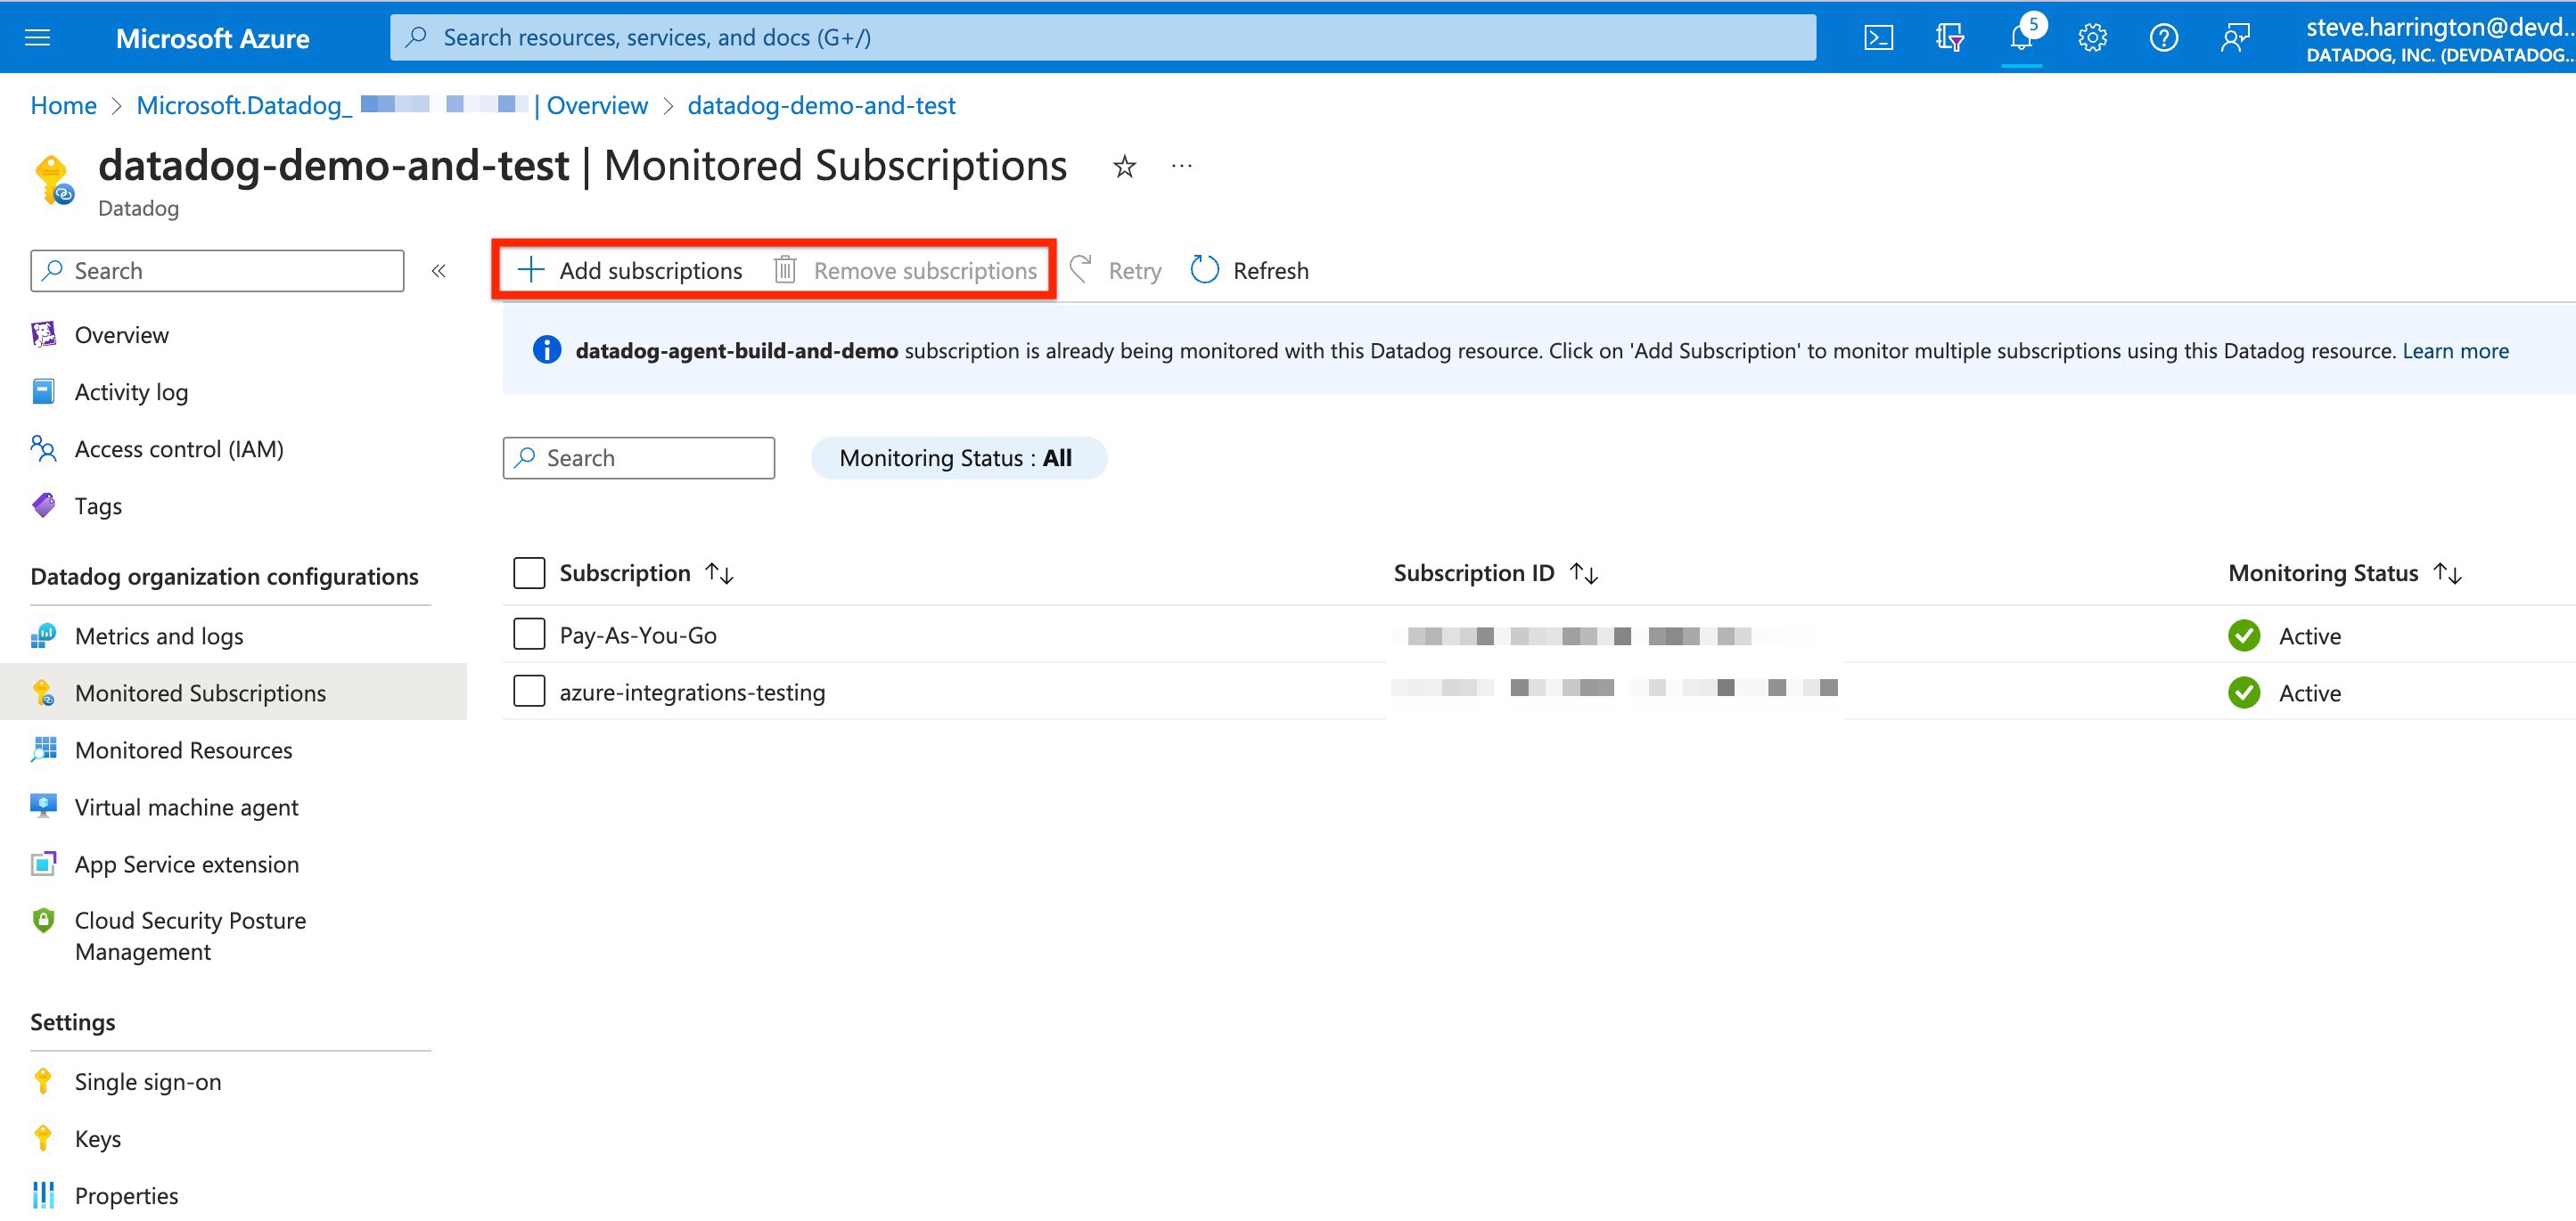
Select Monitored Subscriptions in the left sidebar to view or modify the scope of the Datadog resource. A list of currently monitored subscriptions appears. Use this view to configure the scope of the Datadog resource to monitor as many subscriptions as desired. The subscription with the Datadog resource must be included in the scope.
- To add subscriptions to monitor, click
+ Add Subscriptions. The list of subscriptions available only includes subscriptions to which you have theOwnerrole assigned. Select the subscriptions you wish to monitor and clickAdd. - To remove subscriptions from being monitored with Datadog, select the subscriptions you wish to remove and click
Remove Subscriptions. Only users with theOwnerrole can remove subscriptions.
Note: The same settings (such as host filters and log collection rules) are applied across all subscriptions in scope. To apply different settings to different subscriptions, create different Datadog resources.
Metrics and logs
Select Metrics and logs in the left sidebar to change the configuration rules for metrics and logs. All rules are applied dynamically across the entire subscription as resources are added or tags change.
Changes to metric or log configuration settings should take effect within a few minutes.
Metric collection
By default, Datadog automatically collects metrics for all Azure resources within any linked subscriptions.
Optionally, limit metric collection for Azure VMs and App Service Plans using Azure tags attached to your resources.
Tag rules for sending metrics
- Virtual machines, virtual machine scale sets, and App Service Plans with
includetags send metrics to Datadog. - Virtual machines, virtual machine scale sets, and App Service Plans with
excludetags don’t send metrics to Datadog. - If there’s a conflict between inclusion and exclusion rules, exclusion takes priority.
- There is no option to limit metric collection for other resource types.
Log collection
There are three types of logs that can be emitted from Azure to Datadog using the Datadog resource.
Activity logs
Subscription level logs provide insight into the operations on your resources at the control plane. Updates on service health events are also included. Use the activity log to determine the what, who, and when for any write operations (PUT, POST, DELETE).
To send subscription level logs to Datadog, select Send subscription activity logs. If this option is left unchecked, none of the subscription level logs are sent to Datadog.
Resource logs
Azure resource logs provide insight into operations taken on Azure resources at the data plane. For example, getting a secret from a key vault or making a request to a database are data plane operations. The content of resource logs varies by the Azure service and resource type.
To send Azure resource logs to Datadog, select Send Azure resource logs for all defined resources. The types of Azure resource logs are listed in the Azure Monitor Resource Log categories. When this option is selected, all resource logs are sent to Datadog, including any new resources created in the linked subscriptions.
You can optionally filter the set of Azure resources sending logs to Datadog using Azure resource tags.
Tag rules for sending logs
- Azure resources with
includetags send logs to Datadog. - Azure resources with
excludetags don’t send logs to Datadog. - If there’s a conflict between inclusion and exclusion rules, exclusion takes priority.
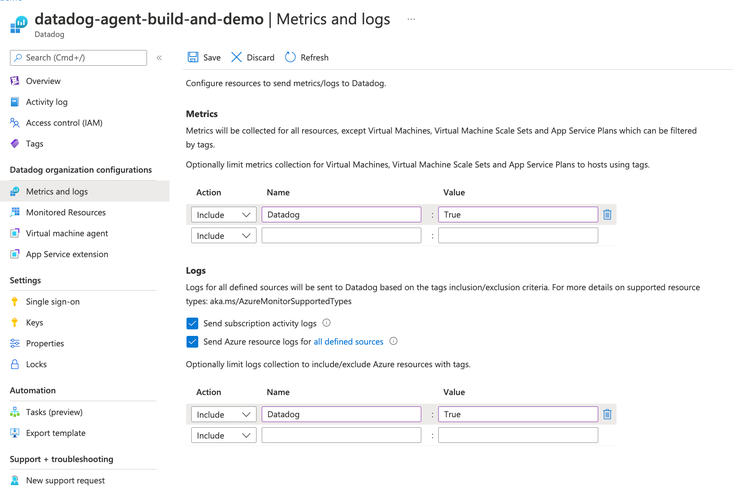
For example, the screenshot below shows a tag rule where only virtual machines, virtual machine scale sets, and app service plans tagged with Datadog = True send metrics to Datadog. Resources (of all types) tagged with Datadog = True send logs to Datadog.
Microsoft Entra ID logs
Microsoft Entra ID logs contain the history of sign-in activity and an audit trail of changes made in Microsoft Entra ID for a particular tenant. To send Microsoft Entra ID logs:
- Navigate to Microsoft Entra ID, and select Diagnostic Settings under Monitoring in the left navigation bar.
- Click Add diagnostic setting.
- Select the log categories you want to send to Datadog. Datadog recommends sending all categories.
- In Destination details, select Send to a partner solution.
- Select a subscription. Select a Datadog resource in the Destination dropdown.
All Microsoft Entra ID logs from the tenant are sent to the Datadog organization linked to the Datadog resource selected. For cases where you have more than one Datadog resource that links subscriptions to the same Datadog organization, it does not matter which Datadog resource is selected. You only need to set this up once for each Azure tenant.
Monitored resources
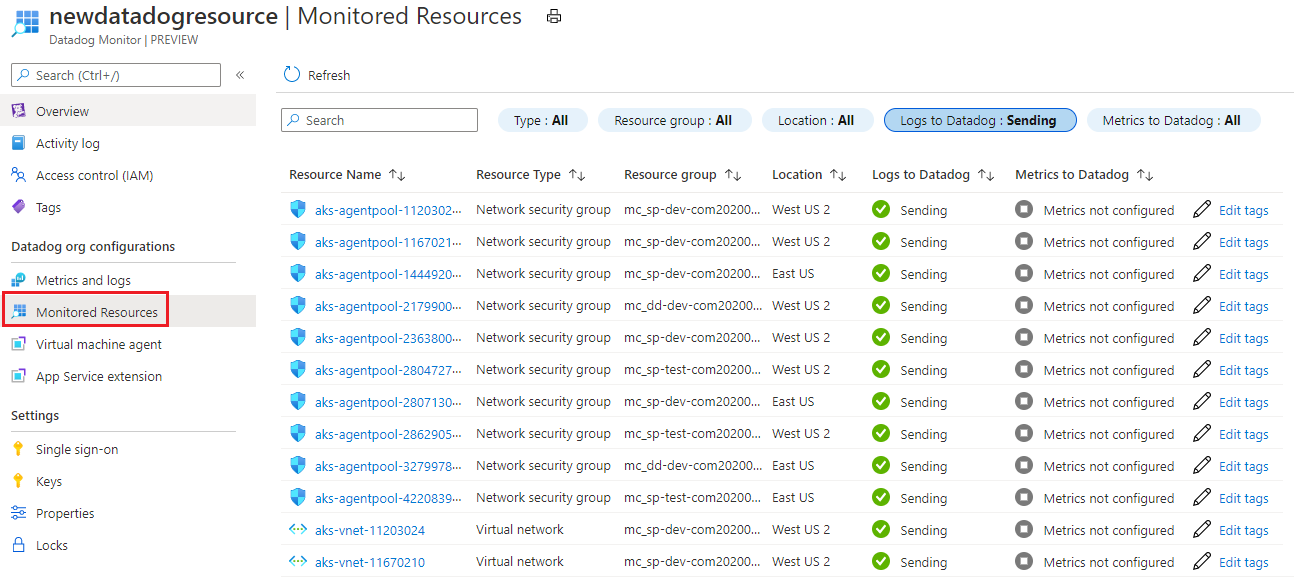
Select Monitored Resources in the left sidebar to see a list of resources emitting logs and metrics to Datadog. Use the search to filter the list by resource name, type, group, location, logs to Datadog, or metrics to Datadog.
The Logs to Datadog column displays Sending if the resource is sending logs to Datadog. Otherwise, this field indicates why logs aren’t being sent. Possible reasons:
| Reason | Description |
|---|---|
| Resource doesn’t support sending logs | Only resource types with monitoring log categories can be configured to send logs to Datadog. |
| Limit of five diagnostic settings reached | Each Azure resource can have a maximum of five diagnostic settings. For more information, see diagnostic settings. |
| Error | The resource is configured to send logs to Datadog, but is blocked by an error. |
| Logs not configured | Only Azure resources with appropriate resource tags are configured to send logs to Datadog. |
| Region not supported | The Azure resource is in a region that doesn’t support sending logs to Datadog. |
| Datadog Agent not configured | Virtual machines without the Datadog Agent installed don’t emit logs to Datadog. |
Datadog Agent extensions
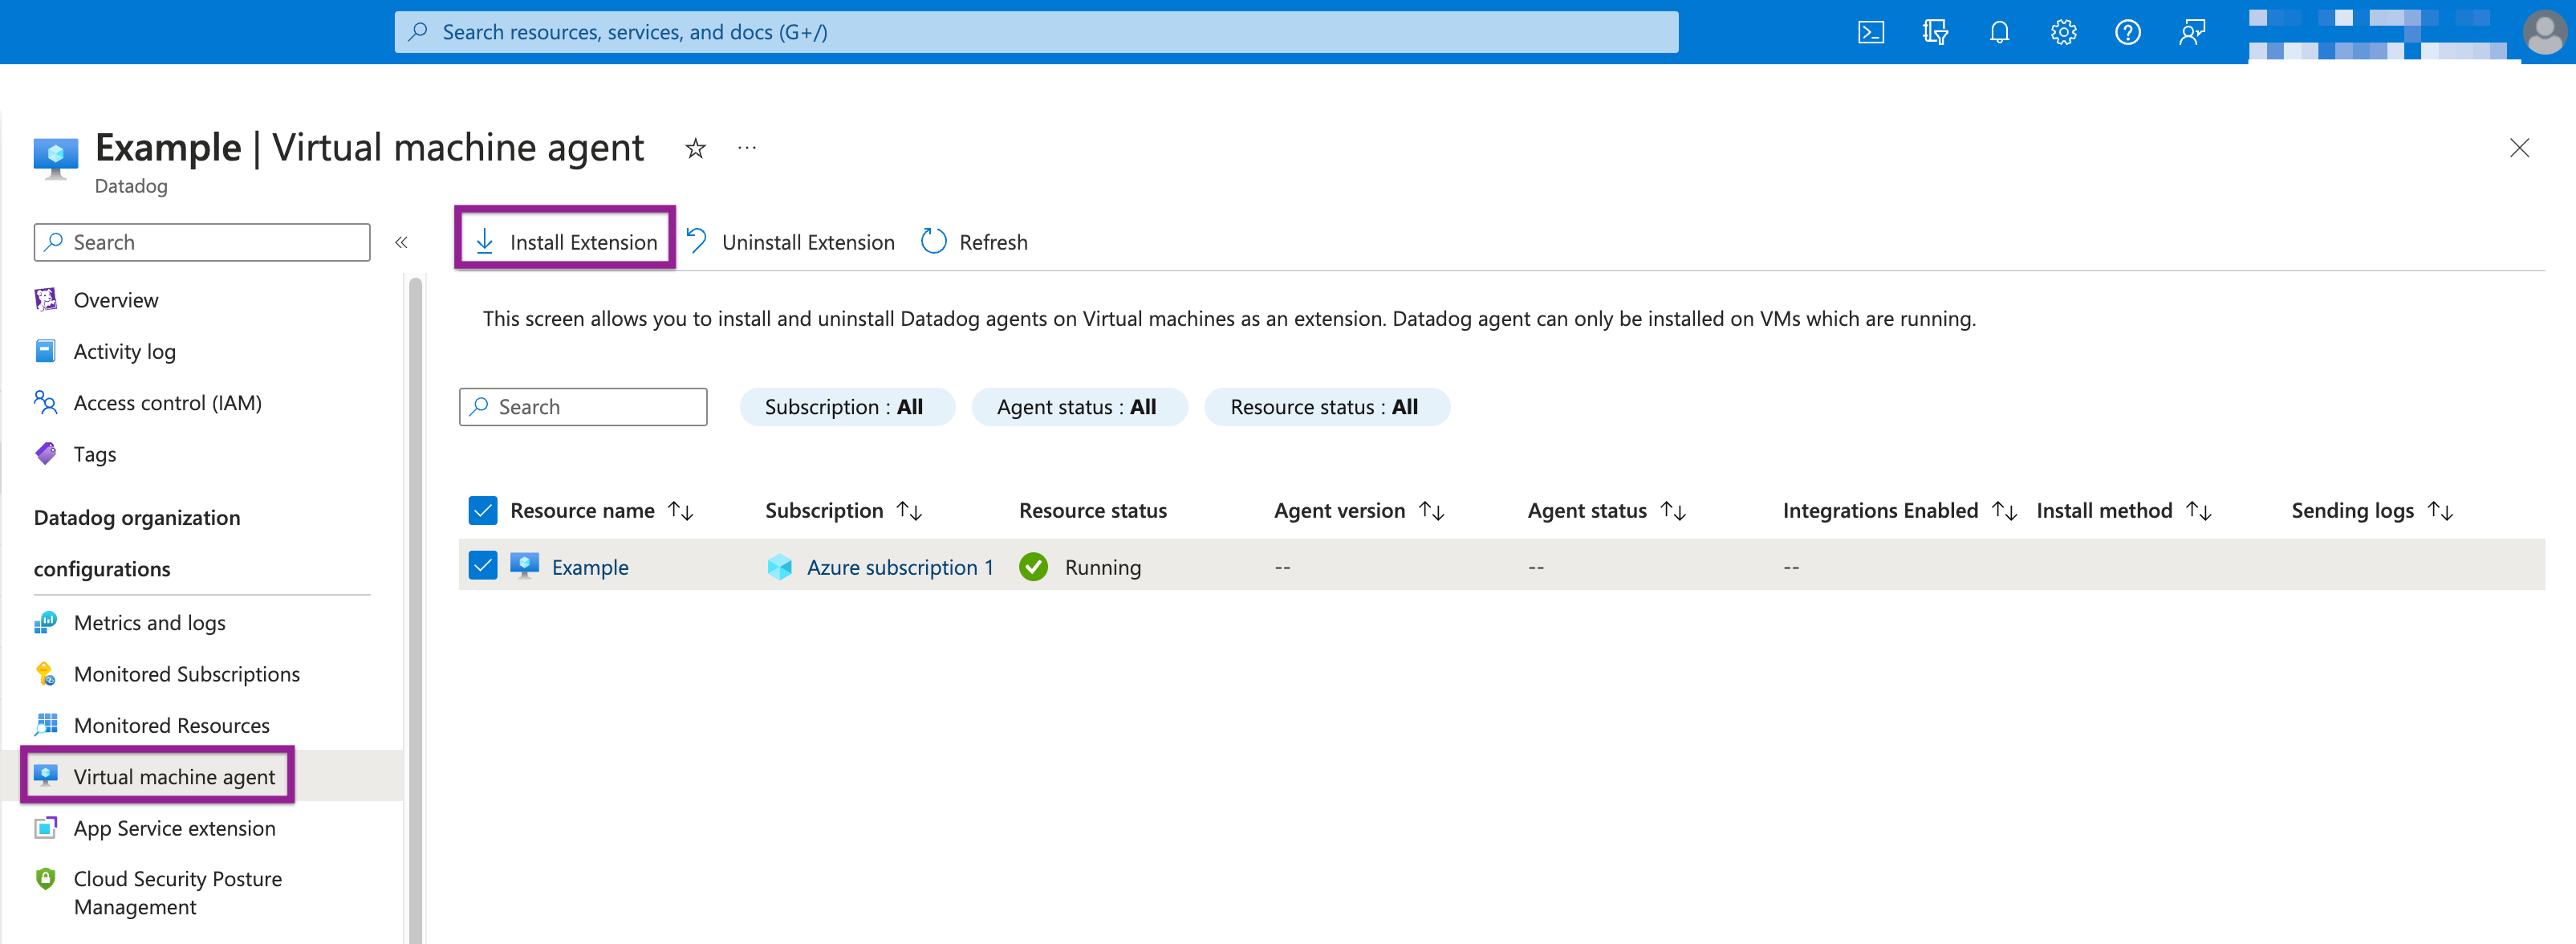
To see a list of virtual machines (VMs) in the subscription, select Virtual machine agent in the left sidebar. On this page, you can install the Datadog Agent on a VM as an extension.
For each VM, the following information is displayed:
| Column | Description |
|---|---|
| Resource name | The VM’s name |
| Resource status | Whether the VM is stopped or running. The Datadog Agent can only be installed on a running VM. If the VM is stopped, installing the Datadog Agent is disabled. |
| Agent version | The Datadog Agent version number |
| Agent status | Whether the Datadog Agent is running on the VM. |
| Integrations enabled | The key metrics being collected by enabled integrations in the Datadog Agent. |
| Install method | The specific tool used to install the Datadog Agent, such as Chef, Azure VM extension, etc. |
| Sending logs | Whether the Datadog Agent is sending logs to Datadog. |
Install
You can install the Datadog Agent directly in Azure with the VM Extension. To install the Datadog Agent:
- Select the appropriate VM.
- Click Install Extension.
- The portal asks for confirmation to install the Agent with the default key. Select OK to begin installation. Azure shows the status as
Installinguntil the Agent is installed and provisioned. After the Datadog Agent is installed, the status changes toInstalled.
Uninstall
If the Datadog Agent was installed with the Azure VM extension:
- Select the appropriate VM.
- Click Uninstall Agent.
If the Agent was installed using a different method, you cannot use the Datadog resource to deploy or remove the Agent, but information about the Agent is still reflected on this page.
The Datadog AKS Cluster Extension allows you to deploy the Datadog Agent natively within Azure AKS, avoiding the complexity of third-party management tools.
Install
To install the Datadog Agent with the AKS Cluster Extension:
- Click on your AKS cluster in the Monitored Resources section in the left sidebar.
- From the left sidebar of the AKS cluster, select Extensions + applications under Settings.
- Search for and select the
Datadog AKS Cluster Extension. - Click Create, and follow the instructions in the tile using your Datadog credentials and Datadog site.
Uninstall
- Click on your AKS cluster in the Monitored Resources section in the left sidebar.
- From the left sidebar of the AKS cluster, select Extensions + applications under Settings.
- Select the Datadog AKS Cluster Extension (its Type is
Datadog.AKSExtension). - Click Uninstall.
App Service extension
Select App Service extension in the left sidebar to see a list of app services in the subscription. On this page, you can install the Datadog extension on Azure App Service to enable APM tracing and custom metrics.
For each app service, the following information is displayed:
| Column | Description |
|---|---|
| Resource name | The app name |
| Resource status | Whether the app service is stopped or running. The app service must be running to initiate install. If the app service is stopped, installing the Datadog Agent is disabled. |
| App service plan | The specific plan configured for the app service |
| Extension version | The Datadog extension version number |
Install
To install the Datadog extension, select the appropriate app, then click Install Extension. The portal asks for confirmation to install the extension. Select OK to begin installation. This restarts your app and adds the following settings:
DD_API_KEY:<DEFAULT_API_KEY>DD_SITE:us3.datadoghq.com
Azure shows the status as Installing until the Agent is installed and provisioned. After the Datadog Agent is installed, the status changes to Installed.
Note: Ensure you are adding the extension to apps with supported runtimes. The Datadog resource does not limit or filter the list of apps.
Uninstall
To uninstall the Datadog extension, select the appropriate app, then click Uninstall Extension.
Settings
Single sign-on
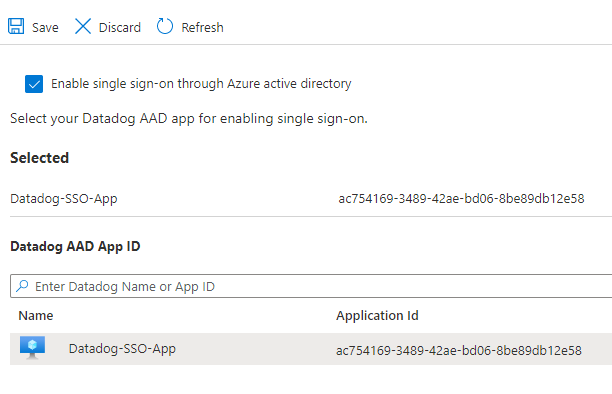
Select Single sign-on in the left sidebar to reconfigure single sign-on.
To activate single sign-on through Microsoft Entra ID, select Enable single sign-on. The portal retrieves the appropriate Datadog application from Microsoft Entra ID. The app name is the enterprise app name you chose when setting up the integration. Select the Datadog application name as shown below.
API keys
Select Keys in the left sidebar to view a list of API keys for your Datadog resource.
The Azure portal provides a read-only view of the API keys. To manage the keys, select the “Datadog portal” link. After making changes in Datadog, refresh the Azure portal view.
The Azure Datadog integration allows you to install the Datadog Agent on a VM or app service. If there is no default key selected, a Datadog Agent installation fails.
Cloud Security Misconfigurations
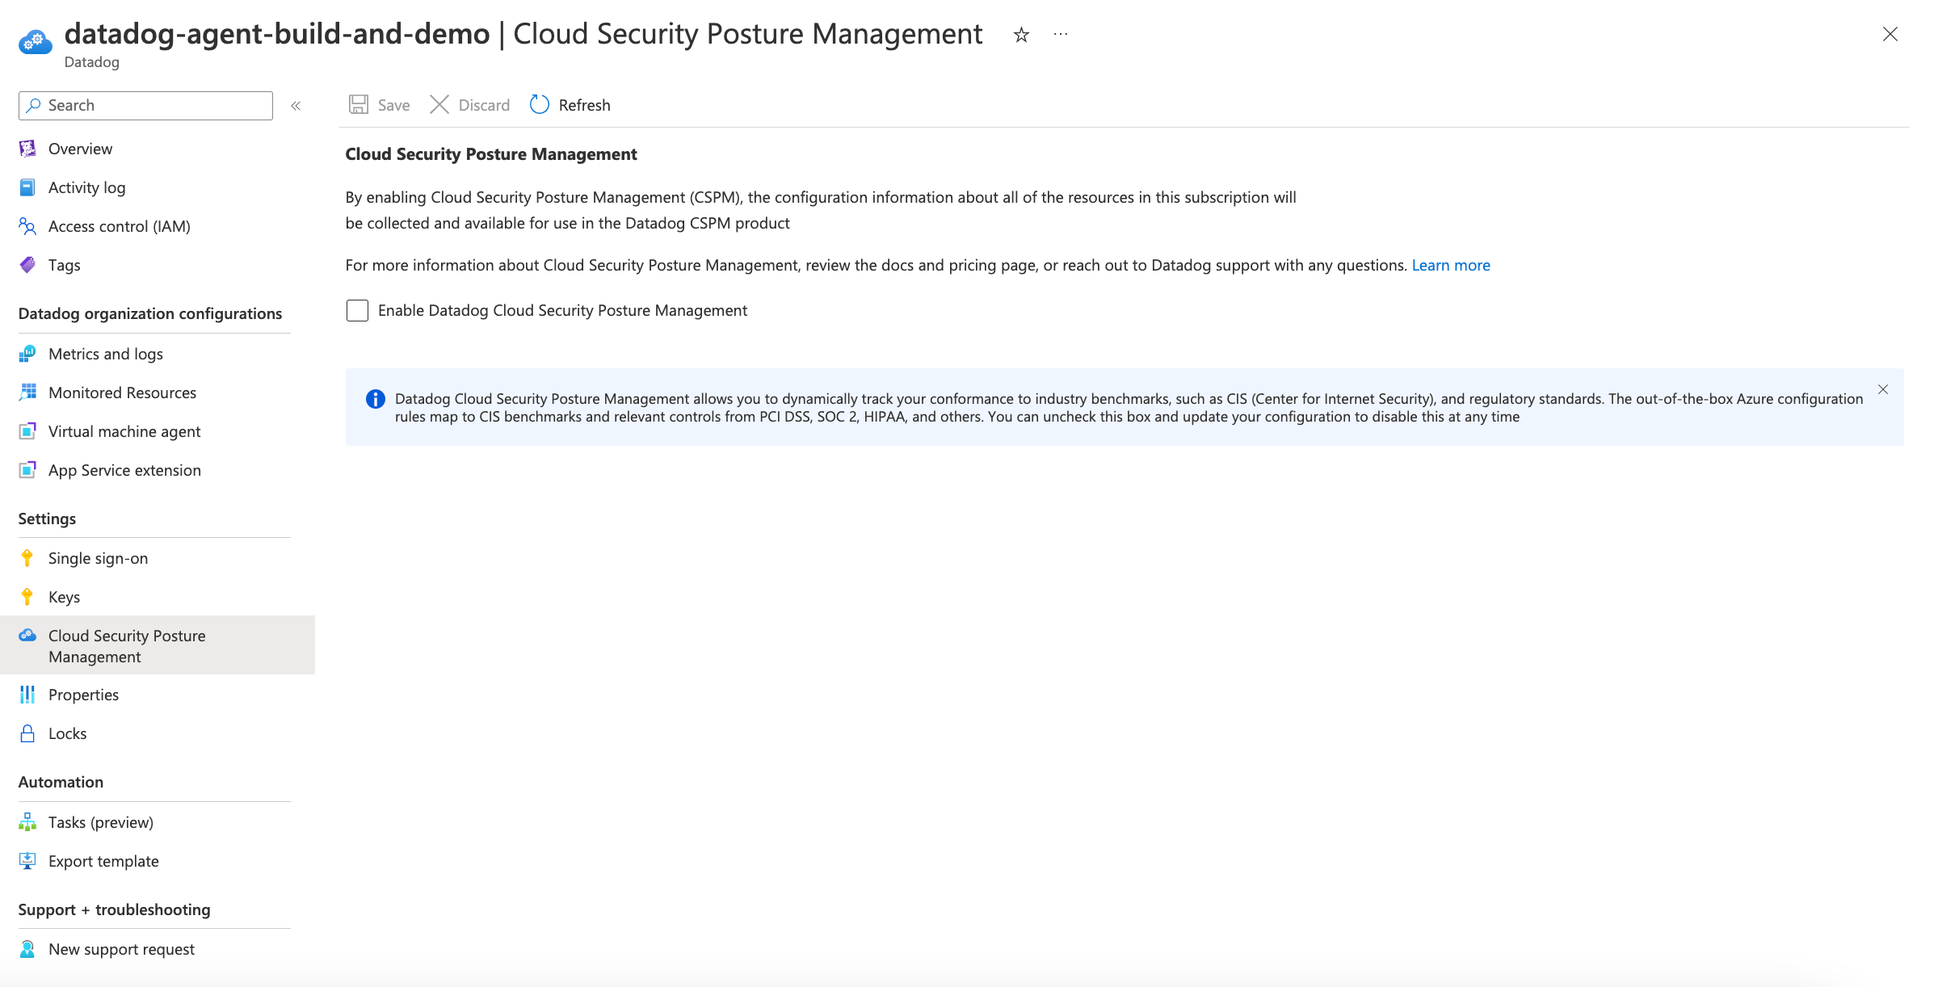
Select Cloud Security Posture Management in the left sidebar to configure Cloud Security Misconfigurations.
By default, Cloud Security Misconfigurations is not enabled. To enable Cloud Security Misconfigurations, select Enable Datadog Cloud Security Posture Management and click Save. This enables Datadog Cloud Security Misconfigurations for any subscriptions associated with the Datadog resource.
To disable, uncheck the box and click Save.
Further Reading
Additional helpful documentation, links, and articles:
