Ce produit n'est pas pris en charge par le site Datadog que vous avez sélectionné. ().
Cette page n'est pas encore disponible en français, sa traduction est en cours. Si vous avez des questions ou des retours sur notre projet de traduction actuel, n'hésitez pas à nous contacter.
Overview
Steps represent individually recorded interactions or assertions that you want to execute in your test. To define a step, click Start Recording and interact with the device as you would normally, or create a step manually by clicking Assertion or Interaction.
Launch a device
To start recording and adding steps, select a device to launch a mobile app test from the dropdown menu and click Launch Device.
Select Show only available devices. Available devices load faster to see the most available devices for shorter testing wait times.
Notifications
Click the green Device Connection Notification button in the Launch a device to start recording modal to enable notifications for when your device is ready and when your device is going to timeout because of inactivity.
Automatically recorded steps
After you click Start Recording, Datadog automatically records any interactions you have with your device and displays them in the step list on the left.
To stop recording, click Stop Recording.
Manually added steps
In addition to automatically creating steps by interacting directly with your device, you can manually create steps (using the element inspector, assertions, and interactions). You can also update steps by clicking into a previously recorded step or reorder steps by dragging them up and down the step list.
Element Inspector
The Element Inspector allows you to visualize the element hierarchy, copy attributes, and target elements to generate interaction steps using XML.
You can use this feature by going to the test recorder, launching a device, and clicking the Element Inspector button. Use the Element Inspector to:
Visualize the element tree: View the complete hierarchy of elements in your application for a clear, structured overview.
Copy attributes: Copy attributes like element name or XPATH values directly from the inspector.
Target elements: Generate steps such as tap or scroll by selecting the element within the element tree.
Assertion
Assertions allow you to validate the content displayed (or not displayed) within a particular section of your test flow.
To create a step, select an assertion type:
Test an element’s content
Create this assertion step to have your mobile app test select a page element and check if it contains a specific value.
Test that some text is present on the active screen
Create this assertion step to have your mobile app test confirm that the text you specified in the Value field is present on the current page being recorded.
Test that some text is not present on the active screen
Create this assertion step to have your mobile app test confirm that the text you specified in the Value field is not present on the current page being recorded.
Interaction
In addition to automatically recording steps based on your device assertions, you can also manually create steps by clicking Interaction.
Double tap
Interacting with elements with a double tap on your mobile application records a step.
Rotate device
Add a name to the step and select Portrait or Landscape mode.
Scroll
Mobile app tests automatically scroll to the elements that need to be interacted with. In most cases, you do not need to add a scroll step manually. Use the scroll step when you need to trigger an additional interaction, such as an infinite scroll.
Specify the number of pixels you want the mobile app test to scroll vertically and horizontally.
By default, the Scroll step scrolls through the entire page. If you need to scroll on a specific element (for example, a specific <div>), click Starting Element and select an element you want the mobile app test to scroll on.
Scroll to element
This action allows you to scroll to a specific element horizontally or vertically.
Tap
Interacting with elements with a tap on your mobile application records a step.
Type text
Interacting with a text input field on your mobile application, adding a name, and setting a value records a step.
To see all available variables on manually added steps, type {{ in the input field.
To use a variable on automatically recorded steps, add a step name and specify the variable value to input the variable value while recording.
Press back
Interacting with the Back button below the mobile application records a step. Available on Android only.
Extract variable from element
This action allows you to extract the value of an element and save it as a variable.
Open deep link
Add a name to the step and enter a deep link URI.
Restart application
This action allows you to restart your application.
This action does not reinstall the application but instead closes and then launches the application again.
Wait
If you know that a page or page element takes more than 60 seconds to load, you can add a wait step with a max value of 300 seconds.
By default, mobile app tests wait for a page to be fully loaded before performing a step or the next step with a timeout of 60 seconds. This additional time is systematically added to every run of your mobile app test’s recording.
Toggle Wi-Fi
This action allows you to enable or disable Wi-Fi within your test to monitor how your application performs with or without internet access.
HTTP requests
You can run HTTP requests, add assertions, and extract variables as part of your Mobile app tests. If you are using restrictive networks, ensure the required IP address ranges are added to your allowlist to enable HTTP steps to run in your Synthetic Monitoring Mobile tests.
Note: You can copy an HTTP step from a Synthetic Monitoring Mobile test and re-use it into a Synthetic Monitoring Browser test. However, copying steps from a Browser test to a Mobile test is not supported.
To define your HTTP request:
Enter the URL you wish to test.
Optionally, specify Advanced Options:
Follow redirects: Select this option to have your HTTP test follow up to ten redirects when performing the request.
Ignore server certificate error: Select this option to have your HTTP test go on with connection even if there are errors when validating the SSL certificate.
Request headers: Define headers to add to your HTTP request. You can also override the default headers (for example, the user-agent header).
Cookies: Define cookies to add to your HTTP request. Set multiple cookies using the format <COOKIE_NAME1>=<COOKIE_VALUE1>; <COOKIE_NAME2>=<COOKIE_VALUE2>.
Client certificate: Authenticate through mTLS by uploading your client certificate and the associated private key.
AWS Signature: Add AWS Access Key ID and Secret Access Key.
NTLM: Add NTLM authentication credentials. Support both NTLMv2 and NTLMv1.
OAuth 2.0: Select a Grant Type (Client credentials, or Resource owner password).
Encode parameters: Add the name and value of query parameters that require encoding.
Body type: Select the type of the request body (text/plain, application/json, text/xml, text/html, application/x-www-form-urlencoded, GraphQL, or None) you want to add to your HTTP request.
Request body: Add the content of your HTTP request body. The request body is limited to a maximum size of 50 KB.
Proxy URL: Specify the URL of the proxy the HTTP request should go through (http://<YOUR_USER>:<YOUR_PWD>@<YOUR_IP>:<YOUR_PORT>).
Proxy Header: Add headers to include in the HTTP request to the proxy.
Do not save response body: Select this option to prevent the response body from being saved at runtime. This helps ensure no sensitive data is displayed in your test results, but it can make failure troubleshooting more difficult. For full security recommendations, see Synthetic Monitoring Data Security.
Click Send to try out the request configuration. A response preview appears.
Add assertions
Assertions define what an expected test result is. After you click Send, basic assertions on status code, response time, and headercontent-type are added based on the test response. Assertions are optional for HTTP steps in Mobile app tests.
Type
Operator
Value type
body
contains, does not contain, is, is not, matches, does not match, jsonpath, xpath
HTTP requests can decompress bodies with the following content-encoding headers: br, deflate, gzip, and identity.
If a test does not contain an assertion on the response body, the body payload drops and returns an associated response time for the request within the timeout limit set by the Synthetics Worker.
If a test contains an assertion on the response body and the timeout limit is reached, an Assertions on the body/response cannot be run beyond this limit error appears.
You can create up to 20 assertions per step by clicking New Assertion or by clicking directly on the response preview.
Extract a variable from the response
Optionally, extract a variable from the response of your HTTP request by parsing its response headers or body. The value of the variable updates each time the HTTP request step runs. Once created, this variable can be used in the following steps of your browser test.
To start parsing a variable, click Extract a variable from response content:
Enter a Variable Name. Your variable name can only use uppercase letters, numbers, and underscores and must have at least three characters.
Decide whether to extract your variable from the response headers or the response body.
Extract the value from response header: use the full response header of your HTTP request as the variable value or parse it with regex.
Extract the value from response body: use the full response body of your HTTP request as the variable value or parse it with regex, JSONPath, or XPath.
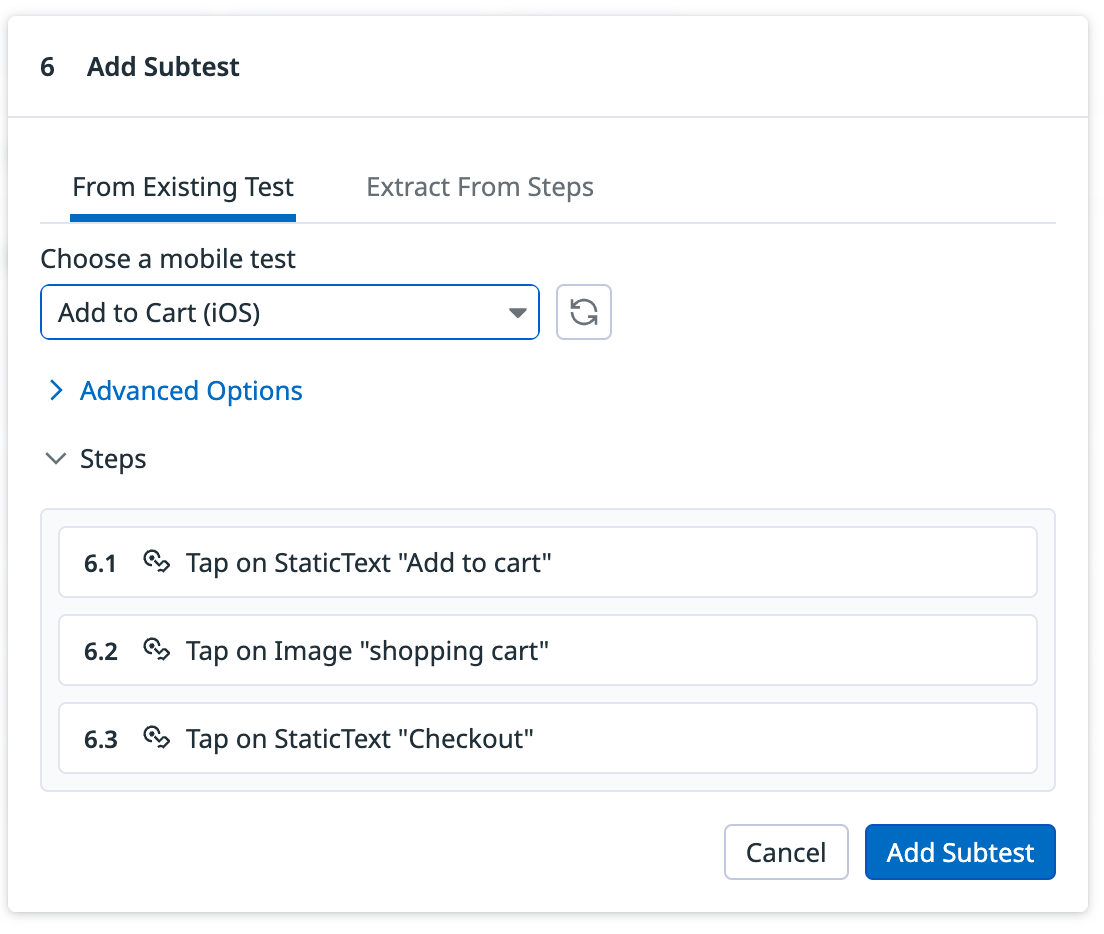
You can run mobile app tests within other mobile app tests to reuse existing workflows up to two levels of nesting.
To use an existing mobile app test as a subtest, click Subtest, select a mobile app test from the dropdown menu, and click Add Subtest.
In order to override variables from subtests in parent tests, ensure the variables created at the parent test level have the same names as the variables present in the subtest. A variable always uses the value that was first assigned to it.
If it does not make sense for you to run your subtest independently, you can pause it. The test continues to be called as part of your parent test, and is not executed individually. For more information, see Reusing Browser Test Journeys Across Your Test Suite.
Step preview
When adding subtests to your mobile tests, click the steps dropdown to show a preview of each step within the subtest:
After adding the subtest to your mobile test, click the subtest to view another preview of each step within the subtest:
Variables
Create local variables
To create a local variable, click + All steps > Variables. You can select one of the following available builtins to add to your variable string:
{{ numeric(n) }}
Generates a numeric string with n digits.
{{ alphabetic(n) }}
Generates an alphabetic string with n letters.
{{ alphanumeric(n) }}
Generates an alphanumeric string with n characters.
{{ date(n unit, format) }}
Generates a date in one of Datadog’s accepted formats with a value corresponding to the UTC date the test is initiated at + or - n units.
{{ timestamp(n, unit) }}
Generates a timestamp in one of Datadog’s accepted units with a value corresponding to the UTC timestamp the test is initiated at +/- n units.
{{ uuid }}
Generates a version 4 universally unique identifier (UUID).
{{ public-id }}
Injects the Public ID of your test.
{{ result-id }}
Injects the Result ID of your test run.
To obfuscate local variable values in test results, select Hide and obfuscate variable value. Once you have defined the variable string, click Add Variable.
Note: When you import a subtest into another test, any variables defined in the subtest are inherited by the main test.
To override these variables, create a variable in your parent test with the name as the variables within your subtest.
Use global variables
You can use the global variables defined in Settings in the Advanced Options of your mobile app test details, as well as in your test recording to define local variables. To view a list of available variables, type {{ in the desired field.
Make sure to define the variables you want to use in the user journey before you start recording.
You can inject available variables directly into the test steps while recording.
Manage step order
Instead of manually reordering new steps by dragging and dropping individual steps, you can set a cursor on a test step at a particular stage in your recording and insert additional steps.
Hover between two recorded test steps and click Add Steps here. A blue line appears above your test step.