Cisco Secure Client Overview
Cisco Secure Client Overview
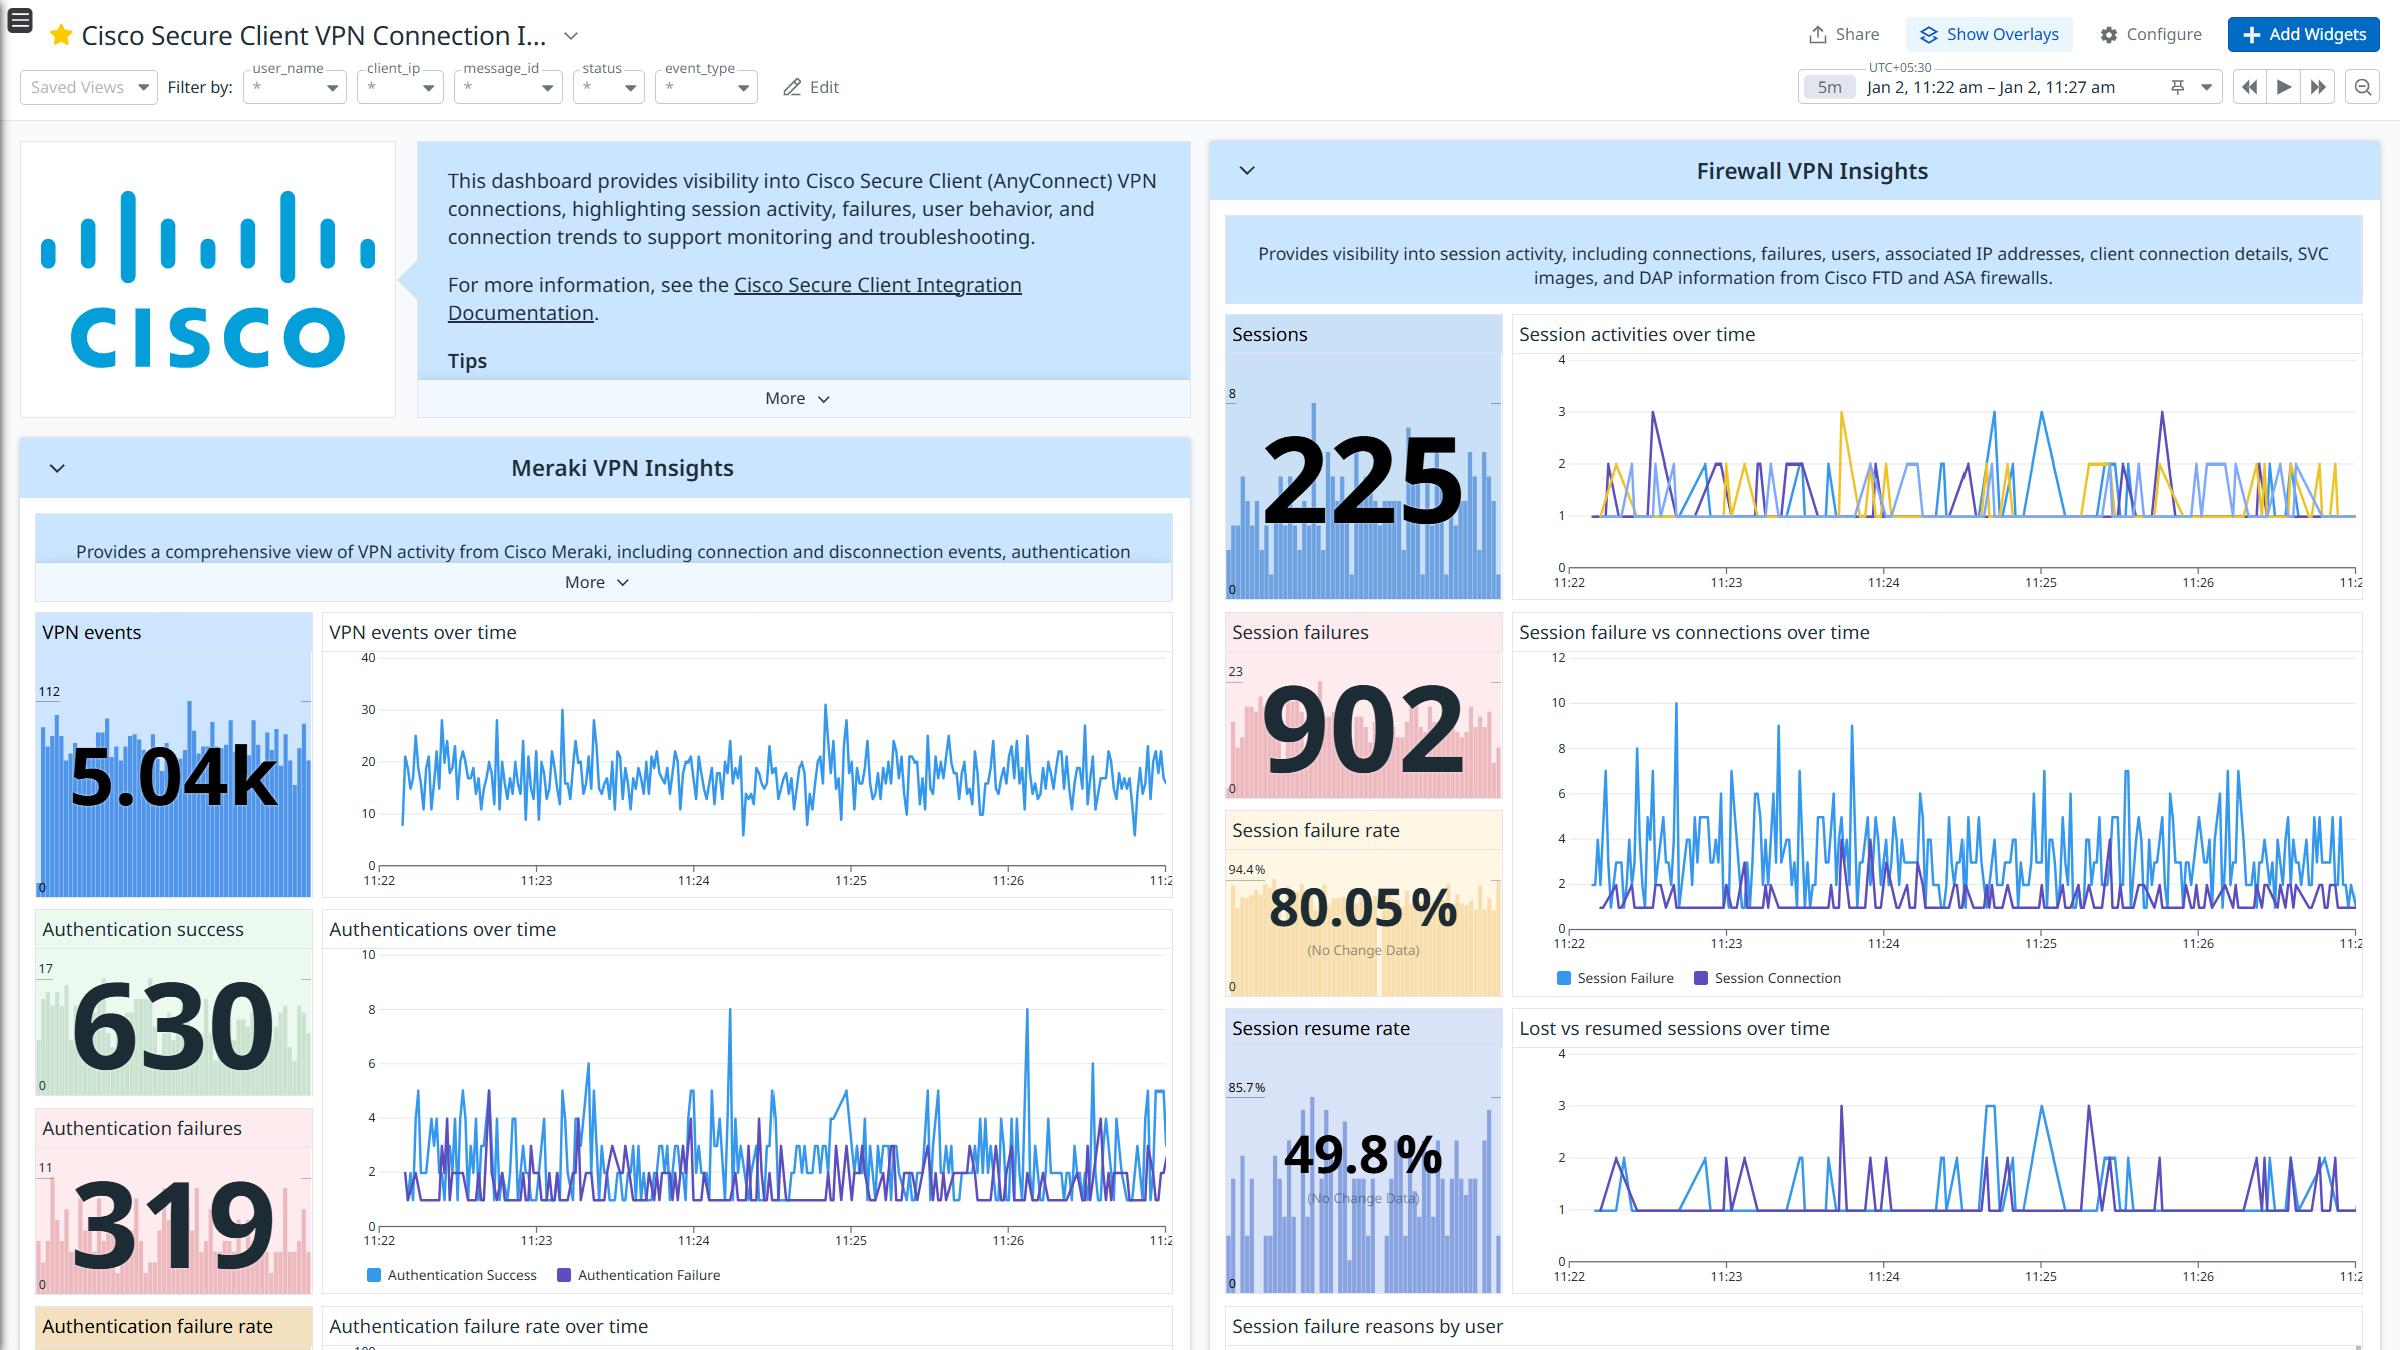
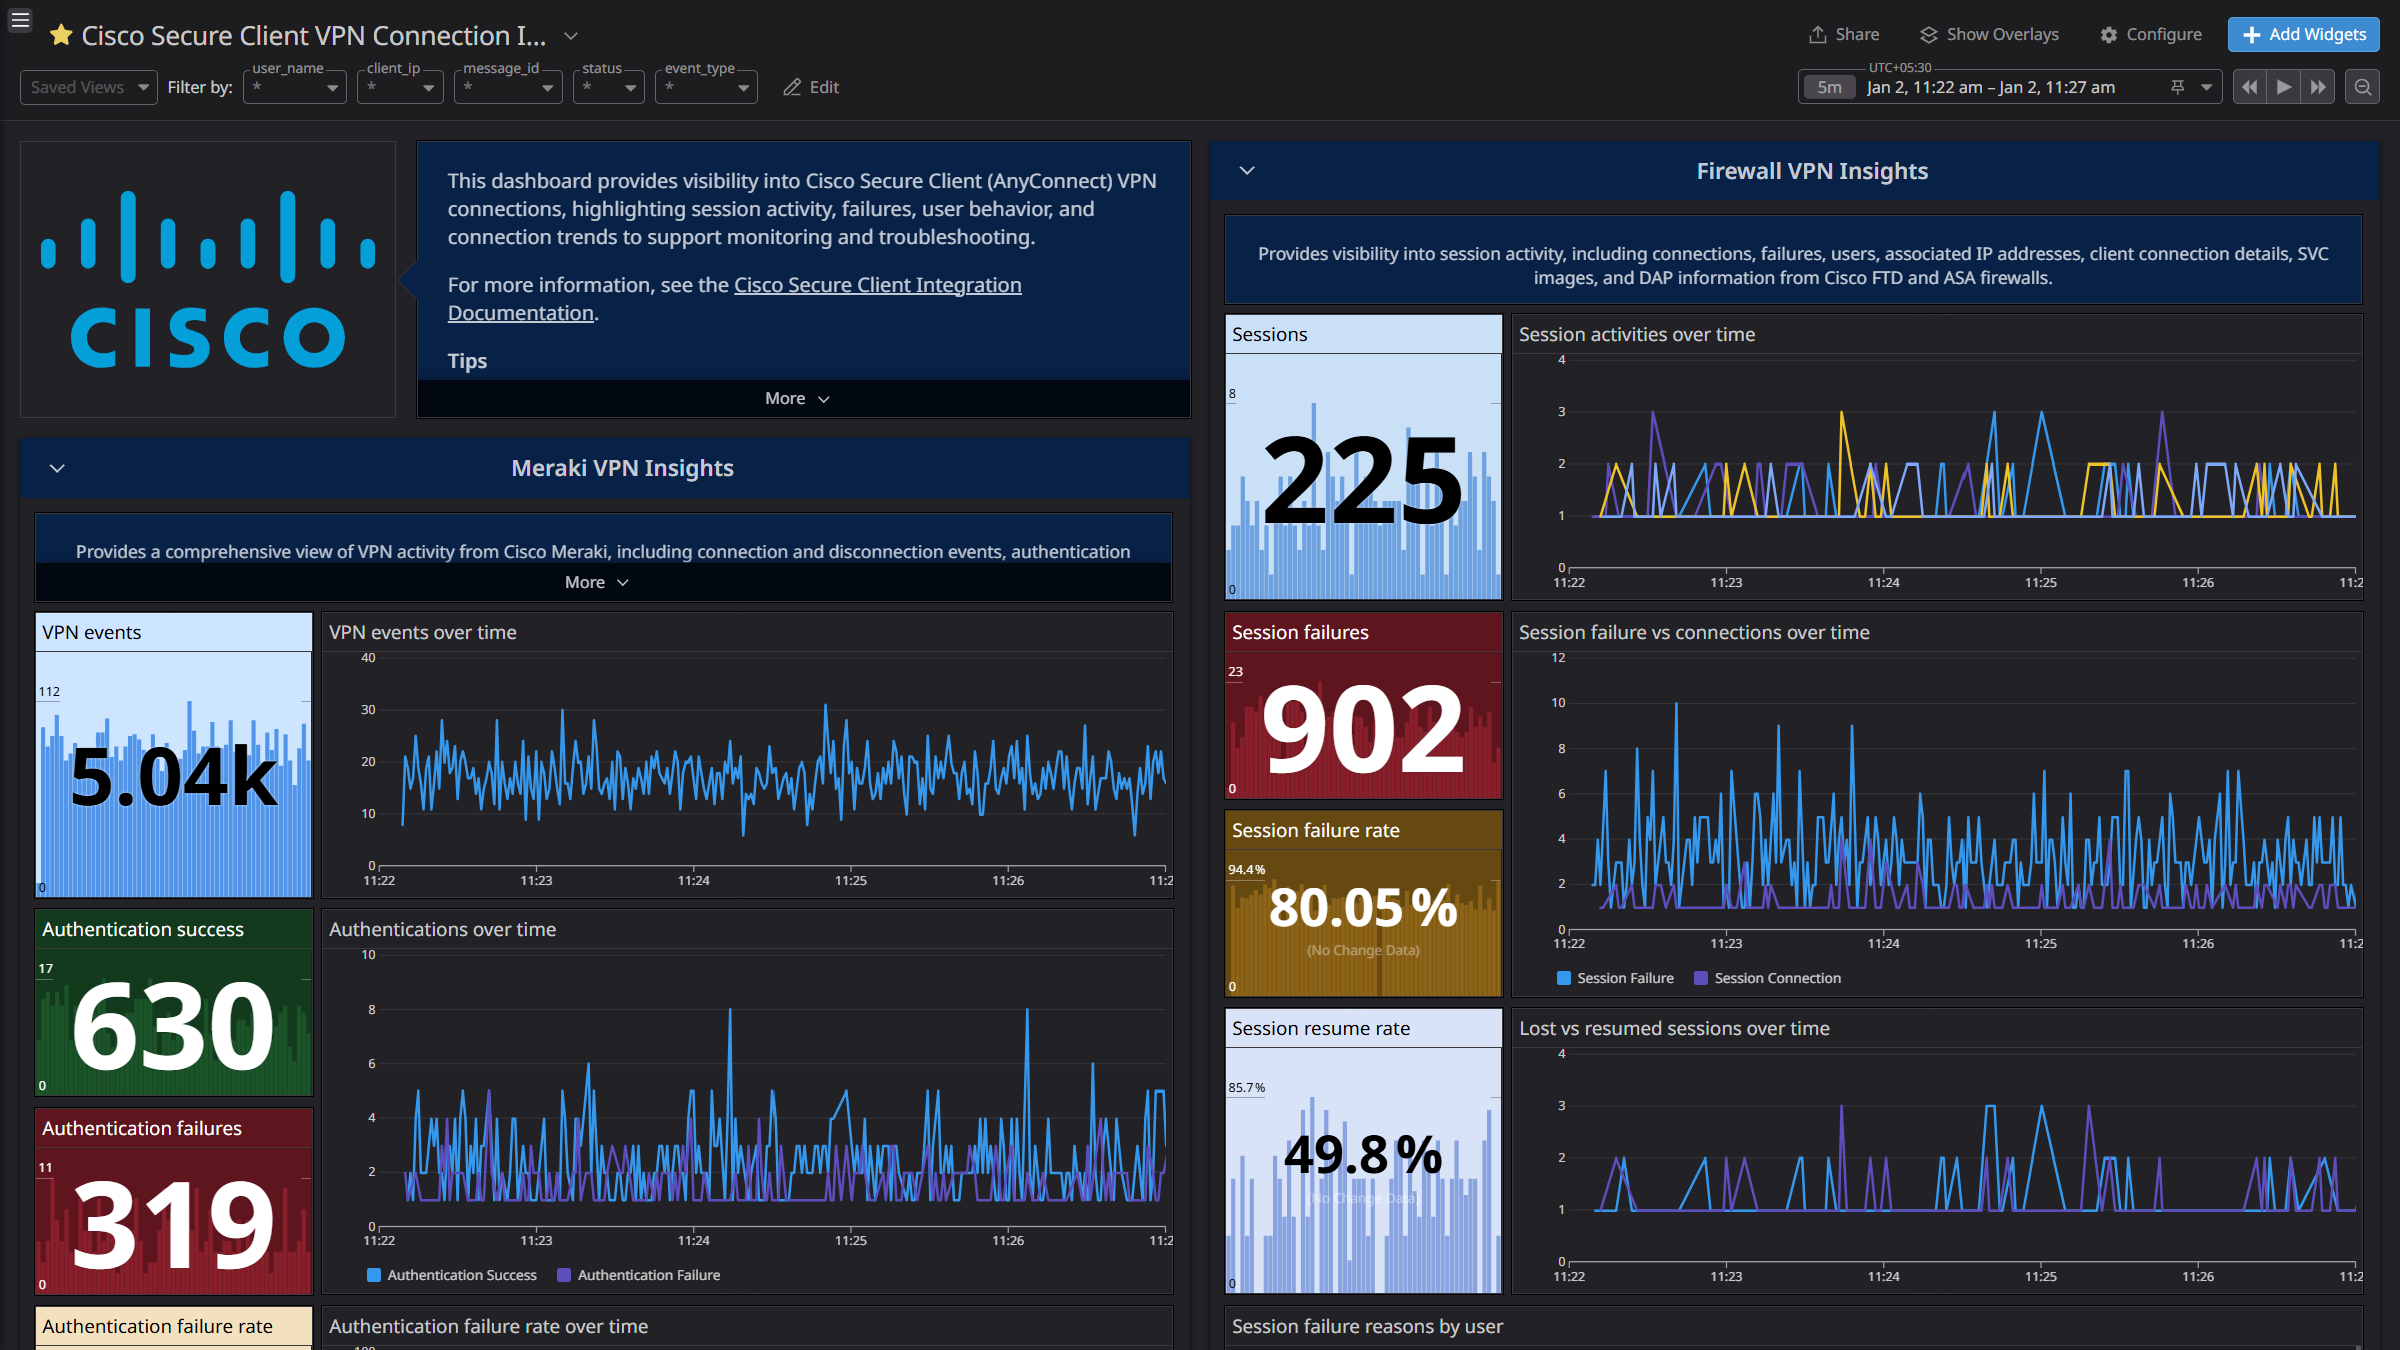
Cisco Secure Client VPN Connection Insights
Cisco Secure Client VPN Connection Insights
Cisco Secure Client VPN Connection Insights
Cisco Secure Client VPN Connection Insights
Cette page n'est pas encore disponible en français, sa traduction est en cours.
Si vous avez des questions ou des retours sur notre projet de traduction actuel,
n'hésitez pas à nous contacter.
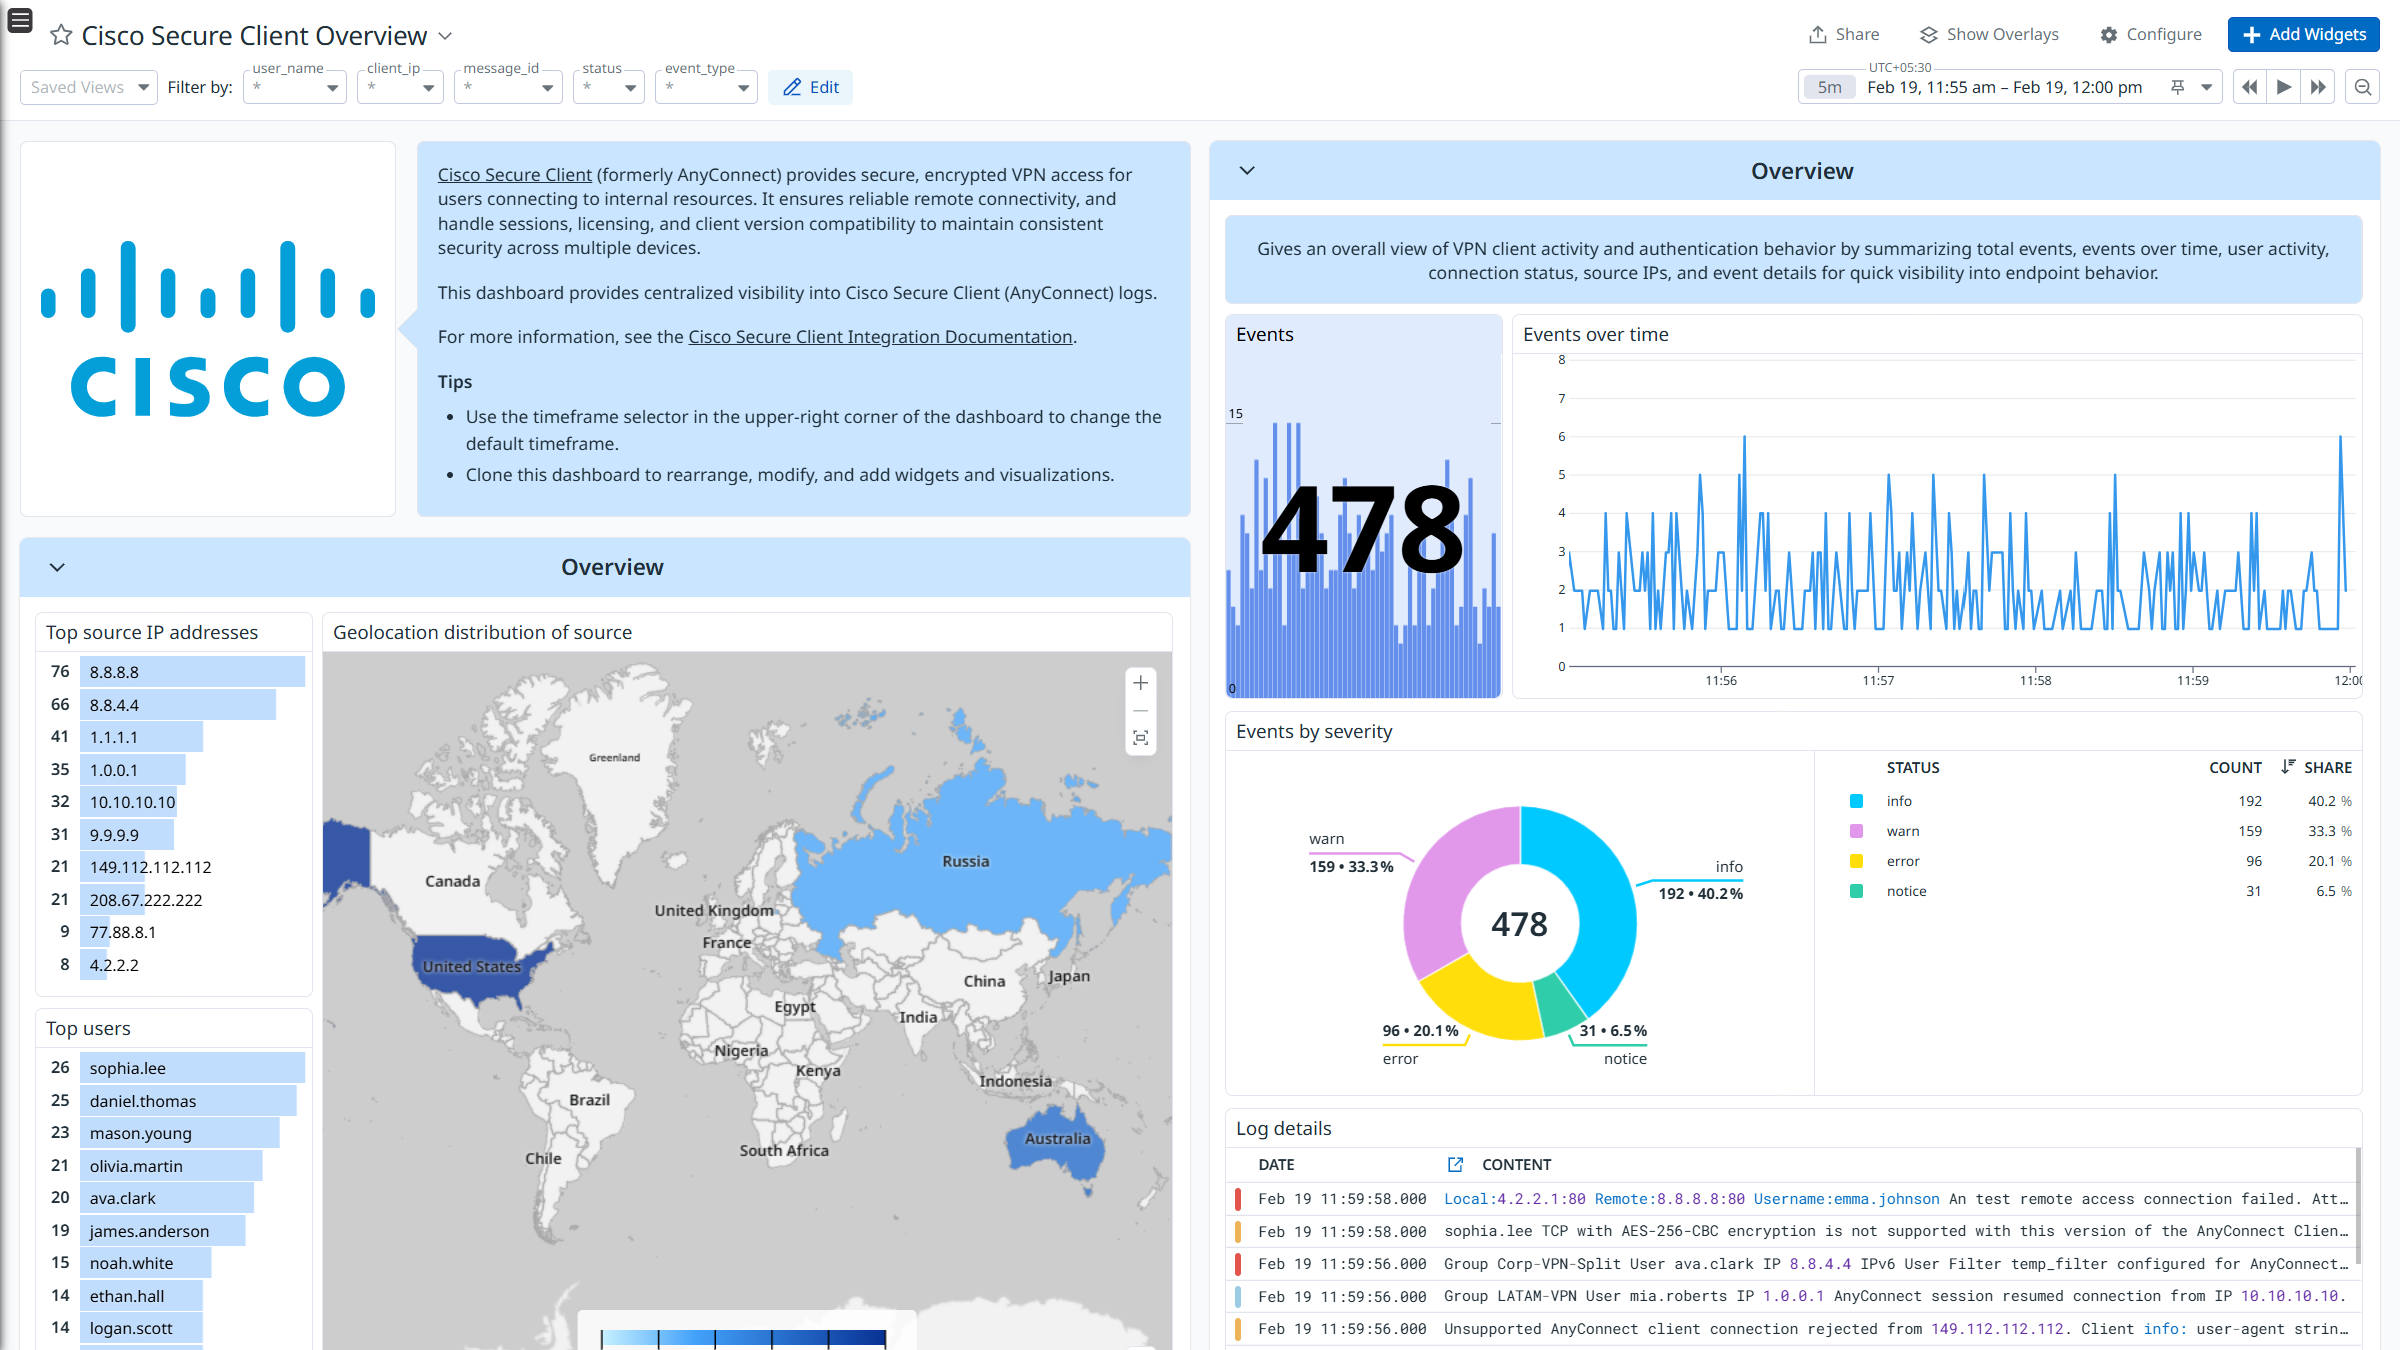
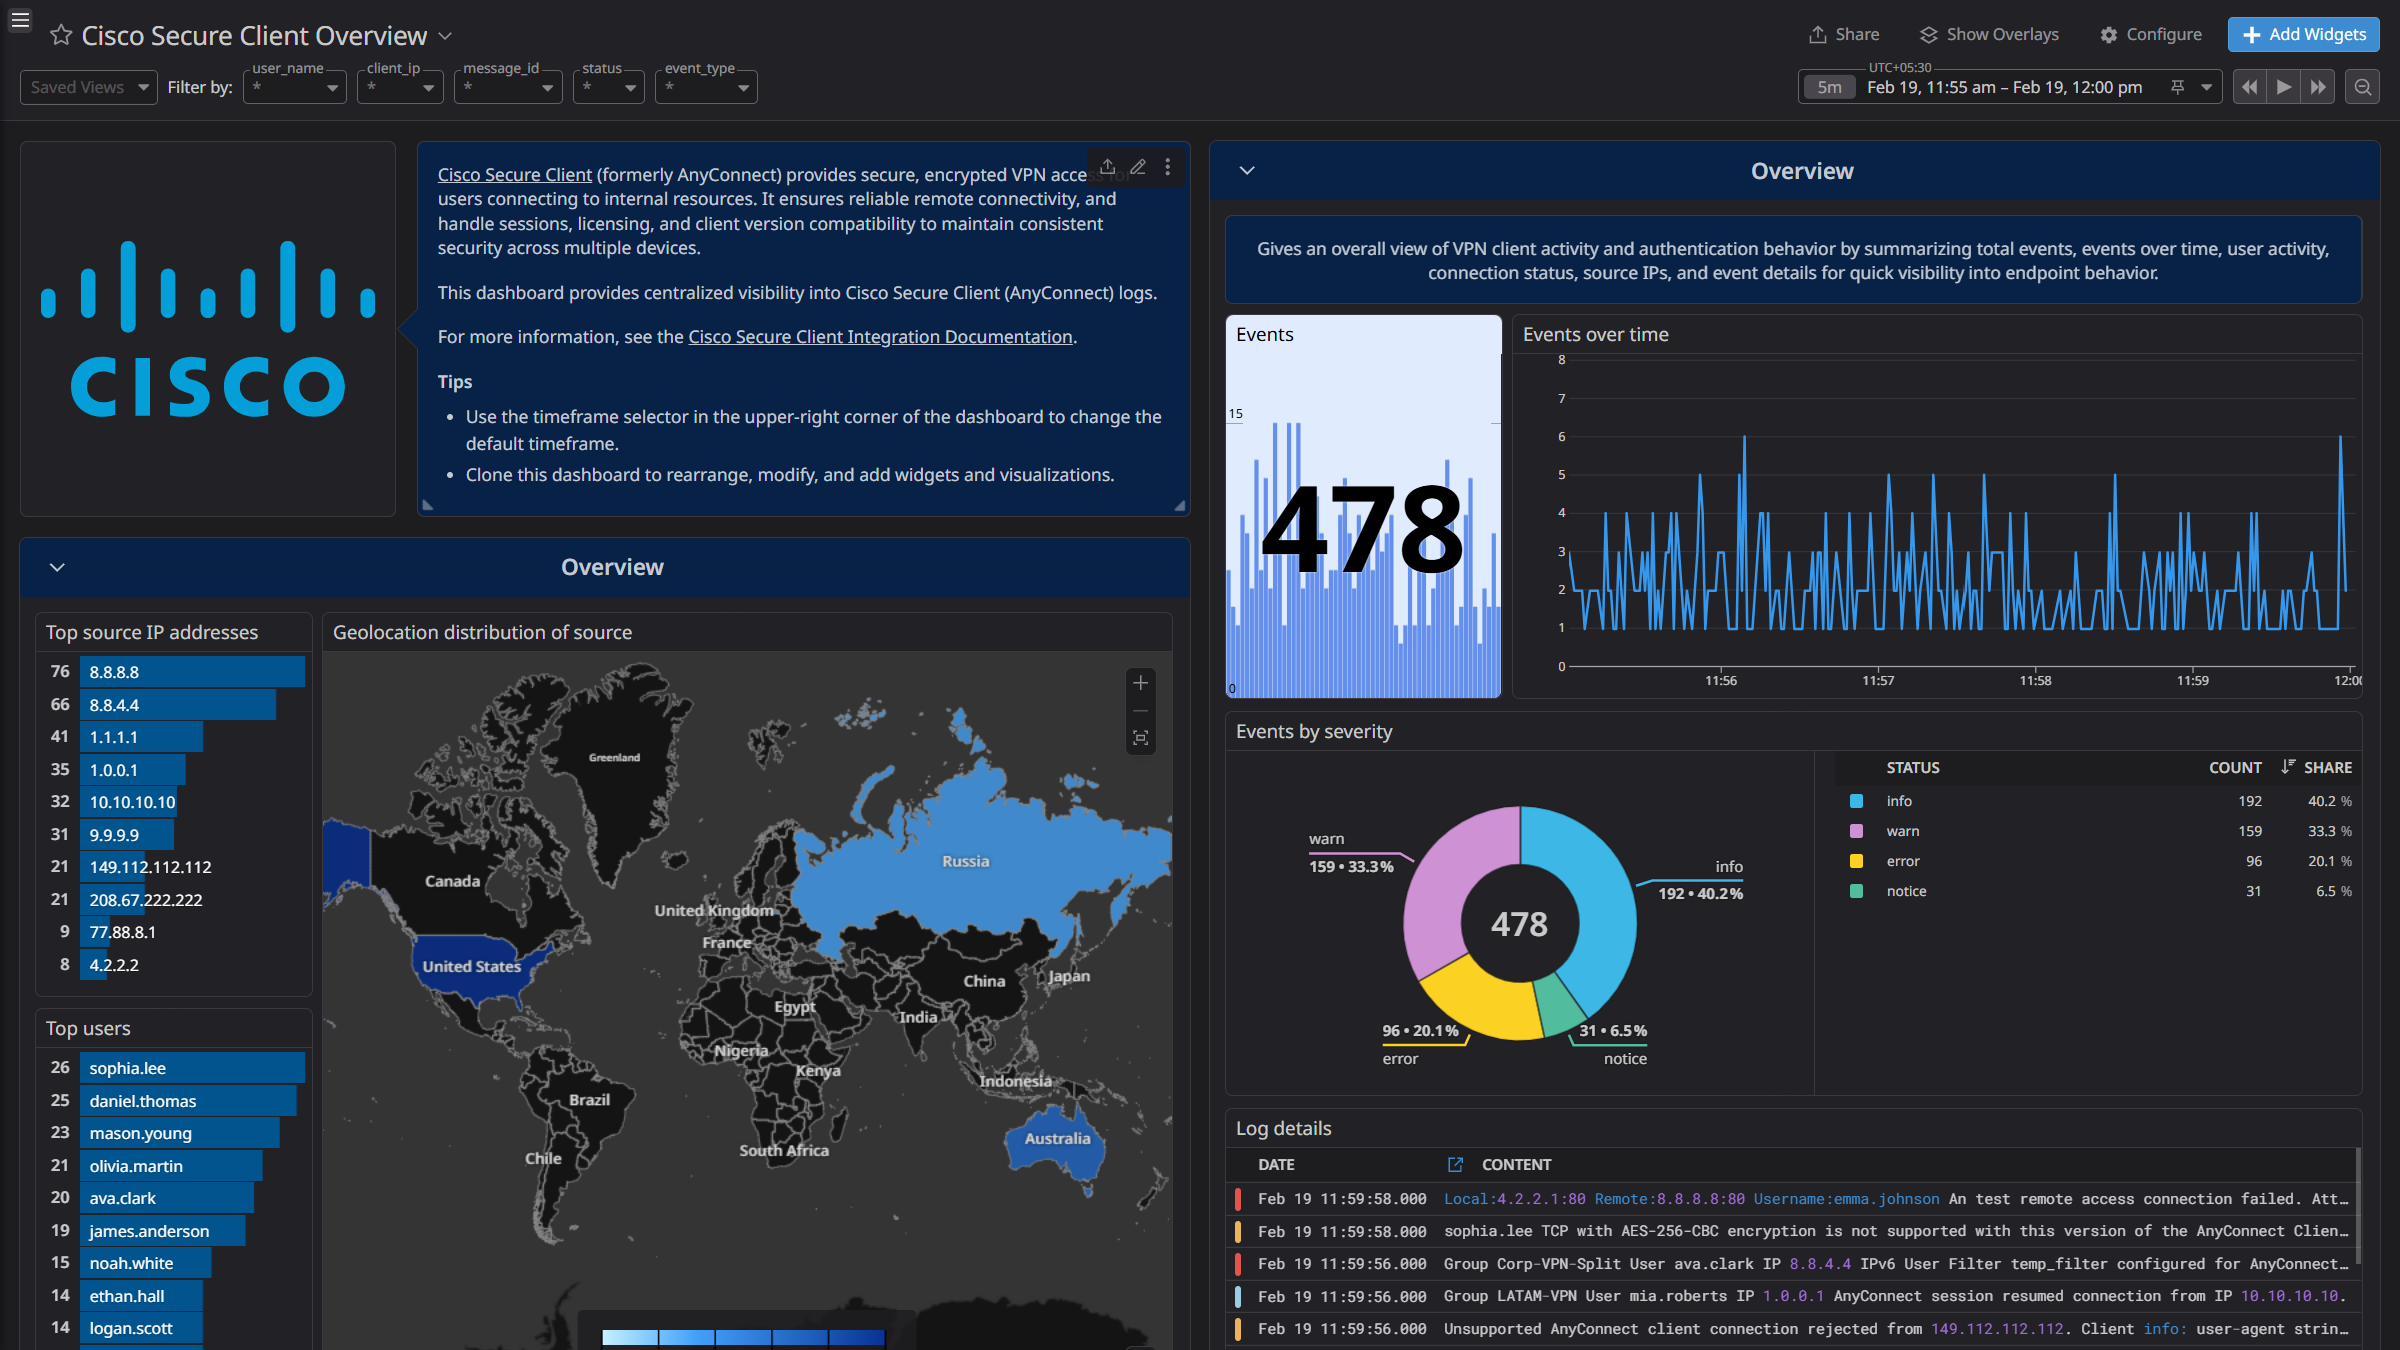
Overview
Cisco Secure Client (formerly AnyConnect) provides secure, encrypted VPN access for users connecting to internal resources. It ensures reliable remote connectivity, and handles sessions, licensing, and client version compatibility to maintain consistent security across multiple devices.
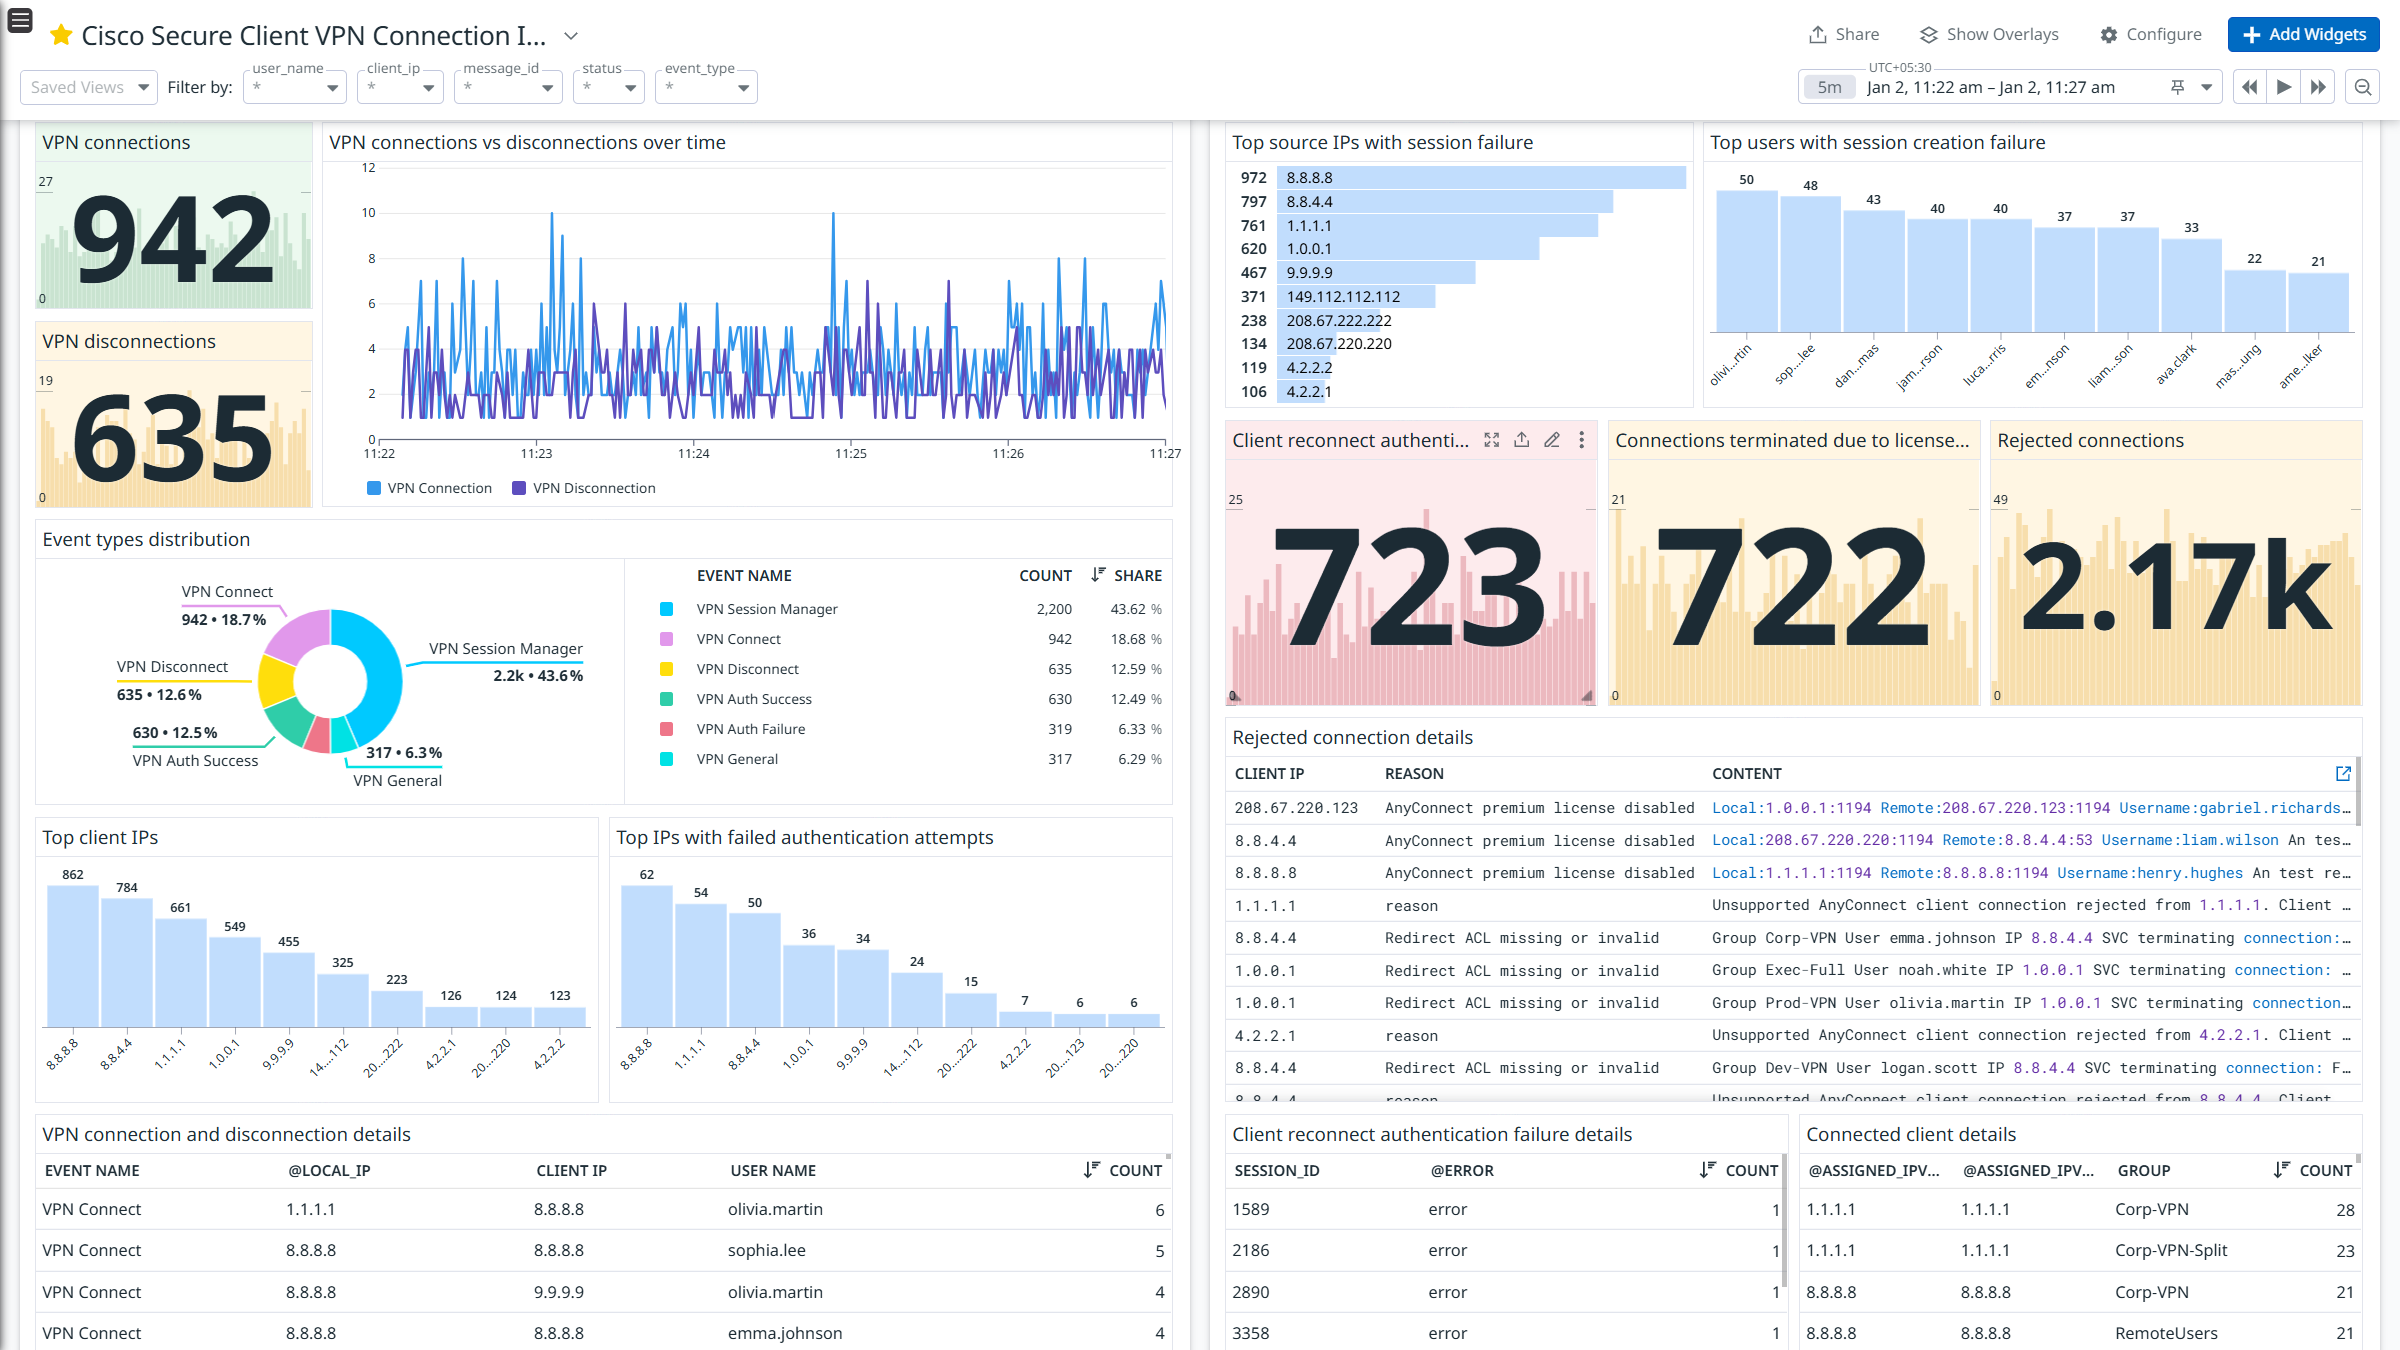
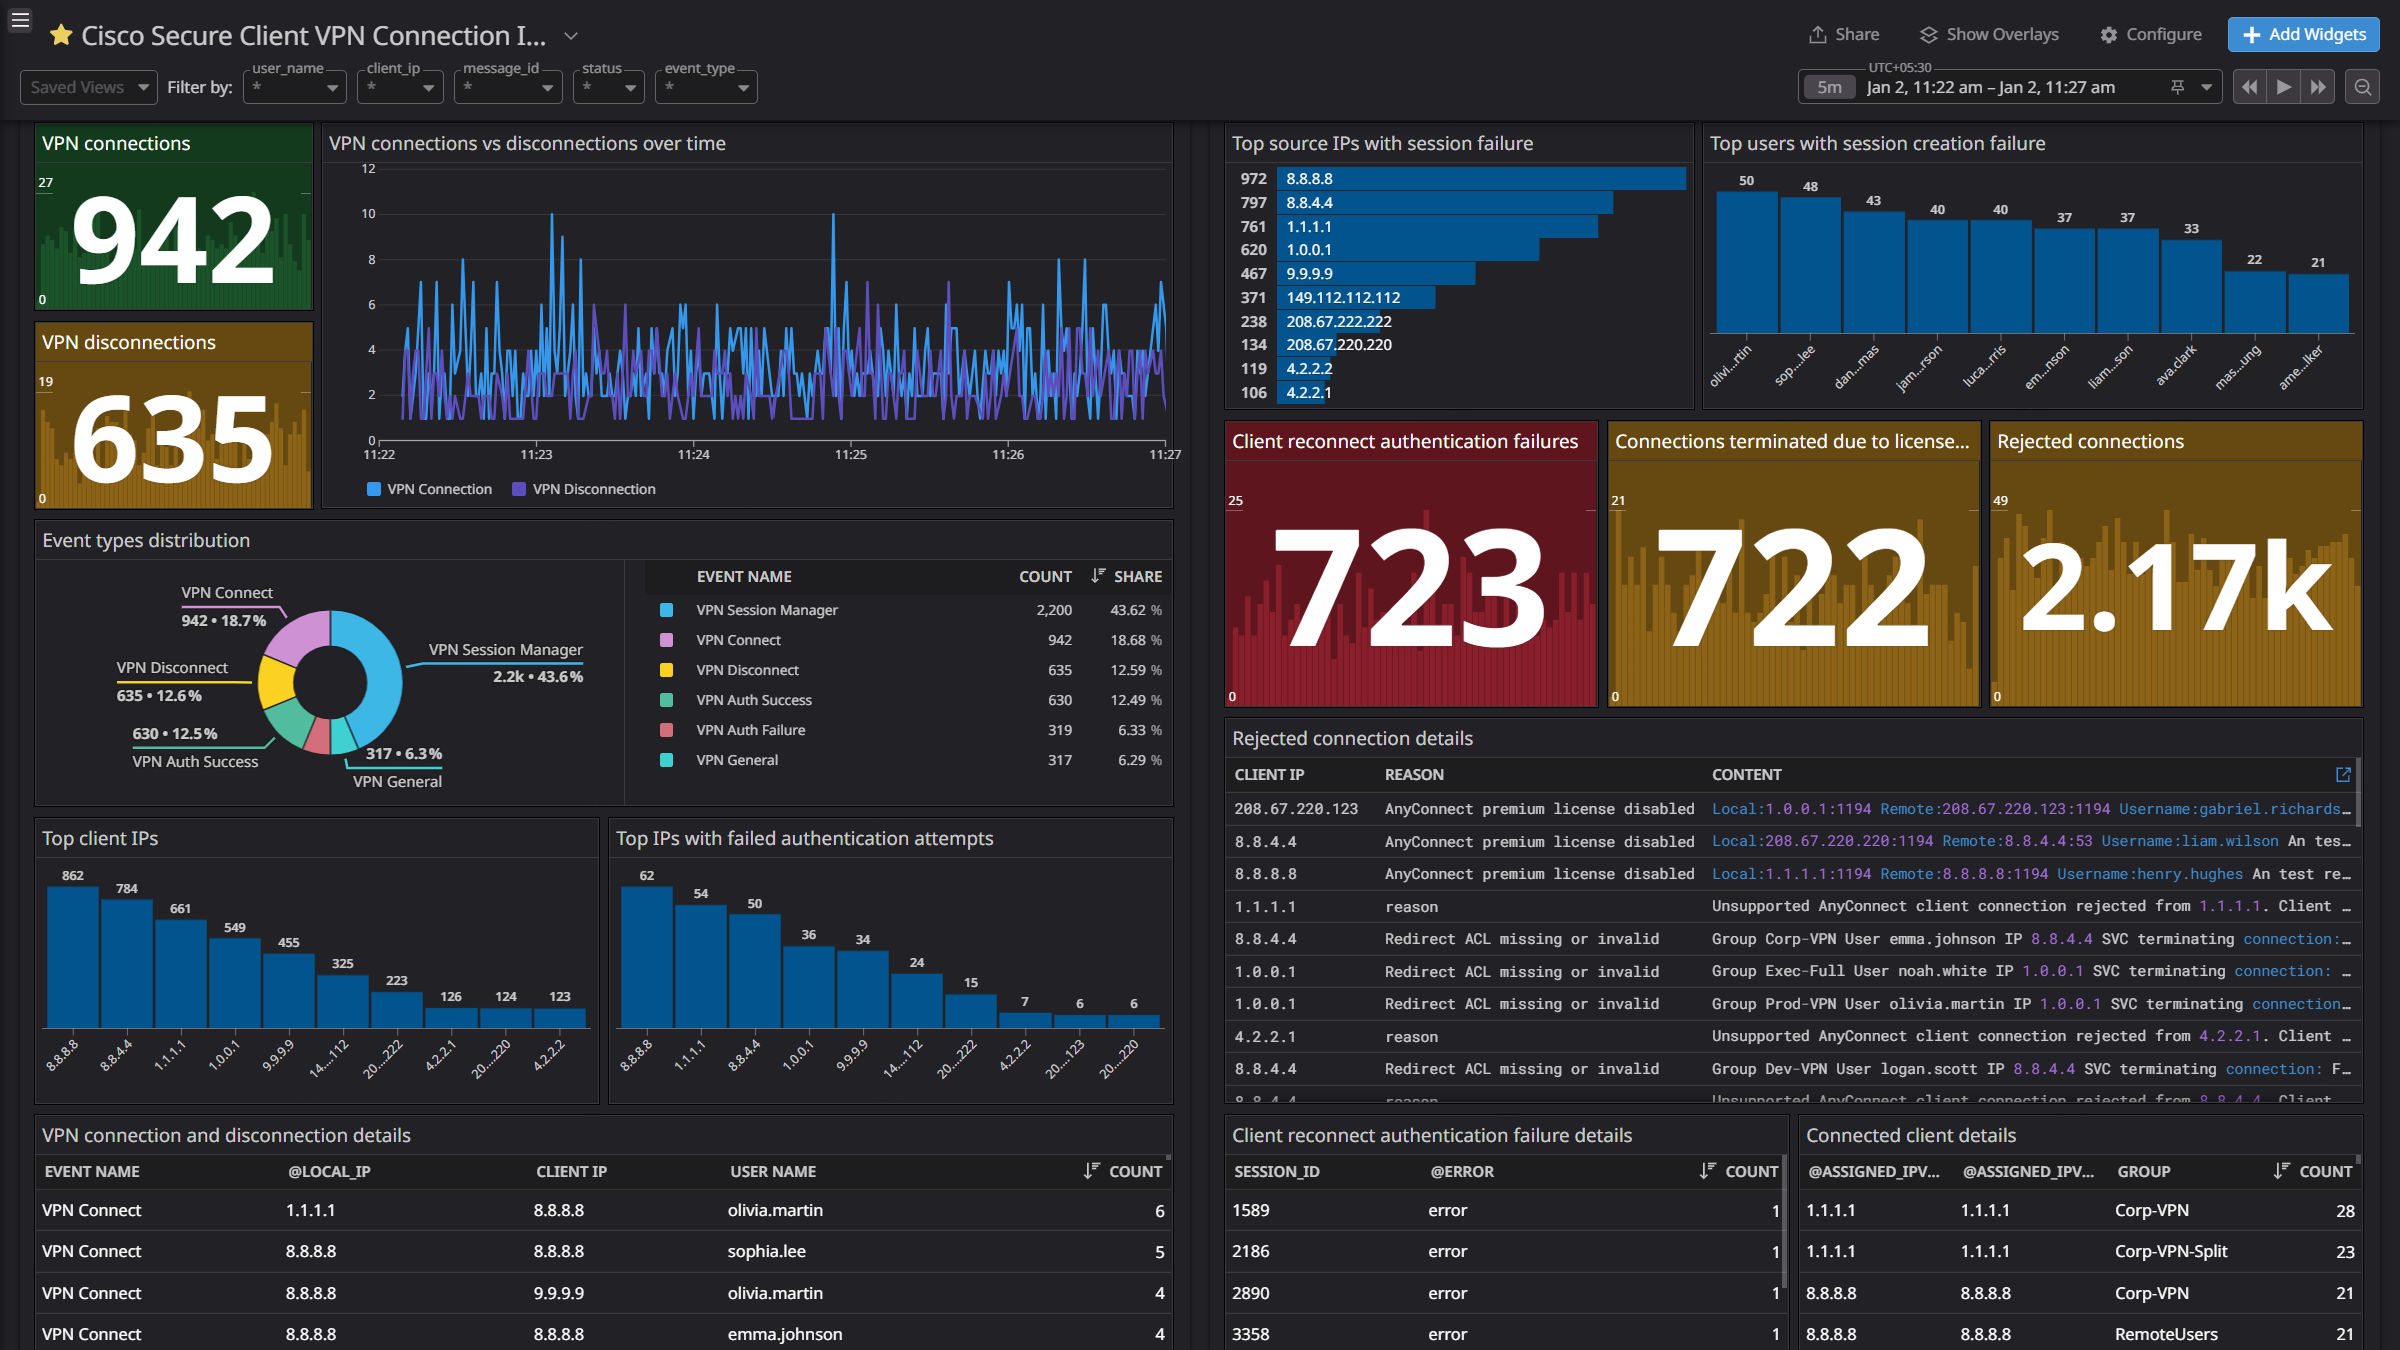
Integrate Cisco Secure Client with Datadog to gain insights into AnyConnect logs using pre-built dashboard visualizations. Datadog uses its built-in log pipelines to parse and enrich these logs, facilitating easy search and detailed insights. The integration can also be used for Cloud SIEM detection rules for enhanced monitoring and security.
Minimum Agent version: 7.77.0
Disclaimer: Your use of this integration, which may collect data that includes personal information, is subject to your agreements with Datadog. Cisco is not responsible for the privacy, security or integrity of any end-user information, including personal data, transmitted through your use of the integration.
Setup
Configuration
Enable log collection
Collecting logs is disabled by default in the Datadog Agent. Enable it in the datadog.yaml file with:
Add the following configuration block to your cisco_secure_client.d/conf.yaml file to start collecting your Cisco Secure Client logs:
logs:
  - type: tcp # or udp
    port: <PORT>
    service: cisco-secure-client
    source: cisco-secure-client
    log_processing_rules:
     - type: include_at_match
       name: include_anyconnect_logs
       pattern: .*(AnyConnect|anyconnect|113038|113039|734001|751025|722053|722054).*
See the sample cisco_secure_client.d/conf.yaml for available configuration options.
Note: Do not change the source and service values, as these parameters are integral to the pipeline’s operation.
Restart the Agent.
Note: To forward Cisco Secure Client logs, you must configure syslog on the Cisco firewall platform that you’re using with Cisco Secure Client (FTD, Meraki, or ASA; see below for instructions for each platform).
- Connect to the Cisco Firewall Management Center (FMC) platform.
- Select Devices > Platform Settings and create or edit an FTD policy.
- Select Syslog > Logging Setup.
- Check the Enable Logging checkbox.
- Click Save.
- Select Syslog > Syslog Settings.
- Check the Enable Timestamp on Syslog Messages checkbox.
- Select RFC 5424 (yyyy-MM-ddTHH:mm:ssZ) from the Timestamp Format dropdown list.
- Click Save.
- Select Syslog > Syslog Server.
Check the Allow user traffic to pass when TCP syslog server is down checkbox.
Click Add to add a new syslog server:
- IP Address: In the dropdown menu, select a network object that contains the IP address of the syslog server. If a network object is not created, click on the plus (+) to create a new network object.
- Protocol: Click on either TCP or UDP protocol for syslog communication.
- Port: Enter the port number on which the Datadog Agent is listening.
- Available Zones: From the Available Zones list, click on the interface or zone where the syslog server is reachable, then click Add to move it to the Selected Zones/Interfaces column.
Click OK, then click Save.
- Go to Deploy > Deployment and deploy the policy to assigned devices. The changes are not active until you deploy them.
Note: The Port value should be similar to the port provided in the Log Collection section.
- Log in to Cisco Meraki.
- Navigate to Network-wide > Configure > General.
- Navigate to Reporting > Syslog Servers.
- Click on Add a syslog server.
- Set the following configuration parameters:
- Server Address: IP address of the syslog server
- Port: port on which the syslog server is listening
- Protocol: select TCP or UDP from the dropdown
- Roles: select Appliance Event Log from the dropdown
- Click Update syslog servers to save the configuration.
Note: The Port value should be similar to the port provided in the Log Collection section.
Connect to the Cisco ASA CLI.
Enter the privileged EXEC mode by running the following; enter the password when prompted:
Enable global configuration mode:
Enable logging:
Configure syslog log forwarding, replacing the placeholders with the relevant values:
<interface_name>: the interface that the syslog server is associated with<ip_address>: the IP address of the syslog server<port>: the port where the syslog server is listening
For UDP:
logging host <interface_name> <ip_address> udp/<port>
For TCP:
logging host <interface_name> <ip_address> tcp/<port>
Set the logging level to debug:
Enable rfc5424 timestamp format in syslog:
logging timestamp rfc5424
Note: The port value should be similar to the port provided in the Log Collection section.
Validation
Run the Agent’s status subcommand and look for cisco_secure_client under the Logs Agent section.
Data Collected
Log Collection
The Cisco Secure Client integration collects AnyConnect logs.
Metrics
The Cisco Secure Client integration does not include any metrics.
Events
The Cisco Secure Client integration does not include any events.
Troubleshooting
Permission denied while port binding:
Binding to a port number under 1024 requires elevated permissions. If you see a Permission denied error while port binding in the Agent logs:
Grant access to the port using the setcap command:
sudo setcap CAP_NET_BIND_SERVICE=+ep /opt/datadog-agent/bin/agent/agent
Note: Re-run this setcap command every time you upgrade the Agent.
Verify the setup is correct by running the getcap command:
sudo getcap /opt/datadog-agent/bin/agent/agent
You should see the following output:
/opt/datadog-agent/bin/agent/agent = cap_net_bind_service+ep
Restart the Agent.
Data is not being collected:
Make sure that traffic is bypassed from the configured port if the firewall is enabled.
Port already in use:
On systems using syslog, if the Agent listens for logs on port 514, the following error can appear in the Agent logs: Can't start UDP forwarder on port 514: listen udp :514: bind: address already in use.
By default, syslog listens on port 514. To resolve this error, take one of the following steps:
- Disable syslog, or
- Configure the Agent to listen on a different, available port.
Need help? Contact Datadog support.