- Principales informations
- Getting Started
- Agent
- API
- Tracing
- Conteneurs
- Dashboards
- Database Monitoring
- Datadog
- Site Datadog
- DevSecOps
- Incident Management
- Intégrations
- Internal Developer Portal
- Logs
- Monitors
- OpenTelemetry
- Profileur
- Session Replay
- Security
- Serverless for AWS Lambda
- Software Delivery
- Surveillance Synthetic
- Tags
- Workflow Automation
- Learning Center
- Support
- Glossary
- Standard Attributes
- Guides
- Agent
- Intégrations
- Développeurs
- OpenTelemetry
- Administrator's Guide
- API
- Partners
- Application mobile
- DDSQL Reference
- CoScreen
- CoTerm
- Remote Configuration
- Cloudcraft
- In The App
- Dashboards
- Notebooks
- DDSQL Editor
- Reference Tables
- Sheets
- Alertes
- Watchdog
- Métriques
- Bits AI
- Internal Developer Portal
- Error Tracking
- Change Tracking
- Service Management
- Actions & Remediations
- Infrastructure
- Cloudcraft
- Resource Catalog
- Universal Service Monitoring
- Hosts
- Conteneurs
- Processes
- Sans serveur
- Surveillance réseau
- Cloud Cost
- Application Performance
- APM
- Termes et concepts de l'APM
- Sending Traces to Datadog
- APM Metrics Collection
- Trace Pipeline Configuration
- Connect Traces with Other Telemetry
- Trace Explorer
- Recommendations
- Code Origin for Spans
- Observabilité des services
- Endpoint Observability
- Dynamic Instrumentation
- Live Debugger
- Suivi des erreurs
- Sécurité des données
- Guides
- Dépannage
- Profileur en continu
- Database Monitoring
- Agent Integration Overhead
- Setup Architectures
- Configuration de Postgres
- Configuration de MySQL
- Configuration de SQL Server
- Setting Up Oracle
- Setting Up Amazon DocumentDB
- Setting Up MongoDB
- Connecting DBM and Traces
- Données collectées
- Exploring Database Hosts
- Explorer les métriques de requête
- Explorer des échantillons de requêtes
- Exploring Database Schemas
- Exploring Recommendations
- Dépannage
- Guides
- Data Streams Monitoring
- Data Jobs Monitoring
- Data Observability
- Digital Experience
- RUM et Session Replay
- Surveillance Synthetic
- Continuous Testing
- Product Analytics
- Software Delivery
- CI Visibility
- CD Visibility
- Deployment Gates
- Test Visibility
- Code Coverage
- Quality Gates
- DORA Metrics
- Feature Flags
- Securité
- Security Overview
- Cloud SIEM
- Code Security
- Cloud Security Management
- Application Security Management
- Workload Protection
- Sensitive Data Scanner
- AI Observability
- Log Management
- Pipelines d'observabilité
- Log Management
- CloudPrem
- Administration
Getting Started with Workflow Automation
Cette page n'est pas encore disponible en français, sa traduction est en cours.
Si vous avez des questions ou des retours sur notre projet de traduction actuel, n'hésitez pas à nous contacter.
Si vous avez des questions ou des retours sur notre projet de traduction actuel, n'hésitez pas à nous contacter.
Overview
With Workflow Automation, you can automate end-to-end processes in response to Datadog alerts and security signals. Workflow Automation is powered by real-time observability data, enabling you to resolve issues faster and proactively maintain the availability and security of your systems.
Follow this guide to create a custom workflow triggered by a monitor alert. When it is triggered, the workflow creates a task in Jira and sends a notification to Slack with a link to the Jira ticket. This guide covers passing data from one step in your workflow to another step, saving and publishing your workflow, and viewing the workflow’s run history.
Prerequisites
Before getting started, you need the Jira and Slack integrations installed on your Datadog account. For installation instructions, see the Slack and Jira integration documentation.
Account credentials and authentication that you set up in the Jira and Slack integration tiles automatically propagate to the Jira and Slack actions in Workflow Automation. Some integrations require additional configuration for authentication. For more information, see Connections.
Build the workflow
Create a workflow with a monitor trigger
You can trigger a workflow from an alert, such as a monitor or security signal, from a schedule, or manually. In this case, create a workflow with a monitor trigger.
Create a workflow:
- From the Workflow Automation page, click New Workflow.
- Enter a name and description for the workflow. The example workflow uses the following name and description:
Name:Create a Jira Ticket.
Description:Create a Jira issue and Slack notification when there is a monitor alert.
Add and configure the monitor:
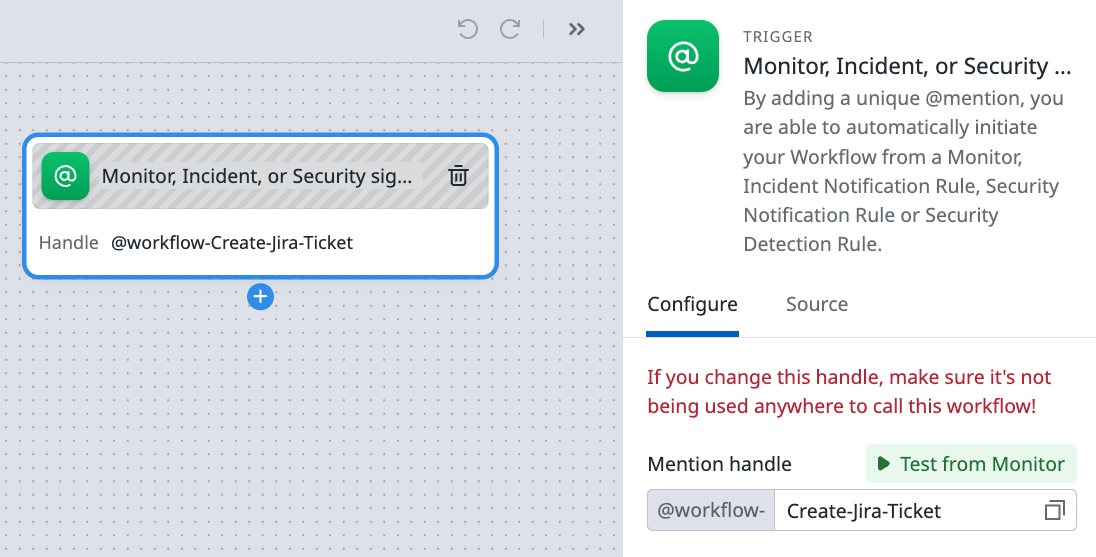
- On the workflow canvas, click Add Trigger and select Monitor.
- In the Configure tab, next to
@workflow-, enter a unique ID for your workflow:Create-Jira-Ticket.
Workflow handles always begin with@workflow-. Later, you use this handle to connect the workflow to a monitor notification. - Click Save to save your workflow.
Add the Jira and Slack actions
Add and configure the Jira step:
On the workflow canvas, click the + icon.
Search for the Jira action and select Create issue.
On the workflow canvas, click the Create issue step.
In the Configure tab, select a Jira Account. The account should correspond to the Jira URL found in the Accounts section of the Jira integration tile.
Enter the Project and Issue type for the Jira issue that the workflow creates.
Enter a Summary and Description for the Jira issue, using context variables to pass in data from the monitor that triggers the workflow. You can access a context variable in a step by enclosing it in double braces (
{{).
The following example description uses the source, trigger, and workflow variables to pass along:- the source that triggered the monitor alert
- a link to the affected monitor
- the workflow name, and the workflow ID
The CPU usage is above the 95% threshold for {{ Trigger.hostname }}

Please investigate - see this Datadog Dashboard to view all workflow executions:
https://app.datadoghq.com/dash/integration/workflow_automation?refresh_mode=sliding&from_ts=1698164453793&to_ts=1698168053793&live=true.

The workflow that created this Jira issue is
{{ WorkflowName }} : {{ WorkflowId }}

The monitor that triggered the workflow can be found here: {{ Source.url }}
For more information on context variables, see Context variables.
Test the Jira action by clicking Test in the Configure tab. Testing the action creates a real Jira ticket.
Click Save to save your workflow.
Next, add the Slack step:
Click the plus icon on the workflow canvas to add another step.
Search for Slack and select Send message.
Enter the Slack Workspace name.
Enter the Slack Channel name.
For a more useful Slack notification, use step output variables. Step output variables allow you to pass data from the Jira step to the Slack step in your workflow. Use the following message text to include the Jira issue key, the monitor name, and the Jira issue in the Slack message:
The monitor named {{ Source.monitor.name }} triggered and created a new Jira issue
{{ Steps.Create_issue.issueKey }}: {{ Steps.Create_issue.issueUrl }}

The workflow that created this Jira issue is {{ WorkflowName }}
To test the action, click Test in the Configure tab. Testing an action creates a real Slack message.
To view your workflow’s name in the monitor’s notification dropdown, save and publish your workflow. Click Publish from the workflow’s page.
Test and publish the workflow
Testing a workflow connected to active Slack and Jira accounts creates actual Slack messages and Jira tickets.
Click Save to apply your changes to the workflow. Next, manually trigger the workflow to test it.
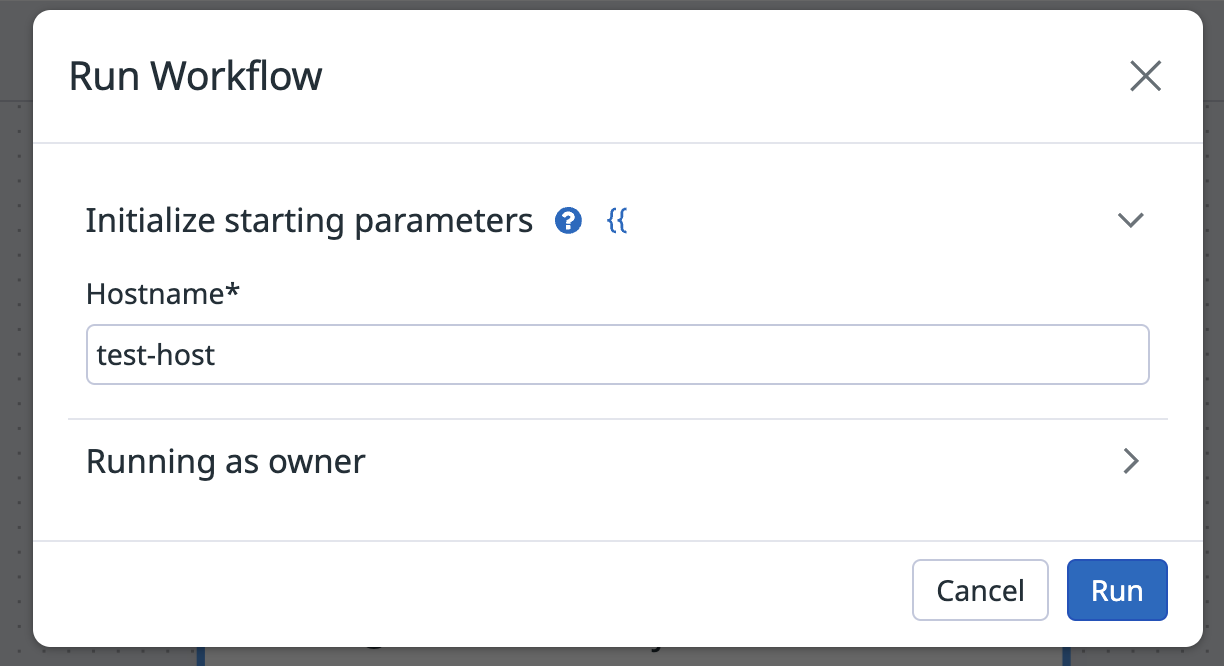
To trigger the workflow manually, click Run from the workflow page, and enter the values for the trigger variables.
Confirm that running the workflow creates a Jira ticket and sends a Slack message.
Scheduled and triggered workflows don’t trigger automatically until you publish them. To publish the workflow, click Publish from the workflow’s page.
Update the monitor that triggers your workflow
- Navigate to the Monitors page in Datadog.
- Find the monitor you’d like to use to trigger the workflow and edit it, or create a new monitor.
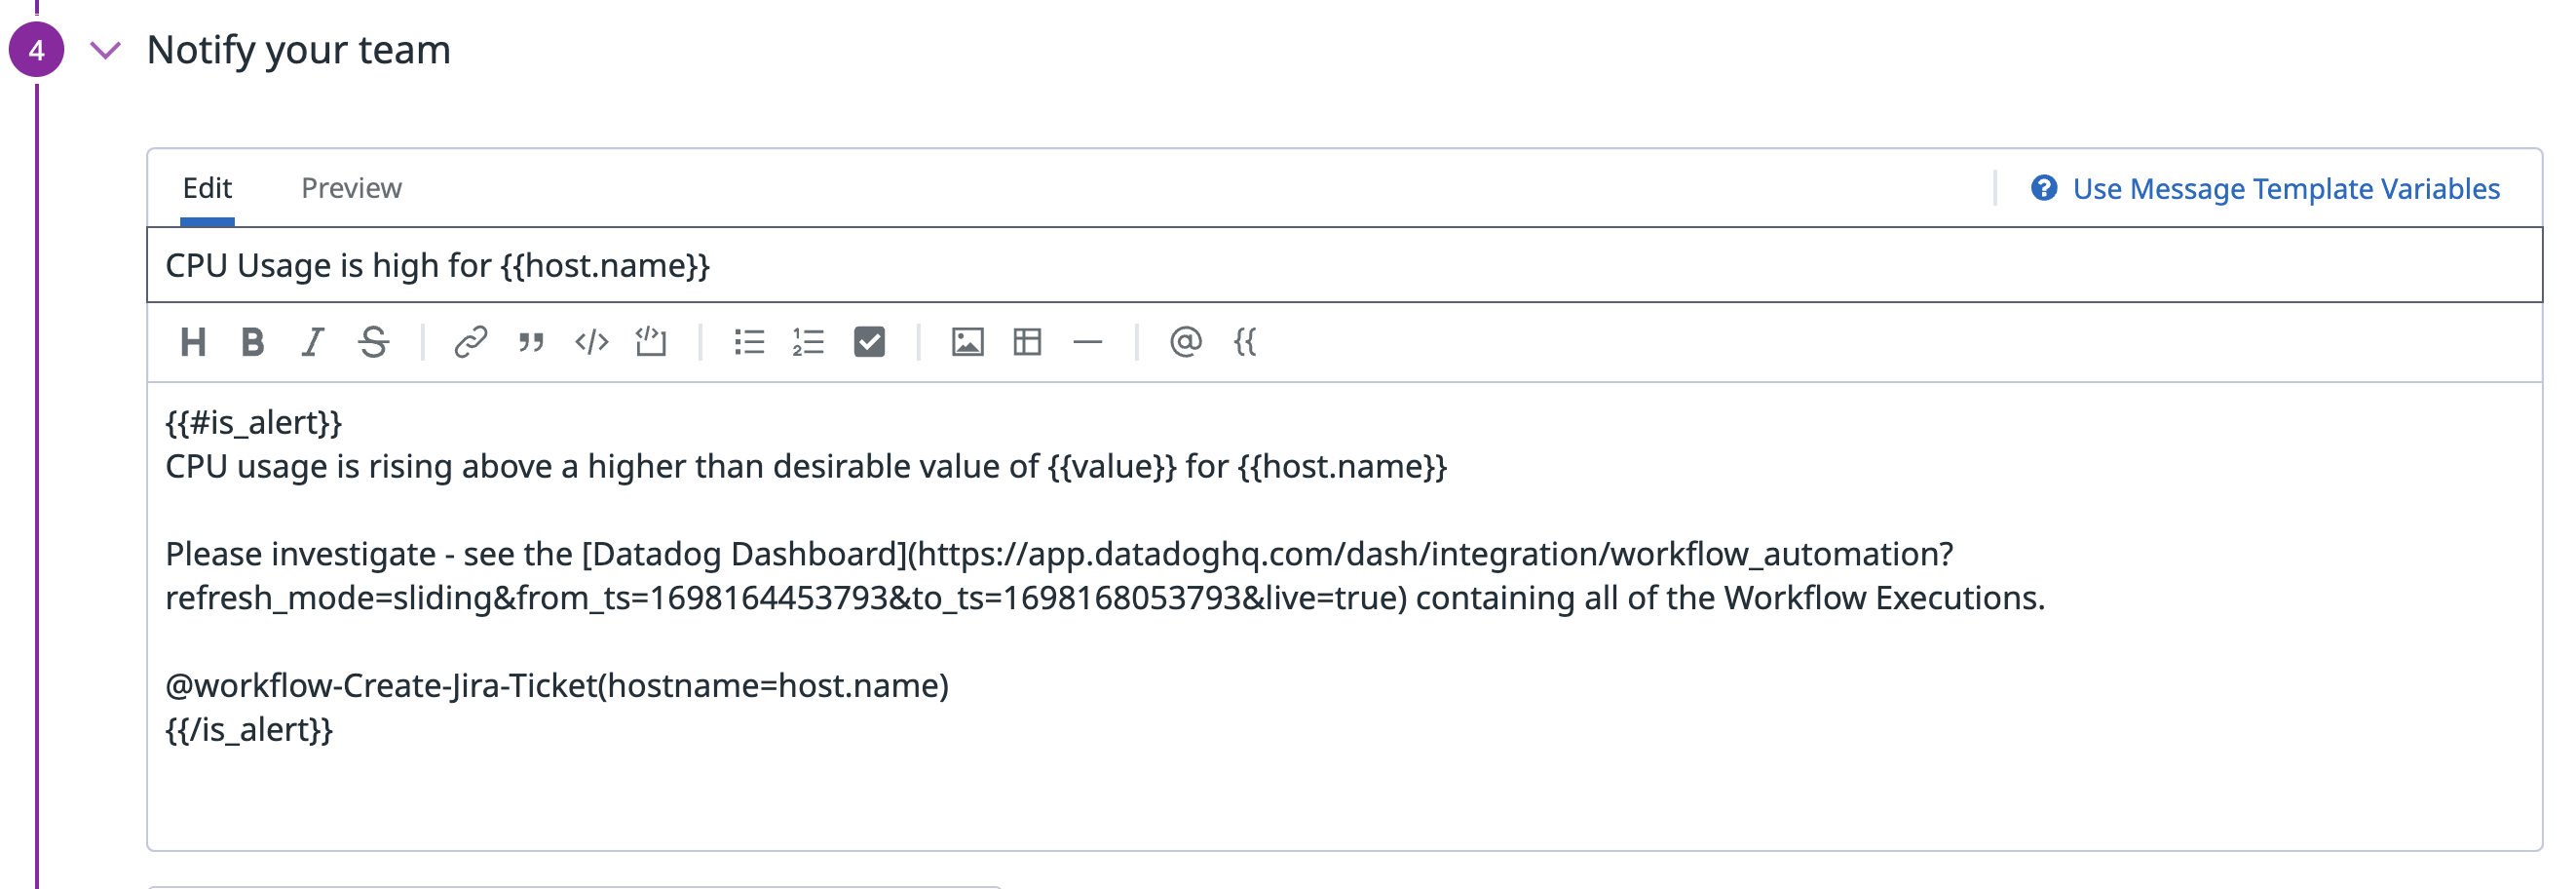
- In the Configure notifications & automations section, click Add Workflow.
- Use the workflow mention name (
@workflow-Create-Jira-Ticket) to search for your workflow and select it from the drop-down.- You can pass trigger variables into the workflow using a comma-separated list with the syntax
@workflow-name(key=value, key=value). For example,@workflow-Create-Jira-Ticket(hostname={{host.name}}).
- You can pass trigger variables into the workflow using a comma-separated list with the syntax
- Click Test Notifications to test the workflow and all of this monitor’s notifications.
- Save the monitor.
Each time the monitor threshold is hit, the monitor triggers a workflow run.
Run history
After you trigger the workflow, you can watch its progress and debug failed steps in the Run History view. Select an executed step to see the inputs, outputs, execution context, and error messages. The example below shows a step that failed due to an invalid Jira configuration.
To make edits to your workflow, click Configuration. To get back to the run history view, click Run History.
To view a list of previous workflow executions and whether each execution succeeded or failed, use the initial run history view. Return to the initial execution history at any time by clicking on the workflow canvas.
Conclusion
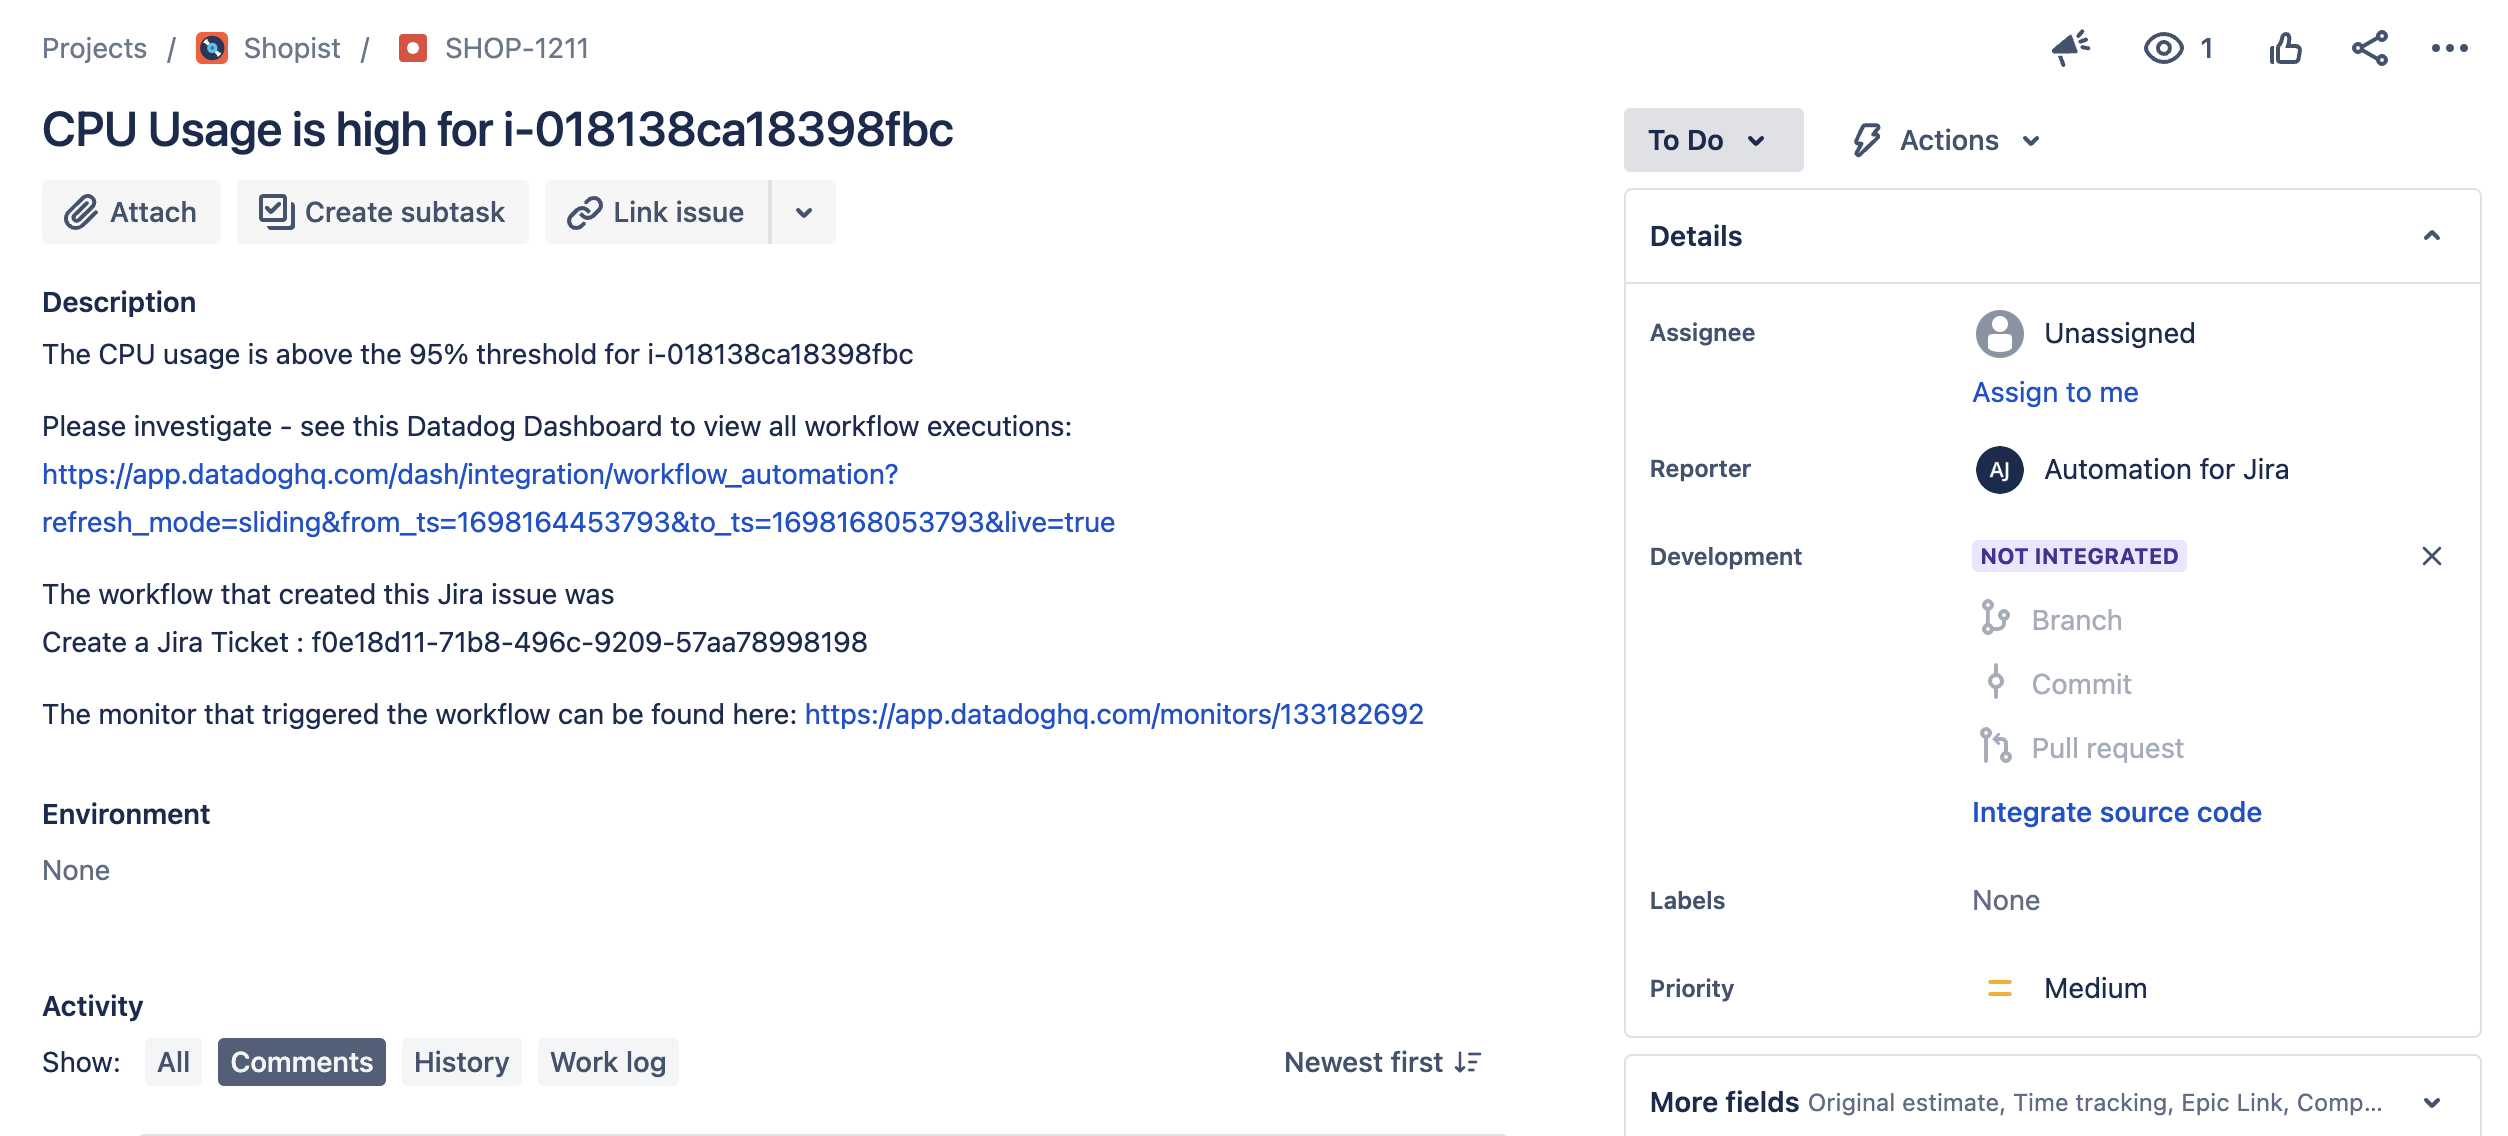
When the monitor triggers the workflow, it creates a Jira issue for your engineering team to review. Here is an example Jira issue:
The workflow also creates a Slack message to notify your team of the Jira issue and monitor alert. Here is an example Slack notification:
What’s next?
- Explore the list of all available workflow actions in the Action Catalog.
- Build a workflow from an out of the box blueprint.
- Use the HTTP action to make a request to any endpoint.
- Implement data transformation actions to perform necessary operations on the information flowing through your workflow.
Further reading
Documentation, liens et articles supplémentaires utiles:


