- Esenciales
- Empezando
- Agent
- API
- Rastreo de APM
- Contenedores
- Dashboards
- Monitorización de bases de datos
- Datadog
- Sitio web de Datadog
- DevSecOps
- Gestión de incidencias
- Integraciones
- Internal Developer Portal
- Logs
- Monitores
- OpenTelemetry
- Generador de perfiles
- Session Replay
- Security
- Serverless para Lambda AWS
- Software Delivery
- Monitorización Synthetic
- Etiquetas (tags)
- Workflow Automation
- Centro de aprendizaje
- Compatibilidad
- Glosario
- Atributos estándar
- Guías
- Agent
- Arquitectura
- IoT
- Plataformas compatibles
- Recopilación de logs
- Configuración
- Automatización de flotas
- Solucionar problemas
- Detección de nombres de host en contenedores
- Modo de depuración
- Flare del Agent
- Estado del check del Agent
- Problemas de NTP
- Problemas de permisos
- Problemas de integraciones
- Problemas del sitio
- Problemas de Autodiscovery
- Problemas de contenedores de Windows
- Configuración del tiempo de ejecución del Agent
- Consumo elevado de memoria o CPU
- Guías
- Seguridad de datos
- Integraciones
- Desarrolladores
- Autorización
- DogStatsD
- Checks personalizados
- Integraciones
- Build an Integration with Datadog
- Crear una integración basada en el Agent
- Crear una integración API
- Crear un pipeline de logs
- Referencia de activos de integración
- Crear una oferta de mercado
- Crear un dashboard de integración
- Create a Monitor Template
- Crear una regla de detección Cloud SIEM
- Instalar la herramienta de desarrollo de integraciones del Agente
- Checks de servicio
- Complementos de IDE
- Comunidad
- Guías
- OpenTelemetry
- Administrator's Guide
- API
- Partners
- Aplicación móvil de Datadog
- DDSQL Reference
- CoScreen
- CoTerm
- Remote Configuration
- Cloudcraft
- En la aplicación
- Dashboards
- Notebooks
- Editor DDSQL
- Reference Tables
- Hojas
- Monitores y alertas
- Watchdog
- Métricas
- Bits AI
- Internal Developer Portal
- Error Tracking
- Explorador
- Estados de problemas
- Detección de regresión
- Suspected Causes
- Error Grouping
- Bits AI Dev Agent
- Monitores
- Issue Correlation
- Identificar confirmaciones sospechosas
- Auto Assign
- Issue Team Ownership
- Rastrear errores del navegador y móviles
- Rastrear errores de backend
- Manage Data Collection
- Solucionar problemas
- Guides
- Change Tracking
- Gestión de servicios
- Objetivos de nivel de servicio (SLOs)
- Gestión de incidentes
- De guardia
- Status Pages
- Gestión de eventos
- Gestión de casos
- Actions & Remediations
- Infraestructura
- Cloudcraft
- Catálogo de recursos
- Universal Service Monitoring
- Hosts
- Contenedores
- Processes
- Serverless
- Monitorización de red
- Cloud Cost
- Rendimiento de las aplicaciones
- APM
- Términos y conceptos de APM
- Instrumentación de aplicación
- Recopilación de métricas de APM
- Configuración de pipelines de trazas
- Correlacionar trazas (traces) y otros datos de telemetría
- Trace Explorer
- Recommendations
- Code Origin for Spans
- Observabilidad del servicio
- Endpoint Observability
- Instrumentación dinámica
- Live Debugger
- Error Tracking
- Seguridad de los datos
- Guías
- Solucionar problemas
- Límites de tasa del Agent
- Métricas de APM del Agent
- Uso de recursos del Agent
- Logs correlacionados
- Stacks tecnológicos de llamada en profundidad PHP 5
- Herramienta de diagnóstico de .NET
- Cuantificación de APM
- Go Compile-Time Instrumentation
- Logs de inicio del rastreador
- Logs de depuración del rastreador
- Errores de conexión
- Continuous Profiler
- Database Monitoring
- Gastos generales de integración del Agent
- Arquitecturas de configuración
- Configuración de Postgres
- Configuración de MySQL
- Configuración de SQL Server
- Configuración de Oracle
- Configuración de MongoDB
- Setting Up Amazon DocumentDB
- Conexión de DBM y trazas
- Datos recopilados
- Explorar hosts de bases de datos
- Explorar métricas de consultas
- Explorar ejemplos de consulta
- Exploring Database Schemas
- Exploring Recommendations
- Solucionar problemas
- Guías
- Data Streams Monitoring
- Data Jobs Monitoring
- Data Observability
- Experiencia digital
- Real User Monitoring
- Pruebas y monitorización de Synthetics
- Continuous Testing
- Análisis de productos
- Entrega de software
- CI Visibility
- CD Visibility
- Deployment Gates
- Test Visibility
- Configuración
- Network Settings
- Tests en contenedores
- Repositories
- Explorador
- Monitores
- Test Health
- Flaky Test Management
- Working with Flaky Tests
- Test Impact Analysis
- Flujos de trabajo de desarrolladores
- Cobertura de código
- Instrumentar tests de navegador con RUM
- Instrumentar tests de Swift con RUM
- Correlacionar logs y tests
- Guías
- Solucionar problemas
- Code Coverage
- Quality Gates
- Métricas de DORA
- Feature Flags
- Seguridad
- Información general de seguridad
- Cloud SIEM
- Code Security
- Cloud Security Management
- Application Security Management
- Workload Protection
- Sensitive Data Scanner
- Observabilidad de la IA
- Log Management
- Observability Pipelines
- Gestión de logs
- CloudPrem
- Administración
- Gestión de cuentas
- Seguridad de los datos
- Ayuda
Microsoft Teams
Información general
Integración con Microsoft Teams para:
- Recibir notificaciones de alertas en Datadog y eventos en Microsoft Teams.
- Gestionar las incidencias desde Microsoft Teams.
- Silenciar los monitores activados directamente desde Microsoft Teams.
- Recibir notificaciones de alertas en Datadog y eventos en Microsoft Teams.
- Silenciar los monitores activados directamente desde Microsoft Teams.
Nota: Aunque tu cuenta de Datadog esté alojada en el entorno seguro US1-FED, es tu responsabilidad gestionar la seguridad de tu entorno Microsoft Teams, incluyendo el acceso, los permisos y la protección de los datos.
Configuración
Enviar notificaciones de monitor a un canal de Microsoft Teams
Conecta tu inquilino de Microsoft a Datadog.
- En Datadog, ve a Integrations > Microsoft Teams (Integraciones > Microsoft Teams).
- Haz clic en Add Tenant (Agregar inquilino), que te redirigirá a Microsoft.
- Sigue las instrucciones y haz clic en OK (Aceptar).
Teams
Asegúrate de haber añadido la aplicación Datadog a todos los Teams en los que desees recibir notificaciones de Datadog.
Asegúrate de haber añadido la aplicación Datadog for Government a todos los Teams en los que desees recibir notificaciones de Datadog.
- Abre Microsoft Teams.
- En la barra de herramientas vertical, haz clic en Apps (Aplicaciones).
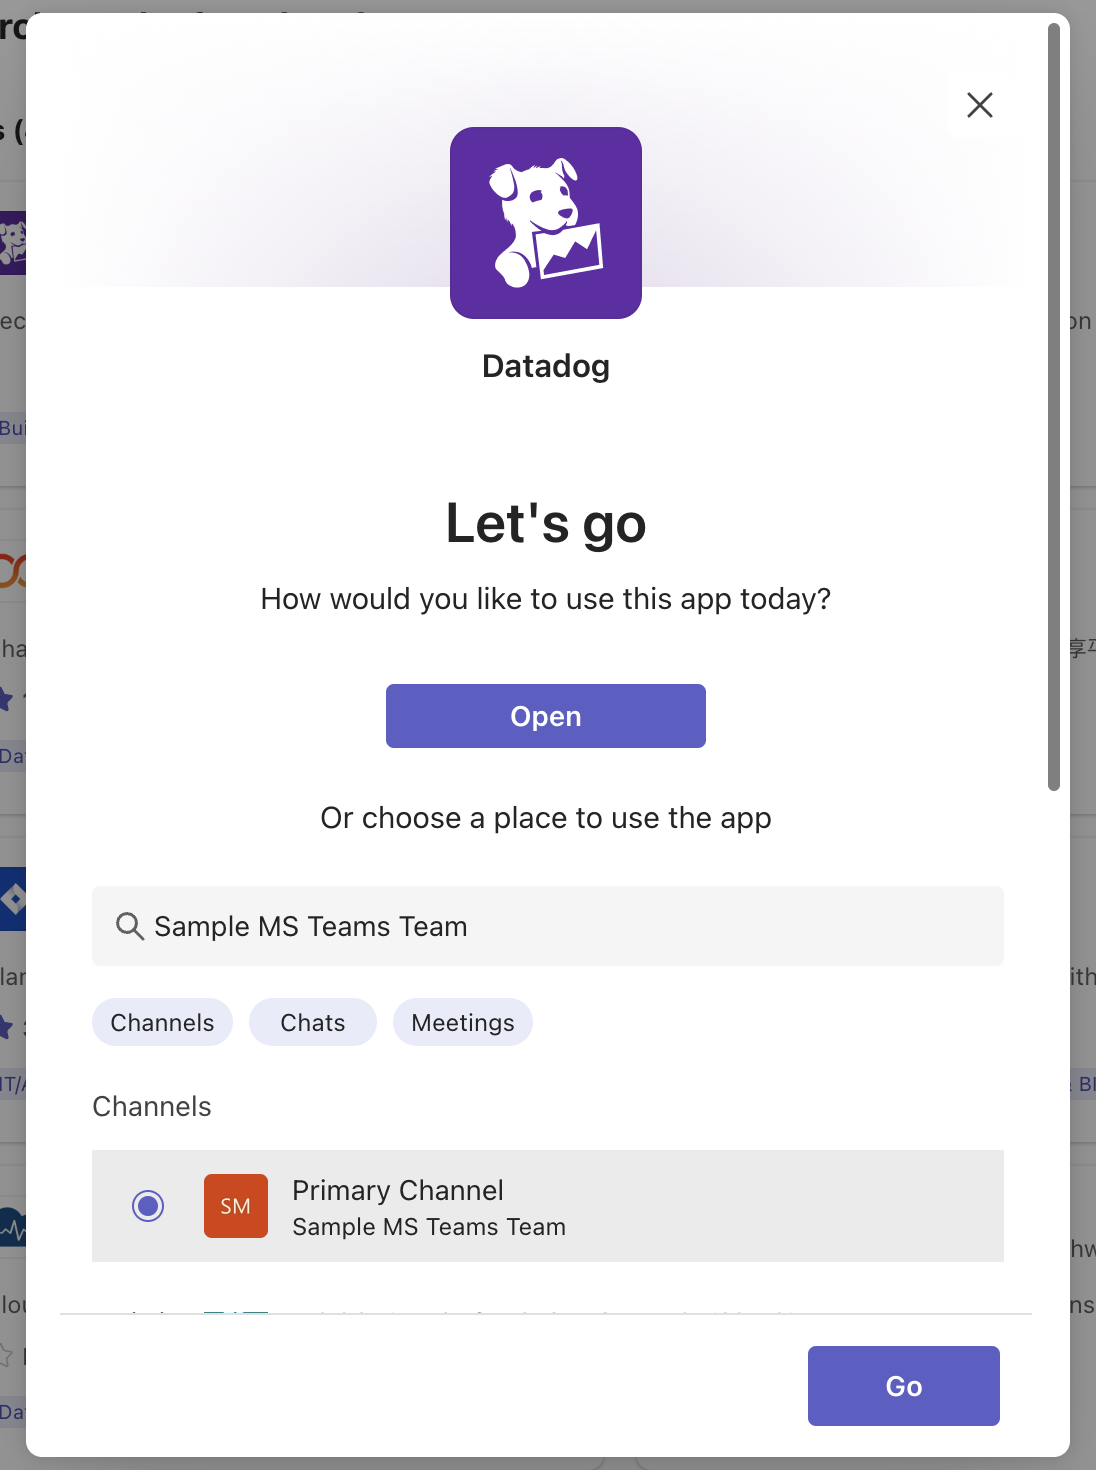
- Busca “Datadog” y haz clic en Open (Abrir).
- En el modal que se abre, selecciona el canal principal del equipo donde debe añadirse la aplicación. Haz clic en Go (Listo) para completar la instalación.
- Abre Microsoft Teams.
- En la barra de herramientas vertical, haz clic en Apps (Aplicaciones).
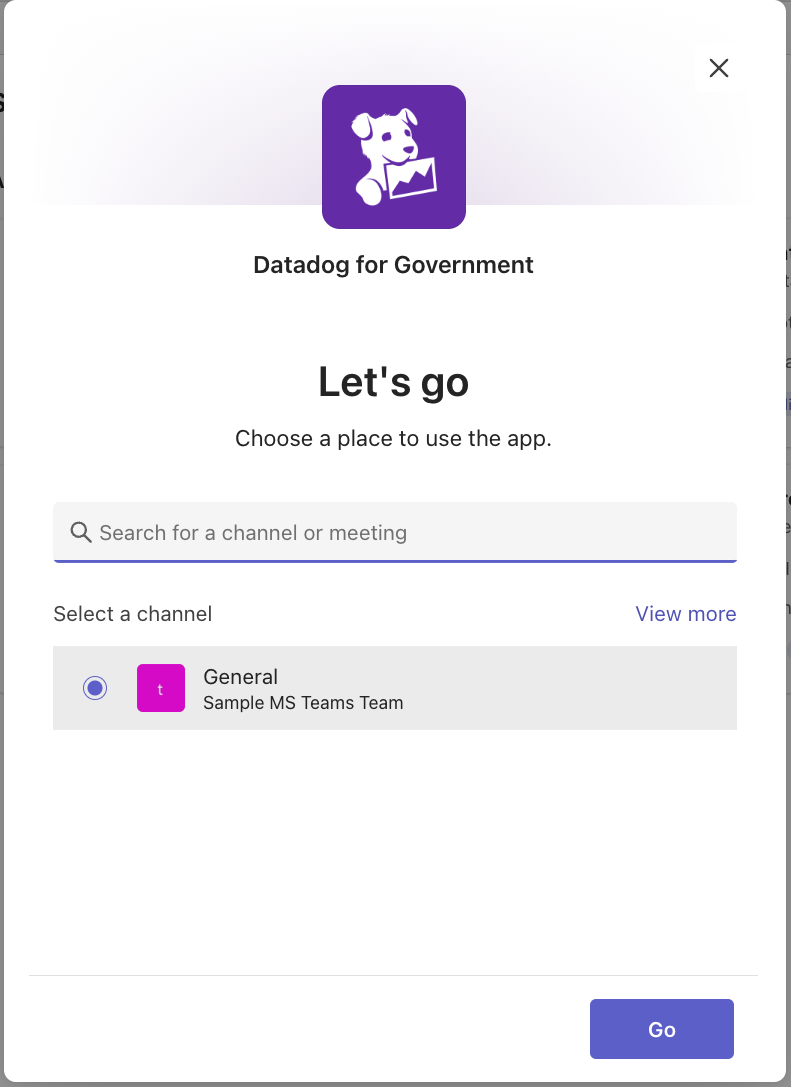
- Busca “Datadog para el Gobierno” y haz clic en Open (Abrir).
- En el modal que se abre, selecciona el canal principal del equipo donde debe añadirse la aplicación. Haz clic en Go (Listo) para completar la instalación.
Una vez que el bot se haya añadido al equipo, configura el gestor de notificaciones en Datadog.
- En un inquilino configurado, haz clic en Add Handle (Añadir gestor). Asigna un nombre al gestor, selecciona el equipo y el canal en los menús desplegables y haz clic en Save (Guardar).
Migrar los conectores de legacy a la integración basada en inquilinos
Microsoft ha anunciado que los conectores de Office 365 para Microsoft Teams quedan obsoletos. Esto tiene los siguientes efectos:
- Todos los conectores de Datadog dejarán de funcionar el 31 de enero de 2025.
- Los conectores de webhooks entrantes sin URL actualizadas dejarán de funcionar el 31 de enero de 2025.
- Todos los conectores dejarán de funcionar el 31 de diciembre de 2025 (previamente era el 1 de octubre de 2024).
Para obtener más información, consulta la entrada de blog de Microsoft.
Para migrar todos los gestores de notificaciones que utilizan actualmente los conectores de Office 365 legacy a integraciones Datadog basadas en inquilinos:
- Sigue los pasos de configuración para conectar tu inquilino de Microsoft a Datadog.
- Añade la aplicación Datadog a todos los equipos en los que tengas configurado un conector legacy de Office 365.
- Para cada gestión de conector de notificación heredada en el Ícono de integración de Microsoft Teams :
- En el inquilino configurado, haz clic en Add Handle (Añadir gestor).
- Asigna al nuevo gestor el mismo nombre que el gestor del conector. Por ejemplo, si el gestor del conector legacy se llama
channel-123, crea un nuevo gestor en la configuración del inquilino con el nombrechannel-123. - Selecciona el equipo y el canal elegidos en los menús desplegables a los que el gestor del conector legacy enviaba el mensaje y haz clic en Save (Guardar). Este nuevo gestor anula el gestor del conector legacy existente.
- Sigue los pasos de configuración para conectar tu inquilino de Microsoft a Datadog.
- Añade la aplicación Datadog para el Gobierno a todos los equipos en los que tengas configurado un conector legacy de Office 365.
- Para cada gestión de conector de notificación heredada en el Ícono de integración de Microsoft Teams:
- En el inquilino configurado, haz clic en Add Handle (Añadir gestor).
- Asigna al nuevo gestor el mismo nombre que el gestor del conector. Por ejemplo, si el gestor del conector legacy se llama
channel-123, crea un nuevo gestor en la configuración del inquilino con el nombrechannel-123. - Selecciona el equipo y el canal elegidos en los menús desplegables a los que el gestor del conector legacy enviaba el mensaje y haz clic en Save (Guardar). Este nuevo gestor anula el gestor del conector legacy existente.
Utilización
Desde un monitor de Datadog, envía una notificación a Microsoft Teams utilizando la función @-notification . Envía la notificación a la dirección @teams-<HANDLE>, sustituyendo <HANDLE> por el nombre de tu administrador de Microsoft Teams. Para silenciar un monitor activado desde Microsoft Teams, haz clic en Silenciar monitor, selecciona una Duración del silencio y haz clic en Silenciar.
Menciones de usuarios
Las menciones de usuarios te permiten notificar a usuarios específicos de tus canales de Microsoft Teams cuando se activan las alertas de monitor. Esto ayuda a garantizar que se notifiquen los eventos importantes a las personas adecuadas. Para mencionar a un usuario específico, sigue los pasos que se indican a continuación para encontrar su nombre principal de usuario (UPN).
Sintaxis: <at>{User Principal Name}</at>
Ejemplo: <at>user@microsoft.com</at>
Ejemplo de notificación completa: @Teams-CHANNEL_NAME <at>user@microsoft.com</at> <at>another.user@microsoft.com</at>
Para encontrar el nombre de usuario principal (UPN) de un usuario:
Método 1 (sólo funciona si el UPN coincide con el correo electrónico):
- En Microsoft Teams, haz clic en la foto de perfil o en el nombre del usuario para abrir su tarjeta de contacto.
- El correo electrónico que aparece en el campo
Chatsuele ser el UPN. Si difieren, utiliza el método 2 a continuación.
Método 2 (funciona siempre, pero requiere permisos de Azure Portal):
- Inicia sesión en el Microsoft Azure Portal.
- Ve a
Microsoft Entra ID>Manage>Users. - Localiza al usuario en la lista y copia su UPN de la columna
User principal name.
Datadog recomienda hacer un test de tus notificaciones de monitor para garantizar una entrega fiable. Consulta test de notificaciones para obtener instrucciones.
Dashboards
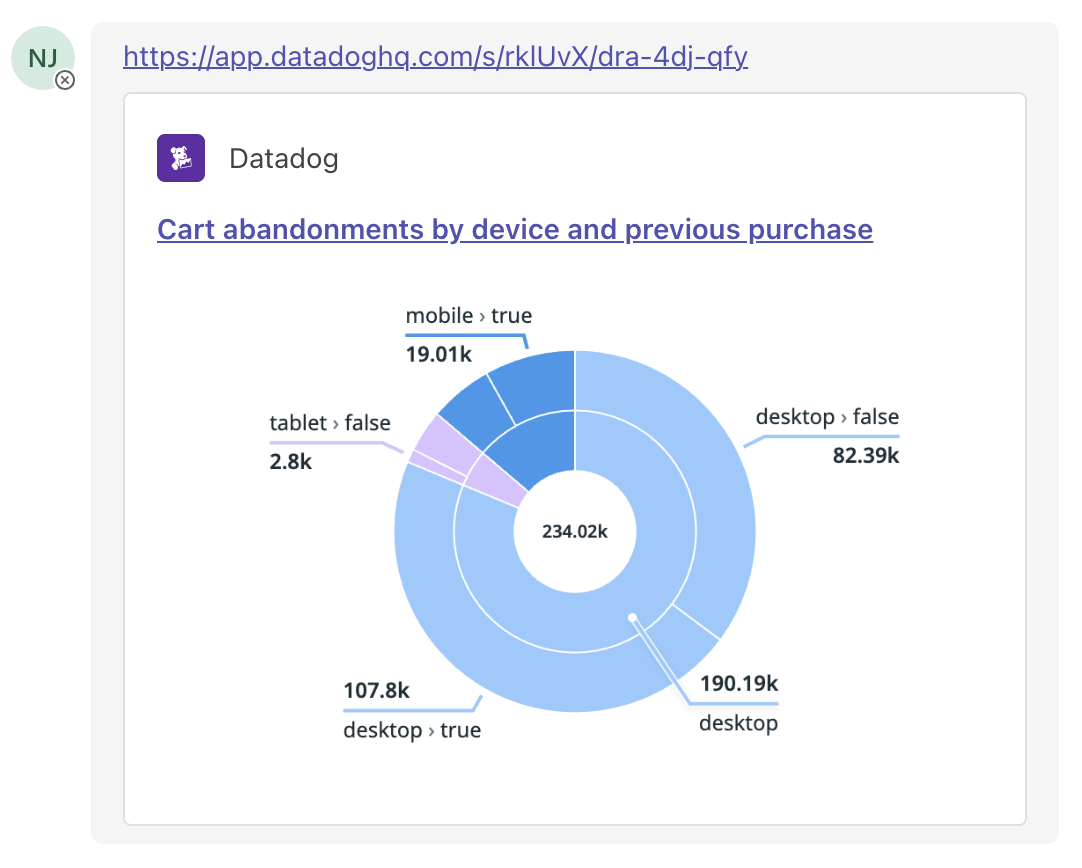
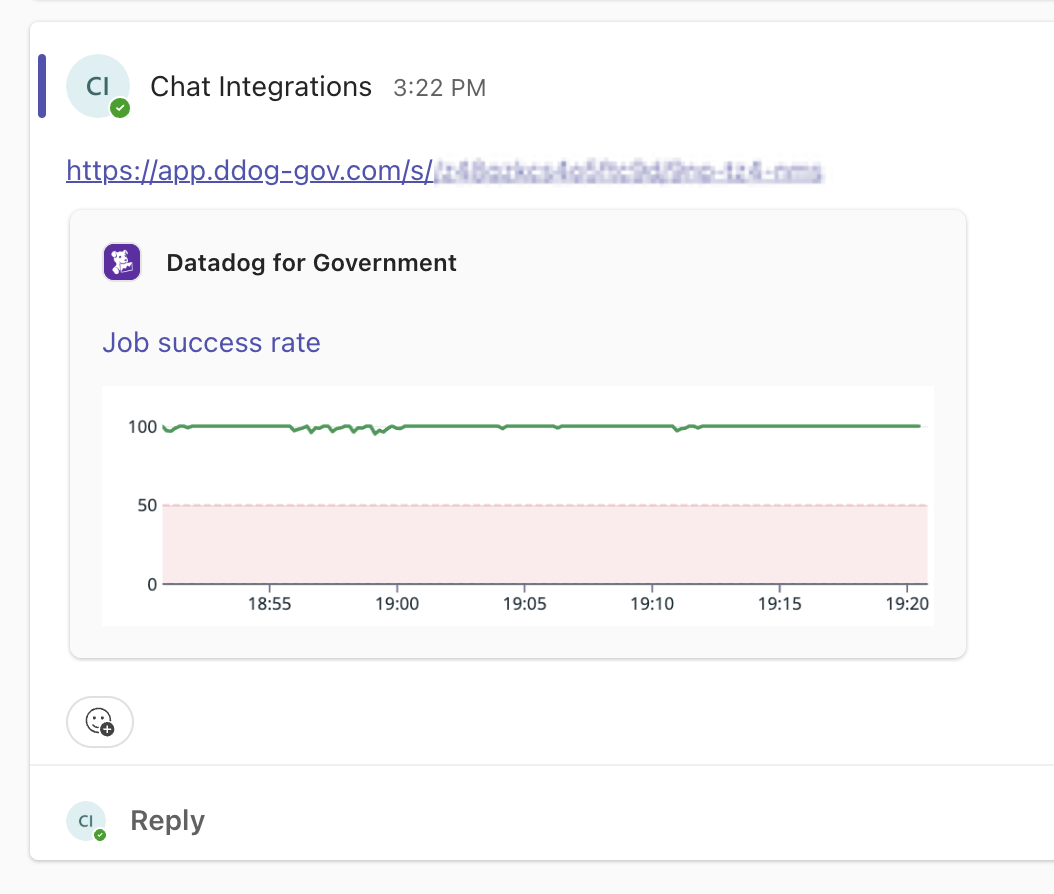
Puedes publicar snapshots de widgets de dashboard en cualquier equipo o chat. Para consultar la lista de los widgets admitidos, consulta Informes programados.
Para compartir un widget de dashboard en Teams:
- En Datadog, pasa el ratón por encima del widget de dashboard y pulsa
CMD + CoCTRL + C, o haz clic en el botón Copy (Copiar) del menú compartir. - Pega el enlace en Teams.
Limitar el acceso de edición
Por defecto, todos los usuarios tienen acceso completo a los inquilinos de Microsoft Teams conectados.
Utiliza Control de acceso granular para limitar los roles que pueden editar un inquilino específico:
- Mientras visualizas un inquilino, haz clic en el icono de engranaje de la esquina superior derecha para abrir el menú de configuración.
- Selecciona Permissions (Permisos).
- Haz clic en Restrict Access (Acceso restringido). El cuadro de diálogo se actualiza para mostrar que los miembros de tu organización tienen acceso de Visor por defecto.
- Utiliza el desplegable para seleccionar uno o varios roles, equipos o usuarios que pueden editar el inquilino de Microsoft Teams.
- Haz clic en Add (Añadir). El cuadro de diálogo se actualiza para mostrar que el rol seleccionado tiene el permiso de Editor.
- Haz clic en Save (Guardar).
Nota: Para conservar tu acceso de edición al inquilino, debes incluir al menos un rol al que pertenezcas antes de guardar.
Si tienes acceso de edición, puedes restablecer el acceso general a un inquilino restringido siguiendo estos pasos:
- Mientras visualizas el inquilino, haz clic en el icono de engranaje de la esquina superior derecha para abrir el menú de configuración.
- Selecciona Permissions (Permisos).
- Haz clic en Restore Full Access (Restablecer acceso completo).
- Haz clic en Save (Guardar).
Para editar los permisos de los inquilinos a través de la API:
- Ve al Ícono de integración de Microsoft Teams .
- Haz clic en la pestaña Inquilinos.
- Copia el ID de inquilino mostrado para el inquilino seleccionado.
- Utiliza la API de políticas de restricción, donde el tipo de recurso es
integration-accounty el id esmicrosoft-Teams:<tenant_id>.
¿Qué son los webhooks de Microsoft Workflows?
Workflows / Power Automate es un producto de Microsoft para crear flujos de trabajo automatizados. Microsoft Workflows puede utilizarse para enviar notificaciones con webhooks entrantes. Si no puedes instalar la aplicación Datadog en tu inquilino de Microsoft Teams (recomendado) o si quieres enviar notificaciones a canales privados, puedes configurar gestores Datadog para enviar notificaciones a canales de Microsoft Teams a través de Microsoft Workflows. Esta integración está pensada para su uso con la siguiente plantilla de Microsoft Workflows: Publicar en un canal cuando se recibe una solicitud de webhook
¿Estás migrando conectores legacy a la integración de webhooks de Microsoft Workflows?
Microsoft ha anunciado que los conectores de Office 365 para Microsoft Teams quedan obsoletos y las URL de los conectores existentes dejarán de funcionar el 31 de enero de 2025. Microsoft promueve el uso de webhooks entrantes de Microsoft Workflows como sustituto de los conectores legacy. Sigue los pasos que se indican a continuación para migrar todos los gestores de notificaciones que utilizan actualmente conectores de Office 365 legacy a la integración de webhooks de Microsoft Workflows de Datadog.
Para cada gestor de un conector de notificaciones legacy en el cuadro de la integración Microsoft Teams:
- Sigue los pasos de configuración para crear un gestor de webhook de flujo de trabajo para el canal de Microsoft Teams elegido.
- En la sección Webhooks de Microsoft Workflows, asigna al nuevo gestor el mismo nombre que el gestor del conector al que debe sustituir. Por ejemplo, si el gestor del conector legacy se denomina
channel-123, asigna el nombrechannel-123a su nuevo gestor en la sección Webhooks de Microsoft Workflows. Este nuevo gestor sustituye al gestor de conector legacy existente.
Crear un webhook de Microsoft Workflows
Requisitos previos
- Para crear un nuevo flujo de trabajo, se requiere una cuenta Microsoft, tanto para la propiedad del flujo de trabajo como para enviar notificaciones a los canales (no es necesario que sean de la misma cuenta Microsoft).
- La cuenta propietaria del flujo de trabajo (configurada en el paso 2 a continuación) es la cuenta que puede editar y renovar el flujo de trabajo. Para facilitar el acceso compartido, utiliza una cuenta de servicio.
- La cuenta que envía notificaciones a los canales (configurada en el paso 8 a continuación) realiza publicaciones como usuario de la cuenta. Esta cuenta debe formar parte del equipo al que quieres enviar notificaciones. Si envías notificaciones a un canal privado, esta cuenta también debe ser añadida al canal. Si quieres darle a esta cuenta un nombre como “Notificaciones Datadog” utiliza una cuenta de servicio.
Instrucciones
Nota: La mayoría de estos pasos están en Microsoft Workflows. Dado que Microsoft realiza cambios en Workflows, es posible que los siguientes pasos no reflejen los cambios más recientes.
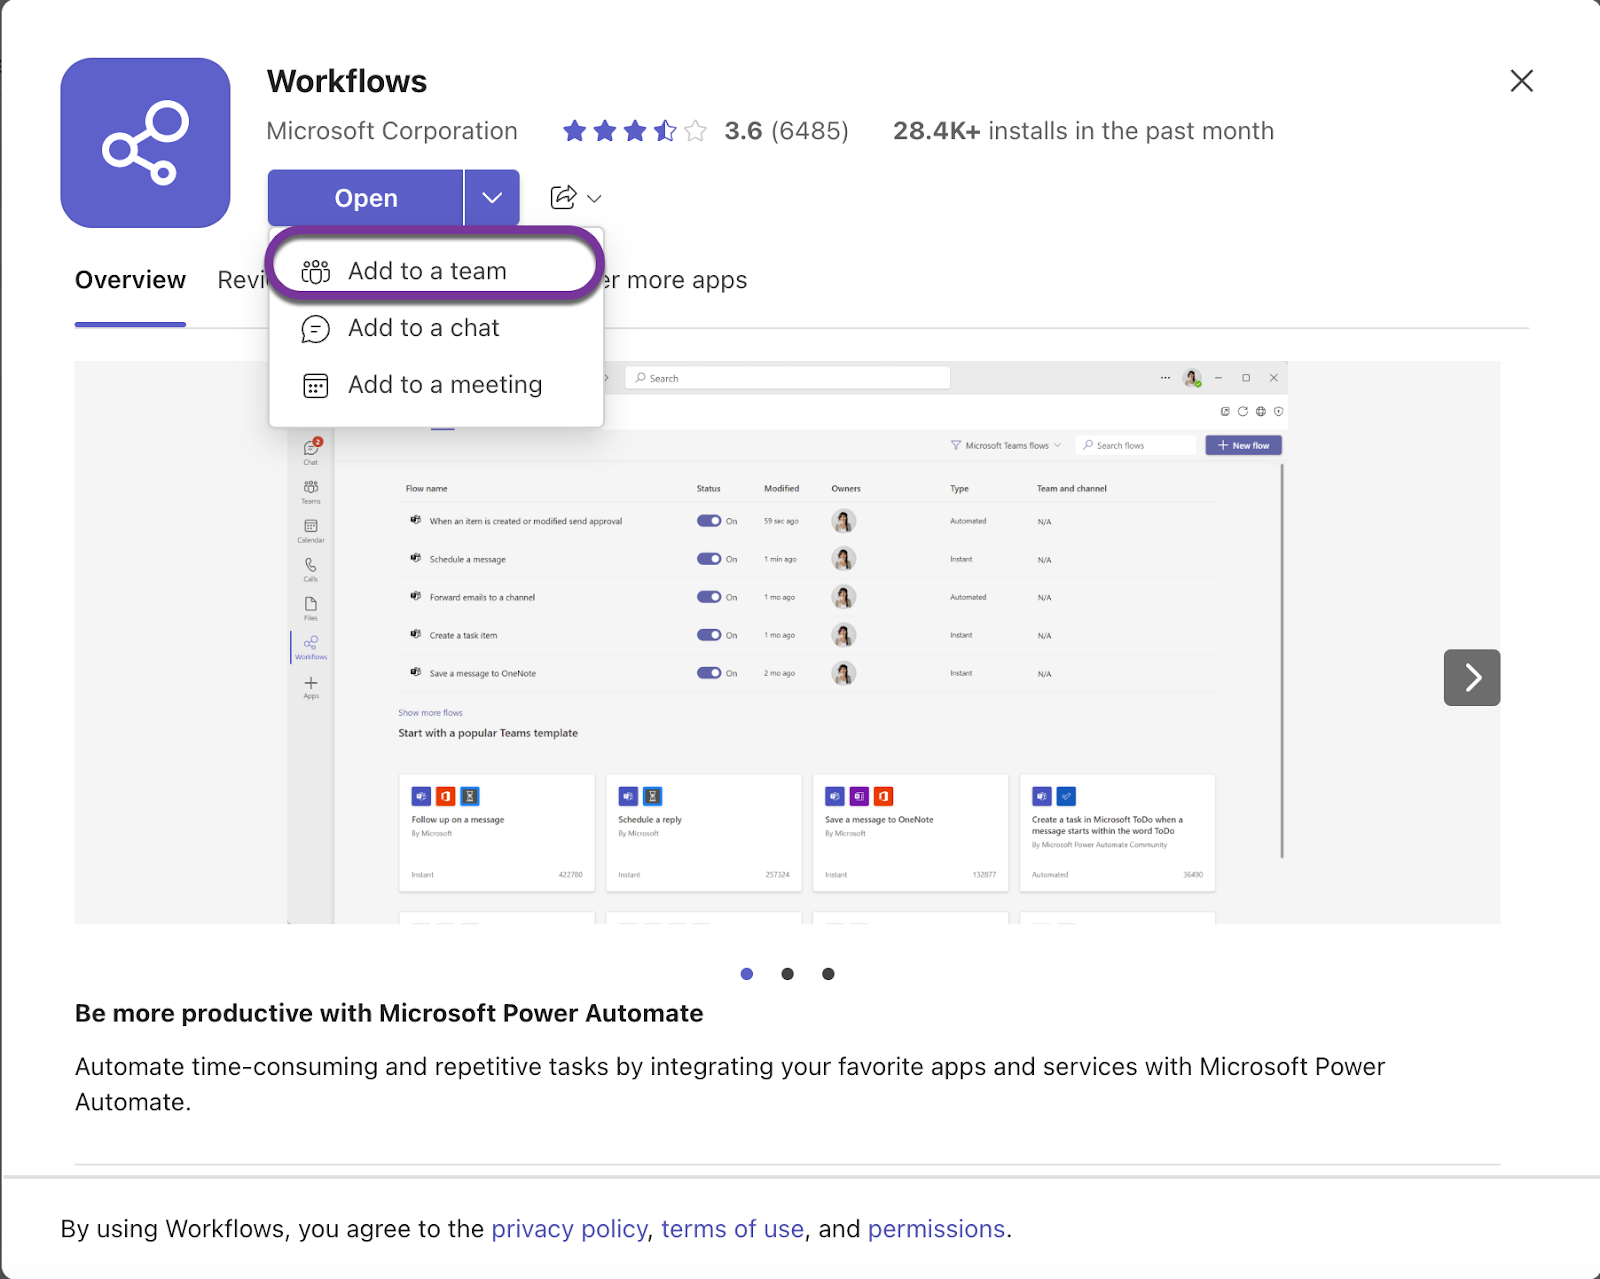
En Microsoft Teams, añade la aplicación Workflows a todos los equipos a los que quieres enviar notificaciones. Si no puedes añadir la aplicación a tu equipo, sigue las instrucciones de la sección “Canales privados”.
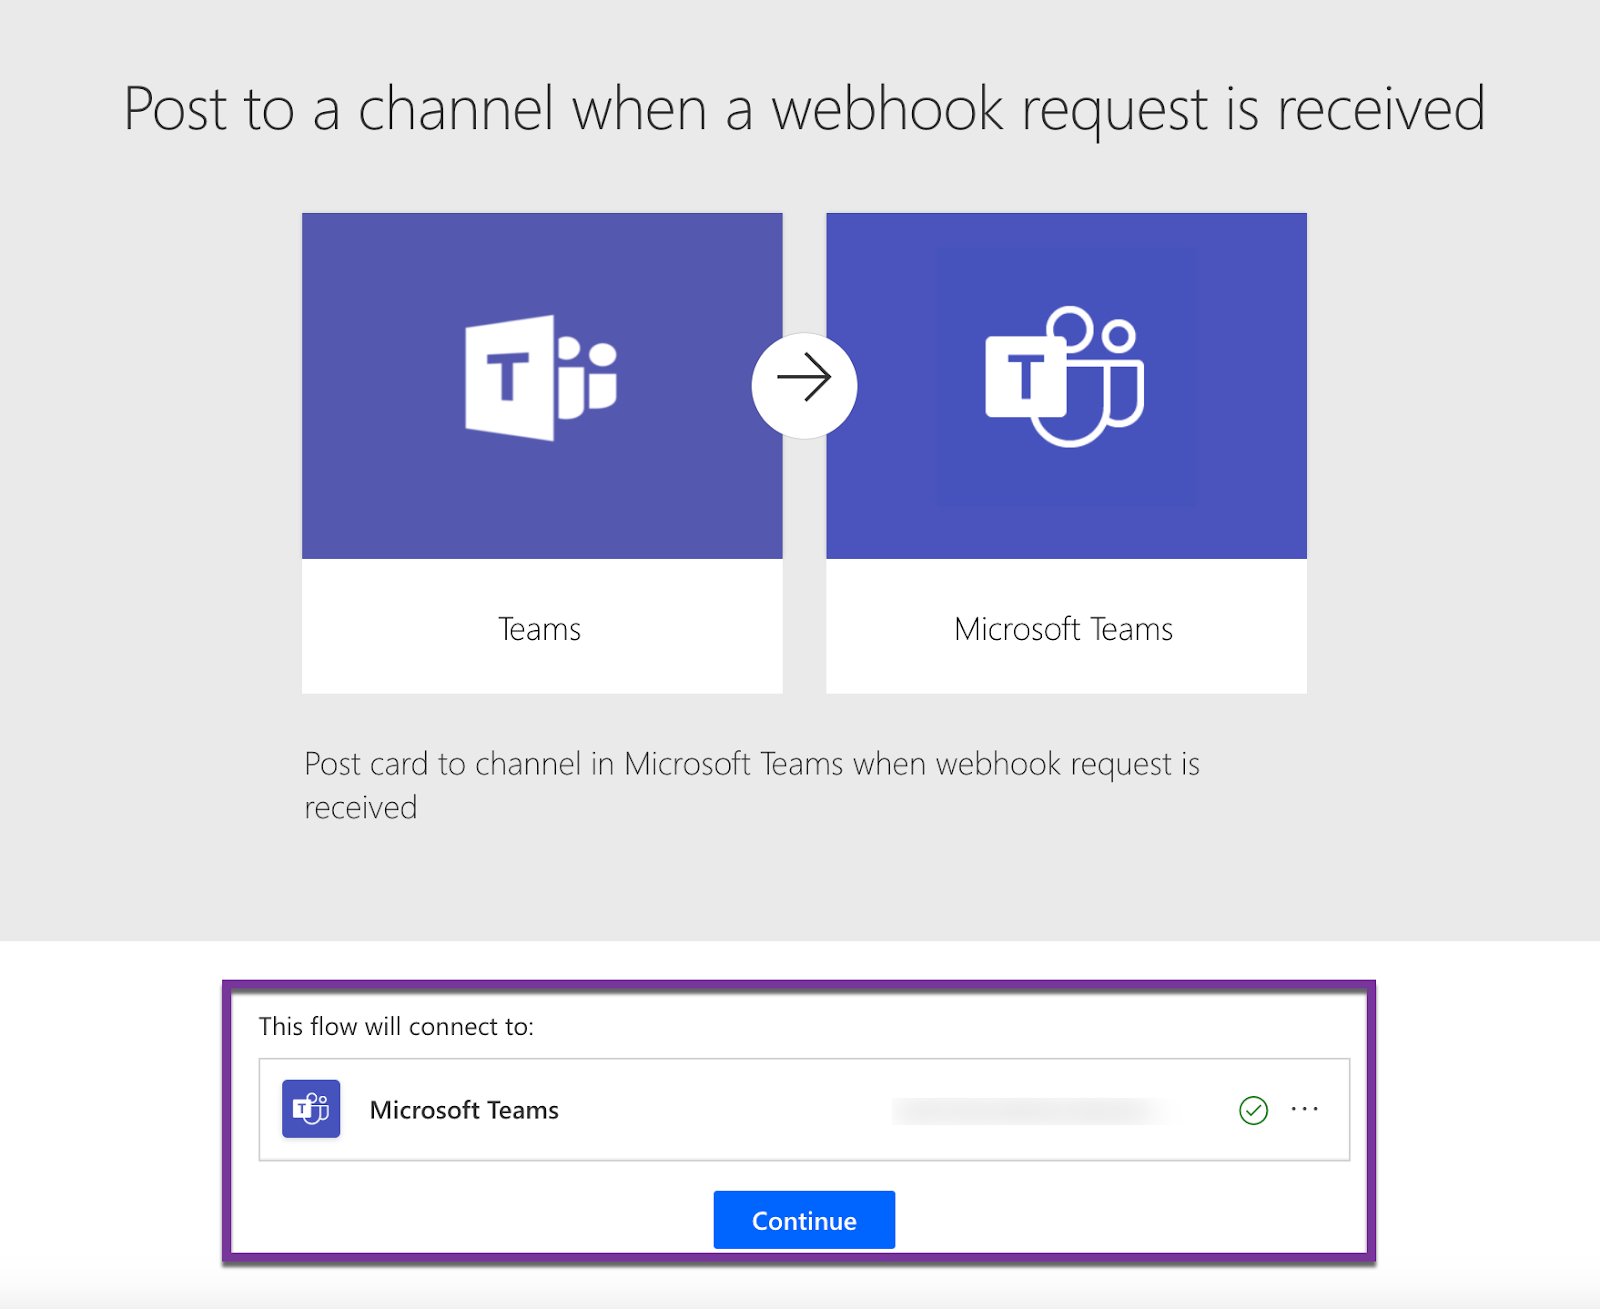
Crea un nuevo flujo de trabajo en Power Automate a partir de la plantilla Publicar en un canal cuando se reciba una solicitud de webhook de Microsoft.
Elige la cuenta Microsoft que quieres utilizar para ser propietario del flujo de trabajo (utiliza una cuenta de servicio para facilitar el acceso compartido) y luego haz clic en Continue (Continuar).
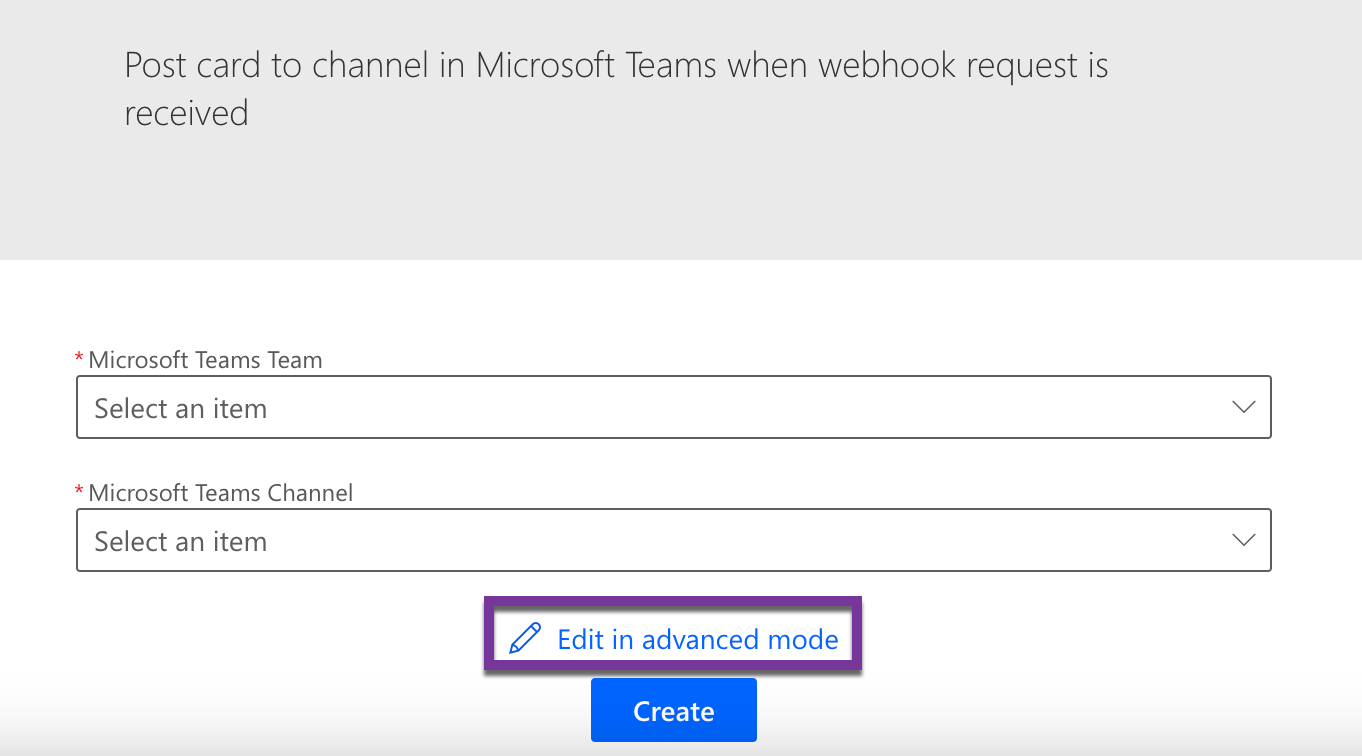
Haz clic en Edit in advanced mode (Editar en modo avanzado).
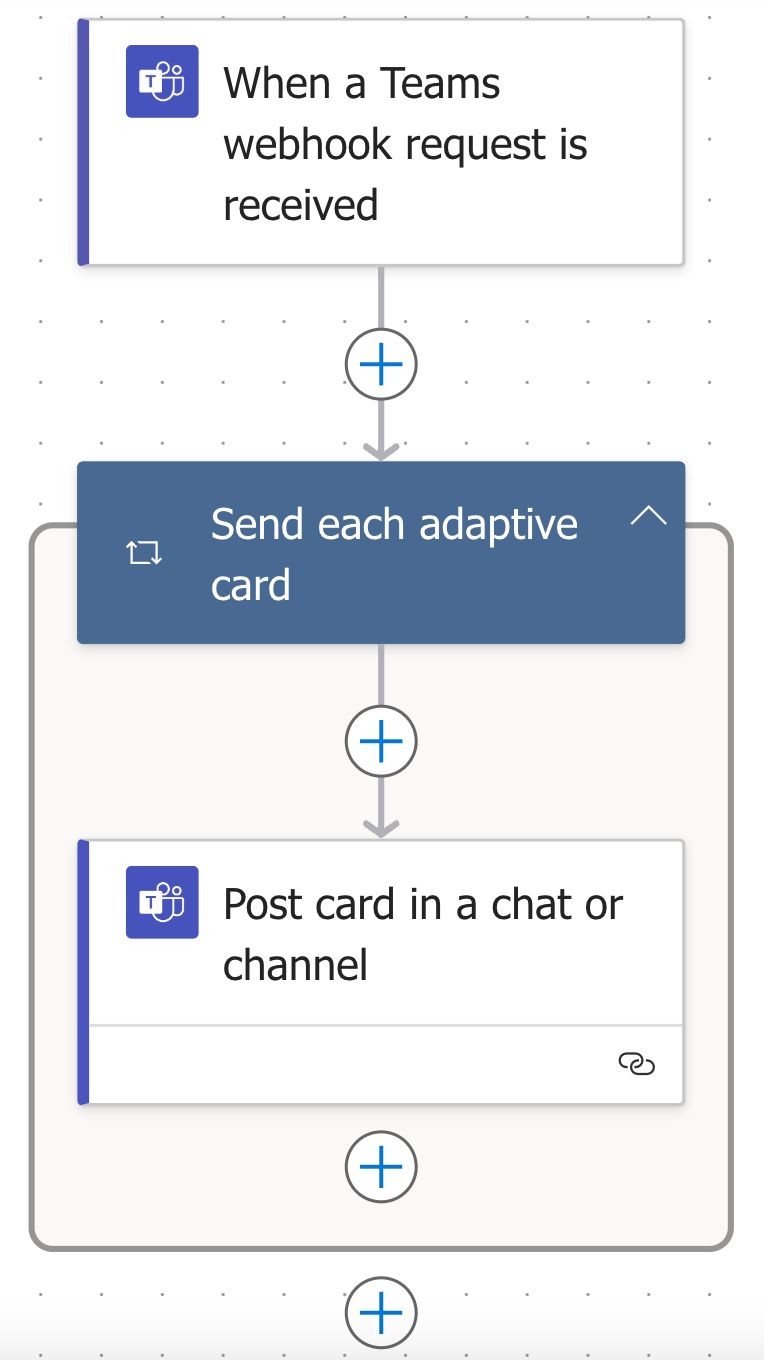
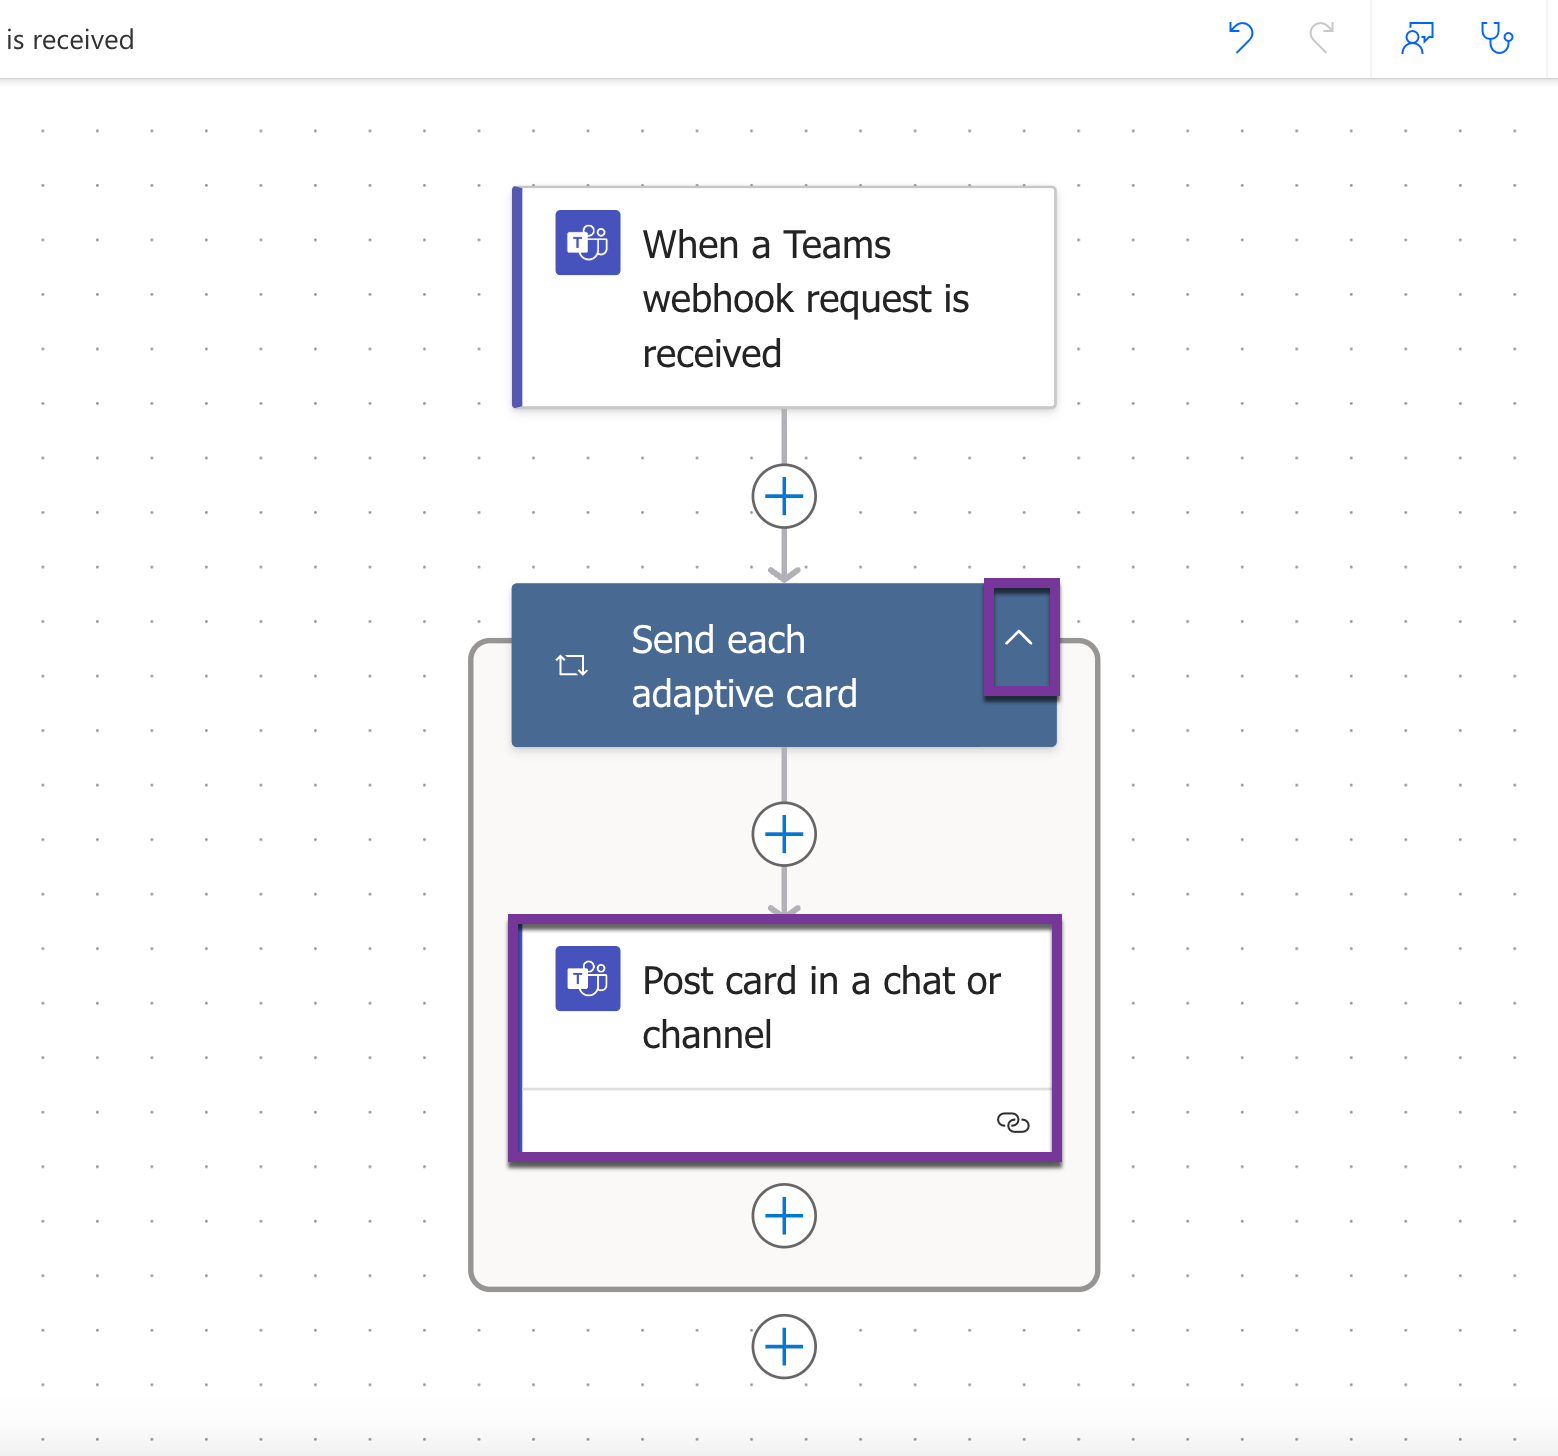
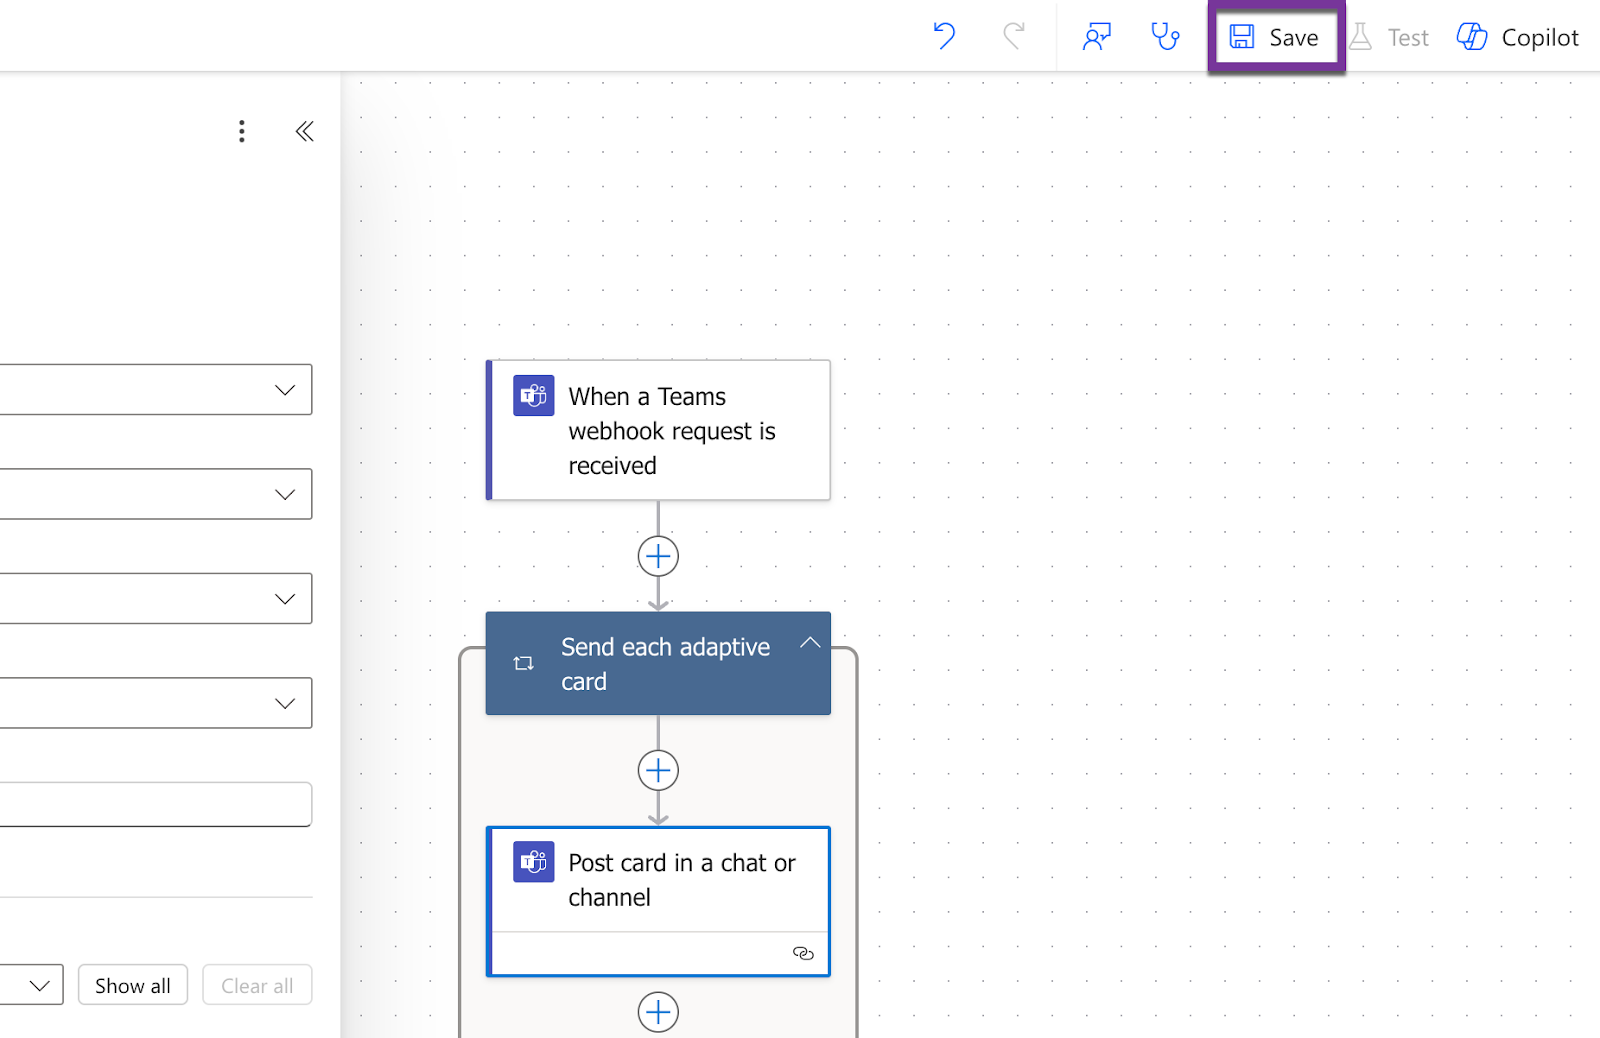
Amplía Enviar cada tarjeta adaptable y luego haz clic en Post card in a chat or channel (Publicar tarjeta en un chat o canal).
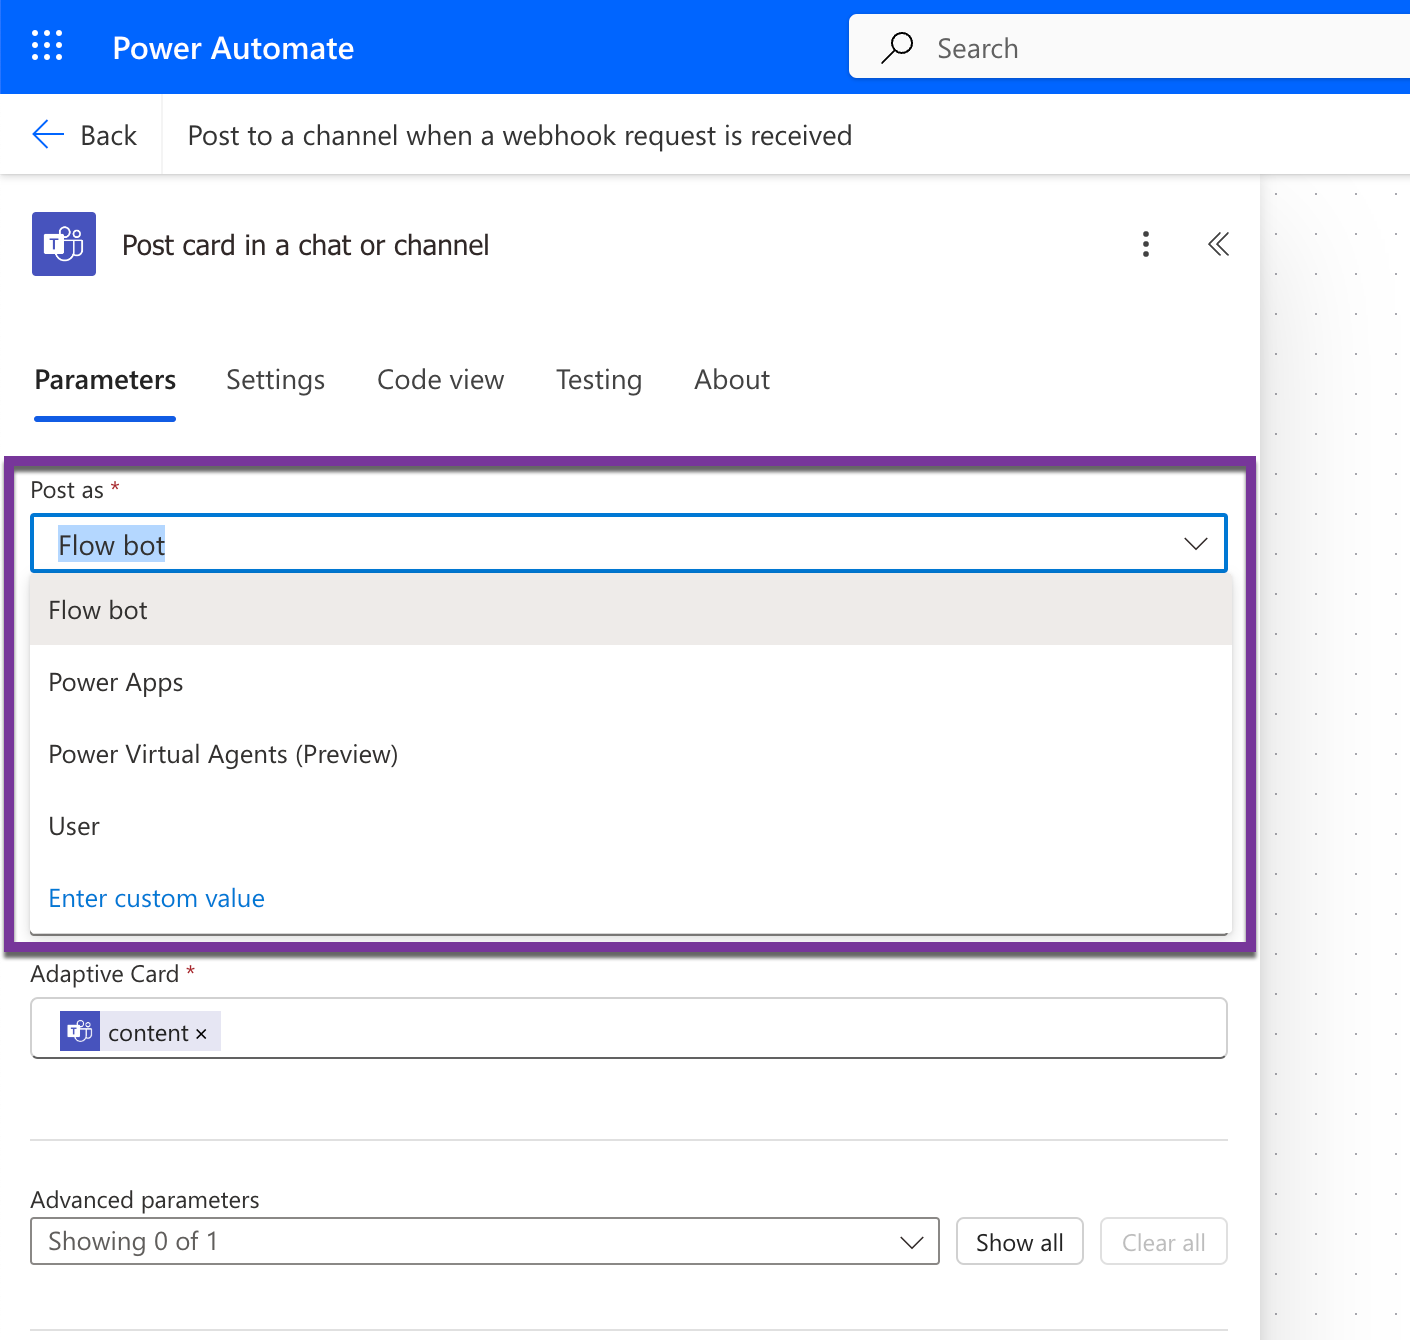
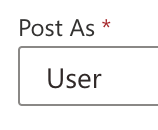
Utiliza el desplegable Post As (Publicar como) para definir Post as (Publicar como) en Flow bot (Bot de flujo). Las notificaciones aparecerán como enviadas por “
<NAME>vía Workflows”. Para recibir estas notificaciones, la aplicación Workflows debe añadirse al equipo elegido. Si se envían notificaciones a un canal privado, Post As (Publicar como) debe definirse en un usuario del canal. Para obtener más información, consulta la sección “Canales privados” a continuación. Nota: Al cambiar Post as (Publicar como) se restablecerá el campo Post in (Publicar en).Para acceder a los desplegables de equipos y canales, elimina los símbolos @ borrándolos o haciendo clic en los iconos X.
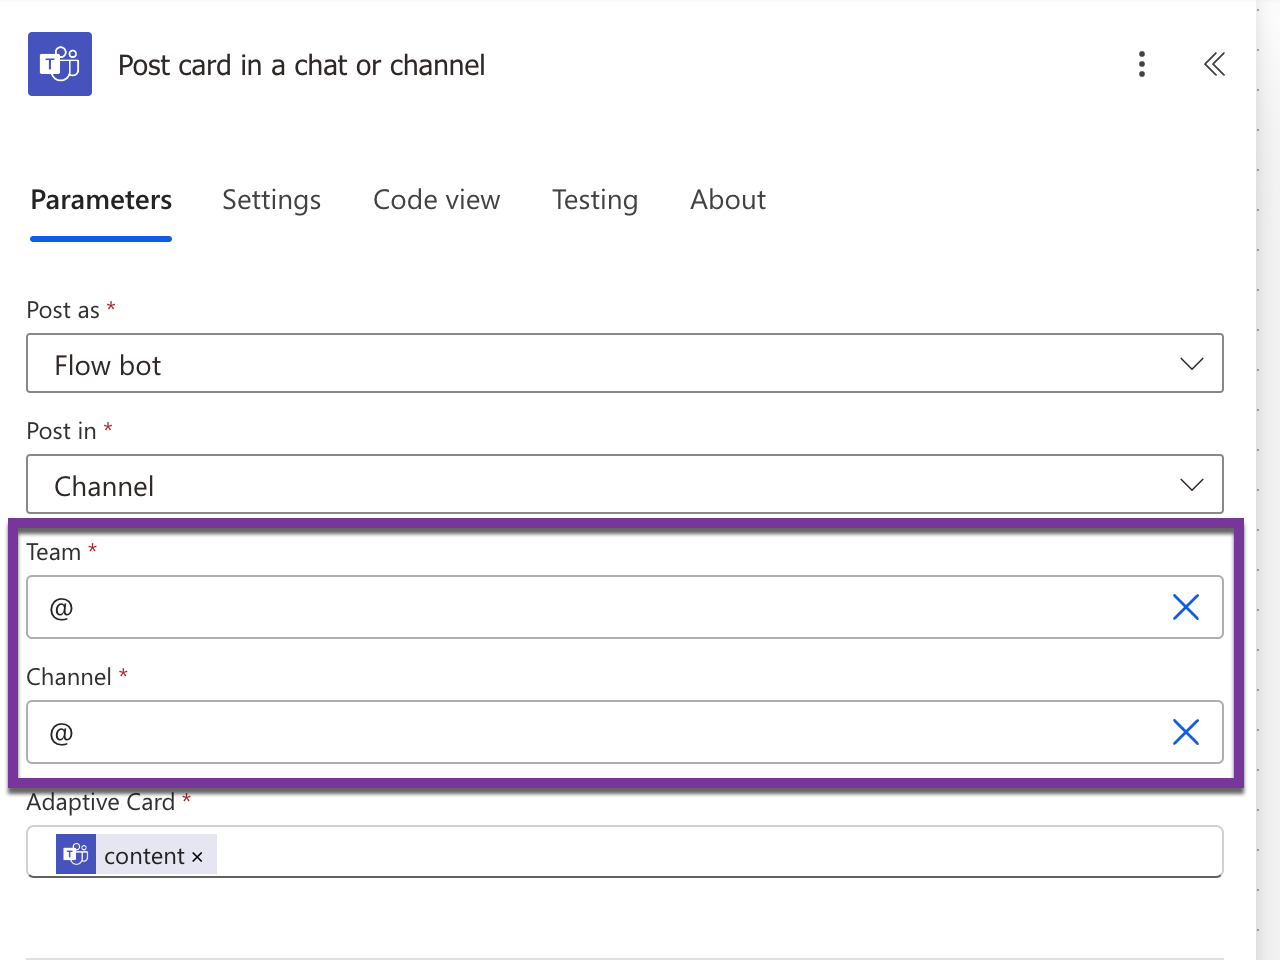
Utiliza los desplegables para seleccionar el equipo y el canal.
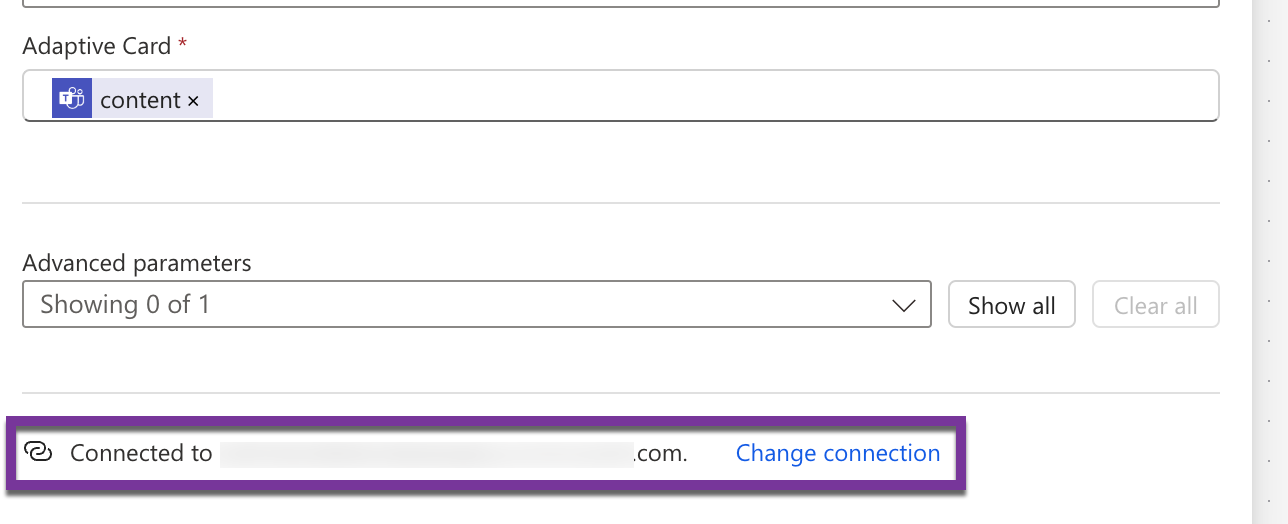
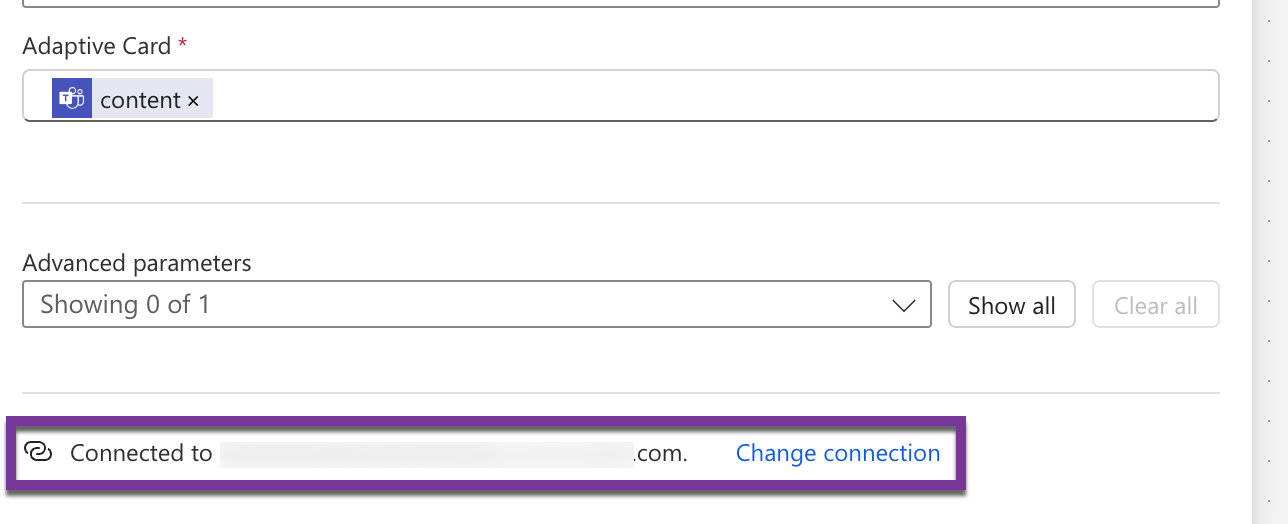
Asegúrate de que el flujo de trabajo está conectado a la cuenta de Microsoft prevista para el envío de notificaciones (por ejemplo, una cuenta de servicio denominada “Notificaciones de Datadog”). Las notificaciones aparecerán como enviadas por “
<NAME>a través de Workflows”. Esta cuenta debe tener acceso al canal de Microsoft Teams configurado. Para cambiar la cuenta, haz clic en Change connection (Cambiar connection) y sigue las instrucciones para configurar otra cuenta de Microsoft.Pulsa el botón Save (Guardar).
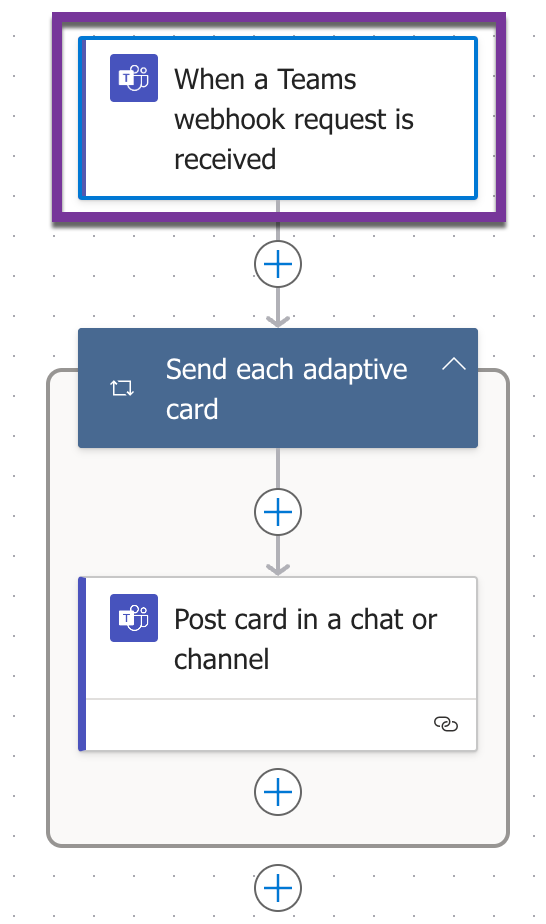
Para encontrar el enlace de tu webhook, haz clic en el primer bloque del flujo de trabajo.
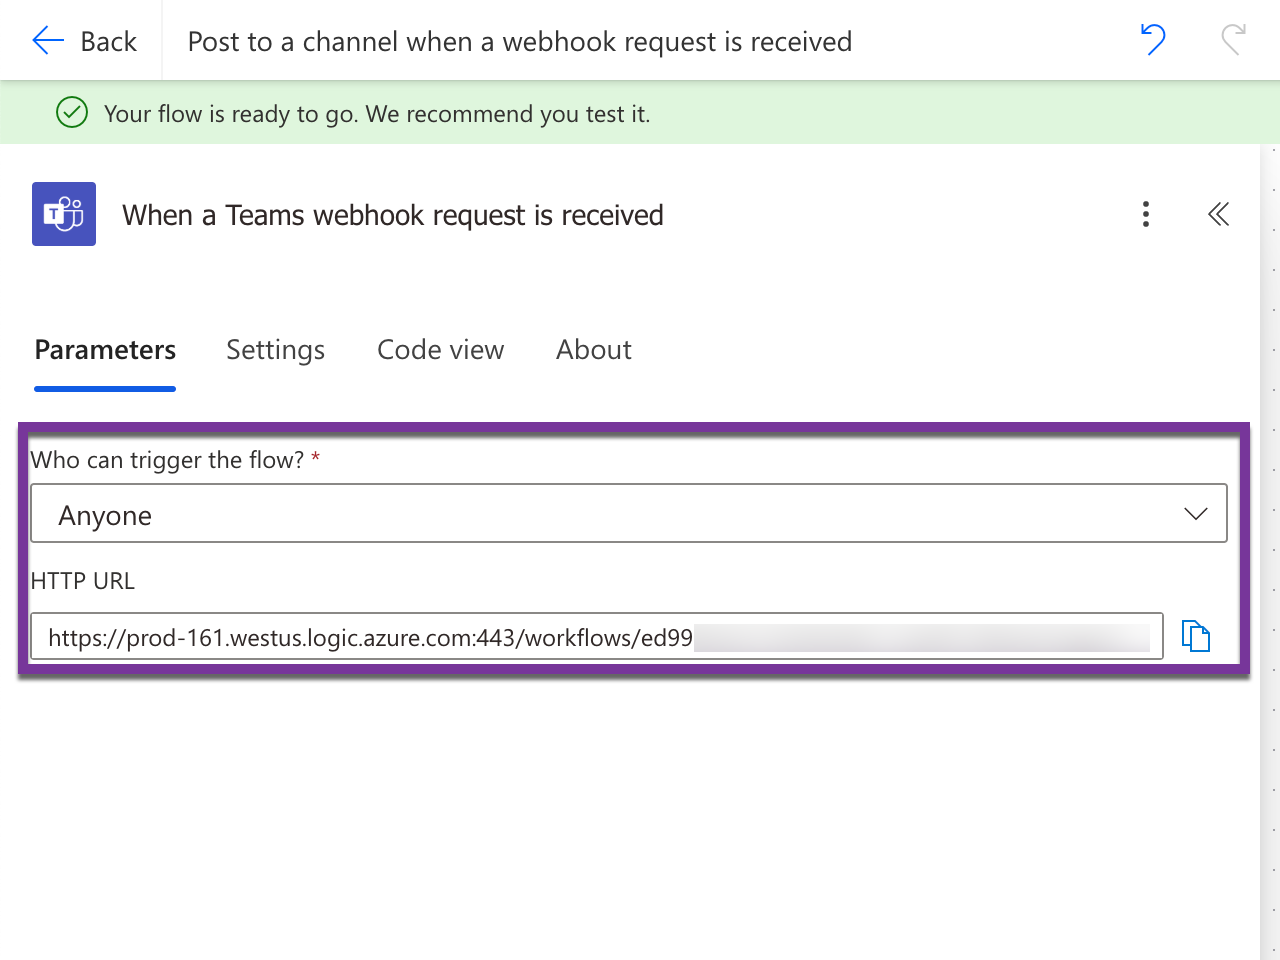
Asegúrate de que cualquiera pueda activar el flujo y luego copia el enlace.
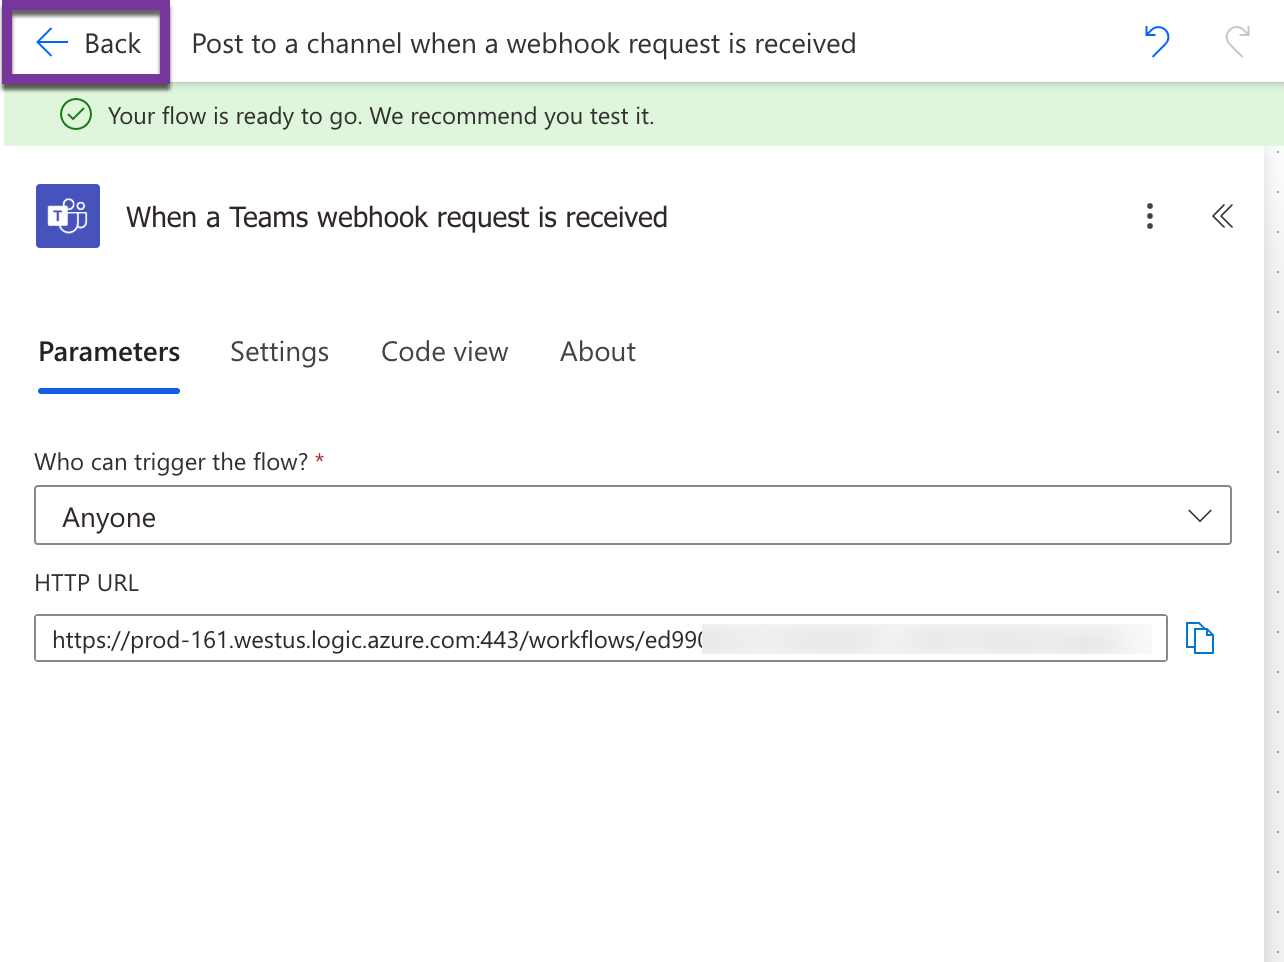
Haz clic en el botón Back (Volver) para ir al dashboard del flujo de trabajo.
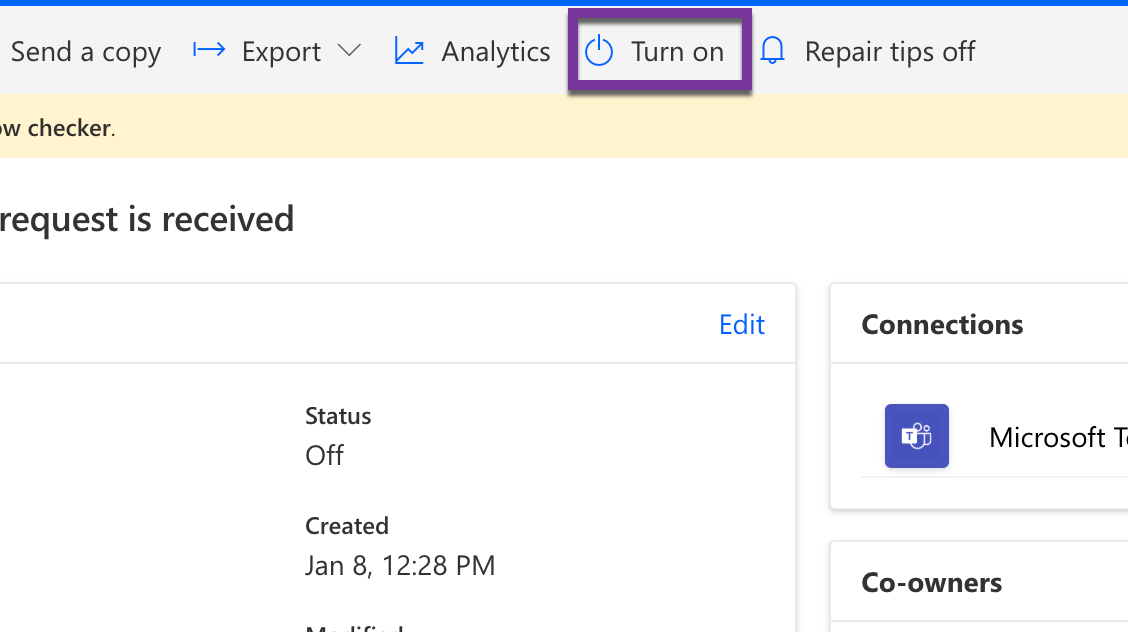
Comprueba que el flujo de trabajo está activado en el dashboard. Si está desactivado, haz clic en el botón “Turn on” (Activar).
En Datadog, ve a Integrations > Microsoft Teams (Integraciones > Microsoft Teams).
En la pestaña Configuración, ve a la sección Webhooks de Microsoft Workflows y haz clic en Add Handle (Añadir gestor). Colócale un nombre al gestor (si estás migrando desde un gestor de conector legacy, utiliza el mismo nombre del gestor de conector correspondiente) y pega la URL del webhook.
Haz clic en Save (Guardar).
Canales privados
Para enviar notificaciones a canales privados, la cuenta configurada dentro del bloque Publicar tarjeta en chat o canal debe tener acceso al canal. Esto permite que el flujo de trabajo envíe notificaciones en nombre de esa cuenta de usuario.
Dentro del bloque Publicar tarjeta en chat o canal, cambia Post as (Publicar como) a User (Usuario).
A continuación, para elegir la cuenta, haz clic en Change connection (Cambiar conexión) y sigue las instrucciones para cambiar la cuenta.
Limitaciones
Si eres cliente de Microsoft 365, los flujos de trabajo se desactivarán automáticamente después de 90 días sin activaciones exitosas. Cuando un flujo de trabajo está a punto de caducar, Microsoft envía un correo electrónico a la cuenta a la que pertenece el flujo de trabajo. Este temporizador de 90 días se puede restablecer ejecutando un test dentro de Microsoft Workflows.
Cuando se utiliza la plantilla, todos los mensajes se adjuntan con una línea de texto que indica quién ha creado el flujo de trabajo junto con un enlace a la plantilla.
Para eliminar esto, ve a tu flujo de trabajo y haz clic en Save As (Guardar como) para hacer una copia, ve hasta la copia buscándola dentro de Mis Flujos y utiliza el nuevo webhook del flujo de trabajo copiado en lugar del flujo de trabajo original.
Microsoft Workflows no admite funciones interactivas para los mensajes que publica (como silenciar monitores directamente desde Microsoft Teams).
Microsoft Workflows no admite canales compartidos.
Microsoft Workflows no admite menciones de usuarios cuando se publica un webhook de Workflows como usuario.
Utilización
Desde un monitor Datadog, envía una notificación a Microsoft Teams utilizando la función @-notification. Envía la notificación a la dirección @teams-<HANDLE>, sustituyendo <HANDLE> por el nombre de tu gestor de Microsoft Teams.
Menciones de usuarios con identificadores de webhooks de Microsoft Workflows
Las menciones de usuarios te permiten notificar a usuarios específicos de tus canales de Microsoft Teams cuando se activan las alertas de monitor. Esto ayuda a garantizar que se notifiquen los eventos importantes a las personas adecuadas. Para mencionar a un usuario específico, sigue los pasos que se indican a continuación para encontrar su nombre principal de usuario (UPN).
Sintaxis: <at>{User Principal Name}</at>
Ejemplo: <at>user@microsoft.com</at>
Ejemplo de notificación completa: @Teams-CHANNEL_NAME <at>user@microsoft.com</at> <at>another.user@microsoft.com</at>
Para encontrar el nombre de usuario principal (UPN) de un usuario:
Método 1 (sólo funciona si el UPN coincide con el correo electrónico):
- En Microsoft Teams, haz clic en la foto de perfil o en el nombre del usuario para abrir su tarjeta de contacto.
- El correo electrónico que aparece en el campo
Chatsuele ser el UPN. Si difieren, utiliza el método 2 a continuación.
Método 2 (funciona siempre, pero requiere permisos de Azure Portal):
- Inicia sesión en el Microsoft Azure Portal.
- Ve a
Microsoft Entra ID>Manage>Users. - Localiza al usuario en la lista y copia su UPN de la columna
User principal name.
Las menciones de usuarios NO son compatibles con los identificadores de webhooks de Workflows publicados como usuario (para canales privados). Incluir una mención de usuario al publicar un webhook de Workflows como usuario fallará. Para incluir menciones de usuarios utilizando webhooks de Workflows debes utilizar el Flow Bot.
Datadog recomienda probar tus notificaciones de monitor para garantizar una entrega fiable. Para obtener instrucciones, consulta Probar notificaciones.
Limitar el acceso de edición
Por defecto, todos los usuarios tienen acceso completo a cada identificador de webhook de Microsoft Workflows.
Utiliza el control de acceso granular para limitar los roles que pueden editar un identificador de webhook de Workflows específico:
- Mientras visualizas los webhooks de Workflows, pasa el ratón sobre un identificador restringido para revelar las acciones en el lado derecho de la fila.
- Haz clic en el icono del candado con la etiqueta Permisos.
- Haz clic en Restrict Access (Acceso restringido). El cuadro de diálogo se actualiza para mostrar que los miembros de tu organización tienen acceso de Visor por defecto.
- Utiliza el desplegable para seleccionar uno o varios roles, equipos o usuarios que pueden editar el identificador de webhook de Workflows.
- Haz clic en Add (Añadir). El cuadro de diálogo se actualiza para mostrar que el rol seleccionado tiene el permiso de Editor.
- Haz clic en Save (Guardar).
Nota: Para conservar tu acceso de edición al identificador de webhook de Workflows, debes incluir al menos un rol al que pertenezcas antes de guardar.
Si tienes acceso de edición, puedes restablecer el acceso general a un identificador de webhook de Workflows restringido siguiendo estos pasos:
- Mientras visualizas los webhooks de Workflows, pasa el ratón sobre el identificador restringido para revelar las acciones en el lado derecho de la fila.
- Haz clic en el icono del candado con la etiqueta Permisos.
- Haz clic en Restore Full Access (Restablecer acceso completo).
- Haz clic en Save (Guardar).
Para editar permisos de webhooks de Workflows a través de la API:
- Obtén los ID de webhooks de Workflows utilizando la API de la integración Microsoft Teams .
- Utiliza la API de políticas de restricción, donde el tipo de recurso es
integration-webhooky el ID esmicrosoft-teams:<workflows_webhook_id>.
Migrar los conectores de legacy a la integración basada en inquilinos
Microsoft ha anunciado que los conectores de Office 365 para Microsoft Teams quedan obsoletos. Esto tiene los siguientes efectos:
- Todos los conectores de Datadog dejarán de funcionar el 31 de enero de 2025.
- Los conectores de webhooks entrantes sin URL actualizadas dejarán de funcionar el 31 de enero de 2025.
- Todos los conectores dejarán de funcionar el 31 de diciembre de 2025 (previamente era el 1 de octubre de 2024).
Para obtener más información, consulta la entrada de blog de Microsoft.
Para migrar todos los gestores de notificaciones que utilizan actualmente los conectores de Office 365 legacy a la integración de Datadog basada en inquilinos:
- Sigue los pasos de configuración para conectar tu inquilino de Microsoft a Datadog.
- Añade la aplicación Datadog a todos los equipos en los que tengas configurado un conector legacy de Office 365.
- Para cada gestor de conector de notificación heredada en el Ícono de integración de Microsoft Teams :
- En el inquilino configurado, haz clic en Add Handle (Añadir gestor).
- Asigna al nuevo gestor el mismo nombre que el gestor del conector. Por ejemplo, si el gestor del conector legacy se llama
channel-123, crea un nuevo gestor en la configuración del inquilino con el nombrechannel-123. - Selecciona el equipo y el canal elegidos en los menús desplegables a los que el gestor del conector legacy enviaba el mensaje y haz clic en Save (Guardar). Este nuevo gestor anula el gestor del conector legacy existente.
- Sigue los pasos de configuración para conectar tu inquilino de Microsoft a Datadog.
- Añade la aplicación Datadog para el Gobierno a todos los equipos en los que tengas configurado un conector legacy de Office 365.
- Para cada gestor de conector de notificación heredada en el Ícono de integración de Microsoft Teams:
- En el inquilino configurado, haz clic en Add Handle (Añadir gestor).
- Asigna al nuevo gestor el mismo nombre que el gestor del conector. Por ejemplo, si el gestor del conector legacy se llama
channel-123, crea un nuevo gestor en la configuración del inquilino con el nombrechannel-123. - Selecciona el equipo y el canal elegidos en los menús desplegables a los que el gestor del conector legacy enviaba el mensaje y haz clic en Save (Guardar). Este nuevo gestor anula el gestor del conector legacy existente.
Migrar conectores legacy a la integración de webhooks de Microsoft Workflows
Microsoft ha anunciado que los conectores de Office 365 para Microsoft Teams quedan obsoletos. Esto tiene los siguientes efectos:
- Todos los conectores de Datadog dejarán de funcionar el 31 de enero de 2025.
- Los conectores de webhooks entrantes sin URL actualizadas dejarán de funcionar el 31 de enero de 2025.
- Todos los conectores dejarán de funcionar el 31 de diciembre de 2025 (previamente era el 1 de octubre de 2024).
Para obtener más información, consulta la entrada de blog de Microsoft.
Para migrar todos los gestores de notificaciones que utilizan actualmente los conectores de Office 365 legacy a la integración de webhooks de Microsoft Workflows de Datadog, consulta Webhooks de Microsoft Workflows.
Configuración del conector (obsoleto)
Los gestores de notificaciones legacy no se ven afectados por la nueva configuración, a menos que utilices el mismo
@teams-HANDLE_NAME, en cuyo caso la nueva configuración anula la configuración legacy.Selecciona el botón
...situado junto al nombre del canal en lista de canales y, a continuación, elige Connectors (Conectores).Busca Datadog y haz clic en Configure (Configurar).
En el modal de configuración del conector, copia la URL del webhook.
En Datadog, ve a Integrations > Microsoft Teams (Integraciones > Microsoft Teams).
En la pestaña Configuration (Configuración), haz clic en Add Handle (Añadir gestor), dale un nombre y pega la URL del webhook.
En el modal de configuración del conector, haz clic en Save (Guardar).
Datadog Incident Management en Microsoft Teams
Configuración de la cuenta
En primer lugar, instala la aplicación Datadog en Microsoft Teams:
Abre Microsoft Teams.
En la barra de herramientas vertical, haz clic en Apps (Aplicaciones).
Busca “Datadog” y haz clic en Open (Abrir).
En el modal que se abre, selecciona el canal principal del equipo donde debe añadirse la aplicación. Haz clic en Go (Listo) para completar la instalación.
A continuación, conecta tu inquilino de Microsoft a Datadog:
- En Datadog, ve al Ícono de integración de Microsoft Teams.
- Haz clic en Add Tenant (Agregar inquilino), que te redirigirá a Microsoft.
- Sigue las instrucciones y haz clic en OK (Aceptar).
Concesión de permisos adicionales
Algunas funciones de Incident Management de Datadog necesitan permiso para realizar acciones en tu inquiino, por ejemplo, crear un nuevo canal para un incident (incidente). Para otorgar el consentimiento de administrador en todo el inquilino, se necesita una persona autorizada para otorgarlo en nombre de la organización Microsoft, como por ejemplo, un usuario con el rol de Administrador global. Consulta la documentación de Microsoft Entra ID para obtener más información sobre quién puede otorgar el consentimiento de administrador a la aplicación Datadog.
Puedes elegir conceder a Datadog permisos de aplicación y delegados o sólo permisos delegados. El uso de permisos de aplicación y delegados es fácil de configurar, mientras que el uso de permisos delegados te ofrece un control más preciso sobre la aplicación Datadog en tu inquilino. Para obtener más información, consulta Documentación general sobre permisos y consentimiento de Microsoft.
- Navega hasta el cuadro de integración de Microsoft Teams en Datadog.
- Para el inquilino en el que quieres utilizar Incident Management, haz clic en el icono del engranaje situado a la derecha.
- Haz clic en Grant application permissions (Conceder permisos de aplicación) y se te redirigirá a Microsoft. Este paso debe realizarlo un usuario que pueda conceder el permiso de administrador de todo el inquilino. Este usuario debe tener una cuenta Datadog, pero no es necesario que el correo electrónico utilizado para su cuenta Datadog coincida con el correo electrónico de su cuenta Microsoft.
- Sigue las instrucciones y haz clic en OK (Aceptar).
Los permisos delegados permiten a Datadog operar dentro de tu inquilino Microsoft Teams como usuario. Datadog podrá realizar cualquier acción que ese usuario pueda realizar y acceder a los recursos a los que ese usuario pueda acceder.
En primer lugar, concede permisos delegados a la aplicación Datadog:
- Navega hasta el cuadro de integración de Microsoft Teams en Datadog.
- Para el inquilino en el que quieres utilizar Incident Management, haz clic en el icono del engranaje situado a la derecha.
- Haz clic en Grant delegated permissions (Conceder permisos delegados) y se te redirigirá a Microsoft. Este paso debe realizarlo un usuario que pueda conceder el permiso de administrador de todo el inquilino. Este usuario debe tener una cuenta Datadog, pero no es necesario que el correo electrónico utilizado para su cuenta Datadog coincida con el correo electrónico de su cuenta Microsoft.
- Sigue las instrucciones y haz clic en OK (Aceptar).
A continuación, crea la cuenta de servicio para que Datadog:
Cree un usuario de cuenta de servicio de Office365. Datadog recomienda asignar a este usuario de cuenta de servicio un nombre como ‘Datadog’ para distinguirlo de los usuarios reales de Microsoft Teams y evitar confusiones.
Asigne una licencia de Microsoft Teams a la cuenta de servicio.
Añada el usuario de la cuenta de servicio a cada equipo en el que quieres gestionar la respuesta a incidentes. Esto incluye los equipos donde se crean nuevos canales de incidentes y los equipos desde donde los usuarios declaran incidentes.
Asegúrate de que esos equipos tienen los siguientes permisos habilitados:
Allow members to create and update channelsAllow members to delete and restore channelsAllow members to create, update, and remove tabs
Para activar estos permisos, haz clic en … junto al nombre del equipo > Gestionar equipo > Configuración > Permisos de miembro.
Por último, conecta el usuario de la cuenta de servicio que creaste en el primera paso.
- Asegúrate de que has iniciado sesión como el usuario de la cuenta de servicio que acabas de crear. Nota: No es necesario crear un usuario Datadog para la cuenta de servicio, y el usuario de la cuenta de servicio no está conectado al usuario Datadog que realiza este paso.
- Navega hasta el cuadro de integración de Microsoft Teams en Datadog.
- Para el inquilino en el que quieres utilizar Incident Management, haz clic en el icono del engranaje situado a la derecha.
- Haz clic en Connect delegated user (Conectar usuario delegado) y se te redirigirá a Microsoft. Nota: No es necesario ser administrador de todo el inquilino para realizar este paso.
- Sigue las instrucciones y haz clic en OK (Aceptar).
Nota importante sobre los tokens de actualización
Cuando te conectas a Microsoft Teams utilizando una cuenta de servicio delegada, Datadog utiliza un token de actualización para conservar el acceso sin necesidad de iniciar sesión repetidamente. Este token puede dejar de ser válido si cambia la contraseña de la cuenta de servicio, si se desactiva la cuenta o si Microsoft revoca el token.
Estos tokens también caducan a los 90 días. Cada vez que Datadog realiza un acción en nombre del usuario delegado, se emite un nuevo token, pero si el usuario delegado no se utiliza durante 90 días, el token caduca y la integración deja de funcionar.
Si el token deja de ser válido o caduca, tendrás que volver a conectar la cuenta de servicio para restaurar la funcionalidad.
Para obtener más información, consulta la documentación de Microsoft sobre actualización de tokens en la plataforma de identidad de Microsoft.
Configuración del usuario
Para realizar acciones en Datadog desde Microsoft Teams es necesario conectar las cuentas Datadog y Microsoft Team.
Para conectar tu cuenta desde Microsoft Teams:
Abre Microsoft Teams.
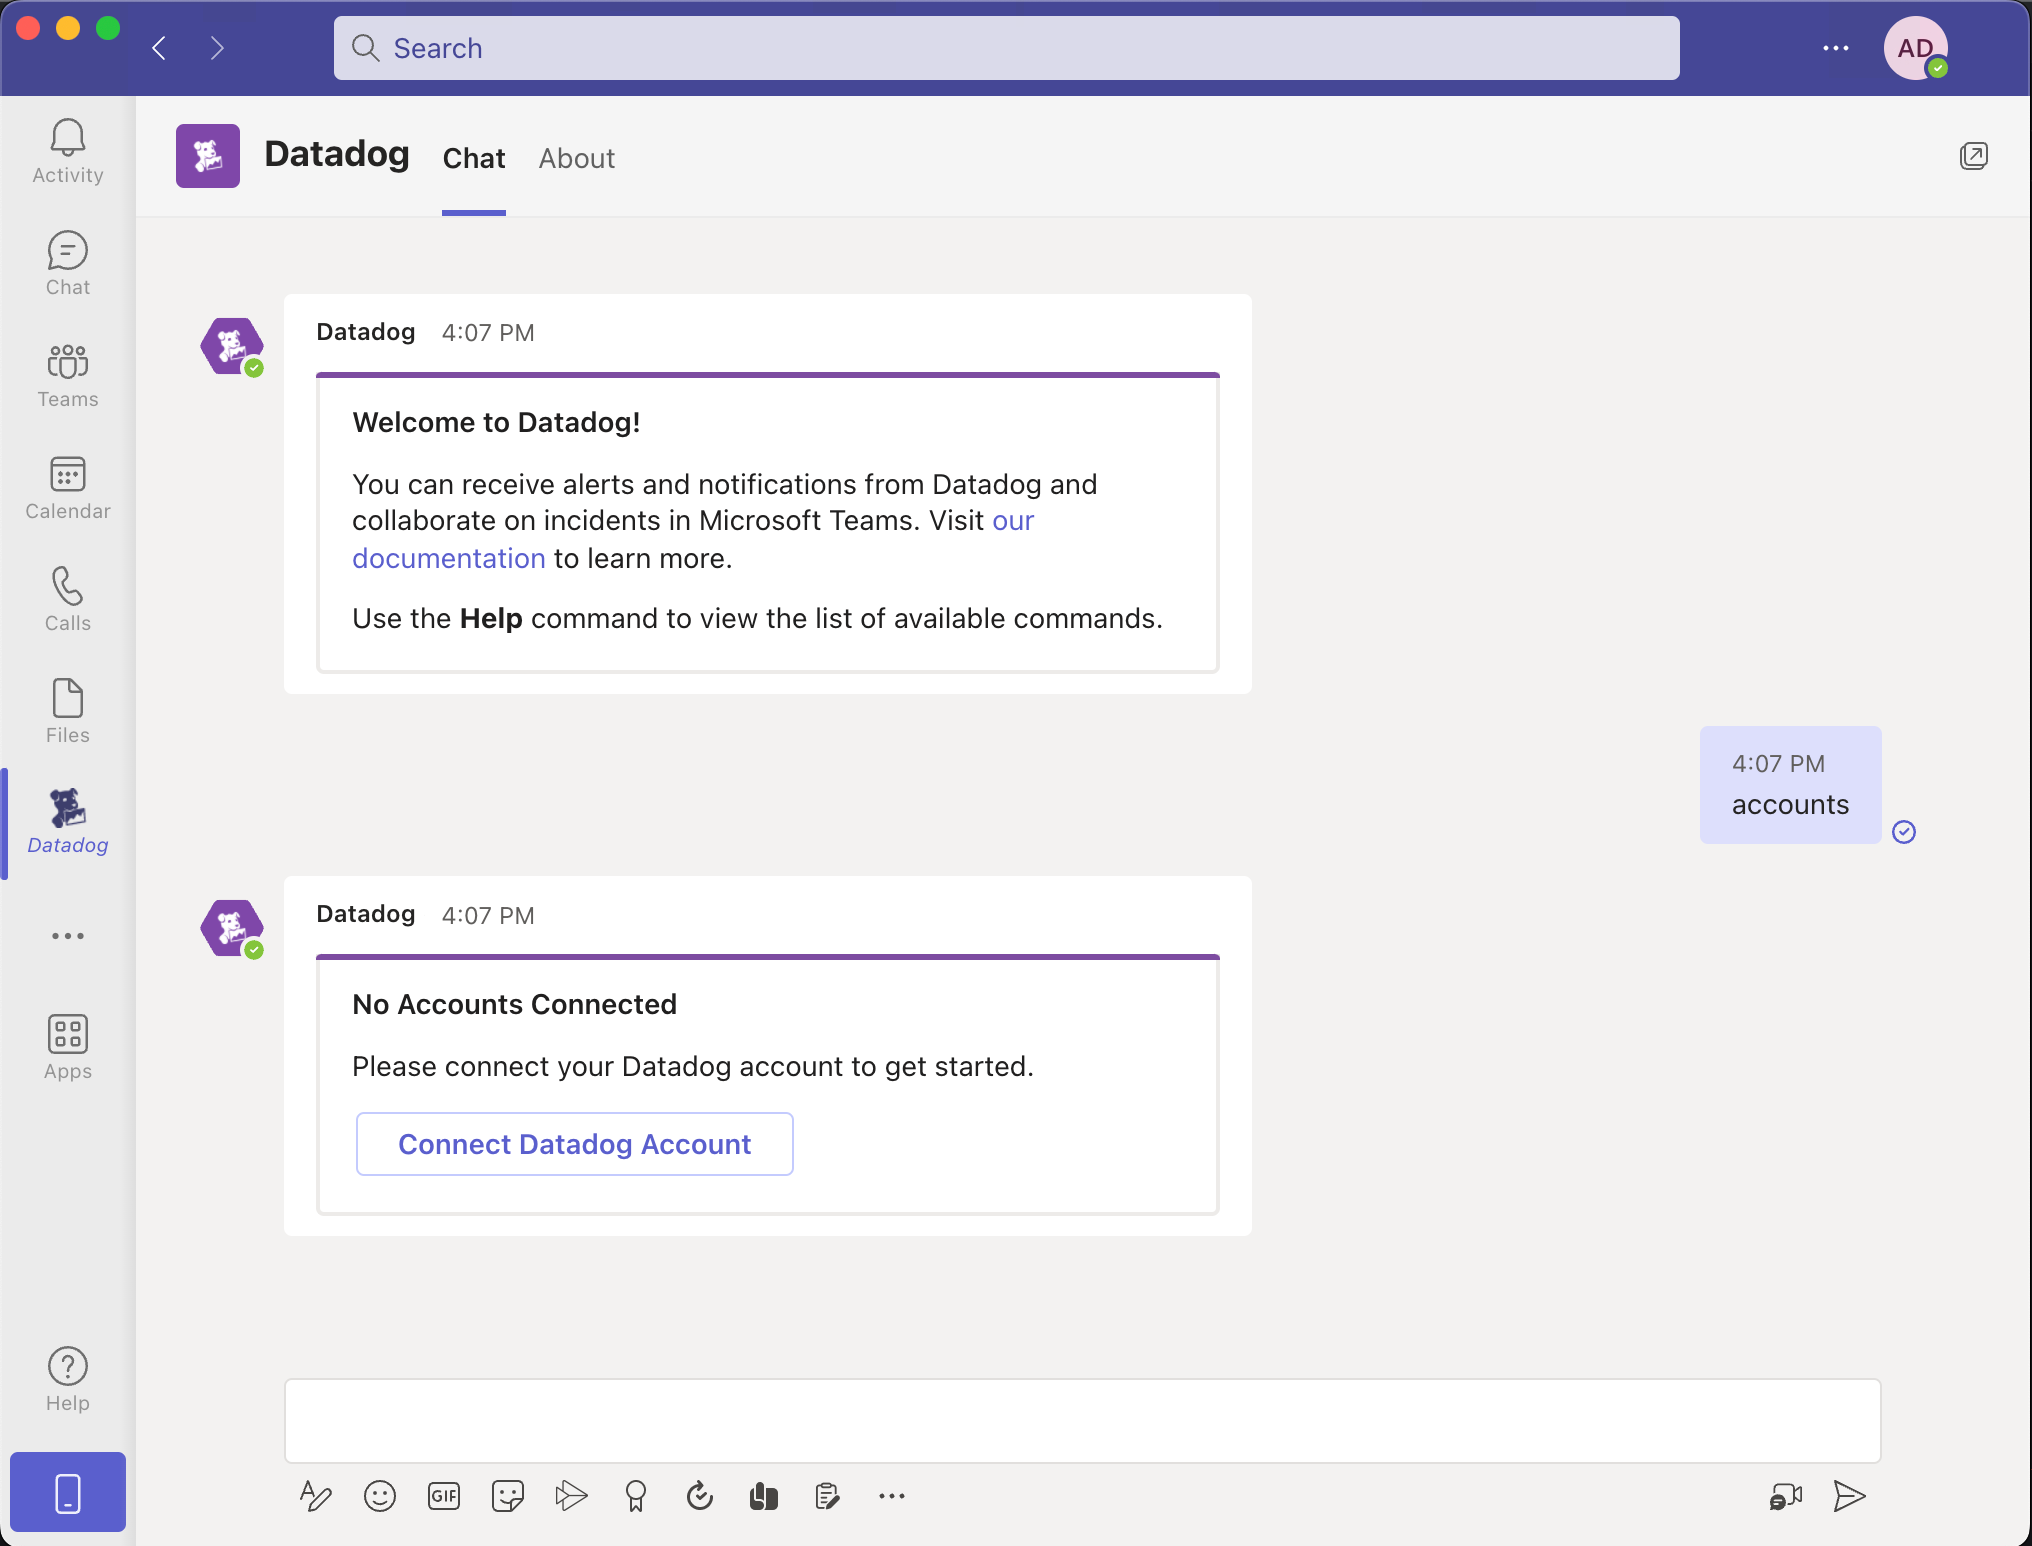
Inicia un chat con el bot de Datadog al hacer clic en el botón
...de la barra de herramientas vertical y seleccionar Datadog.Escribe “cuentas” y pulsa intro.
El bot de Datadog responderá con instrucciones sobre cómo conectar tus cuentas. Haz clic en Connect Datadog Account (Conectar cuenta Datadog).
El bot de Datadog te enviará un mensaje con un enlace para conectar tus cuentas. Haz clic en el enlace y sigue las instrucciones.
Se te redirigirá de nuevo al Ícono de integración de Microsoft Teams.
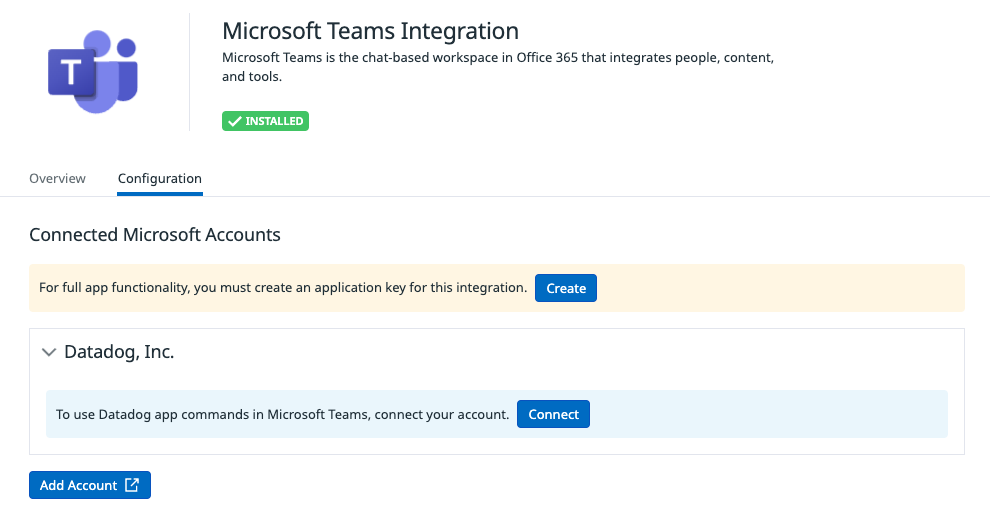
Crea una clave de aplicación haciendo clic en Crear en el Ícono de integración de Microsoft Teams.
También puedes conectar tus cuentas desde Datadog:
- En Datadog, ve al Ícono de integración de Microsoft Teams.
- Haz clic en Connect (Conectar) en el inquilino que aparece en la lista.
- Sigue las instrucciones y haz clic en OK (Aceptar).
- Desde el Ícono de integración de Microsoft Teams, crea una clave de aplicación haciendo clic en Crear en el aviso anterior.
Uso del incidente
Incidentes
Para declarar una nueva incidencia desde Microsoft Teams:
- Inicia una conversación en un canal de cualquier equipo o un chat con la aplicación Datadog.
- Tipo
@Datadog incident (incidente) - Aparece una tarjeta adaptable. Haz clic en el botón Declare Incident (Declarar incidente) para abrir la pestaña Datadog y declarar un incidente.
Un usuario debe conectar su cuenta Microsoft Teams a su cuenta Datadog para declarar un incidente.
Para actualizar una incidencia, sigue un procedimiento similar al de creación en proceso:
- Inicia una conversación en un equipo de incidencias.
- Escribe
@Datadogo utiliza el botón...para abrir el menú Connect Datadog Account. (Extensiones de mensajería) y selecciona la aplicación Datadog. - Selecciona Update Incident (Actualizar incidencia).
- Rellena el formulario con la información pertinente.
- Haz clic en Update (Actualizar).
Haz una lista de todas las incidencias abiertas (activas y estables) con:
@Datadog list incidents
Utiliza el menú “More actions” (Más acciones) en cualquier mensaje dentro de un equipo de incidencias en el extremo derecho para enviar ese mensaje a la Línea de tiempo de la incidencia.
Canal de actualización de incidencias
El uso de un canal de actualizaciones de incidencias proporciona a las partes interesadas visibilidad en toda la organización del estado de todas las incidencias directamente desde Microsoft Teams. Selecciona en qué equipo y canal de tu cuenta deseas publicar estas actualizaciones y el canal recibirá las siguientes publicaciones:
- Nuevas incidencias declaradas.
- Cambios de gravedad, transición de estado y encargado de la incidencia.
- Enlaces a la página de información general del incidente en la aplicación.
- Enlace para unirse al equipo especializado en incidencias.
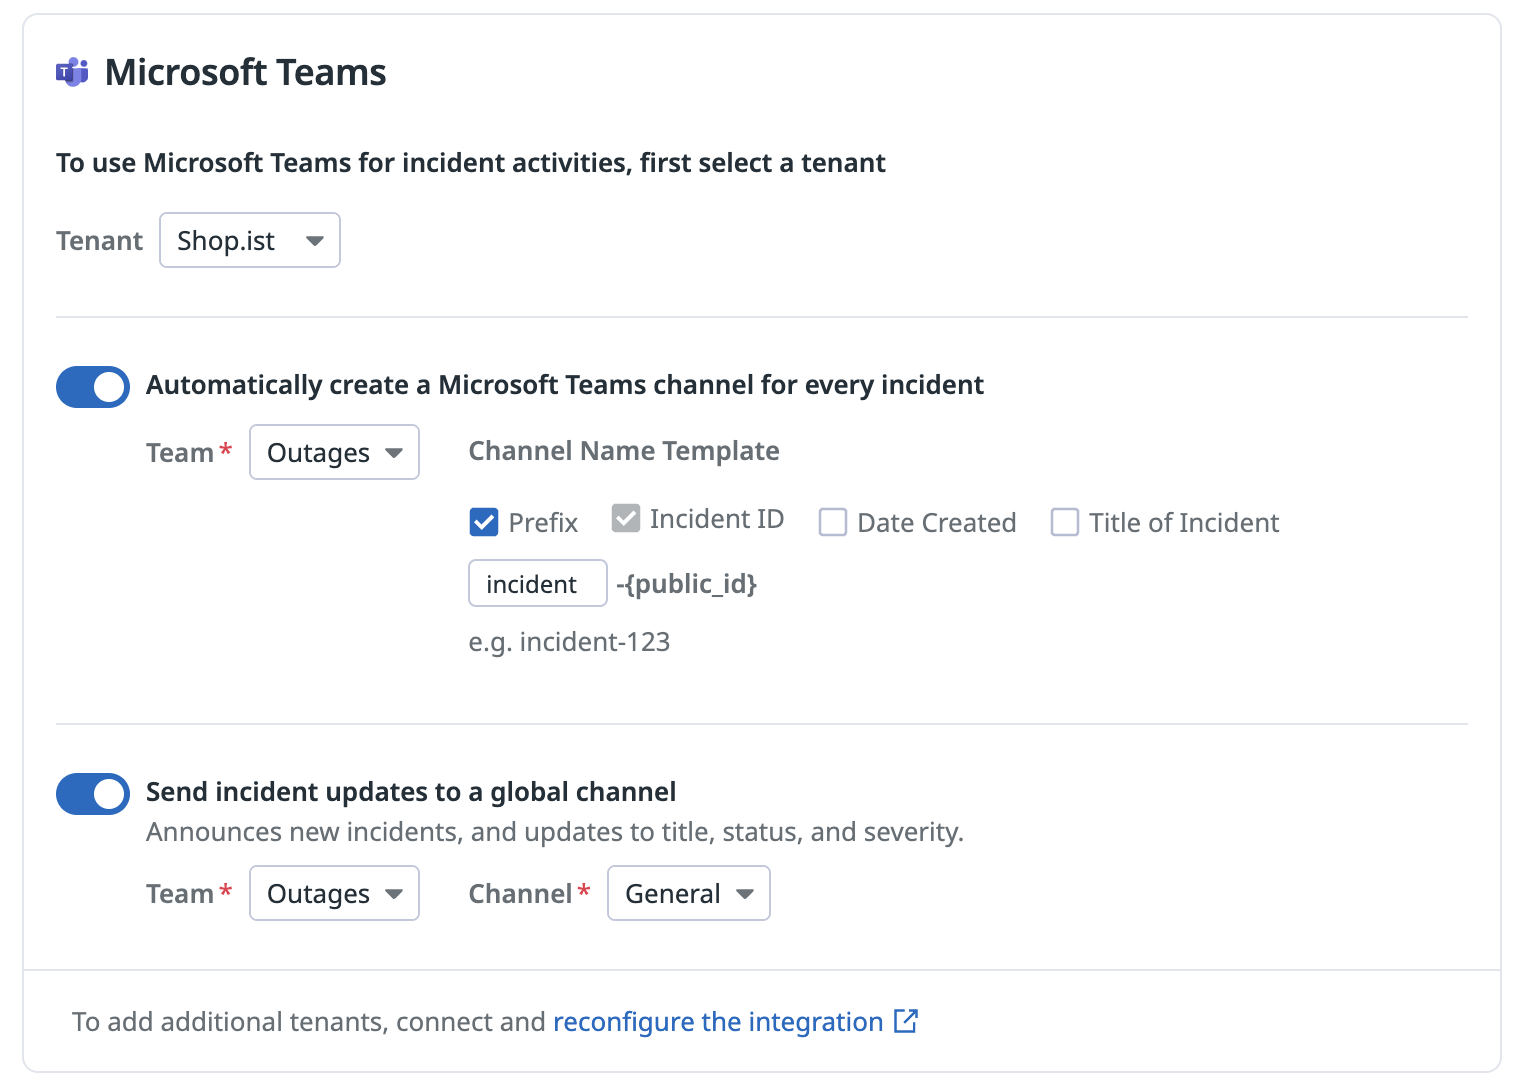
Una vez instalada la aplicación de Microsoft Teams, puedes ir a la página Incident Settings (Configuración de incidencias). Desde aquí, puedes desplazarte hasta la sección Incident Updates (Actualizaciones de incidencias) y comenzar el flujo de configuración.
Cómo crear un canal de incidencias:
- Ve a Configuración de incidentes.
- En la sección Microsoft Teams, selecciona tu inquilino de Microsoft Teams conectado.
- Activa Automatically create a Microsoft Teams channel for every incident (Crear automáticamente un canal de Microsoft Teams para cada incidencia).
- Selecciona el equipo en el que deseas crear automáticamente nuevos canales.
- Guarda la configuración.
Datos recopilados
Métricas
La integración Microsoft Teams no proporciona métricas.
Eventos
La integración Microsoft Teams no incluye eventos.
Checks de servicio
La integración Microsoft Teams no incluye checks de servicios.
Permisos
La integración de Microsoft Teams recibe los siguientes permisos para Teams al que se ha añadido. Para obtener más información, consulta [Referencia de permisos de la aplicación de Microsoft][978].
| Descripción del permiso | Motivo de la solicitud |
|---|---|
| Recibir mensajes y datos que yo le facilite. | Los usuarios pueden interactuar con la aplicación Datadog en un chat personal. |
| Enviarme mensajes y notificaciones. | Los usuarios pueden interactuar con la aplicación Datadog en un chat personal. |
| Acceder a la información de mi perfil, como mi nombre, dirección de correo electrónico, nombre de la empresa e idioma preferido. | Permitir a los usuarios configurar notificaciones de Microsoft Teams y flujos de trabajo dentro de la interfaz de usuario de Datadog. |
| Recibir mensajes y datos que los miembros de un equipo o chat le proporcionan en un canal o chat. | Los usuarios pueden interactuar con Datadog a través de los comandos @Datadog. |
| Enviar mensajes y notificaciones en un canal o chat. | Enviar notificaciones de Datadog a los objetivos configurados. |
| Acceder a la información de este equipo o chat, como el nombre del equipo o chat, la lista de canales, y la nómina (incluidos los nombres y direcciones de correo electrónico de los miembros del equipo o chat), y utilizarlos para ponerte en contacto con ellos. | Permitir a los usuarios configurar las notificaciones de Microsoft Teams y flujos de trabajo dentro de Datadog. |
Se necesitan permisos adicionales para utilizar las funciones de Incident Management en la integración de Microsoft Teams. Estos deben ser autorizados por un usuario con permisos para todo el inquilino (consulta Managment Incident de Datadog en Microsoft Teams: Configuración de la cuenta para obtener instrucciones detalladas). Para obtener más información sobre estos permisos, consulta la Referencia de permisos de Microsoft Graph.
| API/Nombre de permisos | Tipo | Motivo de la solicitud |
Channel.Create | Aplicación y delegado | Crear canales para administrar y corregir incidentes mediante Datadog Incident Management. |
Channel.Delete.All | Aplicación y delegado | Autoarchivo de canales de incidentes después de un periodo especificado. |
ChannelMessage.Read.All | Aplicación y delegado | Sincronizar automáticamente mensajes de línea temporal en la línea temporal del incidente desde un canal de incidentes. |
ChannelSettings.ReadWrite.All | Aplicación y delegado | Crear y modificar canales para corregir incidentes usando Datadog Incident Management. |
Directory.Read.All,GroupMember.Read.All | Aplicación | Ofrece sugerencias para autocompletar el nombre del equipo o el canal en la configuración de Datadog Incident Management. |
TeamsTab.Create | Aplicación y delegado | Crear una pestaña en un equipo para la aplicación de Datadog (este permiso es obligatorio para una experiencia de declaración de incidente de Microsoft Teams futura). |
OnlineMeetings.ReadWrite | Delegado | Crear automáticamente en un equipo para la aplicación de Datadog (este permiso es obligatorio para una experiencia de declaración de incidente de Microsoft Teams futura). |
TeamsAppInstallation.
ReadWriteSelfForTeam | Delegado | Permite la aplicación de Datadog para comprobar si es miembro de un equipo. |
TeamsTab.Read.All | Delegado | Comprueba si una pestaña de Datadog ha sido creada en un canal (este permiso es obligatorio para una experiencia de declaración de incidente de Microsoft Teams futura). |
User.Read | Delegado | Ofrece detalles sobre el usuario registrado para conectar una cuenta de Microsoft Teams con una cuenta de Datadog correspondiente. |
User.Read.All | Delegado | Muestra el nombre del usuario de Microsoft Teams que actualizó o creó un incidente. |
Team.ReadBasic.All | Delegado | Muestra los equipos de los que es miembro la cuenta de servicio en la página de configuración del incidente. |
| API/Nombre de permisos | Tipo | Motivo de la solicitud |
Channel.Create | Delegado | Crear canales para administrar y corregir incidentes mediante Datadog Incident Management. |
Channel.Delete.All | Delegado | Autoarchivar canales de incidentes después de un periodo especificado. |
ChannelMessage.Read.All | Delegado | Sincroniza automáticamente mensajes de línea temporal en la línea temporal del incidente desde un canal de incidente. |
ChannelSettings.ReadWrite.All | Delegado | Crear y modificar canales para corregir incidentes mediante Datadog Incident Management. |
TeamsTab.Create | Delegado | Crear una pestaña en un equipo para la aplicación de Datadog (este permiso es obligatorio para una experiencia de declaración de incidente de Microsoft Teams futura). |
OnlineMeetings.ReadWrite | Delegado | Crear automáticamente una reunión en un equipo para la aplicación de Datadog (este permiso es obligatorio para una experiencia de declaración de incidente de Microsoft Teams futura). |
TeamsAppInstallation.
ReadWriteSelfForTeam | Delegado | Permite que la aplicación de Datadog compruebe si es miembro de un equipo. |
TeamsTab.Read.All | Delegado | Comprueba si una pestaña de Datadog ha sido creada en un canal (este permiso es obligatorio para una experiencia de declaración de incidente de Microsoft Teams futura). |
User.Read | Delegado | Ofrece detalles sobre el usuario registrado para conectar una cuenta de Microsoft Teams con una cuenta de Datadog correspondiente. |
User.Read.All | Delegado | Muestra el nombre del usuario de Microsoft Teams que actualizó o creó un incidente. |
Team.ReadBasic.All | Delegado | Muestra los equipos de los que es miembro la cuenta de servicio en la página de configuración del incidente. |
Solucionar problemas
Uso de SSO
Sigue los siguientes pasos para configurar nuevos conectores de canal:
Inicia sesión en Datadog y completa los pasos 1 y 2.
Después de que el paso de configuración 3 te redirija a Datadog desde la página de MS Teams, abre una nueva pestaña e inicia sesión en Datadog con tu SSO. A continuación, realiza el paso de configuración 4 por separado.
¿Por qué no aparece mi equipo en el cuadro de la integración?
Si añadieras el bot al equipo antes de añadir el inquilino a Datadog, entonces a Datadog se le pasaría el evento de unirse al equipo al no saber que el equipo existe. Puedes tratar de:
- Sincroniza los canales estándar de tu equipo con Datadog publicando
@Datadog syncen cualquier canal estándar de ese equipo:
- Ve a un canal estándar del equipo que quieres sincronizar.
- Inicia una publicación en el canal.
- Publica
@Datadog syncen el canal y espera un mensaje de confirmación en el subproceso que indique el éxito de la operación.
- Elimina la aplicación Datadog del equipo y luego vuelve a añadirla. Nota: Esto elimina los conectores configurados para ese equipo. Realiza esta acción sólo cuando tengas todo listo para migrar todos los conectores de ese equipo a una integración Datadog basada en inquilinos:
- Haz clic en los tres puntos situados junto al nombre del equipo en la barra lateral izquierda.
- Haz clic en Manage Team (Gestionar equipo).
- Ve a pestaña con la etiqueta Apps (Aplicaciones).
- Haz clic en los tres puntos situados junto a la aplicación Datadog.
- Haz clic en Remove (Eliminar).
- Vuelve a añadir la aplicación Datadog siguiendo los pasos de configuración.
Si añadieras el bot al equipo antes de añadir el inquilino a Datadog, entonces a Datadog se le pasaría el evento de unirse al equipo al no saber que el equipo existe. Puedes tratar de:
- Sincroniza los canales estándar de tu equipo con Datadog publicando
@Datadog for Government syncen cualquier canal estándar de ese equipo:
- Ve a un canal estándar del equipo que quieres sincronizar.
- Inicia una publicación en el canal.
- Publica
@Datadog for Government syncen el canal y espera un mensaje de confirmación en el hilo indicando el éxito de la operación.
- Elimina la aplicación Datadog para el Gobierno del equipo y luego vuelve a añadirla. Nota: Esto elimina los conectores configurados para ese equipo. Realiza esta acción sólo cuando tengas todo listo para migrar todos los conectores de ese equipo a una integración Datadog basada en inquilinos.
- Haz clic en los tres puntos situados junto al nombre del equipo en la barra lateral izquierda.
- Haz clic en Manage Team (Gestionar equipo).
- Ve a pestaña con la etiqueta Apps (Aplicaciones).
- Haz clic en los tres puntos situados junto a la aplicación Datadog para el Gobierno.
- Haz clic en Remove (Eliminar).
- Vuelva a añadir la aplicación Datadog for Government siguiendo los pasos de configuración.
¿El bot admite canales privados?
Debido a las limitaciones de los canales confidenciales en Microsoft Teams, el bot no admite canales confidenciales. Si deseas enviar notificaciones a canales confidenciales, consulta Microsoft Workflows Webhooks.
¿Se admiten varias menciones de usuarios en las notificaciones de monitor?
Sí, puedes incluir varias menciones de usuarios en una sola notificación para asegurarte de que se notifica a todos los miembros pertinentes del equipo.
Ejemplo: @Teams-handle <at>user1@microsoft.com</at> <at>user2@microsoft.com</at> <at>user3@microsoft.com</at>
Cuando se incluyen diferentes menciones de usuarios en una notificación y una de ellas no es válida, los usuarios válidos seguirán recibiendo notificaciones, pero las menciones de usuarios no válidas pueden hacer que las menciones aparezcan desordenadas.
¿Es compatible la aplicación Datadog para el Gobierno con GCC o GCC High?
Actualmente, la aplicación Datadog para el Gobierno solo es compatible con los clientes de Datadog US1-FED que intentan conectarse a su inquilino commercial de Microsoft Teams. Los inquilinos GCC y GCC High no son compatibles con la aplicación.
¿Por qué no funciona una función de incidentes cuando se utilizan permisos delegados?
En primer lugar, asegúrate de que el usuario de la cuenta de servicio es miembro del equipo en el que se utiliza la función.
- Si no se está creando la pestaña de incidentes, asegúrate de que has permitido a los miembros crear, actualizar y eliminar pestañas en los canales de ese equipo.
- Si no se están creando o renombrando nuevos canales de incidentes, asegúrate de que has permitido a los miembros crear y actualizar canales en ese equipo.
- Si los canales de incidentes no se están archivando, asegúrate de que has permitido a los miembros eliminar y restaurar canales en ese equipo.
Por último, es posible que el token del usuario delegado haya caducado o haya sido revocado. Si ese es el caso, vuelve a conectar al usuario delegado.
¿Por qué se me pide que compruebe la configuración de mi aplicación cuando intento declarar un incidente?
Para utilizar la nueva experiencia de declaración de incidentes, asegúrate de lo siguiente:
- La versión de tu aplicación es 3.1.23 o superior. Consulta las instrucciones para actualizar la versión de la aplicación.
- Si utilizas permisos de aplicación, asegúrate de haber concedido el permiso de aplicación
TeamsTab.Create - Si utiliza permisos delegados, asegúrate de haber concedido los permisos delegados
TeamsTab.CreateyTeamsTab.Read.All. - Si estás utilizando permisos delegados, asegúrate de que la cuenta de servicio es miembro del equipo en el que estás ejecutando el comando
@Datadog incident (incidente).
También puedes utilizar la nueva experiencia de declaración de incidentes haciendo clic en el signo + en la parte superior de un canal y buscando la aplicación Datadog.
¿Necesitas ayuda? Ponte en contacto con el servicio de asistencia técnica de Datadog.
