- Esenciales
- Empezando
- Agent
- API
- Rastreo de APM
- Contenedores
- Dashboards
- Monitorización de bases de datos
- Datadog
- Sitio web de Datadog
- DevSecOps
- Gestión de incidencias
- Integraciones
- Internal Developer Portal
- Logs
- Monitores
- OpenTelemetry
- Generador de perfiles
- Session Replay
- Security
- Serverless para Lambda AWS
- Software Delivery
- Monitorización Synthetic
- Etiquetas (tags)
- Workflow Automation
- Centro de aprendizaje
- Compatibilidad
- Glosario
- Atributos estándar
- Guías
- Agent
- Arquitectura
- IoT
- Plataformas compatibles
- Recopilación de logs
- Configuración
- Automatización de flotas
- Solucionar problemas
- Detección de nombres de host en contenedores
- Modo de depuración
- Flare del Agent
- Estado del check del Agent
- Problemas de NTP
- Problemas de permisos
- Problemas de integraciones
- Problemas del sitio
- Problemas de Autodiscovery
- Problemas de contenedores de Windows
- Configuración del tiempo de ejecución del Agent
- Consumo elevado de memoria o CPU
- Guías
- Seguridad de datos
- Integraciones
- Desarrolladores
- Autorización
- DogStatsD
- Checks personalizados
- Integraciones
- Build an Integration with Datadog
- Crear una integración basada en el Agent
- Crear una integración API
- Crear un pipeline de logs
- Referencia de activos de integración
- Crear una oferta de mercado
- Crear un dashboard de integración
- Create a Monitor Template
- Crear una regla de detección Cloud SIEM
- Instalar la herramienta de desarrollo de integraciones del Agente
- Checks de servicio
- Complementos de IDE
- Comunidad
- Guías
- OpenTelemetry
- Administrator's Guide
- API
- Partners
- Aplicación móvil de Datadog
- DDSQL Reference
- CoScreen
- CoTerm
- Remote Configuration
- Cloudcraft
- En la aplicación
- Dashboards
- Notebooks
- Editor DDSQL
- Reference Tables
- Hojas
- Monitores y alertas
- Watchdog
- Métricas
- Bits AI
- Internal Developer Portal
- Error Tracking
- Explorador
- Estados de problemas
- Detección de regresión
- Suspected Causes
- Error Grouping
- Bits AI Dev Agent
- Monitores
- Issue Correlation
- Identificar confirmaciones sospechosas
- Auto Assign
- Issue Team Ownership
- Rastrear errores del navegador y móviles
- Rastrear errores de backend
- Manage Data Collection
- Solucionar problemas
- Guides
- Change Tracking
- Gestión de servicios
- Objetivos de nivel de servicio (SLOs)
- Gestión de incidentes
- De guardia
- Status Pages
- Gestión de eventos
- Gestión de casos
- Actions & Remediations
- Infraestructura
- Cloudcraft
- Catálogo de recursos
- Universal Service Monitoring
- Hosts
- Contenedores
- Processes
- Serverless
- Monitorización de red
- Cloud Cost
- Rendimiento de las aplicaciones
- APM
- Términos y conceptos de APM
- Instrumentación de aplicación
- Recopilación de métricas de APM
- Configuración de pipelines de trazas
- Correlacionar trazas (traces) y otros datos de telemetría
- Trace Explorer
- Recommendations
- Code Origin for Spans
- Observabilidad del servicio
- Endpoint Observability
- Instrumentación dinámica
- Live Debugger
- Error Tracking
- Seguridad de los datos
- Guías
- Solucionar problemas
- Límites de tasa del Agent
- Métricas de APM del Agent
- Uso de recursos del Agent
- Logs correlacionados
- Stacks tecnológicos de llamada en profundidad PHP 5
- Herramienta de diagnóstico de .NET
- Cuantificación de APM
- Go Compile-Time Instrumentation
- Logs de inicio del rastreador
- Logs de depuración del rastreador
- Errores de conexión
- Continuous Profiler
- Database Monitoring
- Gastos generales de integración del Agent
- Arquitecturas de configuración
- Configuración de Postgres
- Configuración de MySQL
- Configuración de SQL Server
- Configuración de Oracle
- Configuración de MongoDB
- Setting Up Amazon DocumentDB
- Conexión de DBM y trazas
- Datos recopilados
- Explorar hosts de bases de datos
- Explorar métricas de consultas
- Explorar ejemplos de consulta
- Exploring Database Schemas
- Exploring Recommendations
- Solucionar problemas
- Guías
- Data Streams Monitoring
- Data Jobs Monitoring
- Data Observability
- Experiencia digital
- Real User Monitoring
- Pruebas y monitorización de Synthetics
- Continuous Testing
- Análisis de productos
- Entrega de software
- CI Visibility
- CD Visibility
- Deployment Gates
- Test Visibility
- Configuración
- Network Settings
- Tests en contenedores
- Repositories
- Explorador
- Monitores
- Test Health
- Flaky Test Management
- Working with Flaky Tests
- Test Impact Analysis
- Flujos de trabajo de desarrolladores
- Cobertura de código
- Instrumentar tests de navegador con RUM
- Instrumentar tests de Swift con RUM
- Correlacionar logs y tests
- Guías
- Solucionar problemas
- Code Coverage
- Quality Gates
- Métricas de DORA
- Feature Flags
- Seguridad
- Información general de seguridad
- Cloud SIEM
- Code Security
- Cloud Security Management
- Application Security Management
- Workload Protection
- Sensitive Data Scanner
- Observabilidad de la IA
- Log Management
- Observability Pipelines
- Gestión de logs
- CloudPrem
- Administración
- Gestión de cuentas
- Seguridad de los datos
- Ayuda
Habilitar el SSO con Azure AD
Habilitar el inicio de sesión único (SSO) con Azure AD como proveedor de identidad te permite simplificar la autenticación y el acceso de inicio de sesión a Cloudcraft.
Este artículo te ayuda a configurar el SSO si tu proveedor de identidad es Azure AD. Para otros proveedores de identidad, consulta los siguientes artículos:
Para ver más información general sobre el uso del SSO con Cloudcraft, consulta Habilitar SSO en tu cuenta.
Configuración de SAML/SSO
Sólo el propietario de la cuenta puede configurar la función SSO SAML. Si el propietario de la cuenta no puede configurar el SSO, ponte en contacto con el equipo de asistencia de Cloudcraft para habilitar esta función.
- En Cloudcraft, ve a User > Security & SSO (Usuario > Seguridad y SSO).
- La información que necesitas para crear una nueva aplicación con Azure se encuentra en la sección Información del proveedor del servicio Cloudcraft.
- Inicia sesión en Azure como administrador.
- Haz clic en el menú situado en la esquina superior izquierda de la pantalla y selecciona Azure Active Directory.
- En la sección Gestionar del menú de la izquierda, haz clic en *Enterprise applications (Aplicaciones empresariales).
- Haz clic en New application (Nueva aplicación) y selecciona Aplicación que no es de galería.
- Introduce Cloudcraft como nombre de la aplicación y haz clic en Add (Añadir).
A continuación, configura la integración SAML utilizando la información proporcionada por Cloudcraft.
- En la sección Empezando, selecciona Configurar inicio de sesión único y luego haz clic en SAML.
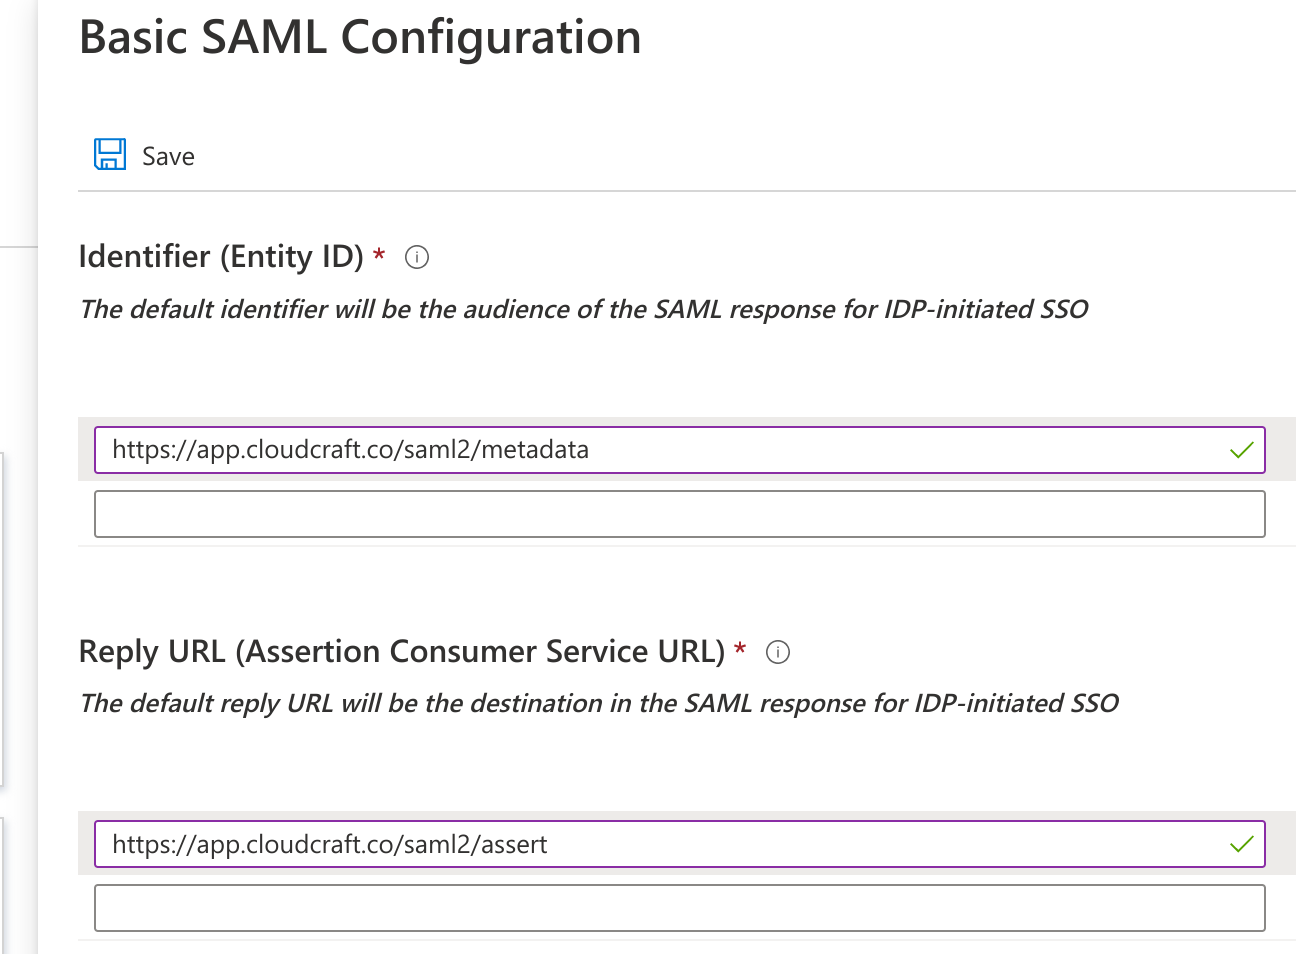
- En la sección Configuración SAML básica, haz clic en Edit (Editar).
- Introduce la información proporcionada por Cloudcraft. Los campos se asignan como sigue, siendo el primer valor la etiqueta (label) en Azure AD y el segundo la etiqueta en el diálogo de Cloudcraft.
- Identificador: ID de entidad del proveedor de servicio.
- URL de respuesta: URL de servicio del consumidor de aserciones.
- URL de inicio de sesión: Déjalo en blanco para permitir el SSO iniciado por el proveedor de identidad.
- Haz clic en Save (Guardar) para volver a la pantalla anterior.
- En la sección Certificado de firma SAML, selecciona XML de metadatos de federación y descarga el archivo XML en tu ordenador.
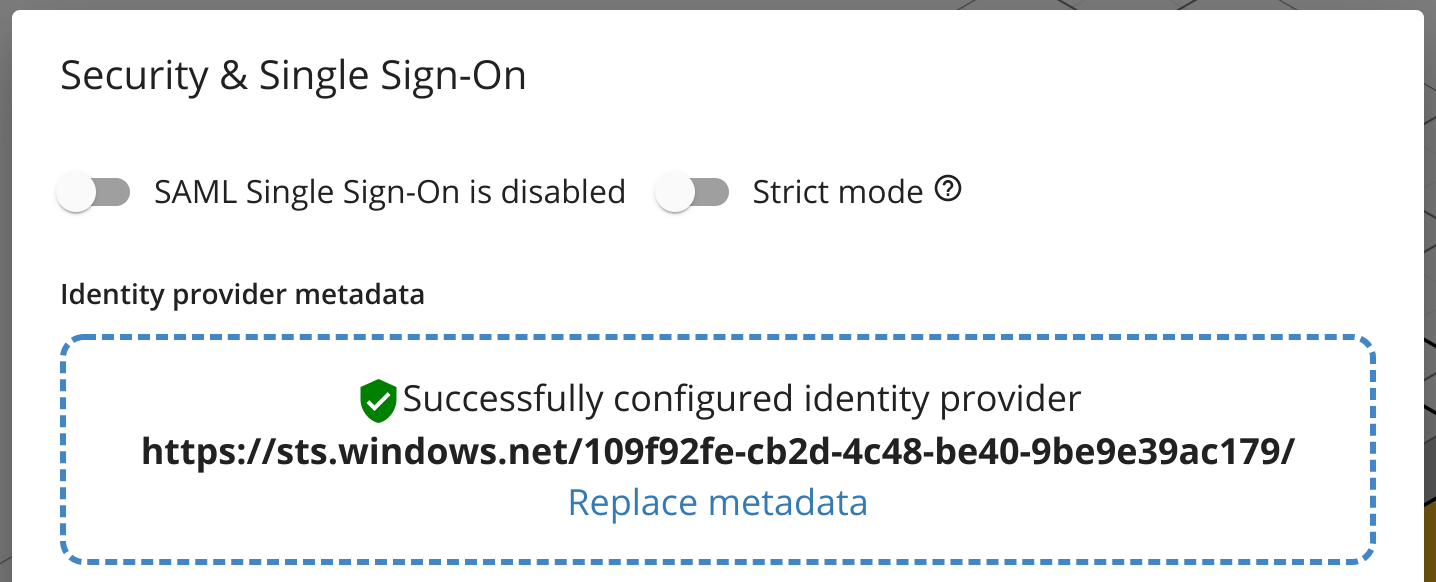
- Vuelve a Cloudcraft y carga tu archivo XML de metadatos.
- Activa la opción Inicio de sesión único SAML activado.
- Vuelve al portal Azure.
- En la sección Probar inicio de sesión único con Cloudcraft, haz clic en Test para probar tu integración.
- Si prefieres que tus usuarios accedan a Cloudcraft únicamente a través de Azure AD, activa la opción Modo estricto, que desactiva todos los demás métodos de inicio de sesión.
Nota: Para conceder acceso a los usuarios de tu organización, consulte la documentación de Azure AD.


