Overview
Sensitive data, such as credit card numbers, API keys, IP addresses, and personally identifiable information (PII) are often leaked unintentionally, which can expose your organization to security and compliance risks. Sensitive data can be found in:
- APM spans
- Code repositories
- Events from Event Management
- LLM Observability traces
- RUM events
- Telemetry data, such as application logs
Sensitive data can also be unintentionally moved to cloud storage resources when engineering teams move their workloads to the cloud. Datadog’s Sensitive Data Scanner can help prevent sensitive data leaks and limit non-compliance risks by discovering, classifying, and optionally redacting sensitive data.
Note: Datadog’s tools and policies comply with PCI v4.0. For more information, see PCI DSS Compliance.
Scan telemetry data
Sensitive Data Scanner can scan your data in the cloud or within your environment.
In the Cloud
With Sensitive Data Scanner in the Cloud, you submit logs and events to the Datadog backend, so the data leaves your environment before it gets redacted. The logs and events are scanned and redacted in the Datadog backend during processing, so sensitive data is redacted before events are indexed and shown in the Datadog UI.
The data that can be scanned and redacted are:
- Logs: All structured and unstructured log content, including log message and attribute values
- APM: Span attribute values only
- RUM: Event attribute values only
- Events: Event attribute values only
Optionally, sampling rates can be set between 10% and 99% for each product. This helps manage costs when you first get started by reducing the amount of data that gets scanned for sensitive information.
For each scanning rule, one of the following actions can be applied to matched sensitive data:
- Redact: Replace the entire matched data with a single token that you choose, such as
[sensitive_data]. - Partially redact: Replace a specific portion of all matching values.
- Hash: Replace the entire matched data with a non-reversible unique identifier.
- Mask (available for logs only): Obfuscate all matching values. Users with the
Data Scanner Unmask permission can de-obfuscate (unmask) and view this data in Datadog. See Mask action for more information.
Note: When scanning sampled data, you will not be able to select actions that obfuscate the data it scans.
To use Sensitive Data Scanner, set up a scanning group to define what data to scan and then set up scanning rules to determine what sensitive information to match within the data. For scanning rules you can:
See Set Up Sensitive Data Scanner for Telemetry Data for setup details.
In your environment
Use Observability Pipelines to collect and process your logs within your environment, and then route the data to their downstream integrations. When you set up a pipeline in Observability Pipelines, add the Sensitive Data Scanner processor to redact sensitive data in your logs before they leave your premises. You can add predefined scanning rules from the Rule Library, such as email addresses, credit card numbers, API keys, authorization tokens, IP addresses, and more. You can also create your own rules using regex patterns.
See Set Up Pipelines for more information.
Scan LLM Observability data
Sensitive Data Scanner can scan Datadog LLM Observability traces, including inputs and outputs from LLM applications. This helps prevent exposing sensitive data like PII, API keys, or proprietary information in prompts, completions, and LLM workflow metadata.
LLM Observability scanning uses a managed configuration model that differs from telemetry data scanning, where LLM Observability scanning has:
- One managed scanning group: A default scanning group is automatically created for your organization when you first access the LLM Observability Settings page. You cannot create additional scanning groups or delete the managed group.
- Customizable rules: You can modify existing rules, disable rules you don’t need, or add custom scanning rules to detect additional sensitive data patterns.
For each scanning rule, one of the following actions can be applied to matched sensitive data:
- Redact: Replace the entire matched data with a single token that you choose, such as
[sensitive_data]. - Partially redact: Replace a specific portion of all matching values.
- Hash: Replace the entire matched data with a non-reversible unique identifier.
To configure scanning for LLM Observability data, navigate to the LLM Observability Settings page in Sensitive Data Scanner settings. For more information about LLM Observability, see the LLM Observability documentation.
Scan cloud storage
Join the Preview!
Scanning support for Amazon S3 buckets and RDS instances is in Preview. To enroll, click Request Access.
Request AccessIf you have Sensitive Data Scanner enabled, you can catalog and classify sensitive data in your Amazon S3 buckets. Note: Sensitive Data Scanner does not redact sensitive data in your cloud storage resources.
Sensitive Data Scanner scans for sensitive data by deploying Agentless scanners in your cloud environments. These scanning instances retrieve a list of all S3 buckets through Remote Configuration, and have set instructions to scan text files—such as CSVs and JSONs over time.
Sensitive Data Scanner leverages its entire rules library to find matches. When a match is found, the location of the match is sent to Datadog by the scanning instance. Note: Data stores and their files are only read in your environment—no sensitive data that was scanned is sent back to Datadog.
Along with displaying sensitive data matches, Sensitive Data Scanner surfaces any security issues detected by Cloud Security affecting the sensitive data stores. You can click any issue to continue triage and remediation within Cloud Security.
See Set up Sensitive Data Scanner for Cloud Storage for setup details.
Scan code repositories
Datadog Secret Scanning scans code repositories to detect exposed secrets in the source code. Secret Scanning is powered by Sensitive Data Scanner and uses all rules from the Secrets and credentials category of the SDS library to find matches.
Unlike telemetry data scanning, Secret Scanning operates in your CI/CD pipelines or directly in Datadog with hosted scanning (supported for GitHub, Azure DevOps, and GitLab). When secrets are detected in the code, findings are surfaced in the Code Security interface.
See the Secret Scanning documentation for setup details.
Investigate sensitive data findings
Use the Findings page to see details of sensitive data findings identified by your scanning rules. These details include:
- The specific scanning rule that detected the matches, so that you can determine which rules to modify as needed.
- The scanning group in which the finding has occurred, so that you can determine the blast radius of any leaks.
- The number of events associated with the finding to help you gauge its scope and severity.
- A graph of the events associated with the finding to help you pinpoint when a finding started and see how it has progressed.
- Related cases created for the finding.
See Investigate Sensitive Data Findings for more information on triaging sensitive data using the Findings page.
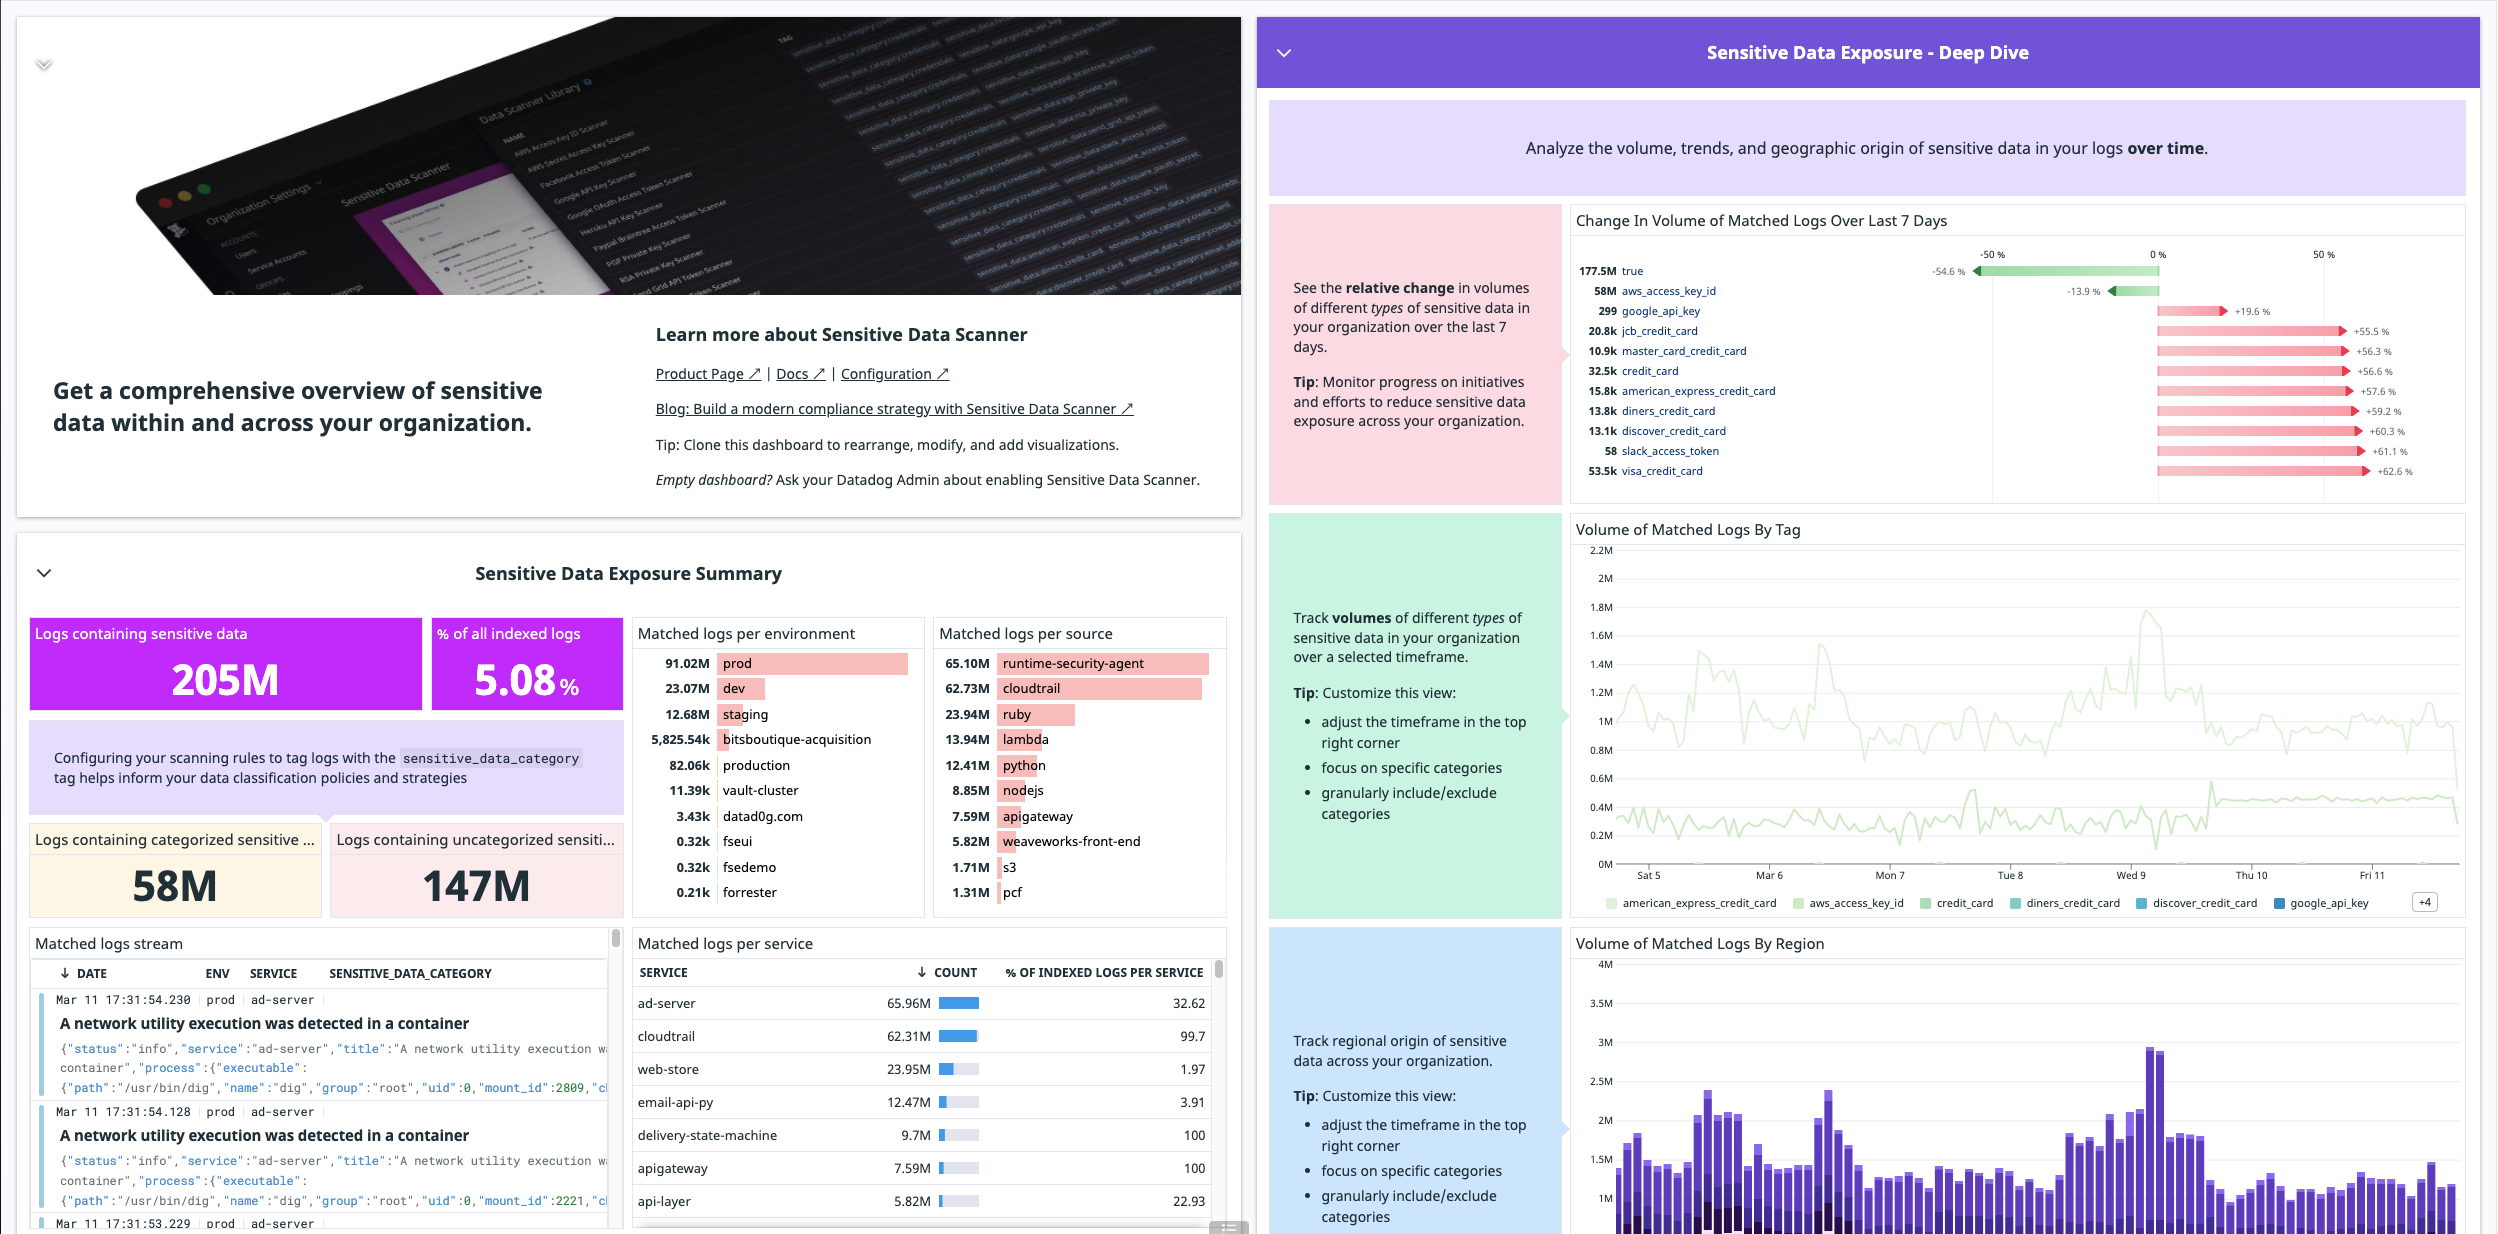
Review sensitive data trends
When Sensitive Data Scanner is enabled, an out-of-the-box dashboard summarizing sensitive data findings is automatically installed in your account. To access this dashboard, navigate to Dashboards > Dashboards List and search for “Sensitive Data Scanner Overview”.
Further reading
Additional helpful documentation, links, and articles: