- Essentials
- Getting Started
- Agent
- API
- APM Tracing
- Containers
- Dashboards
- Database Monitoring
- Datadog
- Datadog Site
- DevSecOps
- Incident Management
- Integrations
- Internal Developer Portal
- Logs
- Monitors
- Notebooks
- OpenTelemetry
- Profiler
- Search
- Session Replay
- Security
- Serverless for AWS Lambda
- Software Delivery
- Synthetic Monitoring and Testing
- Tags
- Workflow Automation
- Learning Center
- Support
- Glossary
- Standard Attributes
- Guides
- Agent
- Integrations
- Developers
- Authorization
- DogStatsD
- Custom Checks
- Integrations
- Build an Integration with Datadog
- Create an Agent-based Integration
- Create an API-based Integration
- Create a Log Pipeline
- Integration Assets Reference
- Build a Marketplace Offering
- Create an Integration Dashboard
- Create a Monitor Template
- Create a Cloud SIEM Detection Rule
- Install Agent Integration Developer Tool
- Service Checks
- IDE Plugins
- Community
- Guides
- OpenTelemetry
- Administrator's Guide
- API
- Partners
- Datadog Mobile App
- DDSQL Reference
- CoScreen
- CoTerm
- Remote Configuration
- Cloudcraft (Standalone)
- In The App
- Dashboards
- Notebooks
- DDSQL Editor
- Reference Tables
- Sheets
- Monitors and Alerting
- Service Level Objectives
- Metrics
- Watchdog
- Bits AI
- Internal Developer Portal
- Error Tracking
- Change Tracking
- Event Management
- Incident Response
- Actions & Remediations
- Infrastructure
- Cloudcraft
- Resource Catalog
- Universal Service Monitoring
- End User Device Monitoring
- Hosts
- Containers
- Processes
- Serverless
- Network Monitoring
- Storage Management
- Cloud Cost
- Application Performance
- APM
- Continuous Profiler
- Database Monitoring
- Agent Integration Overhead
- Setup Architectures
- Setting Up Postgres
- Setting Up MySQL
- Setting Up SQL Server
- Setting Up Oracle
- Setting Up Amazon DocumentDB
- Setting Up MongoDB
- Connecting DBM and Traces
- Data Collected
- Exploring Database Hosts
- Exploring Query Metrics
- Exploring Query Samples
- Exploring Database Schemas
- Exploring Recommendations
- Troubleshooting
- Guides
- Data Streams Monitoring
- Data Observability
- Digital Experience
- Real User Monitoring
- Synthetic Testing and Monitoring
- Continuous Testing
- Product Analytics
- Session Replay
- Software Delivery
- CI Visibility
- CD Visibility
- Deployment Gates
- Test Optimization
- Code Coverage
- PR Gates
- DORA Metrics
- Feature Flags
- Security
- Security Overview
- Cloud SIEM
- Code Security
- Cloud Security
- App and API Protection
- AI Guard
- Workload Protection
- Sensitive Data Scanner
- AI Observability
- Log Management
- Observability Pipelines
- Configuration
- Sources
- Processors
- Destinations
- Packs
- Akamai CDN
- Amazon CloudFront
- Amazon VPC Flow Logs
- AWS Application Load Balancer Logs
- AWS CloudTrail
- AWS Elastic Load Balancer Logs
- AWS Network Load Balancer Logs
- Cisco ASA
- Cloudflare
- F5
- Fastly
- Fortinet Firewall
- HAProxy Ingress
- Istio Proxy
- Juniper SRX Firewall Traffic Logs
- Netskope
- NGINX
- Okta
- Palo Alto Firewall
- Windows XML
- ZScaler ZIA DNS
- Zscaler ZIA Firewall
- Zscaler ZIA Tunnel
- Zscaler ZIA Web Logs
- Search Syntax
- Scaling and Performance
- Monitoring and Troubleshooting
- Guides and Resources
- Log Management
- CloudPrem
- Administration
(LEGACY) Route Logs in Datadog-Rehydratable Format to Amazon S3
This product is not supported for your selected Datadog site. ().
The Observability Pipelines Datadog Archives destination is in beta.
Overview
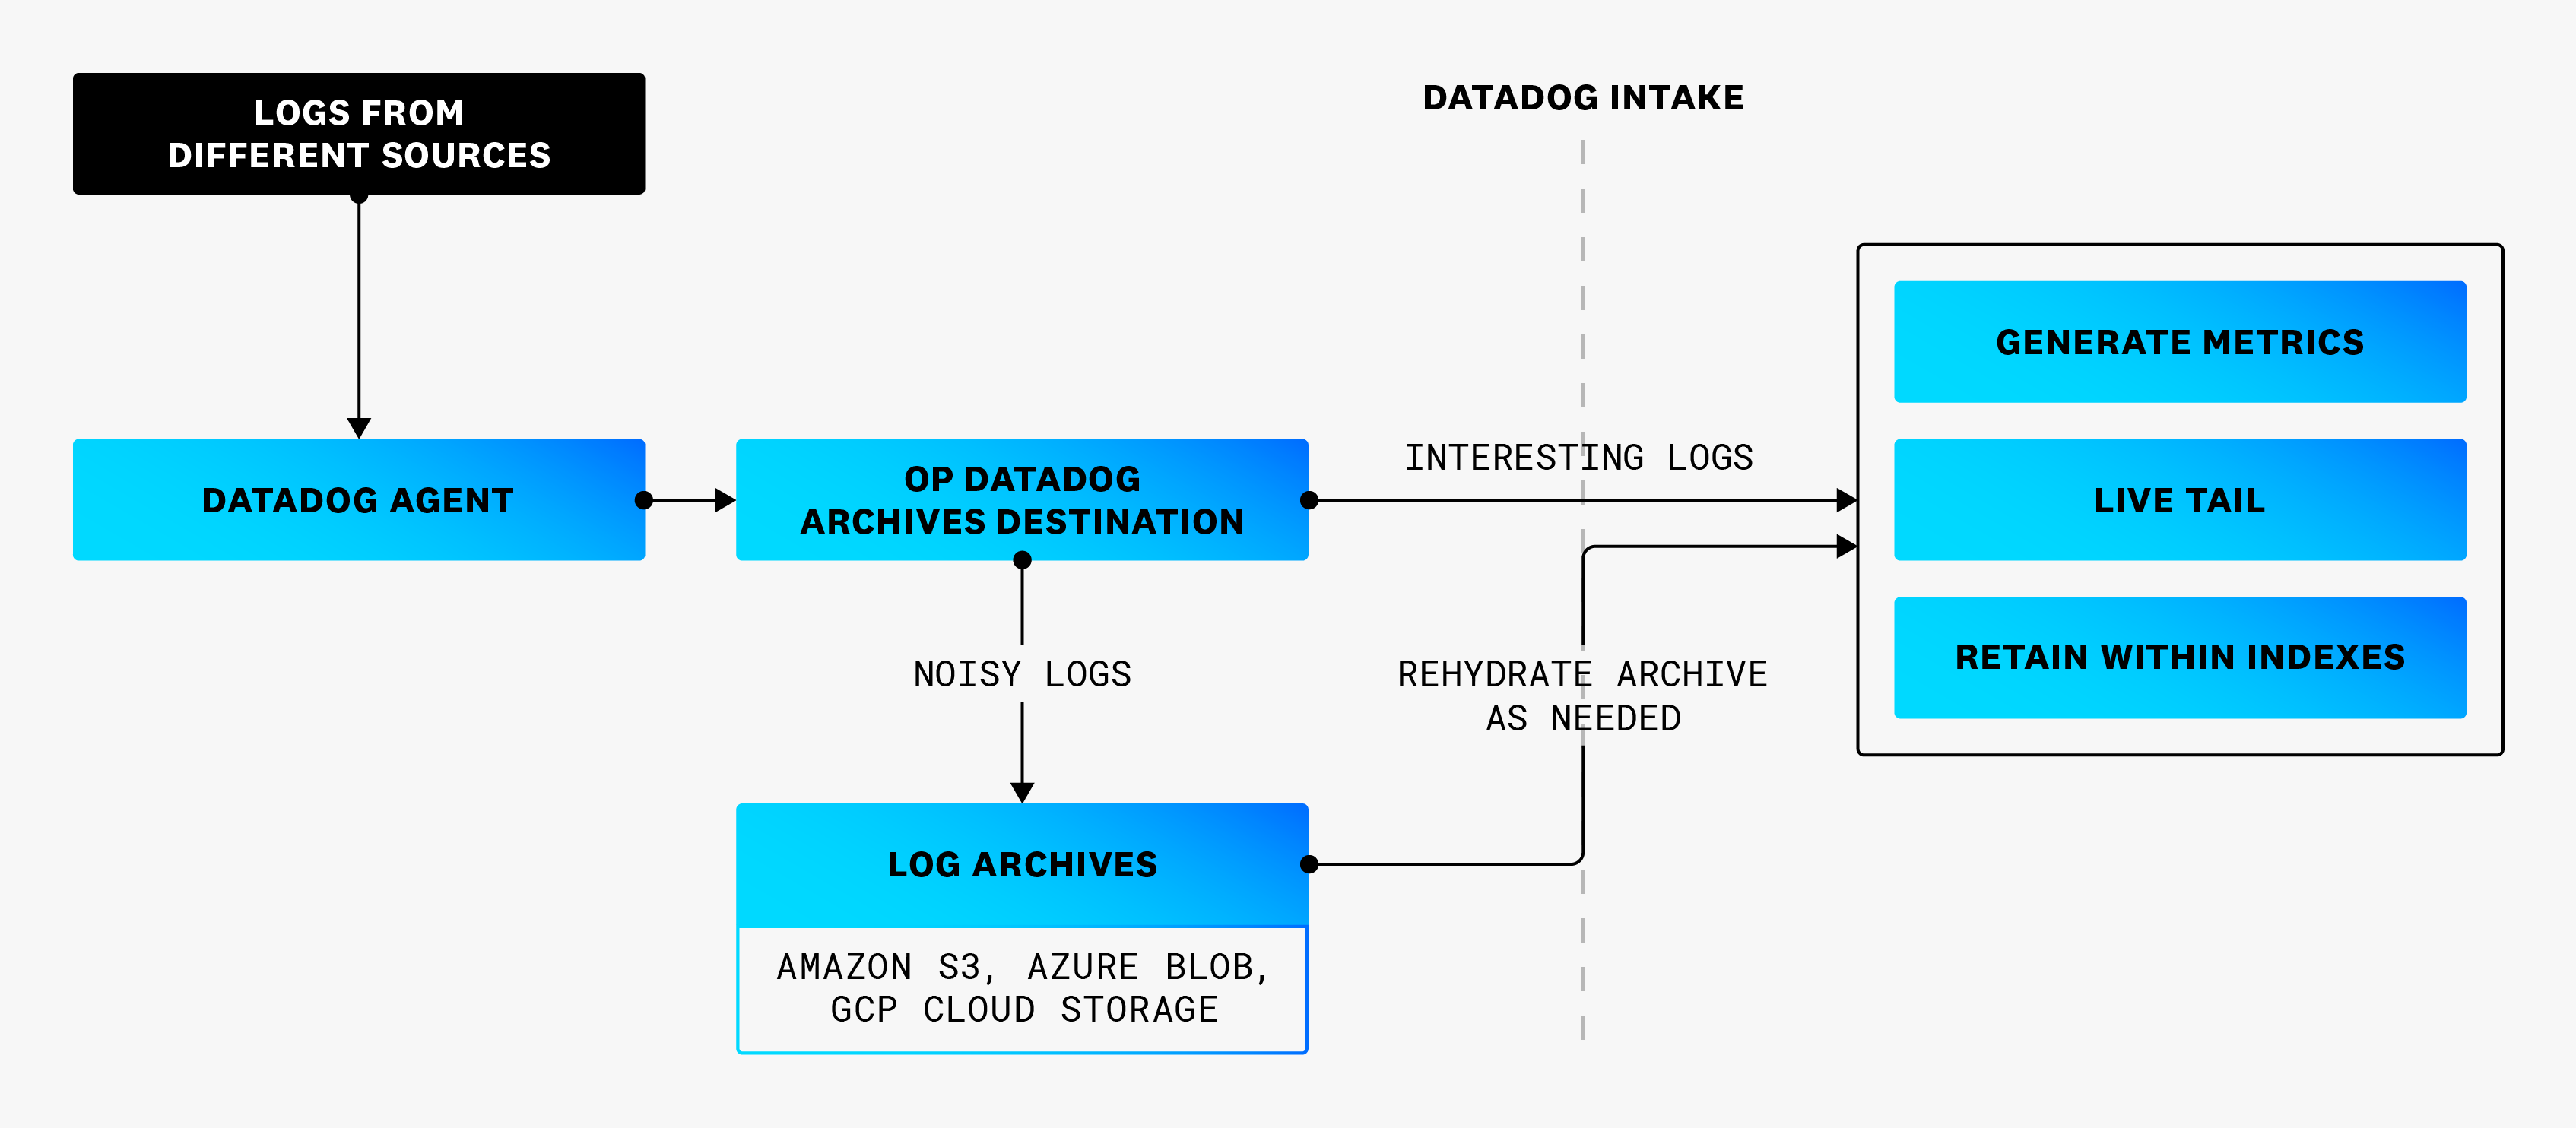
The Observability Pipelines datadog_archives destination formats logs into a Datadog-rehydratable format and then routes them to Log Archives. These logs are not ingested into Datadog, but are routed directly to the archive. You can then rehydrate the archive in Datadog when you need to analyze and investigate them.
The Observability Pipelines Datadog Archives destination is useful when:
- You have a high volume of noisy logs, but you may need to index them in Log Management ad hoc.
- You have a retention policy.
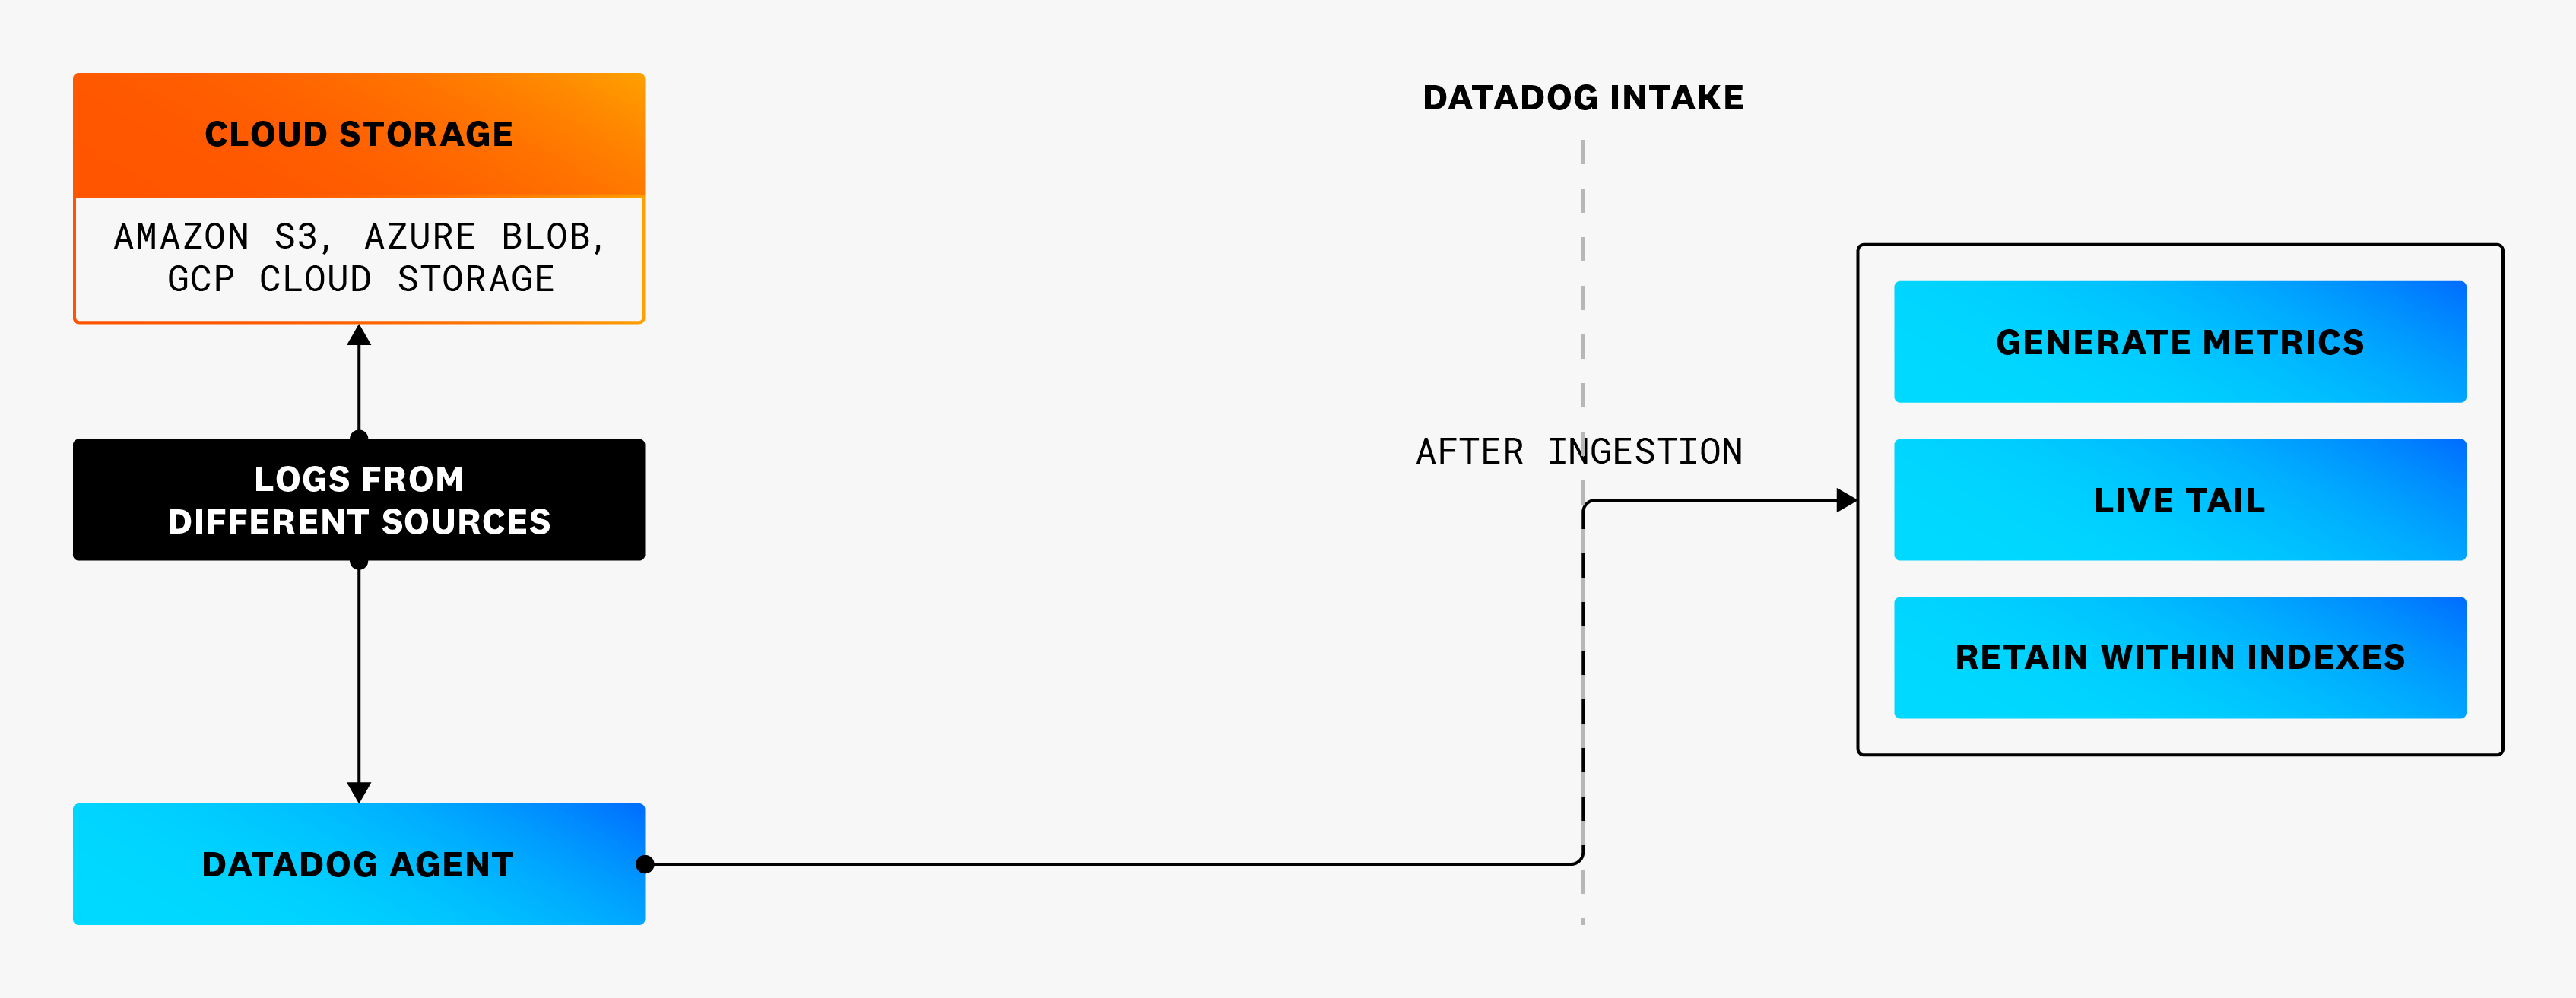
For example in this first diagram, some logs are sent to a cloud storage for archiving and others to Datadog for analysis and investigation. However, the logs sent directly to cloud storage cannot be rehydrated in Datadog when you need to investigate them.
In this second diagram, all logs are going to the Datadog Agent, including the logs that went to a cloud storage in the first diagram. However, in the second scenario, before the logs are ingested into Datadog, the datadog_archives destination formats and routes the logs that would have gone directly to a cloud storage to Datadog Log Archives instead. The logs in Log Archive can be rehydrated in Datadog when needed.
This guide walks you through how to:
datadog_archives is available for Observability Pipelines Worker version 1.5 and later.
Configure a Log Archive
Create an Amazon S3 bucket
See AWS Pricing for inter-region data transfer fees and how cloud storage costs may be impacted.
- Navigate to Amazon S3 buckets.
- Click Create bucket.
- Enter a descriptive name for your bucket.
- Do not make your bucket publicly readable.
- Optionally, add tags.
- Click Create bucket.
Set up an IAM policy that allows Workers to write to the S3 bucket
- Navigate to the IAM console.
- Select Policies in the left side menu.
- Click Create policy.
- Click JSON in the Specify permissions section.
- Copy the below policy and paste it into the Policy editor. Replace
<MY_BUCKET_NAME>and<MY_BUCKET_NAME_1_/_MY_OPTIONAL_BUCKET_PATH_1>with the information for the S3 bucket you created earlier.{ "Version": "2012-10-17", "Statement": [ { "Sid": "DatadogUploadAndRehydrateLogArchives", "Effect": "Allow", "Action": ["s3:PutObject", "s3:GetObject"], "Resource": "arn:aws:s3:::<MY_BUCKET_NAME_1_/_MY_OPTIONAL_BUCKET_PATH_1>/*" }, { "Sid": "DatadogRehydrateLogArchivesListBucket", "Effect": "Allow", "Action": "s3:ListBucket", "Resource": "arn:aws:s3:::<MY_BUCKET_NAME>" } ] } - Click Next.
- Enter a descriptive policy name.
- Optionally, add tags.
- Click Create policy.
Create an IAM user
Create an IAM user and attach the IAM policy you created earlier to it.
- Navigate to the IAM console.
- Select Users in the left side menu.
- Click Create user.
- Enter a user name.
- Click Next.
- Select Attach policies directly.
- Choose the IAM policy you created earlier to attach to the new IAM user.
- Click Next.
- Optionally, add tags.
- Click Create user.
Create access credentials for the new IAM user. Save these credentials as AWS_ACCESS_KEY and AWS_SECRET_ACCESS_KEY.
Create a service account
Create a service account to use the policy you created above. In the Helm configuration, replace ${DD_ARCHIVES_SERVICE_ACCOUNT} with the name of the service account.
Create an IAM user
Create an IAM user and attach the IAM policy you created earlier to it.
- Navigate to the IAM console.
- Select Users in the left side menu.
- Click Create user.
- Enter a user name.
- Click Next.
- Select Attach policies directly.
- Choose the IAM policy you created earlier to attach to the new IAM user.
- Click Next.
- Optionally, add tags.
- Click Create user.
Create access credentials for the new IAM user. Save these credentials as AWS_ACCESS_KEY and AWS_SECRET_ACCESS_KEY.
Attach the policy to the IAM instance profile
Attach the policy to the IAM Instance Profile that is created with Terraform, which you can find under the iam-role-name output.
Connect the S3 bucket to Datadog Log Archives
- Navigate to Datadog Log Forwarding.
- Click Add a new archive.
- Enter a descriptive archive name.
- Add a query that filters out all logs going through log pipelines so that none of those logs go into this archive. For example, add the query
observability_pipelines_read_only_archive, assuming no logs going through the pipeline have that tag added. - Select AWS S3.
- Select the AWS Account that your bucket is in.
- Enter the name of the S3 bucket.
- Optionally, enter a path.
- Check the confirmation statement.
- Optionally, add tags and define the maximum scan size for rehydration. See Advanced settings for more information.
- Click Save.
See the Log Archives documentation for additional information.
Configure the datadog_archives destination
You can configure the datadog_archives destination using the configuration file or the pipeline builder UI.
If the Worker is ingesting logs that are not coming from the Datadog Agent and are routed to the Datadog Archives destination, those logs are not tagged with reserved attributes. This means that you lose Datadog telemetry and the benefits of unified service tagging. For example, say your syslogs are sent to
datadog_archives and those logs have the status tagged as severity instead of the reserved attribute of status and the host tagged as hostname instead of the reserved attribute host. When these logs are rehydrated in Datadog, the status for the logs are all set to info and none of the logs will have a hostname tag.Configuration file
For manual deployments, the sample pipelines configuration file for Datadog includes a sink for sending logs to Amazon S3 under a Datadog-rehydratable format.
In the sample pipelines configuration file, replace AWS_ACCESS_KEY_ID and AWS_SECRET_ACCESS_KEY with the AWS credentials you created earlier.
In the sample pipelines configuration file, replace AWS_ACCESS_KEY_ID and AWS_SECRET_ACCESS_KEY with the AWS credentials you created earlier.
In the sample pipelines configuration file, replace AWS_ACCESS_KEY_ID and AWS_SECRET_ACCESS_KEY with the AWS credentials you created earlier.
In the sample pipelines configuration file, replace AWS_ACCESS_KEY_ID and AWS_SECRET_ACCESS_KEY with the AWS credentials you created earlier.
Replace ${DD_ARCHIVES_BUCKET} and ${DD_ARCHIVES_REGION} parameters based on your S3 configuration.
Pipeline builder UI
- Navigate to your Pipeline.
- (Optional) Add a remap transform to tag all logs going to
datadog_archives.- Click Edit and then Add More in the **Add Transforms.
- Click the Remap tile.
- Enter a descriptive name for the component.
- In the Inputs field, select the source to connect this destination to.
- Add
.sender = "observability_pipelines_worker"in the Source section. - Click Save.
- Navigate back to your pipeline.
- Click Edit.
- Click Add More in the Add Destination tile.
- Click the Datadog Archives tile.
- Enter a descriptive name for the component.
- Select the sources or transforms to connect this destination to.
- In the Bucket field, enter the name of the S3 bucket you created earlier.
- Enter
aws_s3in the Service field. - Toggle AWS S3 to enable those specific configuration options.
- In the Storage Class field, select the storage class in the dropdown menu.
- Set the other configuration options based on your use case.
- Click Save.
- In the Bucket field, enter the name of the S3 bucket you created earlier.
- Enter
azure_blobin the Service field. - Toggle Azure Blob to enable those specific configuration options.
- Enter the Azure Blob Storage Account connection string.
- Set the other configuration options based on your use case.
- Click Save.
- In the Bucket field, enter the name of the S3 bucket you created earlier.
- Enter
gcp_cloud_storagein the Service field. - Toggle GCP Cloud Storage to enable those specific configuration options.
- Set the configuration options based on your use case.
- Click Save.
If you are using Remote Configuration, deploy the change to your pipeline in the UI. For manual configuration, download the updated configuration and restart the worker.
See Datadog Archives reference for details on all configuration options.
Rehydrate your archive
See Rehydrating from Archives for instructions on how to rehydrate your archive in Datadog so that you can start analyzing and investigating those logs.
Further reading
Additional helpful documentation, links, and articles:


