- Essentials
- Getting Started
- Agent
- API
- APM Tracing
- Containers
- Dashboards
- Database Monitoring
- Datadog
- Datadog Site
- DevSecOps
- Incident Management
- Integrations
- Internal Developer Portal
- Logs
- Monitors
- Notebooks
- OpenTelemetry
- Profiler
- Search
- Session Replay
- Security
- Serverless for AWS Lambda
- Software Delivery
- Synthetic Monitoring and Testing
- Tags
- Workflow Automation
- Learning Center
- Support
- Glossary
- Standard Attributes
- Guides
- Agent
- Integrations
- Developers
- Authorization
- DogStatsD
- Custom Checks
- Integrations
- Build an Integration with Datadog
- Create an Agent-based Integration
- Create an API-based Integration
- Create a Log Pipeline
- Integration Assets Reference
- Build a Marketplace Offering
- Create an Integration Dashboard
- Create a Monitor Template
- Create a Cloud SIEM Detection Rule
- Install Agent Integration Developer Tool
- Service Checks
- IDE Plugins
- Community
- Guides
- OpenTelemetry
- Administrator's Guide
- API
- Partners
- Datadog Mobile App
- DDSQL Reference
- CoScreen
- CoTerm
- Remote Configuration
- Cloudcraft (Standalone)
- In The App
- Dashboards
- Notebooks
- DDSQL Editor
- Reference Tables
- Sheets
- Monitors and Alerting
- Service Level Objectives
- Metrics
- Watchdog
- Bits AI
- Internal Developer Portal
- Error Tracking
- Change Tracking
- Event Management
- Incident Response
- Actions & Remediations
- Infrastructure
- Cloudcraft
- Resource Catalog
- Universal Service Monitoring
- End User Device Monitoring
- Hosts
- Containers
- Processes
- Serverless
- Network Monitoring
- Storage Management
- Cloud Cost
- Application Performance
- APM
- Continuous Profiler
- Database Monitoring
- Agent Integration Overhead
- Setup Architectures
- Setting Up Postgres
- Setting Up MySQL
- Setting Up SQL Server
- Setting Up Oracle
- Setting Up Amazon DocumentDB
- Setting Up MongoDB
- Connecting DBM and Traces
- Data Collected
- Exploring Database Hosts
- Exploring Query Metrics
- Exploring Query Samples
- Exploring Database Schemas
- Exploring Recommendations
- Troubleshooting
- Guides
- Data Streams Monitoring
- Data Observability
- Digital Experience
- Real User Monitoring
- Synthetic Testing and Monitoring
- Continuous Testing
- Product Analytics
- Session Replay
- Software Delivery
- CI Visibility
- CD Visibility
- Deployment Gates
- Test Optimization
- Code Coverage
- PR Gates
- DORA Metrics
- Feature Flags
- Security
- Security Overview
- Cloud SIEM
- Code Security
- Cloud Security
- App and API Protection
- AI Guard
- Workload Protection
- Sensitive Data Scanner
- AI Observability
- Log Management
- Observability Pipelines
- Configuration
- Sources
- Processors
- Destinations
- Packs
- Akamai CDN
- Amazon CloudFront
- Amazon VPC Flow Logs
- AWS Application Load Balancer Logs
- AWS CloudTrail
- AWS Elastic Load Balancer Logs
- AWS Network Load Balancer Logs
- Cisco ASA
- Cloudflare
- F5
- Fastly
- Fortinet Firewall
- HAProxy Ingress
- Istio Proxy
- Juniper SRX Firewall Traffic Logs
- Netskope
- NGINX
- Okta
- Palo Alto Firewall
- Windows XML
- ZScaler ZIA DNS
- Zscaler ZIA Firewall
- Zscaler ZIA Tunnel
- Zscaler ZIA Web Logs
- Search Syntax
- Scaling and Performance
- Monitoring and Troubleshooting
- Guides and Resources
- Log Management
- CloudPrem
- Administration
Amazon S3 Destination
This product is not supported for your selected Datadog site. ().
Use the Amazon S3 destination to send logs to Amazon S3. If you want to send logs to Amazon S3 for archiving and rehydration, you must configure Log Archives. If you don’t want to rehydrate your logs in Datadog, skip to Set up the destination for your pipeline.
You can also route logs to Snowflake using the Amazon S3 destination.
Configure Log Archives
This step is only required if you want to send logs to Amazon S3 for archiving and rehydration, and you don’t already have a Datadog Log Archive configured for Observability Pipelines. If you already have a Datadog Log Archive configured or don’t want to rehydrate logs in Datadog, skip to Set up the destination for your pipeline.
You need to have Datadog’s AWS integration installed to set up Datadog Log Archives.
Create an Amazon S3 bucket
- Navigate to Amazon S3 buckets.
- Click Create bucket.
- Enter a descriptive name for your bucket.
- Do not make your bucket publicly readable.
- Optionally, add tags.
- Click Create bucket.
Set up an IAM policy that allows Workers to write to the S3 bucket
- Navigate to the IAM console.
- Select Policies in the left side menu.
- Click Create policy.
- Click JSON in the Specify permissions section.
- Copy the below policy and paste it into the Policy editor. Replace
<MY_BUCKET_NAME>and<MY_BUCKET_NAME_1_/_MY_OPTIONAL_BUCKET_PATH_1>with the information for the S3 bucket you created earlier.{ "Version": "2012-10-17", "Statement": [ { "Sid": "DatadogUploadAndRehydrateLogArchives", "Effect": "Allow", "Action": ["s3:PutObject", "s3:GetObject"], "Resource": "arn:aws:s3:::<MY_BUCKET_NAME_1_/_MY_OPTIONAL_BUCKET_PATH_1>/*" }, { "Sid": "DatadogRehydrateLogArchivesListBucket", "Effect": "Allow", "Action": "s3:ListBucket", "Resource": "arn:aws:s3:::<MY_BUCKET_NAME>" } ] } - Click Next.
- Enter a descriptive policy name.
- Optionally, add tags.
- Click Create policy.
Create a service account
Create a service account to use the policy you created above.
Connect the S3 bucket to Datadog Log Archives
- Navigate to Datadog Log Forwarding.
- Click New archive.
- Enter a descriptive archive name.
- Add a query that filters out all logs going through log pipelines so that none of those logs go into this archive. For example, add the query
observability_pipelines_read_only_archive, assuming no logs going through the pipeline have that tag added. - Select AWS S3.
- Select the AWS account that your bucket is in.
- Enter the name of the S3 bucket.
- Optionally, enter a path.
- Check the confirmation statement.
- Optionally, add tags and define the maximum scan size for rehydration. See Advanced settings for more information.
- Click Save.
See the Log Archives documentation for additional information.
Set up the destination for your pipeline
Set up the Amazon S3 destination and its environment variables when you set up an Archive Logs pipeline. The information below is configured in the pipelines UI.
- Enter your S3 bucket name. If you configured Log Archives, it’s the name of the bucket you created earlier.
- Enter the AWS region the S3 bucket is in.
- Enter the key prefix.
- Prefixes are useful for partitioning objects. For example, you can use a prefix as an object key to store objects under a particular directory. If using a prefix for this purpose, it must end in
/to act as a directory path; a trailing/is not automatically added. - See template syntax if you want to route logs to different object keys based on specific fields in your logs.
- Note: Datadog recommends that you start your prefixes with the directory name and without a lead slash (
/). For example,app-logs/orservice-logs/.
- Prefixes are useful for partitioning objects. For example, you can use a prefix as an object key to store objects under a particular directory. If using a prefix for this purpose, it must end in
- Select the storage class for your S3 bucket in the Storage Class dropdown menu. If you are going to archive and rehydrate your logs:
- Note: Rehydration only supports the following storage classes:
- Standard
- Intelligent-Tiering, only if the optional asynchronous archive access tiers are both disabled.
- Standard-IA
- One Zone-IA
- If you wish to rehydrate from archives in another storage class, you must first move them to one of the supported storage classes above.
- See the Example destination and log archive setup section of this page for how to configure your Log Archive based on your Amazon S3 destination setup.
- Note: Rehydration only supports the following storage classes:
- Optionally, select an AWS authentication option. If you are only using the user or role you created earlier for authentication, do not select Assume role. The Assume role option should only be used if the user or role you created earlier needs to assume a different role to access the specific AWS resource and that permission has to be explicitly defined.
If you select Assume role:- Enter the ARN of the IAM role you want to assume.
- Optionally, enter the assumed role session name and external ID.
- Note: The user or role you created earlier must have permission to assume this role so that the Worker can authenticate with AWS.
- Optionally, toggle the switch to enable Buffering Options. Enable a configurable buffer on your destination to ensure intermittent latency or an outage at the destination doesn’t create immediate backpressure, and allow events to continue to be ingested from your source. Disk buffers can also increase pipeline durability by writing logs to disk, ensuring buffered logs persist through a Worker restart. See Configurable buffers for destinations for more information.
- If left unconfigured, your destination uses a memory buffer with a capacity of 500 events.
- To configure a buffer on your destination:
- Select the buffer type you want to set (Memory or Disk).
- Enter the buffer size and select the unit.
- Maximum memory buffer size is 128 GB.
- Maximum disk buffer size is 500 GB.
Example destination and log archive setup
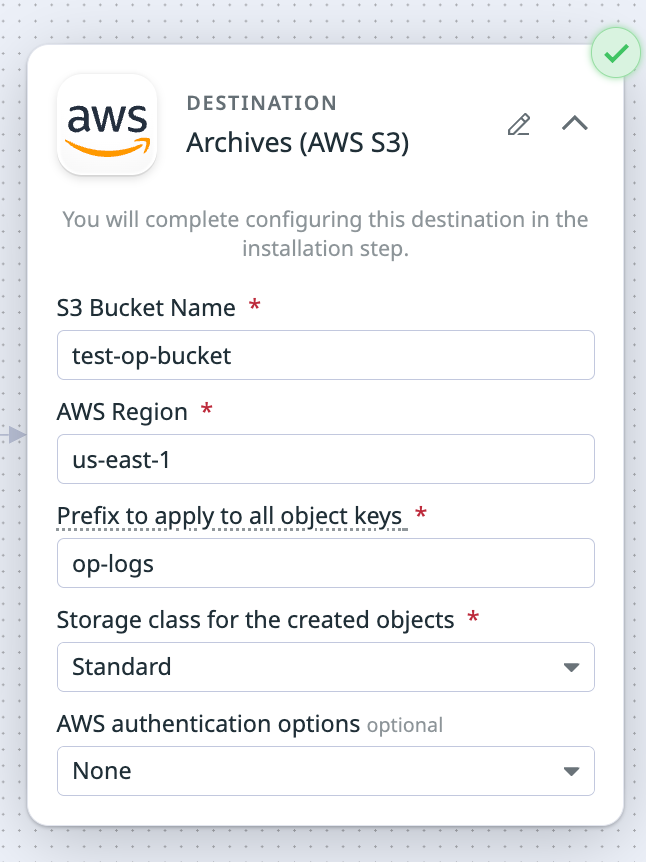
If you enter the following values for your Amazon S3 destination:
- S3 Bucket Name:
test-op-bucket - Prefix to apply to all object keys:
op-logs - Storage class for the created objects:
Standard
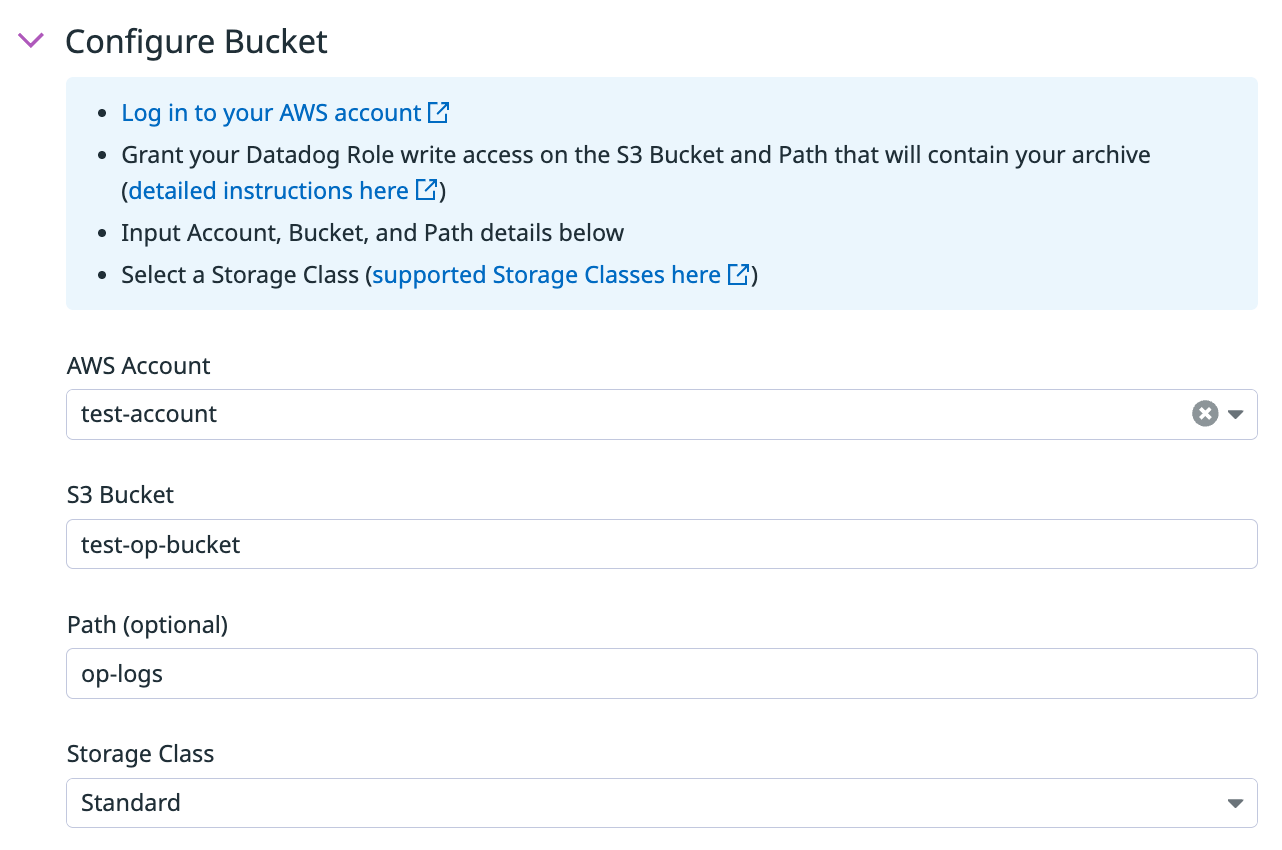
Then these are the values you enter for configuring the S3 bucket for Log Archives:
- S3 bucket:
test-op-bucket - Path:
op-logs - Storage class:
Standard
Set secrets
These are the defaults used for secret identifiers and environment variables.
Note: If you enter identifiers for your secrets and then choose to use environment variables, the environment variable is the identifier entered and prepended with DD_OP. For example, if you entered PASSWORD_1 for a password identifier, the environment variable for that password is DD_OP_PASSWORD_1.
There are no secret identifiers to configure.
There are no environment variables to configure.
Route logs to Snowflake using the Amazon S3 destination
You can route logs from Observability Pipelines to Snowflake using the Amazon S3 destination by configuring Snowpipe in Snowflake to automatically ingest those logs. To set this up:
- Configure Log Archives if you want to archive and rehydrate your logs. If you only want to send logs to Amazon S3, skip to step 2.
- Set up a pipeline to use Amazon S3 as the log destination. When logs are collected by Observability Pipelines, they are written to an S3 bucket using the same configuration detailed in Set up the destination for your pipeline, which includes AWS authentication, region settings, and permissions.
- Set up Snowpipe in Snowflake. See Automating Snowpipe for Amazon S3 for instructions. Snowpipe continuously monitors your S3 bucket for new files and automatically ingests them into your Snowflake tables, ensuring near real-time data availability for analytics or further processing.
How the destination works
AWS Authentication
The Observability Pipelines Worker uses the standard AWS credential provider chain for authentication. See AWS SDKs and Tools standardized credential providers for more information.
Permissions
For Observability Pipelines to send logs to Amazon Security Lake, the following policy permissions are required:
s3:ListBuckets3:PutObject
Event batching
A batch of events is flushed when one of these parameters is met. See event batching for more information.
| Max Events | Max Bytes | Timeout (seconds) |
|---|---|---|
| None | 100,000,000 | 900 |


