- Essentials
- Getting Started
- Agent
- API
- APM Tracing
- Containers
- Dashboards
- Database Monitoring
- Datadog
- Datadog Site
- DevSecOps
- Incident Management
- Integrations
- Internal Developer Portal
- Logs
- Monitors
- Notebooks
- OpenTelemetry
- Profiler
- Search
- Session Replay
- Security
- Serverless for AWS Lambda
- Software Delivery
- Synthetic Monitoring and Testing
- Tags
- Workflow Automation
- Learning Center
- Support
- Glossary
- Standard Attributes
- Guides
- Agent
- Integrations
- Developers
- Authorization
- DogStatsD
- Custom Checks
- Integrations
- Build an Integration with Datadog
- Create an Agent-based Integration
- Create an API-based Integration
- Create a Log Pipeline
- Integration Assets Reference
- Build a Marketplace Offering
- Create an Integration Dashboard
- Create a Monitor Template
- Create a Cloud SIEM Detection Rule
- Install Agent Integration Developer Tool
- Service Checks
- IDE Plugins
- Community
- Guides
- OpenTelemetry
- Administrator's Guide
- API
- Partners
- Datadog Mobile App
- DDSQL Reference
- CoScreen
- CoTerm
- Remote Configuration
- Cloudcraft (Standalone)
- In The App
- Dashboards
- Notebooks
- DDSQL Editor
- Reference Tables
- Sheets
- Monitors and Alerting
- Watchdog
- Metrics
- Bits AI
- Internal Developer Portal
- Error Tracking
- Change Tracking
- Service Management
- Service Level Objectives
- Incident Management
- On-Call
- Status Pages
- Event Management
- Case Management
- Actions & Remediations
- Infrastructure
- Cloudcraft
- Resource Catalog
- Universal Service Monitoring
- End User Device Monitoring
- Hosts
- Containers
- Processes
- Serverless
- Network Monitoring
- Storage Management
- Cloud Cost
- Application Performance
- APM
- APM Terms and Concepts
- Application Instrumentation
- APM Metrics Collection
- Trace Pipeline Configuration
- Correlate Traces with Other Telemetry
- Trace Explorer
- Recommendations
- Code Origin for Spans
- Service Observability
- Endpoint Observability
- Dynamic Instrumentation
- Live Debugger
- Error Tracking
- Data Security
- Guides
- Troubleshooting
- Continuous Profiler
- Database Monitoring
- Agent Integration Overhead
- Setup Architectures
- Setting Up Postgres
- Setting Up MySQL
- Setting Up SQL Server
- Setting Up Oracle
- Setting Up Amazon DocumentDB
- Setting Up MongoDB
- Connecting DBM and Traces
- Data Collected
- Exploring Database Hosts
- Exploring Query Metrics
- Exploring Query Samples
- Exploring Database Schemas
- Exploring Recommendations
- Troubleshooting
- Guides
- Data Streams Monitoring
- Data Jobs Monitoring
- Data Observability
- Digital Experience
- Real User Monitoring
- Synthetic Testing and Monitoring
- Continuous Testing
- Product Analytics
- Software Delivery
- CI Visibility
- CD Visibility
- Deployment Gates
- Test Optimization
- Code Coverage
- PR Gates
- DORA Metrics
- Feature Flags
- Security
- Security Overview
- Cloud SIEM
- Code Security
- Cloud Security
- App and API Protection
- Workload Protection
- Sensitive Data Scanner
- AI Observability
- Log Management
- Administration
Access Control
This product is not supported for your selected Datadog site. ().
Overview
Datadog’s access management system uses role-based access control (RBAC). This lets you define the level of access users have to different Datadog resources. Users are assigned to roles that define their account permissions, including what data they can read and which account assets they can modify. When permissions are granted for a role, any user who is associated with that role receives those permissions. See Role based access control for more information.
Granular access control lets you restrict access to individual resources by roles, Teams, or users. For Observability Pipelines, you can restrict access to a pipeline or restrict access to Live Capture for a pipeline.
Permissions
See the list of permissions for Observability Pipelines’ assets and what levels of permissions Datadog default roles include.
Granular access control
Granular access control can only restrict access to resources and does not elevate permissions. For example, if a user has the Datadog Read Only Role and they are given the Editor access for a specific pipeline using granular access control, the user still only has read-only access to this pipeline and cannot edit it. You need to update their role to one that allows pipeline editing if you want them to be able to make changes to this pipeline and other pipelines.
Restrict access to a pipeline
You can restrict access to a specific pipeline with the following role options:
| Role | View pipeline | Edit pipeline | Deploy pipeline | Delete pipeline | Can restrict access to pipeline |
|---|---|---|---|---|---|
| Editor | |||||
| Runner | |||||
| Contributor* | |||||
| Viewer | |||||
| No Access |
*Contributor can only edit pipeline configuration when the pipeline is in draft mode and has not been deployed yet.
Notes:
- You can’t save granular access settings if there isn’t at least one user with Editor access to the pipeline.
- You can lock yourself out of a pipeline even if you created it. When you edit granular access restrictions for pipeline access and you want to continue to have Editor access for the pipeline, make sure you are one of the users or part of a Team or role with Editor access.
To use granular access controls to limit access to a specific pipeline:
- Navigate to the Pipelines page.
- Select the pipeline you want to restrict access to.
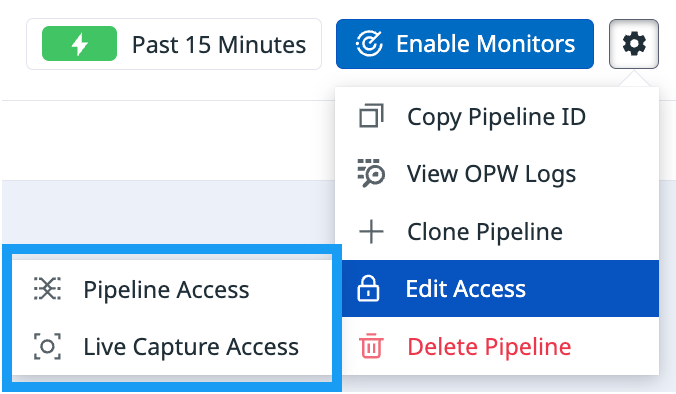
- Click the cog on the upper right side of the page.
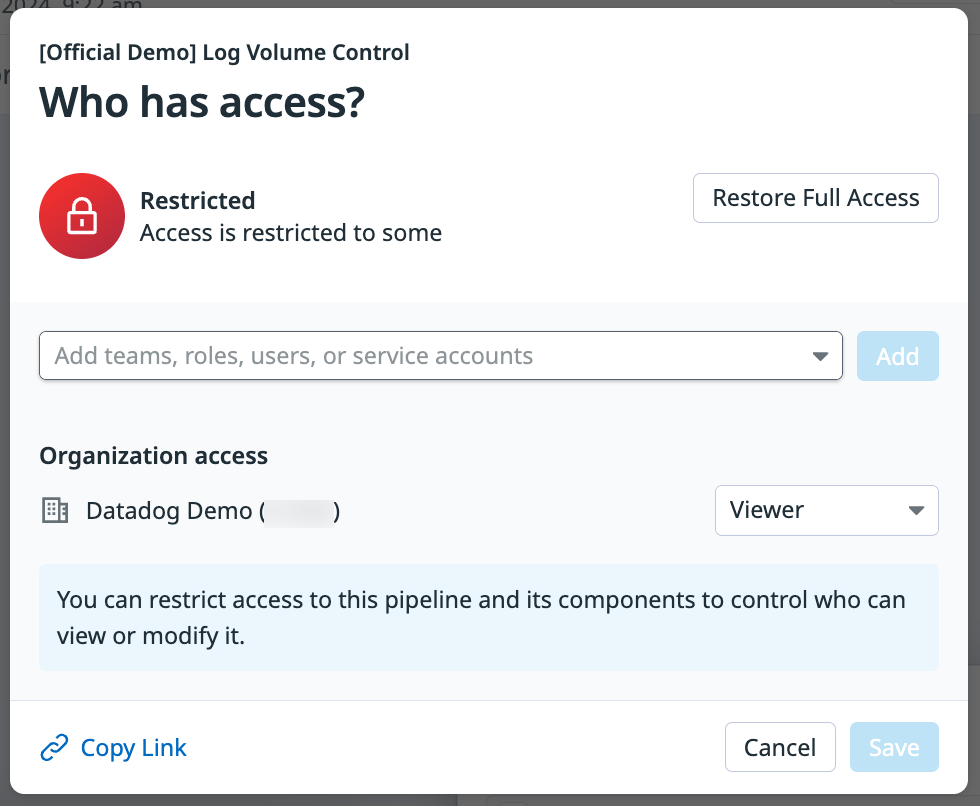
- Click Edit Access > Pipeline Access.
- Click Restrict Access.
- The Organization access section shows that members of your organization have Viewer access by default. Use the dropdown menu to select what kind of access you want them to have.
- Click the dropdown menu in the Restricted section to set access levels for Teams, roles, users, or service accounts.
- Click Copy Link if you want to provide the pipeline link to users who are getting access to this pipeline.
- Click Save.
To restore full access to a pipeline:
- Click the cog on the upper right side of your pipeline’s page.
- Click Edit Access > Pipeline Access.
- Click Restore Full Access.
- Click Save.
Restrict access to Live Capture for a pipeline
Live Capture lets you:
- See the data a source sends to the pipelines.
- See the data a processor receives.
- See the data a processor sends to the destination.
You can restrict access to Live Capture for a specific pipeline with the following options:
| Role | View captured events | Run new captures | Restrict access to Live Capture |
|---|---|---|---|
| Editor | |||
| Viewer | |||
| No Access |
Notes:
- You can’t save granular access settings if there isn’t at least one user with Editor access to Live Capture.
- You can lock yourself out of Live Capture for a specific pipeline even if you created the pipeline. When you edit granular access restrictions for Live Capture access and you want to have Editor access for Live Capture, make sure you are one of the users or part of a Team or role with Editor access.
To use granular access controls to limit access to Live Capture for a specific pipeline:
- Navigate to the Pipelines page.
- Select the pipeline you want to restrict access to.
- Click the cog on the upper right side of the page.
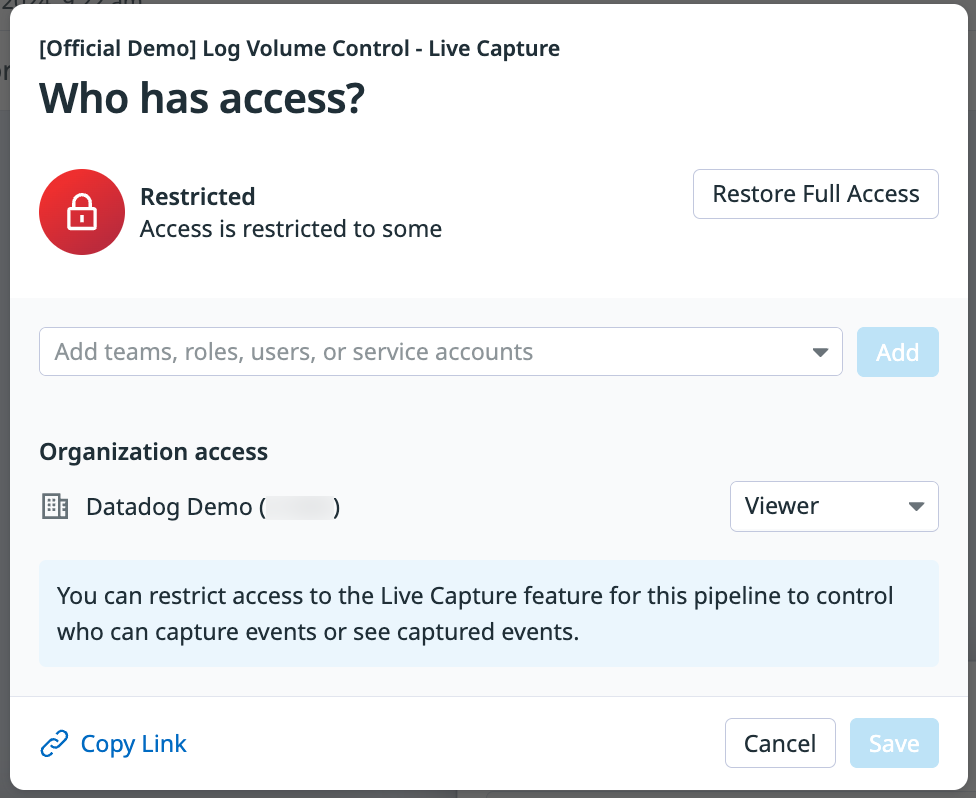
- Click Edit Access > Live Capture Access.
- Click Restrict Access.
- The Organization access section shows that members of your organization have Viewer access by default. Use the dropdown menu to select what kind of access you want them to have.
- Click the dropdown menu in the Restricted section to set access levels for Teams, roles, users, or service accounts based on your use case.
- Click Save.
To restore full access to Live Capture for a pipeline:
- Click the cog on the upper right side of your pipeline’s page.
- Click Edit Access > Live Capture Access.
- Click Restore Full Access.
- Click Save.


