- Essentials
- Getting Started
- Agent
- API
- APM Tracing
- Containers
- Dashboards
- Database Monitoring
- Datadog
- Datadog Site
- DevSecOps
- Incident Management
- Integrations
- Internal Developer Portal
- Logs
- Monitors
- Notebooks
- OpenTelemetry
- Profiler
- Search
- Session Replay
- Security
- Serverless for AWS Lambda
- Software Delivery
- Synthetic Monitoring and Testing
- Tags
- Workflow Automation
- Learning Center
- Support
- Glossary
- Standard Attributes
- Guides
- Agent
- Integrations
- Developers
- Authorization
- DogStatsD
- Custom Checks
- Integrations
- Build an Integration with Datadog
- Create an Agent-based Integration
- Create an API-based Integration
- Create a Log Pipeline
- Integration Assets Reference
- Build a Marketplace Offering
- Create an Integration Dashboard
- Create a Monitor Template
- Create a Cloud SIEM Detection Rule
- Install Agent Integration Developer Tool
- Service Checks
- IDE Plugins
- Community
- Guides
- OpenTelemetry
- Administrator's Guide
- API
- Partners
- Datadog Mobile App
- DDSQL Reference
- CoScreen
- CoTerm
- Remote Configuration
- Cloudcraft (Standalone)
- In The App
- Dashboards
- Notebooks
- DDSQL Editor
- Reference Tables
- Sheets
- Monitors and Alerting
- Service Level Objectives
- Metrics
- Watchdog
- Bits AI
- Internal Developer Portal
- Error Tracking
- Change Tracking
- Event Management
- Incident Response
- Actions & Remediations
- Infrastructure
- Cloudcraft
- Resource Catalog
- Universal Service Monitoring
- End User Device Monitoring
- Hosts
- Containers
- Processes
- Serverless
- Network Monitoring
- Storage Management
- Cloud Cost
- Application Performance
- APM
- Continuous Profiler
- Database Monitoring
- Agent Integration Overhead
- Setup Architectures
- Setting Up Postgres
- Setting Up MySQL
- Setting Up SQL Server
- Setting Up Oracle
- Setting Up Amazon DocumentDB
- Setting Up MongoDB
- Connecting DBM and Traces
- Data Collected
- Exploring Database Hosts
- Exploring Query Metrics
- Exploring Query Samples
- Exploring Database Schemas
- Exploring Recommendations
- Troubleshooting
- Guides
- Data Streams Monitoring
- Data Observability
- Digital Experience
- Real User Monitoring
- Synthetic Testing and Monitoring
- Continuous Testing
- Product Analytics
- Session Replay
- Software Delivery
- CI Visibility
- CD Visibility
- Deployment Gates
- Test Optimization
- Code Coverage
- PR Gates
- DORA Metrics
- Feature Flags
- Security
- Security Overview
- Cloud SIEM
- Code Security
- Cloud Security
- App and API Protection
- AI Guard
- Workload Protection
- Sensitive Data Scanner
- AI Observability
- Log Management
- Observability Pipelines
- Configuration
- Sources
- Processors
- Destinations
- Packs
- Akamai CDN
- Amazon CloudFront
- Amazon VPC Flow Logs
- AWS Application Load Balancer Logs
- AWS CloudTrail
- AWS Elastic Load Balancer Logs
- AWS Network Load Balancer Logs
- Cisco ASA
- Cloudflare
- F5
- Fastly
- Fortinet Firewall
- HAProxy Ingress
- Istio Proxy
- Juniper SRX Firewall Traffic Logs
- Netskope
- NGINX
- Okta
- Palo Alto Firewall
- Windows XML
- ZScaler ZIA DNS
- Zscaler ZIA Firewall
- Zscaler ZIA Tunnel
- Zscaler ZIA Web Logs
- Search Syntax
- Scaling and Performance
- Monitoring and Troubleshooting
- Guides and Resources
- Log Management
- CloudPrem
- Administration
Logs Not Showing the Expected Timestamp
By default, when logs are received by the Datadog intake API, a timestamp is generated and appended as a date attribute. However, this default timestamp does not always reflect the actual timestamp that might be contained in the log itself. This guides walks you through how to override the default timestamp with the actual timestamp.
Displayed timestamp
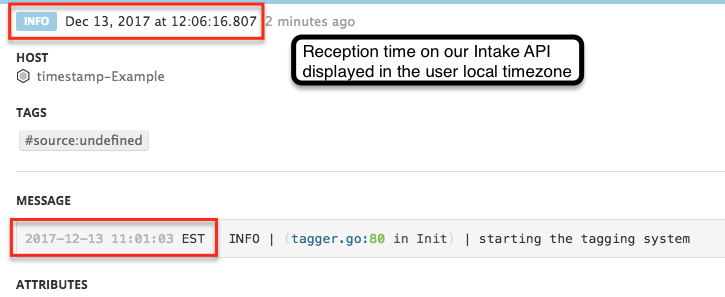
The log timestamp is located at the top section of the log panel. Timestamps are stored in UTC and displayed in the user’s local timezone. In the above screenshot, the local profile is set to UTC+1, therefore the time the log was received is 11:06:16.807 UTC.
The timestamp may not show the expected value because the timezone is incorrectly set. To check if this is the case, go to Preferences and look at the Time zone section.
If the timezone is correct, extract the timestamp from the message to override the log timestamp being shown.
Raw logs
If your raw logs are not showing the expected timestamp in Datadog, extract the correct log timestamp from the raw logs and then remap it.
Extract the timestamp value with a parser
- Navigate to Logs Pipelines and click on the pipeline processing the logs.
- Click Add Processor.
- Select Grok Parser for the processor type.
- Use the date() matcher to extract the date and pass it into a custom date attribute. See the below example, as well as parsing dates examples, for details.
For a log example like this:
2017-12-13 11:01:03 EST | INFO | (tagger.go:80 in Init) | starting the tagging system
Add a parsing rule like:
MyParsingRule %{date("yyyy-MM-dd HH:mm:ss z"):date} \| %{word:severity} \| \(%{notSpace:logger.name}:%{integer:logger.line}[^)]*\) \|.*
The output for MyParsingRule’s extraction:
{
  "date": 1513180863000,
  "logger": {
    "line": 80,
    "name": "tagger.go"
  },
  "severity": "INFO"
}
The date attribute stores the mytimestamp value.
Define a Log Date Remapper
Add a Log Date Remapper to make sure that the value of the date attribute overrides the current log timestamp.
- Navigate to Logs Pipelines and click on the pipeline processing the logs.
- Click Add Processor.
- Select Date remapper as the processor type.
- Enter a name for the processor.
- Add date to the Set date attribute(s) section.
- Click Create.
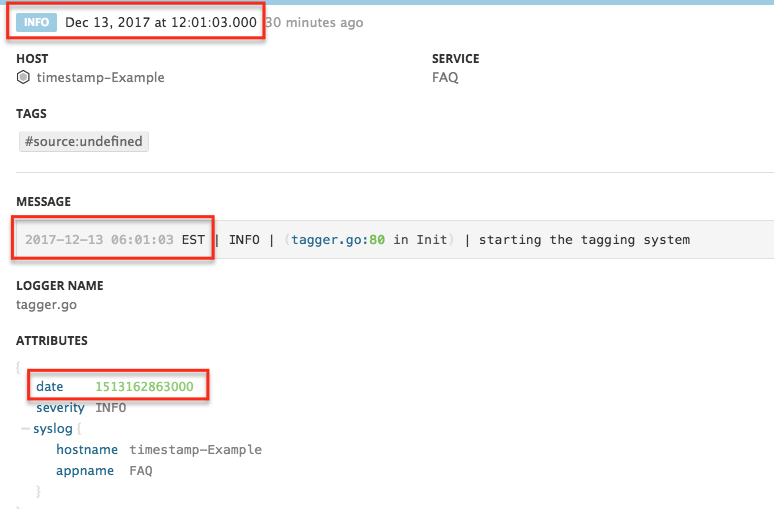
The following log generated at 06:01:03 EST, which correspond to 11:01:03 UTC, is correctly displayed as 12:01:03 (the display timezone is UTC+1 in this case).
Note: Any modification on a Pipeline only impacts new logs as all the processing is done at ingestion.
JSON logs
JSON logs are automatically parsed in Datadog. The log date attribute is a reserved attribute, so it goes through preprocessing operations for JSON logs.
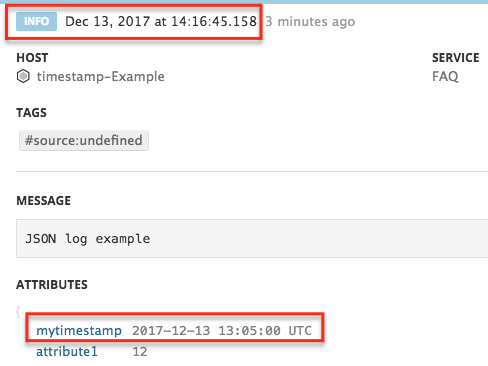
In the below example, the actual timestamp of the log is the value of the mytimestamp attribute and not the log timestamp Dec 13, 2017 at 14:16:45.158.
Supported date formats
To make sure the mytimestamp attribute value overrides the current log timestamp being shown, you must add it as a date attribute.
- Go to your Logs Pipeline.
- Hover over Preprocessing for JSON Logs, and click the pencil icon.
- Add
mytimestampto the list of date attributes. The date remapper looks for each of the reserved attributes in the order they are listed. To ensure the date comes from themytimestampattribute, place it first in the list. - Click Save.
There are specific date formats to follow for the remapping to work. The recognized date formats are: ISO8601, UNIX (the milliseconds EPOCH format), and RFC3164.
If a different date format is being used, see Custom date format.
Note: Any modification on the Pipeline only impacts new logs as all the processing is done at ingestion.
Custom date format
If the date format is not supported by the remapper by default, you can parse the date using a Grok parser and then convert it to a supported format.
- Go to the Pipeline that is processing the logs. If you do not have a Pipeline configured for those logs yet, create a new Pipeline for it.
- Click Add Processor.
- Select Grok Parser for the processor type.
- Define the parsing rule based on your date format. See these parsing dates examples for details.
- In the Advanced Settings section, add
mytimestampto theExtract fromsection so that this parser is applied only to the custommytimestampattribute. - Click Create.
- Add a Log Date Remapper to map the correct timestamp to the new logs.
Additional helpful documentation, links, and articles:


