- 重要な情報
- はじめに
- Datadog
- Datadog サイト
- DevSecOps
- AWS Lambda のサーバーレス
- エージェント
- インテグレーション
- コンテナ
- ダッシュボード
- アラート設定
- ログ管理
- トレーシング
- プロファイラー
- タグ
- API
- Service Catalog
- Session Replay
- Continuous Testing
- Synthetic モニタリング
- Incident Management
- Database Monitoring
- Cloud Security Management
- Cloud SIEM
- Application Security Management
- Workflow Automation
- CI Visibility
- Test Visibility
- Intelligent Test Runner
- Code Analysis
- Learning Center
- Support
- 用語集
- Standard Attributes
- ガイド
- インテグレーション
- エージェント
- OpenTelemetry
- 開発者
- 認可
- DogStatsD
- カスタムチェック
- インテグレーション
- Create an Agent-based Integration
- Create an API Integration
- Create a Log Pipeline
- Integration Assets Reference
- Build a Marketplace Offering
- Create a Tile
- Create an Integration Dashboard
- Create a Recommended Monitor
- Create a Cloud SIEM Detection Rule
- OAuth for Integrations
- Install Agent Integration Developer Tool
- サービスのチェック
- IDE インテグレーション
- コミュニティ
- ガイド
- Administrator's Guide
- API
- モバイルアプリケーション
- CoScreen
- Cloudcraft
- アプリ内
- Service Management
- インフラストラクチャー
- アプリケーションパフォーマンス
- APM
- Continuous Profiler
- データベース モニタリング
- Data Streams Monitoring
- Data Jobs Monitoring
- Digital Experience
- Software Delivery
- CI Visibility (CI/CDの可視化)
- CD Visibility
- Test Visibility
- Intelligent Test Runner
- Code Analysis
- Quality Gates
- DORA Metrics
- セキュリティ
- セキュリティの概要
- Cloud SIEM
- クラウド セキュリティ マネジメント
- Application Security Management
- AI Observability
- ログ管理
- Observability Pipelines(観測データの制御)
- ログ管理
- 管理
ICMP テスト
概要
ICMP テストを使用すると、ホストの可用性を監視し、ネットワーク通信の問題を診断できます。Datadog は、エンドポイントへの 1 つ以上の ICMP ping から受信した値をアサートすることにより、接続の問題、ラウンドトリップ時間のクォータを超えるレイテンシー、セキュリティファイアウォールコンフィギュレーションの予期しない変更を検出するのに役立ちます。テストでは、ホストに接続するために必要なネットワークホップ (TTL) の数を追跡し、traceroute の結果を表示して、パスに沿った各ネットワークホップの詳細を検出することもできます。
ICMP テストは、ネットワークの外部または内部のどちらからエンドポイントへの ICMP ping をトリガーするかに応じて、管理ロケーションおよびプライベートロケーションの両方から実行できます。ICMP テストは、定義されたスケジュールで、オンデマンドで、または CI/CD パイプライン内から実行できます。
構成
You may create a test using one of the following options:
Create a test from a template:
- Hover over one of the pre-populated templates and click View Template. This opens a side panel displaying pre-populated configuration information, including: Test Details, Request Details, Assertions, Alert Conditions, and Monitor Settings.
- Click +Create Test to open the Define Request page, where you can review and edit the pre-populated configuration options. The fields presented are identical to those available when creating a test from scratch.
- Click Save Details to submit your API test.
Build a test from scratch:
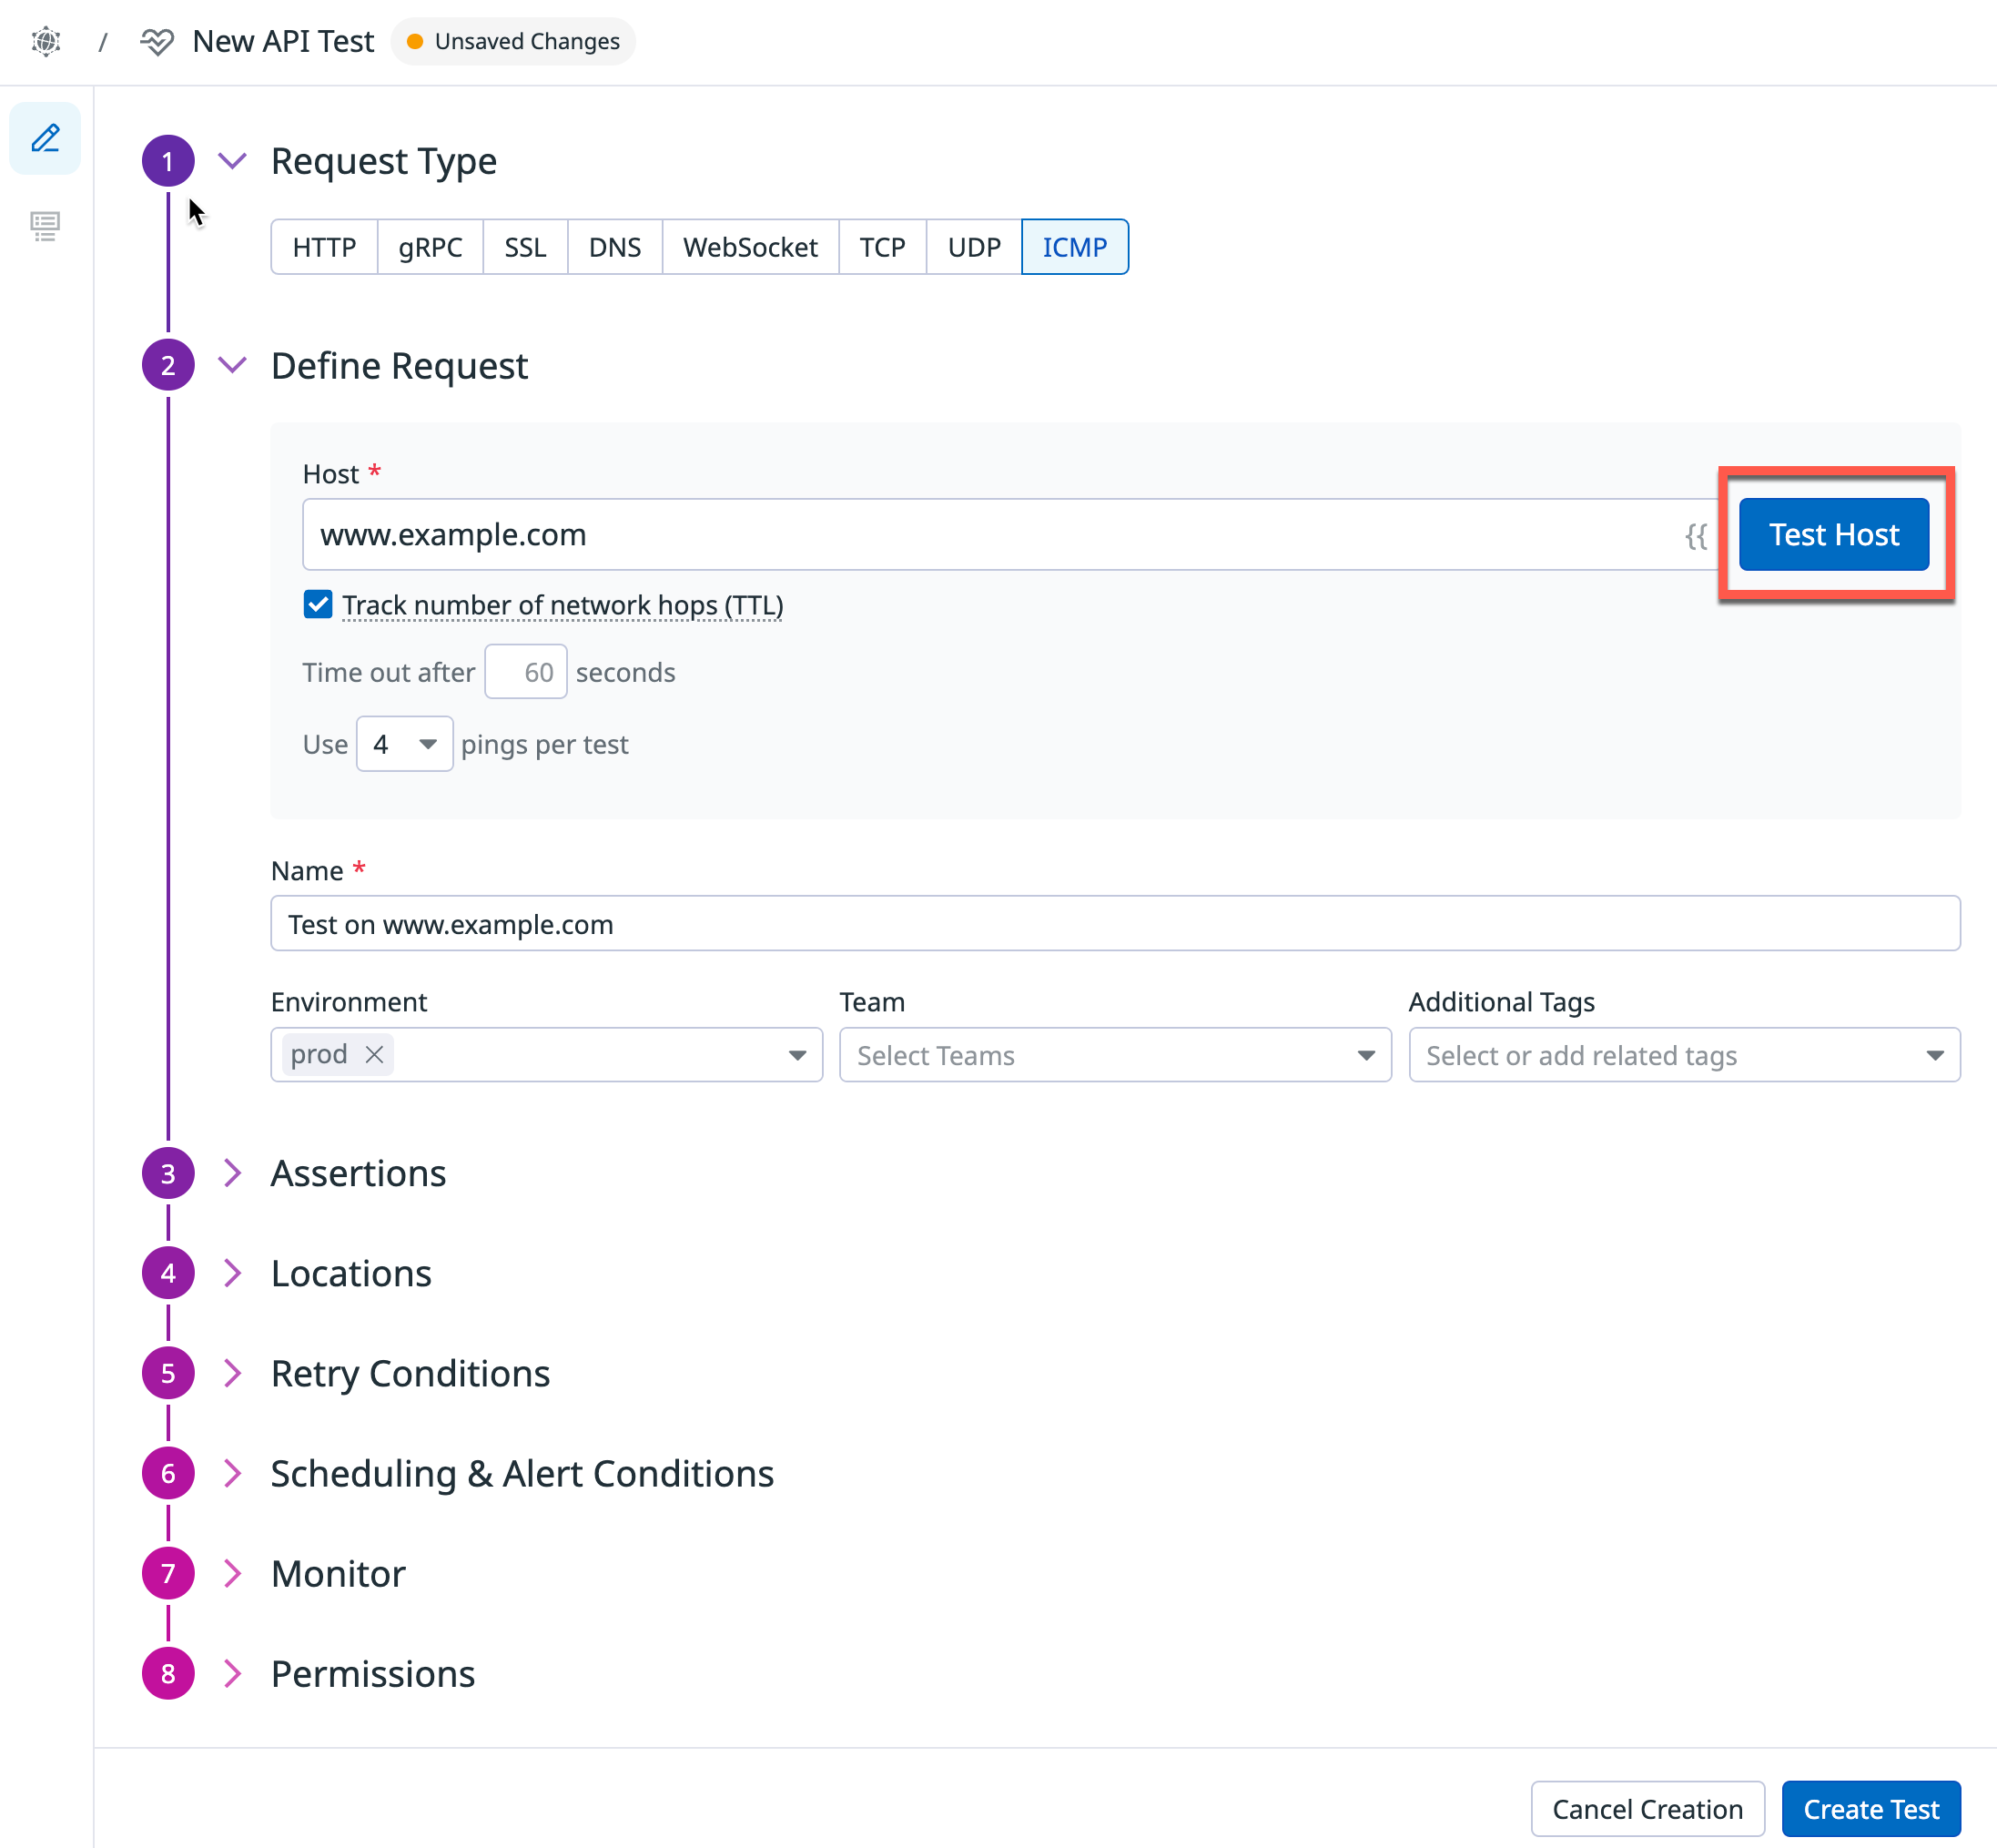
- テストを一から作成するには、+ Start from scratch テンプレートをクリックし、
ICMPリクエストタイプを選択します。 - テストを実行するドメイン名または IP アドレスを指定します。
- Track number of network hops (TTL) (ネットワークホップ数 (TTL) の追跡) を選択または選択解除します。このオプションを選択すると、“traceroute” プローブをオンにして、ホストの宛先へのパスに沿ったすべてのゲートウェイを検出します。
- テストセッションごとにトリガーする Number of Pings (Ping の数) を選択します。 デフォルトでは、ping の数は 4 に設定されています。この数値は、減らすか最大 10 まで増やすかを選択できます。
- ICMP テストに名前を付けます。
- ICMP テストに Environment タグとその他のタグを追加します。次に、これらのタグを使用して、Synthetic Monitoring & Continuous Testing ページで Synthetic テストをフィルタリングできます。
- Test Host をクリックして、リクエストの構成をテストします。画面の右側に応答プレビューが表示されます。
- テストを一から作成するには、+ Start from scratch テンプレートをクリックし、
スニペット
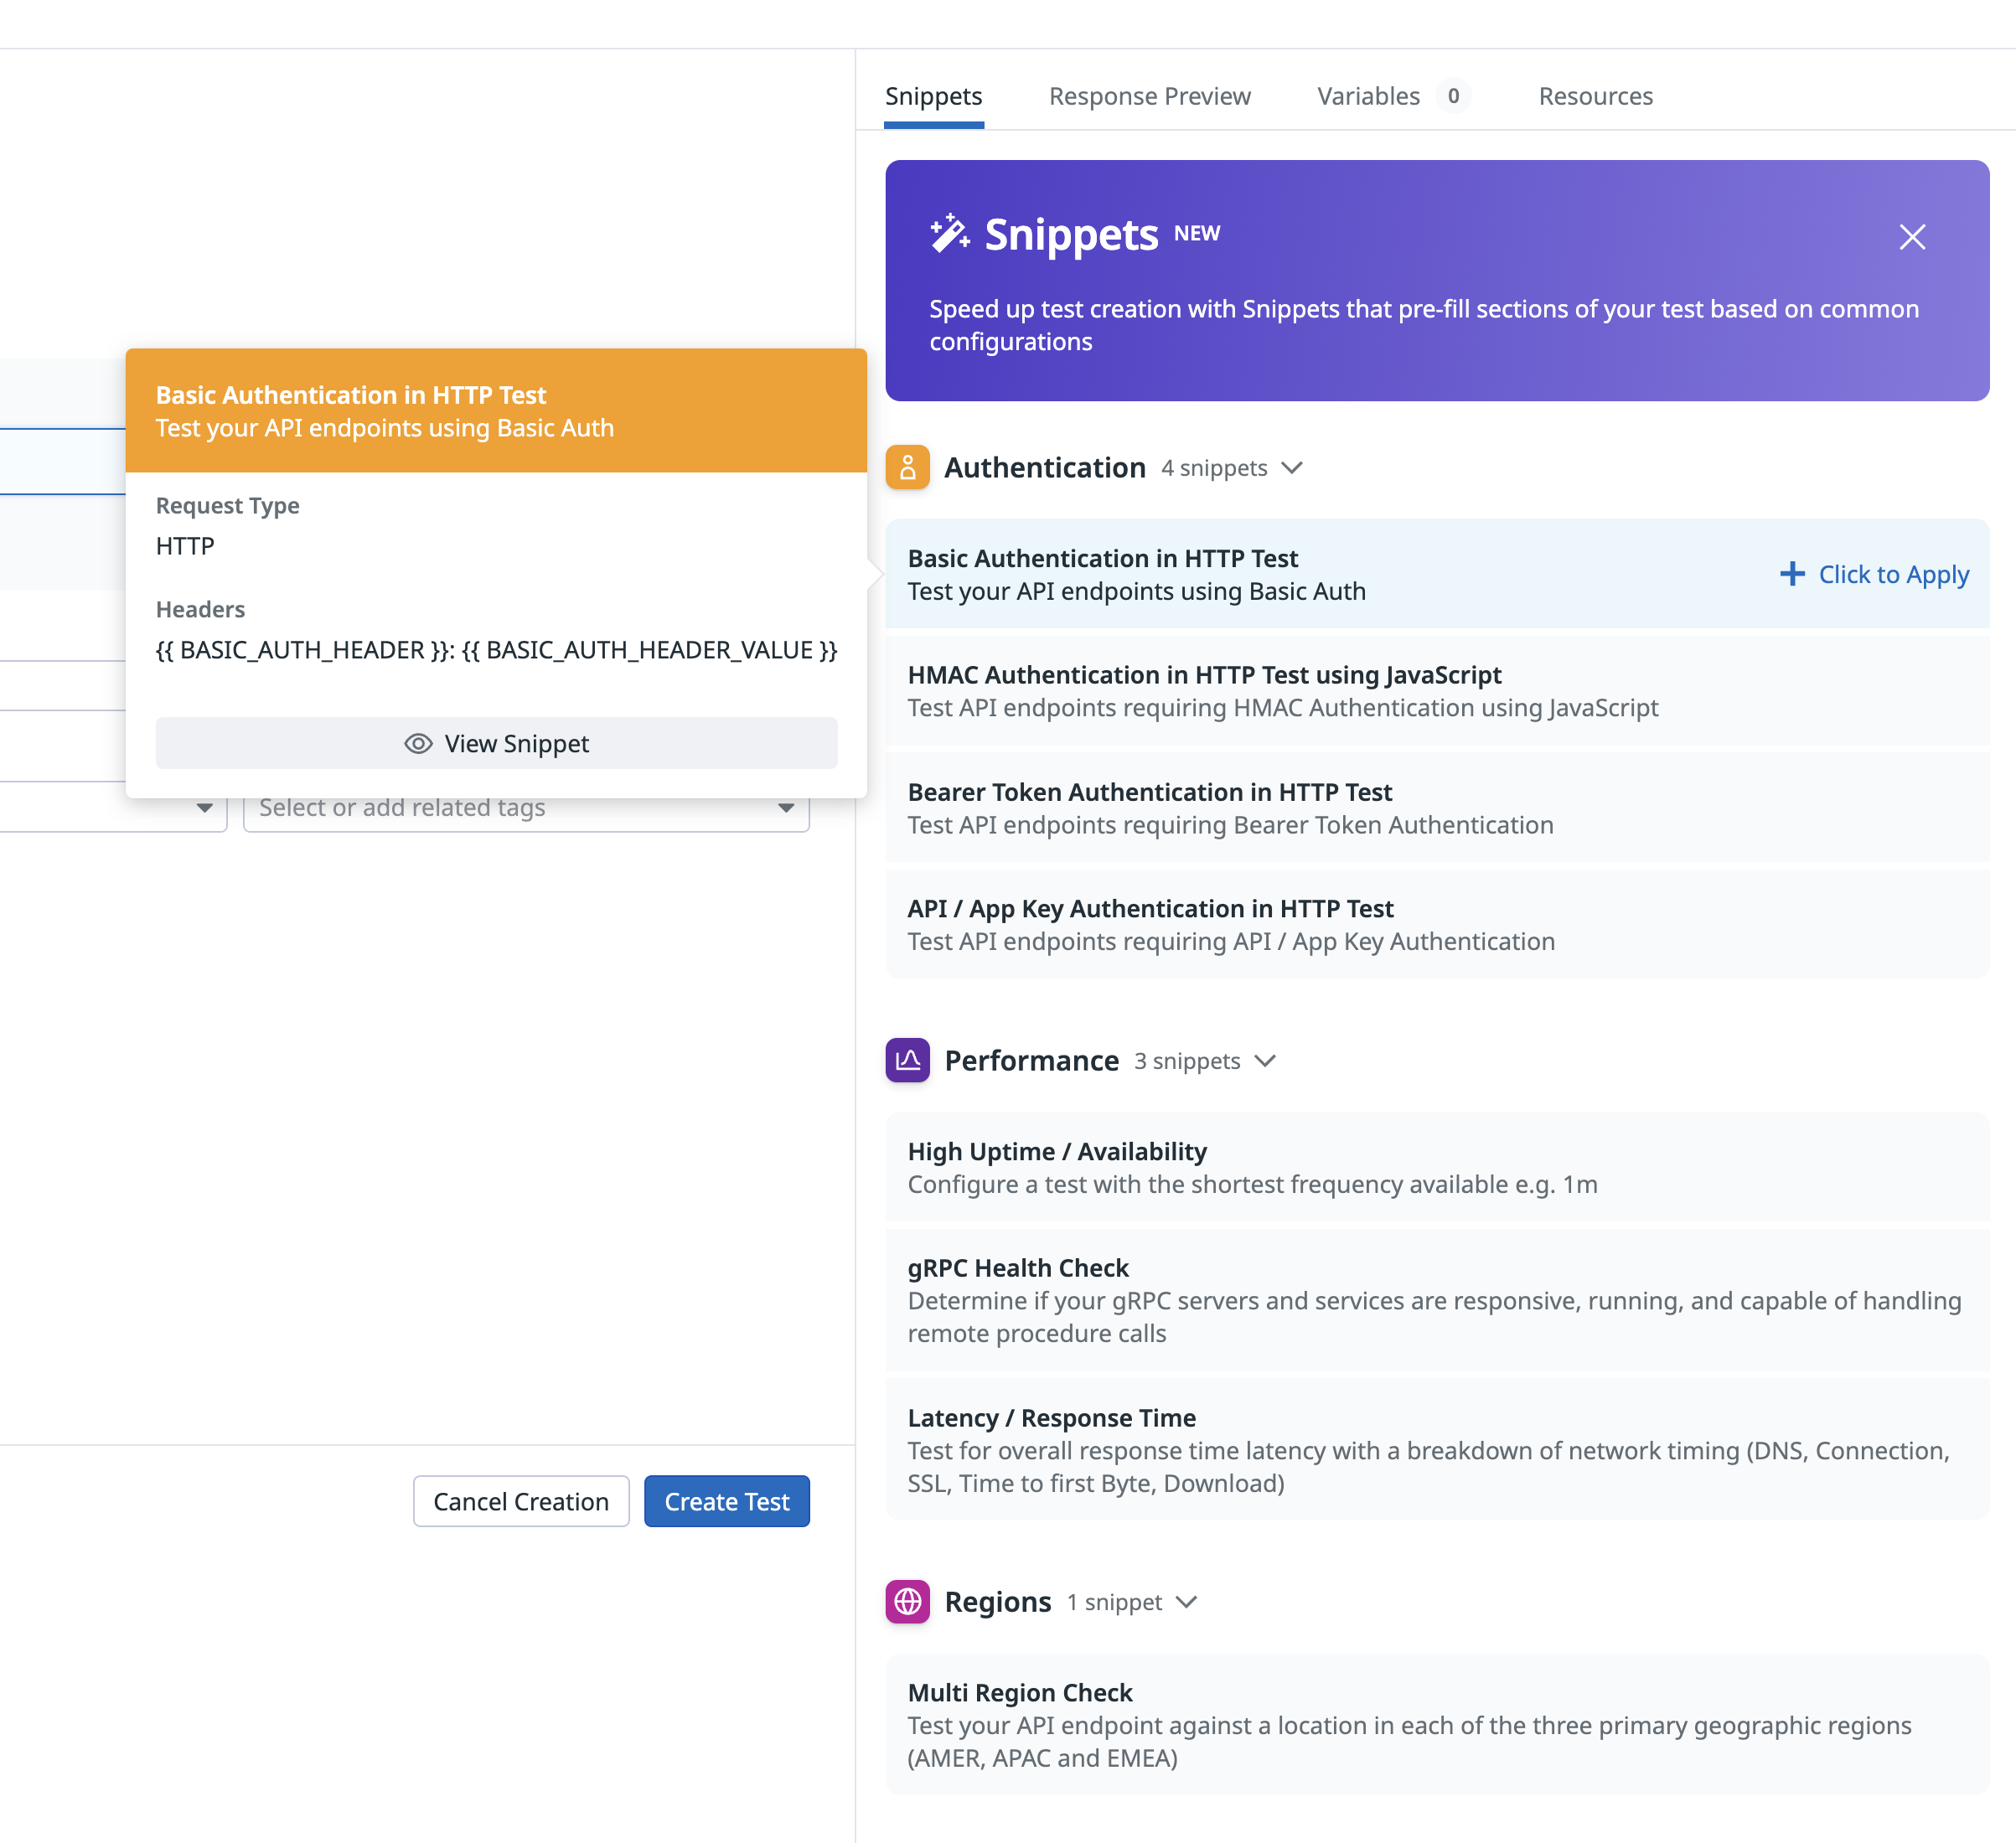
When setting up a new Synthetic Monitoring API test, use snippets to automatically fill in basic auth, performance, and regions, rather than selecting these options manually. The following snippets are available:
Basic Auth: Automatically test your APIs using pre-populated basic auth headers, JavaScript, bearer token, and API/app key auth variables.
Performance: Automatically configure a test with the shortest frequency (one minute), perform a gRPC health check, and test for overall response time latency with a breakdown of network timing.
Regions: Automatically test your API endpoint against a location in each of the three primary geographic regions (AMER, APAC and EMEA).

アサーションを定義する
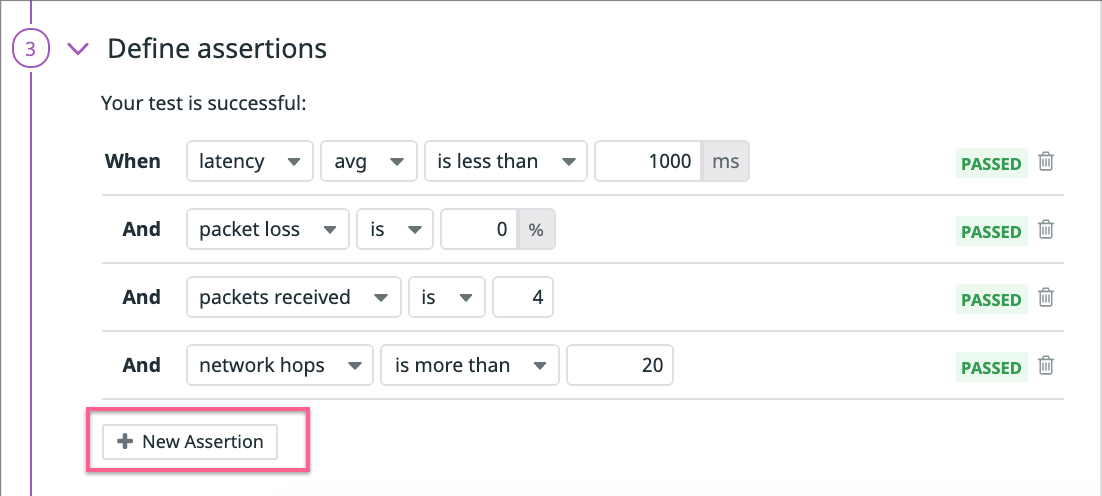
アサーションは、期待されるテスト結果が何であるかを定義します。Test URL をクリックすると、latency、packet loss、packet received の基本的なアサーションが追加されます。テストで監視するには、少なくとも 1 つのアサーションを定義する必要があります。
| タイプ | 集計 | 演算子 | 値の型 |
|---|---|---|---|
| レイテンシー | avg、max、min または stddev (別名 jitter) | is less than、is less than or equal、is、is more than、is more than or equal | 整数 (ms) |
| パケットロス | - | is less than、is less than or equal、is、is more than、is more than or equal | パーセント (%) |
| 受信したパケット | - | is less than、is less than or equal、is、is more than、is more than or equal | integer |
| ネットワークホップ | - | is less than、is less than or equal、is、is more than、is more than or equal | integer |
New Assertion を選択するか、応答プレビューを直接選択することで、API テストごとに最大 20 個のアサーションを作成できます。
テストがレスポンス本文にアサーションを含まない場合、本文のペイロードはドロップし、Synthetics Worker で設定されたタイムアウト制限内でリクエストに関連するレスポンスタイムを返します。
テストがレスポンス本文に対するアサーションを含み、タイムアウトの制限に達した場合、Assertions on the body/response cannot be run beyond this limit というエラーが表示されます。
ロケーションを選択する
ICMP テストを実行するロケーションを選択します。ICMP テストは、ネットワークの外部または内部のどちらから ICMP ping をトリガーするかの好みによって、管理ロケーションとプライベートロケーションの両方から実行できます。
Datadog’s out-of-the-box managed locations allow you to test public-facing websites and endpoints from regions where your customers are located.
AWS:
| Americas | Asia Pacific | EMEA |
|---|---|---|
| Canada Central | Hong Kong | Bahrain |
| Northern California | Jakarta | Cape Town |
| Northern Virginia | Mumbai | Frankfurt |
| Ohio | Osaka | Ireland |
| Oregon | Seoul | London |
| São Paulo | Singapore | Milan |
| Sydney | Paris | |
| Tokyo | Stockholm |
GCP:
| Americas | Asia Pacific | EMEA |
|---|---|---|
| Dallas | Tokyo | Frankfurt |
| Los Angeles | ||
| Oregon | ||
| Virginia |
Azure:
| Region | Location |
|---|---|
| Americas | Virginia |
The Datadog for Government site (US1-FED) uses the following managed location:
| Region | Location |
|---|---|
| Americas | US-West |
テストの頻度を指定する
ICMP テストは次の頻度で実行できます。
- On a schedule: 最も重要なサービスにユーザーが常にアクセスできるようにします。Datadog で ICMP テストを実行する頻度を選択します。
- Within your CI/CD pipelines。
- On-demand: チームにとって最も意味のあるときにいつでもテストを実行します。
アラート条件を定義する
アラート条件で、テストが失敗しアラートをトリガーする状況を設定します。
アラート設定規則
アラートの条件を An alert is triggered if any assertion fails for X minutes from any n of N locations に設定すると、次の 2 つの条件が当てはまる場合にのみアラートがトリガーされます。
- 直近 X 分間に、最低 1 個のロケーションで失敗 (最低 1 つのアサーションが失敗)、
- 直近 X 分間に、ある時点で最低 n 個のロケーションで失敗。
高速再試行
テストが失敗した場合、Y ミリ秒後に X 回再試行することができます。再試行の間隔は、警告の感性に合うようにカスタマイズしてください。
ロケーションのアップタイムは、評価ごとに計算されます (評価前の最後のテスト結果がアップかダウンか)。合計アップタイムは、構成されたアラート条件に基づいて計算されます。送信される通知は、合計アップタイムに基づきます。
テストモニターを構成する
以前に定義されたアラート条件に基づいて、テストによって通知が送信されます。このセクションを使用して、チームに送信するメッセージの方法と内容を定義します。
モニターの構成方法と同様、メッセージに
@notificationを追加するか、ドロップダウンメニューでチームメンバーと接続されたインテグレーションを検索して、通知を受信するユーザーやサービスを選択します。テストの通知メッセージを入力します。このフィールドでは、標準のマークダウン形式のほか、以下の条件付き変数を使用できます。
条件付き変数 説明 {{ #is_alert }} テストがアラートを発する場合に表示します。 {{ ^is_alert }} テストがアラートを発しない限り表示します。 {{ #is_recovery }} テストがアラートから回復したときに表示します。 {{ ^is_recovery }} テストがアラートから回復しない限り表示します。 {{ #is_renotify }} モニターが再通知したときに表示します。 {{ ^is_renotify }} モニターが再通知しない限り表示します。 {{ #is_priority }} モニターが優先順位 (P1~P5) に一致したときに表示します。 {{ ^is_priority }} モニターが優先順位 (P1~P5) に一致しない限り表示します。 テストが失敗した場合に、テストで通知メッセージを再送信する頻度を指定します。テストの失敗を再通知しない場合は、
Never renotify if the monitor has not been resolvedオプションを使用してください。Create をクリックすると、テストの構成とモニターが保存されます。
詳しくは、Synthetic テストモニターの使用をご覧ください。
Create local variables
To create a local variable, click + All steps > Variables. You can select one of the following available builtins to add to your variable string:
- {{ numeric(n) }}
- Generates a numeric string with
ndigits. - {{ alphabetic(n) }}
- Generates an alphabetic string with
nletters. - {{ alphanumeric(n) }}
- Generates an alphanumeric string with
ncharacters. - {{ date(n unit, format) }}
- Generates a date in one of Datadog’s accepted formats with a value corresponding to the UTC date the test is initiated at + or -
nunits. - {{ timestamp(n, unit) }}
- Generates a timestamp in one of Datadog’s accepted units with a value corresponding to the UTC timestamp the test is initiated at +/-
nunits. - {{ uuid }}
- Generates a version 4 universally unique identifier (UUID).
- {{ public-id }}
- Injects the Public ID of your test.
- {{ result-id }}
- Injects the Result ID of your test run.
To obfuscate local variable values in test results, select Hide and obfuscate variable value. Once you have defined the variable string, click Add Variable.
変数を使用する
ICMP テストの URL およびアサーションで、Settings ページで定義されたグローバル変数を使用できます。
変数のリストを表示するには、目的のフィールドに {{ と入力します。
テストの失敗
テストが 1 つ以上のアサーションを満たさない場合、またはリクエストが時期尚早に失敗した場合、テストは FAILED と見なされます。場合によっては、エンドポイントに対してアサーションをテストすることなくテストが実際に失敗することがあります。
これらの理由には以下が含まれます。
DNS- テスト URL に対応する DNS エントリが見つかりませんでした。原因としては、テスト URL の誤構成や DNS エントリの誤構成が考えられます。
権限
デフォルトでは、Datadog 管理者および Datadog 標準ロールを持つユーザーのみが、Synthetic ICMP テストを作成、編集、削除できます。Synthetic ICMP テストの作成、編集、および削除のアクセス権を取得するには、ユーザーのロールをこれら 2 つのデフォルトのロールのいずれかにアップグレードしてください。
カスタムロール機能を使用している場合は、synthetics_read および synthetics_write 権限を含むカスタムロールにユーザーを追加します。
アクセス制限
Use granular access control to limit who has access to your test based on roles, teams, or individual users:
- Open the permissions section of the form.
- Click Edit Access.

- Click Restrict Access.
- Select teams, roles, or users.
- Click Add.
- Select the level of access you want to associate with each of them.
- Click Done.
Note: You can view results from a Private Location even without Viewer access to that Private Location.
| Access level | View test configuration | Edit test configuration | View test results | Run test |
|---|---|---|---|---|
| No access | ||||
| Viewer | Yes | Yes | ||
| Editor | Yes | Yes | Yes | Yes |


