OCI QuickStart は Preview 提供中です。今すぐ申請するには、
このフォーム をご利用ください。
Datadog の OCI QuickStart は、数回クリックするだけで OCI のインフラとアプリケーションの監視を始められる、フル マネージドのセットアップです。OCI QuickStart は、メトリクス、ログ、リソース データを Datadog に転送するために必要な基盤を構築し、新しいリソースや OCI コンパートメントも自動的に検出してデータ収集に取り込みます。
注:
- デフォルトで送信されるのはメトリクスのみです。このセットアップが完了したら、Datadog OCI インテグレーション タイル からログ収集とリソース データ収集を有効にしてください。
- 2025 年 7 月 15 日時点で存在していた OCI Commercial リージョンはすべてサポートされています。この日以降に追加された OCI リージョンは、現時点ではサポートされていません。
To set up the infrastructure for metric and log forwarding to Datadog:
このインテグレーションでは、Datadog へデータを転送するために Oracle Service Connector Hub を使用する必要があります。セットアップを完了する前に、サービス制限の引き上げを申請する ことをおすすめします。必要となる Service Connector Hub のおおよその数は次のとおりです:
$$\text"Service Connector Hubs" = \text"テナンシ内のコンパートメント数" / \text"5"$$
- Your OCI user account needs the Cloud Administrator role to complete these steps
- You must be logged into OCI in the tenancy you want to integrate with
- You must be logged into OCI with the Home Region selected in the top right of the screen
- Your OCI user account needs to be in the Default Identity Domain
- Your OCI user account must be able to create a user, user group, and dynamic group in the Default Identity Domain
- Your OCI user account must be able to create policies in the root compartment
Datadog OCI integration tile
- Datadog OCI インテグレーション タイル に移動し、Add New Tenancy をクリックします。
- Select or create a Datadog API key to use for the integration.
- Create a Datadog application key.
- Click Create OCI Stack. This takes you to an Oracle Resource Manager (ORM) stack to finish deployment.
Note: Deploy this stack only once per tenancy.
ORM stack
- Oracle 利用規約に同意します。
- Leave the option to use custom Terraform providers unchecked.
- スタックのデプロイ先には既定の作業ディレクトリを使用するか、必要に応じて別のディレクトリを選択します。
- Click Next, and Next again.
- Create をクリックし、デプロイが完了するまで最大 15 分待ちます。
Datadog で設定を完了する
Datadog OCI インテグレーション タイル に戻り、Ready! をクリックします。
検証
Datadog の OCI インテグレーション概要ダッシュボード または Metrics Explorer ページ で oci.* メトリクスを確認します。
OCI 関数メトリクス (oci.faas ネームスペース) とコンテナインスタンスメトリクス (oci_computecontainerinstance ネームスペース) はプレビュー版です。
設定
セットアップが完了すると、Datadog OCI インテグレーション タイル の左側で、そのテナンシ用の設定タブが利用できるようになります。以下のセクションで説明するように、テナンシ全体のデータ収集設定を適用してください。
Add regions
On the General tab, select the regions for data collection from the Regions checkbox list. Region selections apply to the entire tenancy, for both metrics and logs.
Note: If you used the QuickStart setup method, and afterward subscribed to a new OCI region, reapply the initial setup stack in ORM. The new region then becomes available in the Datadog OCI tile.
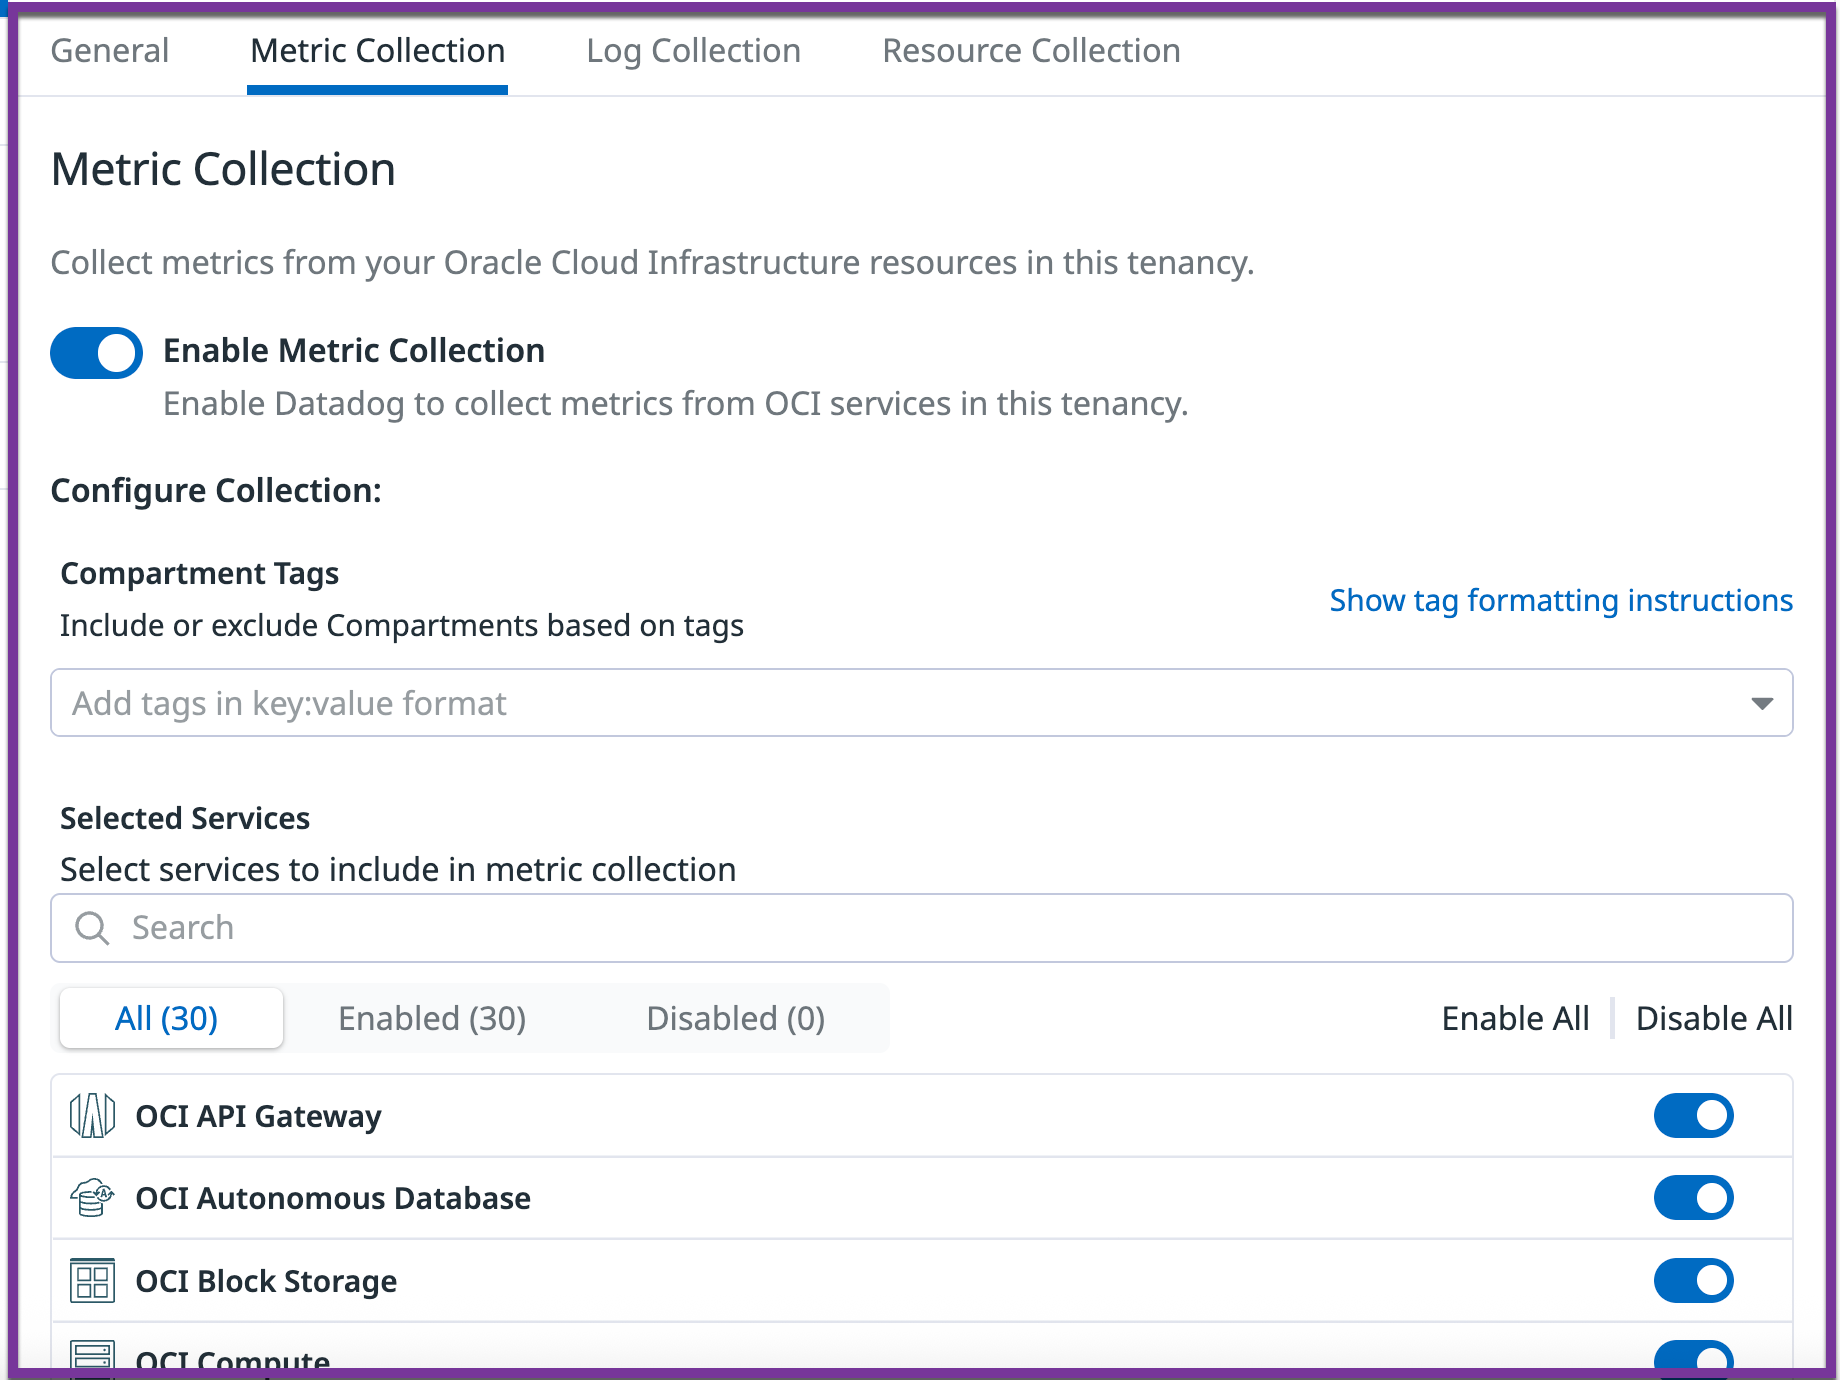
Metric and log collection
Use the Metric collection and Log collection tabs to configure which metrics and logs are sent to Datadog:
- Enable or disable collection of metrics or logs for the entire tenancy
- Include or exclude specific compartments based on
key:value format compartment tags. For example:datadog:monitored,env:prod* includes compartments if either of these tags is present!env:staging,!testing では、両方 のタグが存在する場合にのみコンパートメントが除外されます。datadog:monitored,!region:us-phoenix-1 includes compartments that both have the tag datadog:monitored and do not have the tag region:us-phoenix-1
- Enable or disable collection for specific OCI services
注:
- After modifying tags in OCI, it may take up to 15 minutes for the changes to appear in Datadog
- In OCI, tags are not inherited by child compartments; each compartment must be tagged individually
Resource Collection
Datadog OCI インテグレーション タイル の Resource Collection タブで、Enable Resource Collection トグルをクリックします。リソースは Datadog Resource Catalog で確認できます。
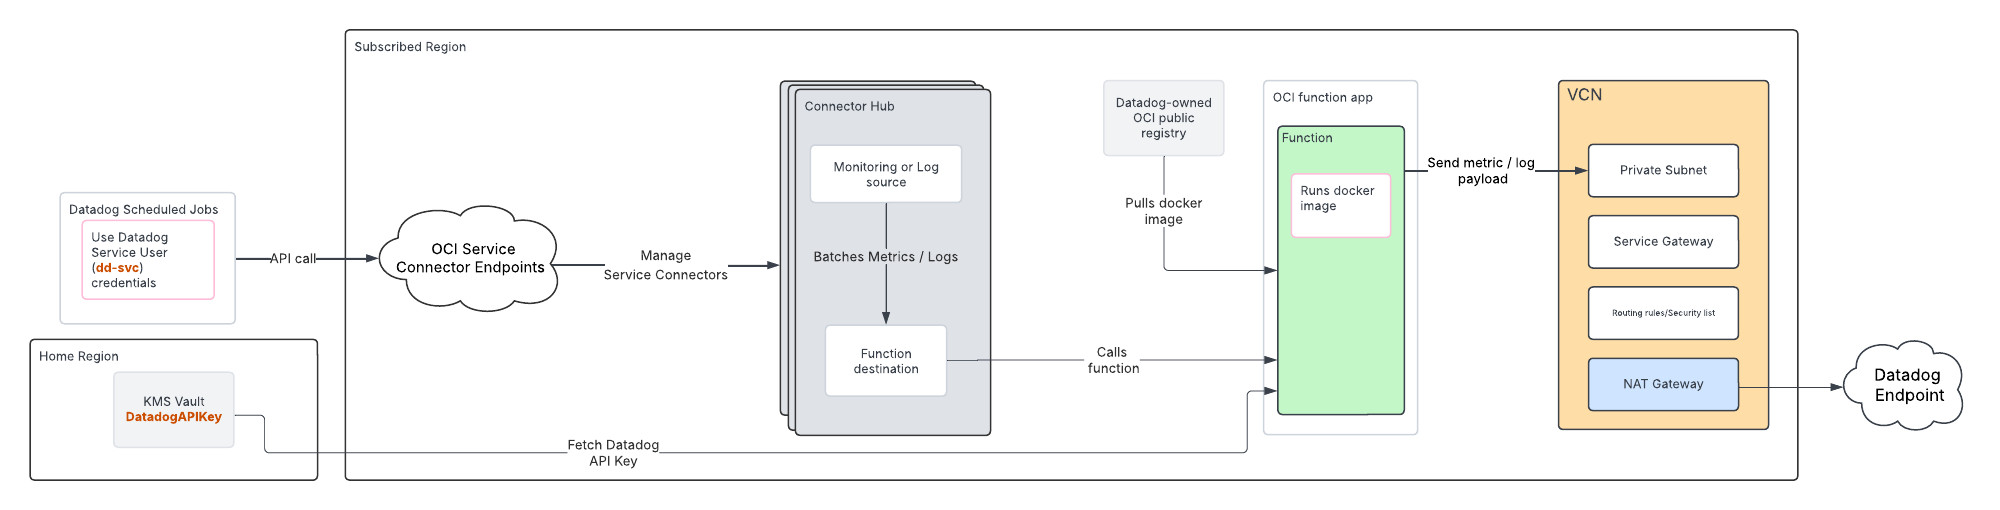
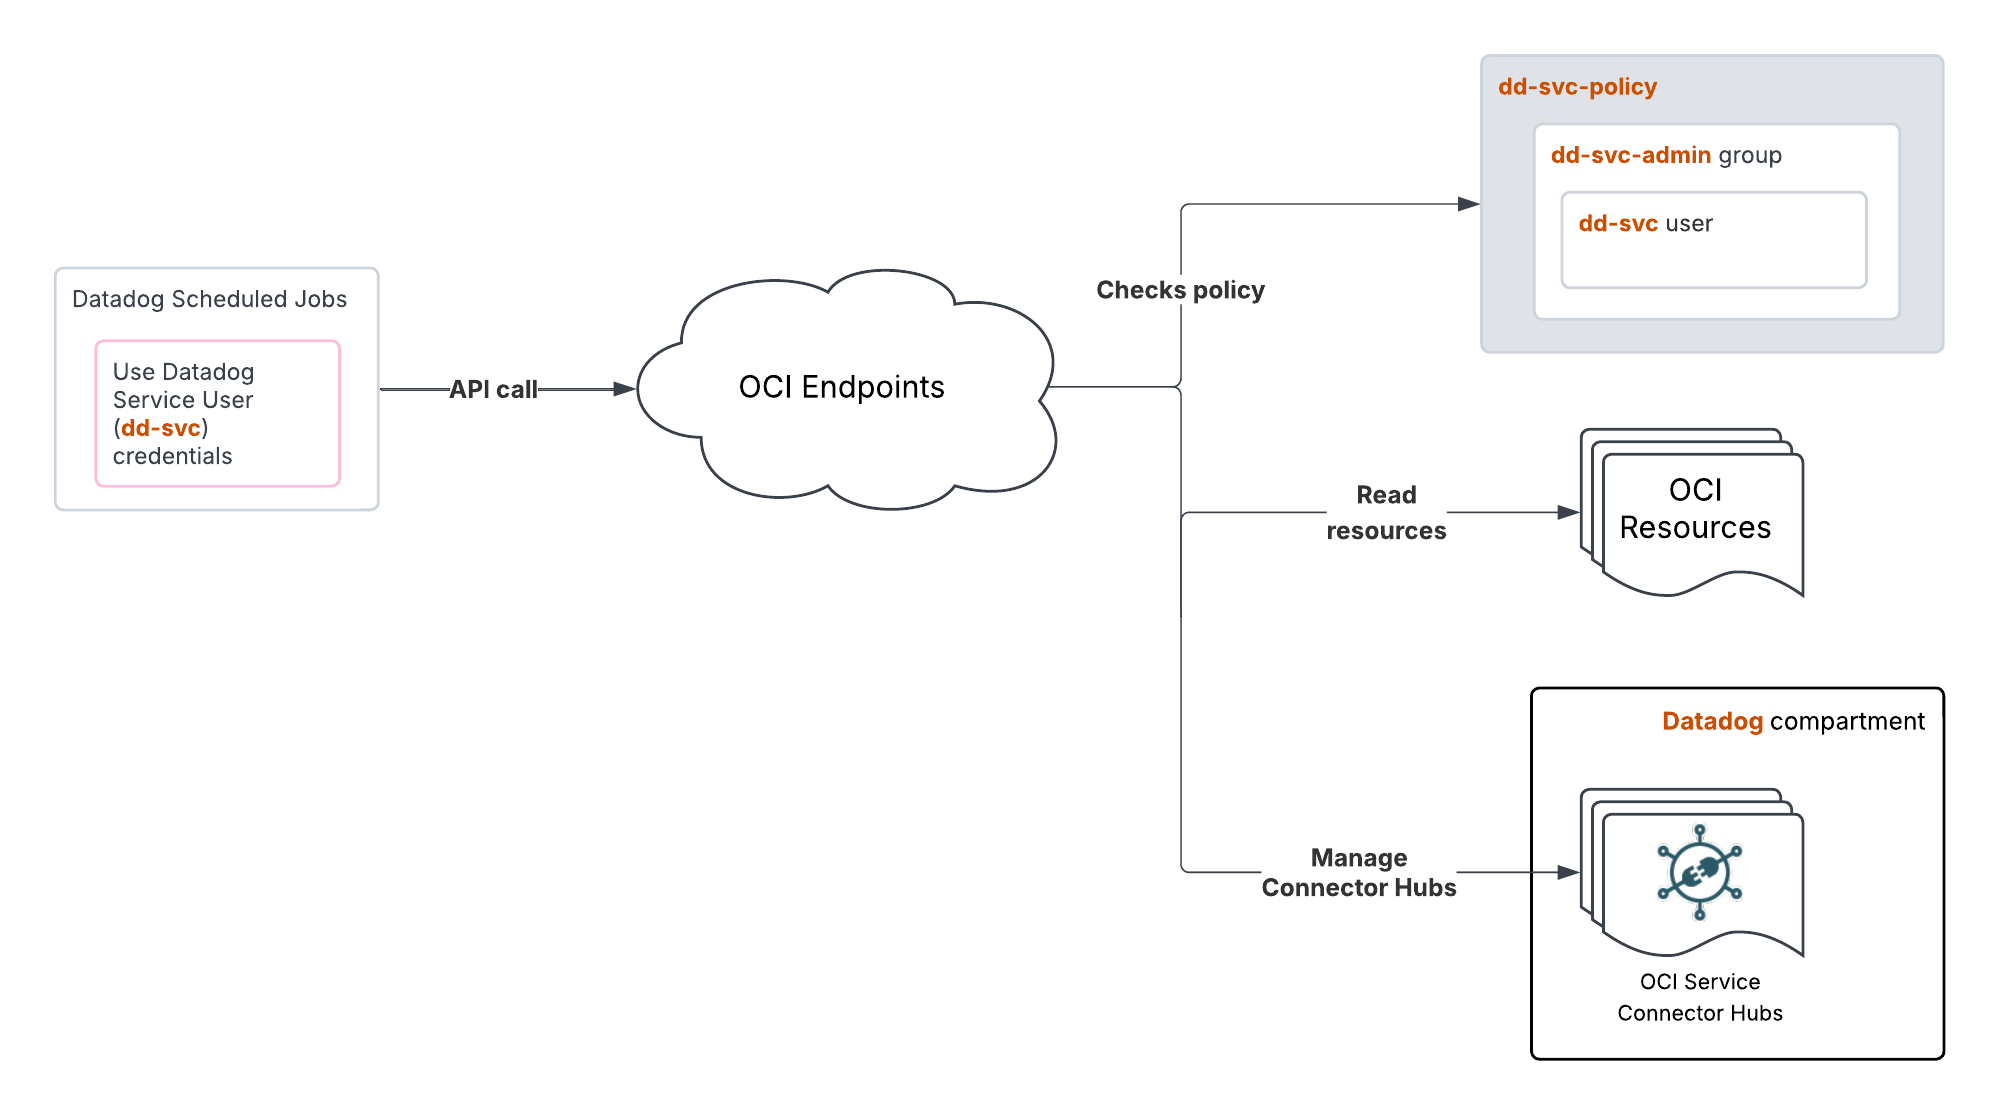
OCI メトリクスを Datadog に転送するには
For a visual representation of this architecture, see the Architecture section.
テナンシー情報を入力
- Your OCI user account needs the Cloud Administrator role to complete these steps
- Tenancy OCID
- Home Region
監視対象のテナンシの OCID と Home Region を、Datadog OCI インテグレーション タイル に入力します。
Create OCI policy stack
- OCI ユーザー アカウントには、Default ドメインで 動的グループとポリシーを作成する 権限が必要です。
- You must be in the home region of the tenancy
Ensure that the home region of the tenancy is selected in the top right of the screen.
This Oracle Resource Manager (ORM) policy stack should only be deployed once per tenancy.
- Click the Create Policy Stack button on the Datadog OCI integration tile.
- Oracle 利用規約に同意します。
- カスタム Terraform プロバイダーを使用するオプションは未選択のままにします。
- Use the default name and compartment for the stack, or optionally provide your own descriptive name or compartment.
- Next をクリックします。
- Leave the tenancy field and current user field as-is.
- Next をクリックします。
- Create をクリックします。
Enter DatadogROAuthUser info
- OCID of the
DatadogROAuthUser - OCI API key and fingerprint value
- In the OCI console search bar, search for
DatadogROAuthUser and click on the User resource that appears. - Copy the user’s OCID value.
- その値を Datadog OCI インテグレーション タイル の User OCID フィールドに貼り付けます。
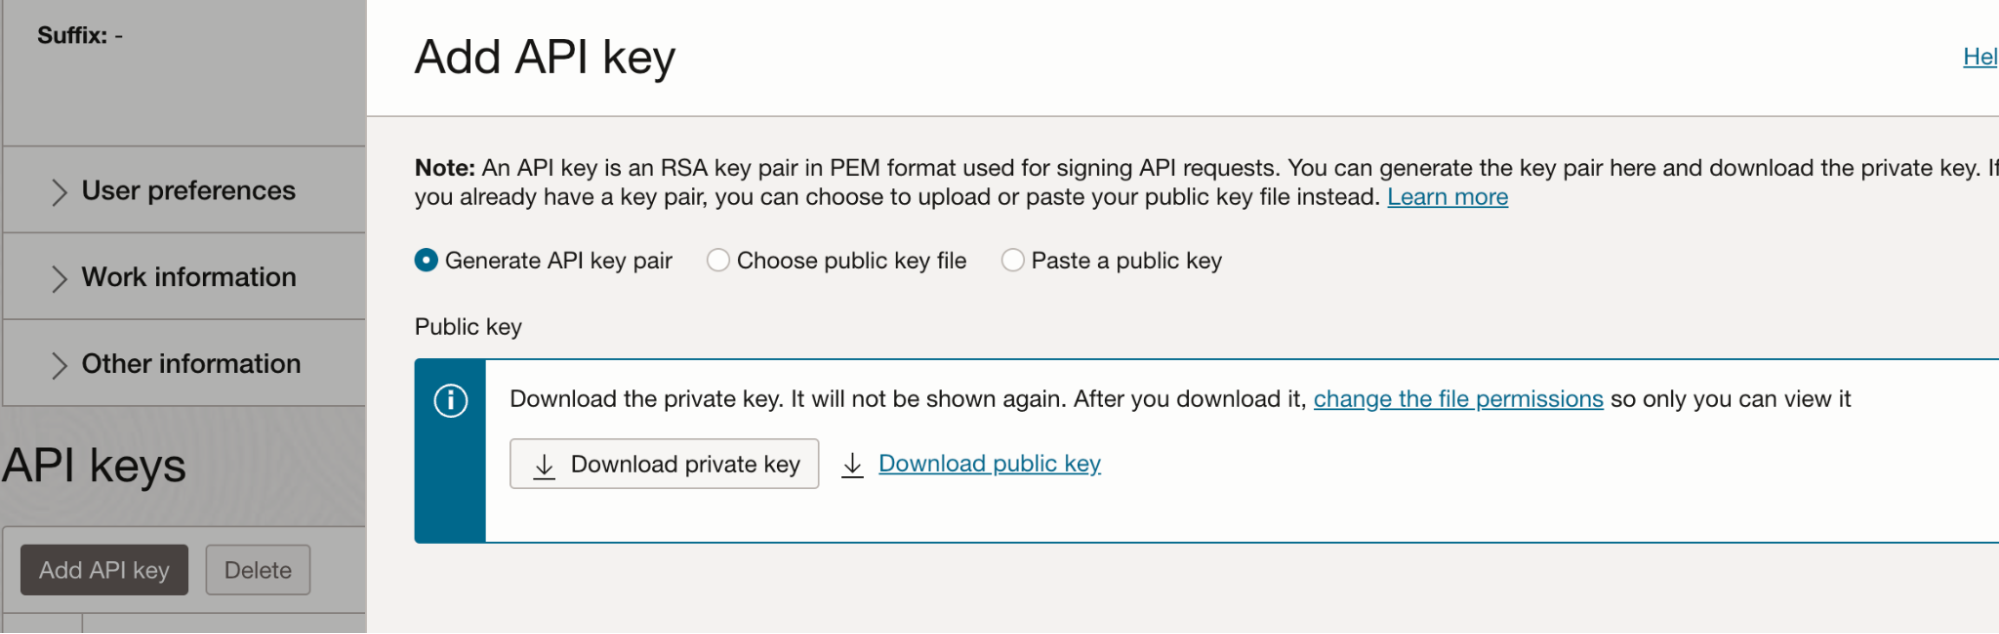
- Returning to the OCI console, generate an API key with these steps:
a. In the bottom left corner of the screen, under Resources, click API keys.
b. Click Add API key.
c. Click Download private key.
d. Click Add.
e. A Configuration file preview popup appears, but no action is needed; close the popup.
- フィンガープリント値をコピーし、Datadog OCI インテグレーション タイル の Fingerprint フィールドに貼り付けます。
- Copy the private key value with these steps:
a. Open the downloaded private key
.pem file in a text editor, or use a terminal command such as cat to display the file’s contents.
b. -----BEGIN PRIVATE KEY----- と -----END PRIVATE KEY----- を含む全内容をコピーします。 - プライベートキーの値を Datadog OCI インテグレーションタイルの Private Key フィールドに貼り付けてください。
Create OCI metric forwarding stack
- Your OCI user account must be able to create resources in the compartment
- Datadog API Key の値
- Username and auth token for a user with the
REPOSITORY_READ and REPOSITORY_UPDATE permissions to pull and push images to a Docker repo
注: Docker registry へのログイン設定が正しいことを確認するには、Oracle Cloud Infrastructure Registry にログインする を参照してください。
The metric forwarding stack must be deployed for each combination of tenancy and region to be monitored. For the simplest setup, Datadog recommends creating all the necessary OCI resources with the Oracle Resource Manager (ORM) stack provided below. Alternatively, you can use your existing OCI networking infrastructure.
All resources created by Datadog’s ORM stack are deployed to the compartment specified, and for the region currently selected in the top right of the screen.
- Click the Create Metric Stack button on the Datadog OCI integration tile.
- Oracle 利用規約に同意します。
- Leave the Custom providers option unchecked.
- スタックに名前を付け、それをデプロイするコンパートメントを選択します。
- Next をクリックします。
- Datadog API Key フィールドに、Datadog API Key の値を入力します。
- In the Network options section, leave
Create VCN checked.
If using an existing Virtual Cloud Network (VCN), the subnet’s OCID must be provided to the stack. Make sure that the VCN:
- Is allowed to make HTTP egress calls through NAT gateway
- Is able to pull images from OCI container registry using service gateway
- Has the route table rules to allow NAT gateway and service gateway
- Has the security rules to send HTTP requests
- In the Network options section, uncheck the
Create VCN option and enter your VCN information:
a. In the vcnCompartment field, select your compartment.
b. In the existingVcn section, select your existing VCN.
c. Function Subnet OCID セクションで、使用するサブネットの OCID を入力します。
- In the Metrics settings section, optionally remove any metric namespaces from collection.
- In the Metrics compartments section, enter a comma-separated list of compartment OCIDs to monitor. Any metric namespace filters selected in the previous step are applied to each compartment.
- In the Function settings section, select
GENERIC_ARM. Select GENERIC_X86 if deploying in a Japan region. - Next をクリックします。
- Create をクリックします。
- Datadog OCI インテグレーション タイル に戻り、Create Configuration をクリックします。
注:
- By default, only the root compartment is selected, and all of the metric namespaces from Step 8 which are present in the compartment are enabled (up to 50 namespaces are supported per connector hub). If you choose to monitor additional compartments, the namespaces added to them are an intersection of namespaces selected and the namespaces present in the compartment.
- Resource Manager スタックの Terraform state file にアクセスできるユーザーは、適切に管理する必要があります。詳しくは、Securing Resource Manager ページの Terraform State Files セクション を参照してください。