- 重要な情報
- はじめに
- 用語集
- Standard Attributes
- ガイド
- インテグレーション
- エージェント
- OpenTelemetry
- 開発者
- Administrator's Guide
- API
- Partners
- DDSQL Reference
- モバイルアプリケーション
- CoScreen
- CoTerm
- Remote Configuration
- Cloudcraft
- アプリ内
- ダッシュボード
- ノートブック
- DDSQL Editor
- Reference Tables
- Sheets
- Watchdog
- アラート設定
- メトリクス
- Bits AI
- Internal Developer Portal
- Error Tracking
- Change Tracking
- Service Management
- Actions & Remediations
- インフラストラクチャー
- Cloudcraft
- Resource Catalog
- ユニバーサル サービス モニタリング
- Hosts
- コンテナ
- Processes
- サーバーレス
- ネットワークモニタリング
- Cloud Cost
- アプリケーションパフォーマンス
- APM
- Continuous Profiler
- データベース モニタリング
- Data Streams Monitoring
- Data Jobs Monitoring
- Data Observability
- Digital Experience
- RUM & セッションリプレイ
- Synthetic モニタリング
- Continuous Testing
- Product Analytics
- Software Delivery
- CI Visibility (CI/CDの可視化)
- CD Visibility
- Deployment Gates
- Test Visibility
- Code Coverage
- Quality Gates
- DORA Metrics
- Feature Flags
- セキュリティ
- セキュリティの概要
- Cloud SIEM
- Code Security
- クラウド セキュリティ マネジメント
- Application Security Management
- Workload Protection
- Sensitive Data Scanner
- AI Observability
- ログ管理
- Observability Pipelines(観測データの制御)
- ログ管理
- CloudPrem
- 管理
ログ パイプラインの作成
概要
このガイドは、Technology Partners に、Datadog へログを送信するインテグレーション向けの ログ パイプラインの作成方法を説明します。ログ パイプラインは、ログを処理・構造化・拡張し、ログを最適に活用するために必要です。
ベスト プラクティス
- Datadog がサポートするログの エンドポイント を使用してください。
- インテグレーションは、Datadog がサポートするいずれかのログ インジェスション エンドポイントを使用する必要があります。
- または、Logs Ingestion HTTP エンドポイント を使用して Datadog にログを送信します。
- すべての Datadog サイトをサポートしてください。
- 該当する場合は、ユーザーが異なる Datadog サイトを選択できるようにします。
- サイト固有の詳細は Datadog サイトのはじめかた を参照してください。
- ログ取り込み用の Datadog サイト エンドポイントは:
http-intake.logs.
- ユーザーがカスタム タグを添付できるようにします。
- タグは、ログ ペイロードの JSON ボディ内でキーと値の属性として設定してください。
- API を使用してログを送信する場合、
ddtags=<TAGS>クエリ パラメーターでタグを設定することもできます。
- インテグレーションのログ ソース タグを設定します。
- ソース タグはインテグレーション名として定義してください。例:
source: okta。 - ソース タグの要件:
- 小文字
- ユーザー編集不可 (パイプラインやダッシュボードで使用)
- ソース タグはインテグレーション名として定義してください。例:
- JSON ボディに配列を含むログの送信は避けてください。
- 配列はサポートされていますが、ファセット化できないため、フィルタリングに制限が生じます。
- Datadog API キーおよび Application キーを保護してください。
- Datadog API キーをログに記録しないでください。これらはリクエスト ヘッダーまたは HTTP パスでのみ渡してください。
- ログ取り込みに Application キーを使用しないでください。
ログ インテグレーション アセットの作成
ログ インテグレーションのアセットは次のとおりです:
- Pipelines - ログを処理して構造化します。
- Facets - ログのフィルタリングや検索に使用する属性です。 Technology Partner のインテグレーションは、すぐに使えるダッシュボードとの互換性を確保するため、Datadog の 標準命名規則 に従う必要があります。
Datadog のインテグレーション チームによるレビューを受けるには、ログ インテグレーションにアセットが含まれ、パイプライン プロセッサまたはファセットが設定されている必要があります。
パイプラインの概要
Datadog に送信されたログは、パイプライン プロセッサを使用して ログ パイプライン で処理されます。これらのプロセッサにより、ユーザーは属性情報を解析・リマップ・抽出でき、ログを強化してプラットフォーム全体で標準化することができます。
パイプラインの作成
- Pipelines ページに移動し、New Pipeline を選択します。
- Filter フィールドに、ログの一意のソース タグを入力します。例えば、Okta インテグレーションでは
source:okta。 - [オプション] 明確化のためにタグと説明を追加します。
- Create をクリックします。
重要: インテグレーション経由で送信されるログが取り込み前にタグ付けされていることを確認してください。
パイプライン プロセッサの追加
- ログの構造化に関するベスト プラクティスについては、Datadog の 標準属性 を確認してください。
Standard Attributes は、プラットフォーム全体に適用される予約済み属性です。
- Add Processor をクリックし、次のオプションから選択します:
- Attribute Remapper - カスタム ログ属性を標準の Datadog 属性にマッピングします。
- Service Remapper - ログが正しいサービス名にリンクされるようにします。
- Date Remapper - ログに正しいタイムスタンプを割り当てます。
- Status Remapper - ログ ステータスを標準の Datadog 属性にマッピングします。
- Message Remapper - ログを正しい message 属性に割り当てます。
- ログが JSON 形式でない場合は、Grok Parser プロセッサーを使用して属性を抽出してください。Grok プロセッサーは属性を抽出し、リマップやさらなる処理の前にログを拡張します。
高度な処理が必要な場合は、次を検討してください:
- Arithmetic Processor - ログ属性に対する計算を実行します。
- String Builder Processor - 複数の文字列属性を連結します。
ヒント
preserveSource:falseを使用してログ属性をリマップする際に元の属性を削除すると、混乱を避けて重複を排除できます。- grok の解析パフォーマンスを最適に保つため、ワイルドカード マッチャーの使用は避けてください。
パイプライン内でプロセッサを使用してデータを強化・再構築し、ログ属性を生成します。すべてのログ プロセッサの一覧については、プロセッサ ドキュメントを参照してください。
要件
- アプリケーションのログ属性を Datadog の Standard Attributes にマップする
- 可能な限り Attribute Remapper を使用して属性キーを Datadog Standard Attributes にマップします。たとえば、ネットワーク サービス クライアント IP を示す属性は
network.client.ipにリマップする必要があります。 - ログの
serviceタグをテレメトリを生成するサービス名にマップする - Service Remapper を使用して
service属性をリマップします。sourceと service が同じ値の場合、serviceタグをsourceタグにリマップします。serviceタグは小文字である必要があります。 - ログの内部タイムスタンプを Datadog の公式タイムスタンプにマップする
- Date Remapper を使用してログの公式タイムスタンプを定義します。ログのタイムスタンプが 標準の date 属性 にマップされない場合、Datadog は取り込み時刻をタイムスタンプとして設定します。
- ログのカスタム status 属性を公式 Datadog
status属性にマップする - Status Remapper を使用してログの
statusをリマップするか、HTTP ステータス コードのように範囲にマップされる場合は Category Processor を使用します。 - ログのカスタム message 属性を公式 Datadog
message属性にマップする - アプリケーション ログが標準の message 属性にマップされていない場合は、メッセージ リマッパー を使用してログの公式メッセージを定義します。これにより、ユーザーはフリー テキスト検索を利用できます。
- ログ内のカスタム属性にネームスペースを設定する
- Datadog Standard Attribute にマップされない一般的なログ属性で ファセット にマップされるものは、ネームスペースを設定する必要があります。例:
file→integration_name.file。 Attribute Remapper を使用して属性キーを新しいネームスペース付き属性に設定します。
- 作成したパイプラインを展開し、Add Processor をクリックしてプロセッサを追加し始めます。
- インテグレーションのログが JSON 形式でない場合は、Grok Processor を追加して属性情報を抽出します。Grok プロセッサは属性を解析し、リマップや追加処理の前にログを強化します。
- 属性を抽出した後、Attribute Remapper を使用して可能な限り Datadog の Standard Attributes にリマップします。
- Date Remapper を使用して、インテグレーションのログのタイムスタンプを公式 Datadog タイムスタンプに設定します。
- 高度な処理やデータ変換には、追加の プロセッサ を活用してください。
例:
Arithmetic Processorで属性に基づく計算を行ったり、String Builder Processorで複数の文字列属性を連結できます。
ヒント
preserveSource:falseを使用してログ属性をリマップする際に元の属性を削除すると、混乱を避けて重複を排除できます。- 最適な grok 解析性能を維持するため、
%{data:}や%{regex(".*"):}などのワイルドカード マッチャーは避け、解析ステートメントをできる限り具体的にしてください。 - プロセッサの記述と Standard Attributes の活用方法については、無料コース Logs Processing をより深く学ぶ をご覧ください。
ファセットの概要
ファセットとは、検索結果をフィルターし絞り込むために使用できる特定の定性的または定量的な属性です。ファセットは検索結果をフィルターするために必ずしも必要ではありませんが、ユーザーが検索を細かく絞り込む際に利用可能なディメンションを理解する上で重要な役割を果たします。
パイプラインを公開すると、Standard Attribute 用のファセットは Datadog により自動的に追加されます。対象の属性を Datadog の Standard Attribute にリマップすべきかどうかを確認してください。
すべての属性がファセットとして使用されるわけではありません。インテグレーションにおけるファセットの必要性は次の 2 点に集約されます:
- ファセットはログをフィルターするためのシンプルなインターフェイスを提供します。これは Log Management のオート コンプリート機能で活用され、ユーザーがログ内のキー情報を検索・集約できるようにします。
- ファセットにより可読性の低い属性にわかりやすいラベルを付け替えることが可能になります。例:
@deviceCPUper→Device CPU Utilization Percentage。
Log Explorer で ファセット を作成できます。
ファセットの作成
ファセットを正しく定義することは、分析、モニター、および Datadog の Log Management 製品全体の集計機能でインデックス化されたログの使いやすさを高めるために重要です。
ファセットは、Log Management 全体のオート コンプリート機能を充実させることでアプリケーション ログの検索性を向上させます。
定量的なファセットは "メジャー" と呼ばれ、リレーショナル オペレーターを使用して数値範囲でログをフィルターできます。
たとえば、レイテンシー属性のメジャーを使用すると、特定の期間を超えるすべてのログを検索できます。
要件
- カスタム ファセットにマップされる属性はまずネームスペース化する必要がある
- Datadog の Standard Attribute にマップされていない汎用カスタム属性をカスタム ファセット で使用する場合は、ネームスペース化が必要です。Attribute Remapper を使用して属性にインテグレーション名のネームスペースを付与できます。
例:
attribute_nameをintegration_name.attribute_nameにリマップします。 - カスタム ファセットは既存の Datadog ファセットを重複しないこと
- 既存の Datadog 標準ファセットとの混同を避けるため、Datadog Standard Attributes にすでにマップされているファセットと重複するカスタム ファセットは作成しないでください。
- カスタム ファセットは
source名の下にグループ化すること - カスタム ファセットを作成する際は、グループを割り当てます。
Group値にsource(インテグレーション名と同じ) を設定してください。 - カスタム ファセットはマップされた属性と同じデータ型を持つこと
- ファセットのデータ型 (String、Boolean、Double、Integer) は、マップされた属性と同じ型にしてください。型が一致しないと、ファセットが正しく機能せず、正しく表示されません。
ファセットまたはメジャーを追加
- ファセットまたはメジャーを追加したい属性を含むログをクリックします。
- ログ パネルで該当属性の横にある Cog icon をクリックします。
- Create facet/measure for @attribute を選択します。
- メジャーの単位を定義する場合は Advanced options をクリックし、属性を表す単位を選択します。 注: メジャーの 単位 は属性が表す内容に基づいて定義してください。
- ファセット Group を指定して Facet List を整理します。グループが存在しない場合は New group を選択し、source タグと一致する名前を入力して説明を追加します。
- Add をクリックしてファセットを作成します。
ファセットの設定と編集
- ログ パネルで、設定またはグループ化したい属性の横にある Cog icon をクリックします。
- 既存のファセットがある場合は Edit facet/measure for @attribute、ない場合は Create facet/measure for @attribute を選択します。
- 完了したら Add または Update をクリックします。
ヒント
- メジャーには可能な限り単位を設定してください。メジャーには 単位 を割り当てることができます。利用可能な単位ファミリーは
TIMEとBYTESで、millisecondやgibibyteなどがあります。 - ファセットには説明を設定できます。明確な説明を追加すると、ユーザーがファセットを効果的に利用しやすくなります。
preserveSource:trueオプションを使用して属性をリマップし元の属性を保持する場合、ファセットはどちらか一方の属性にのみ定義してください。- パイプライン の
.yaml構成ファイルでファセットを手動設定する場合、ファセットにはsourceが割り当てられる点に注意してください。これは属性を取得した場所を示し、属性の場合はlog、タグの場合はtagになります。
ログ パイプラインをエクスポートする
エクスポートしたいパイプラインにカーソルを合わせ、export pipeline を選択します。
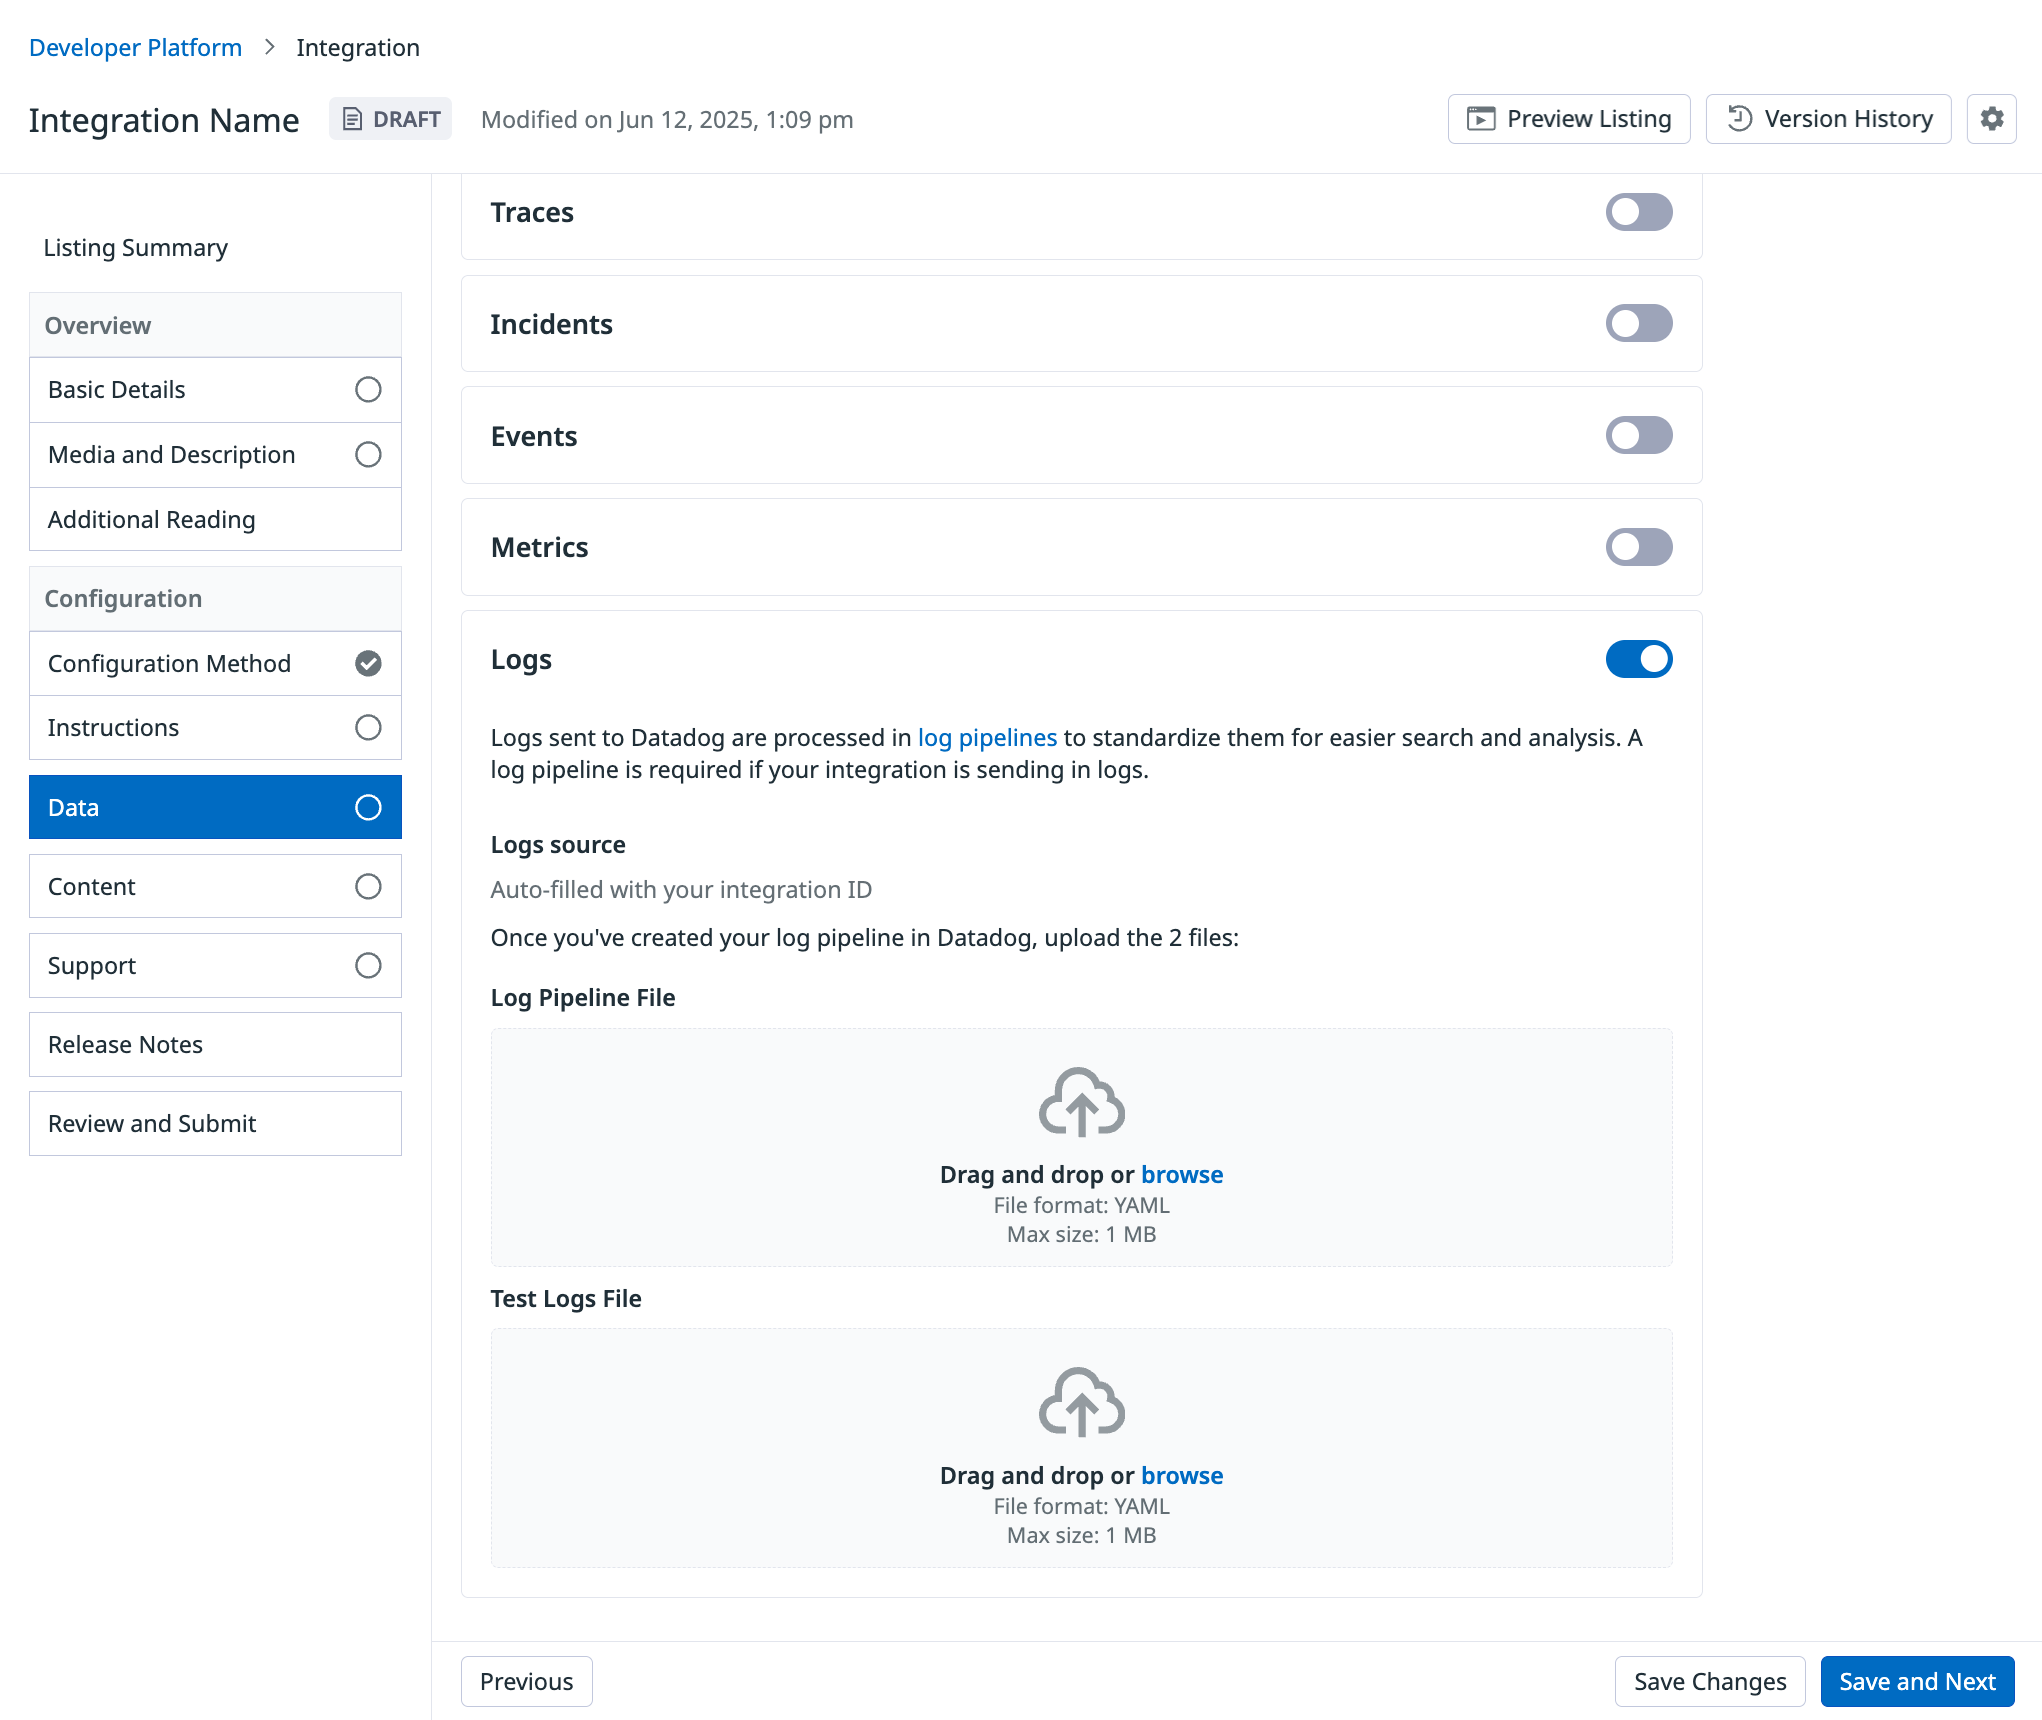
ログ パイプラインをエクスポートすると、2 つの YAML ファイルが含まれます: -pipeline-name.yaml: カスタム ファセット、属性リマッパー、grok パーサーを含む ログ パイプライン。 -pipeline_name_test.yaml: 提供された生のサンプル ログと、空のセクション結果。
注: 使用中のブラウザーによっては、ファイルをダウンロードできるように設定を調整する必要がある場合があります。
ログ パイプラインをアップロードする
Integration Developer Platform に移動し、Data タブ > Submitted logs で、ログ ソースを指定し、前の手順でエクスポートした 2 つのファイルをアップロードします。


