OCI QuickStart est en préversion. Utilisez
ce formulaire pour soumettre votre demande dès aujourd'hui.
OCI QuickStart de Datadog est une expérience de configuration entièrement gérée et à flux unique qui vous permet de surveiller votre infrastructure et vos applications OCI en quelques clics. OCI QuickStart crée l’infrastructure nécessaire au transfert des métriques, des logs et des données de ressources vers Datadog, et découvre automatiquement les nouvelles ressources ou les compartiments OCI pour la collecte de données.
Remarques :
- Seules les métriques sont envoyées par défaut. Activez la collecte de logs et la collecte de données de ressources depuis le carré d’intégration OCI Datadog une fois la configuration terminée.
- Toutes les régions commerciales OCI existant au 15 juillet 2025 sont prises en charge. Les régions OCI ajoutées après cette date ne sont pas actuellement prises en charge.
Pour configurer l’infrastructure de transfert de métriques et de logs vers Datadog :
L’intégration nécessite l’utilisation d’Oracle Service Connector Hubs pour transférer des données vers Datadog. Il est recommandé de demander une augmentation de la limite de service avant de terminer la configuration. Le nombre approximatif de Service Connector Hubs nécessaires est le suivant :
$$\text"Service Connector Hubs" = \text"Nombre de compartiments dans la tenancy" / \text"5"$$
- Votre compte utilisateur OCI doit disposer du rôle Cloud Administrator pour effectuer ces étapes
- Vous devez être connecté à OCI dans la tenancy que vous souhaitez intégrer
- Vous devez être connecté à OCI avec la Home Region sélectionnée en haut à droite de l’écran
- Votre compte utilisateur OCI doit appartenir au domaine d’identité par défaut
- Votre compte utilisateur OCI doit pouvoir créer un utilisateur, un groupe d’utilisateurs et un groupe dynamique dans le domaine d’identité par défaut
- Votre compte utilisateur OCI doit pouvoir créer des stratégies dans le compartiment racine
Carré d’intégration OCI Datadog
- Accédez au carré d’intégration OCI Datadog et cliquez sur Add New Tenancy.
- Sélectionnez ou créez une clé d’API Datadog à utiliser pour l’intégration.
- Créez une clé d’application Datadog.
- Cliquez sur Create OCI Stack. Vous accédez alors à une stack Oracle Resource Manager (ORM) pour terminer le déploiement.
Note : ne déployez cette stack qu’une seule fois par tenancy.
Stack ORM
- Acceptez les conditions d’utilisation d’Oracle.
- Laissez l’option d’utilisation de fournisseurs Terraform personnalisés décochée.
- Utilisez le répertoire de travail par défaut pour déployer la stack, ou choisissez-en un autre si vous le souhaitez.
- Cliquez sur Next, puis de nouveau sur Next.
- Cliquez sur Create et attendez jusqu’à 15 minutes que le déploiement se termine.
Terminer la configuration dans Datadog
Revenez au carré d’intégration OCI Datadog et cliquez sur Ready!
Validation
Consultez les métriques oci.* dans le dashboard de présentation de l’intégration OCI ou sur la page Metrics Explorer dans Datadog.
Les métriques de fonctions OCI (namespace oci.faas) et les métriques d'instances de conteneurs (namespace oci_computecontainerinstance) sont en préversion.
Configuration
Une fois la configuration terminée, un onglet de configuration pour la tenancy devient disponible sur le côté gauche du carré d’intégration OCI Datadog. Appliquez les configurations de collecte de données à l’échelle de la tenancy comme indiqué dans les sections ci-dessous.
Ajouter des régions
Dans l’onglet General, sélectionnez les régions pour la collecte de données dans la liste de cases à cocher Regions. Les sélections de régions s’appliquent à l’ensemble de la tenancy, pour les métriques et les logs.
Remarque : si vous avez utilisé la méthode de configuration QuickStart et que vous avez ensuite souscrit à une nouvelle région OCI, réappliquez la stack de configuration initiale dans ORM. La nouvelle région est alors disponible dans le carré OCI Datadog.
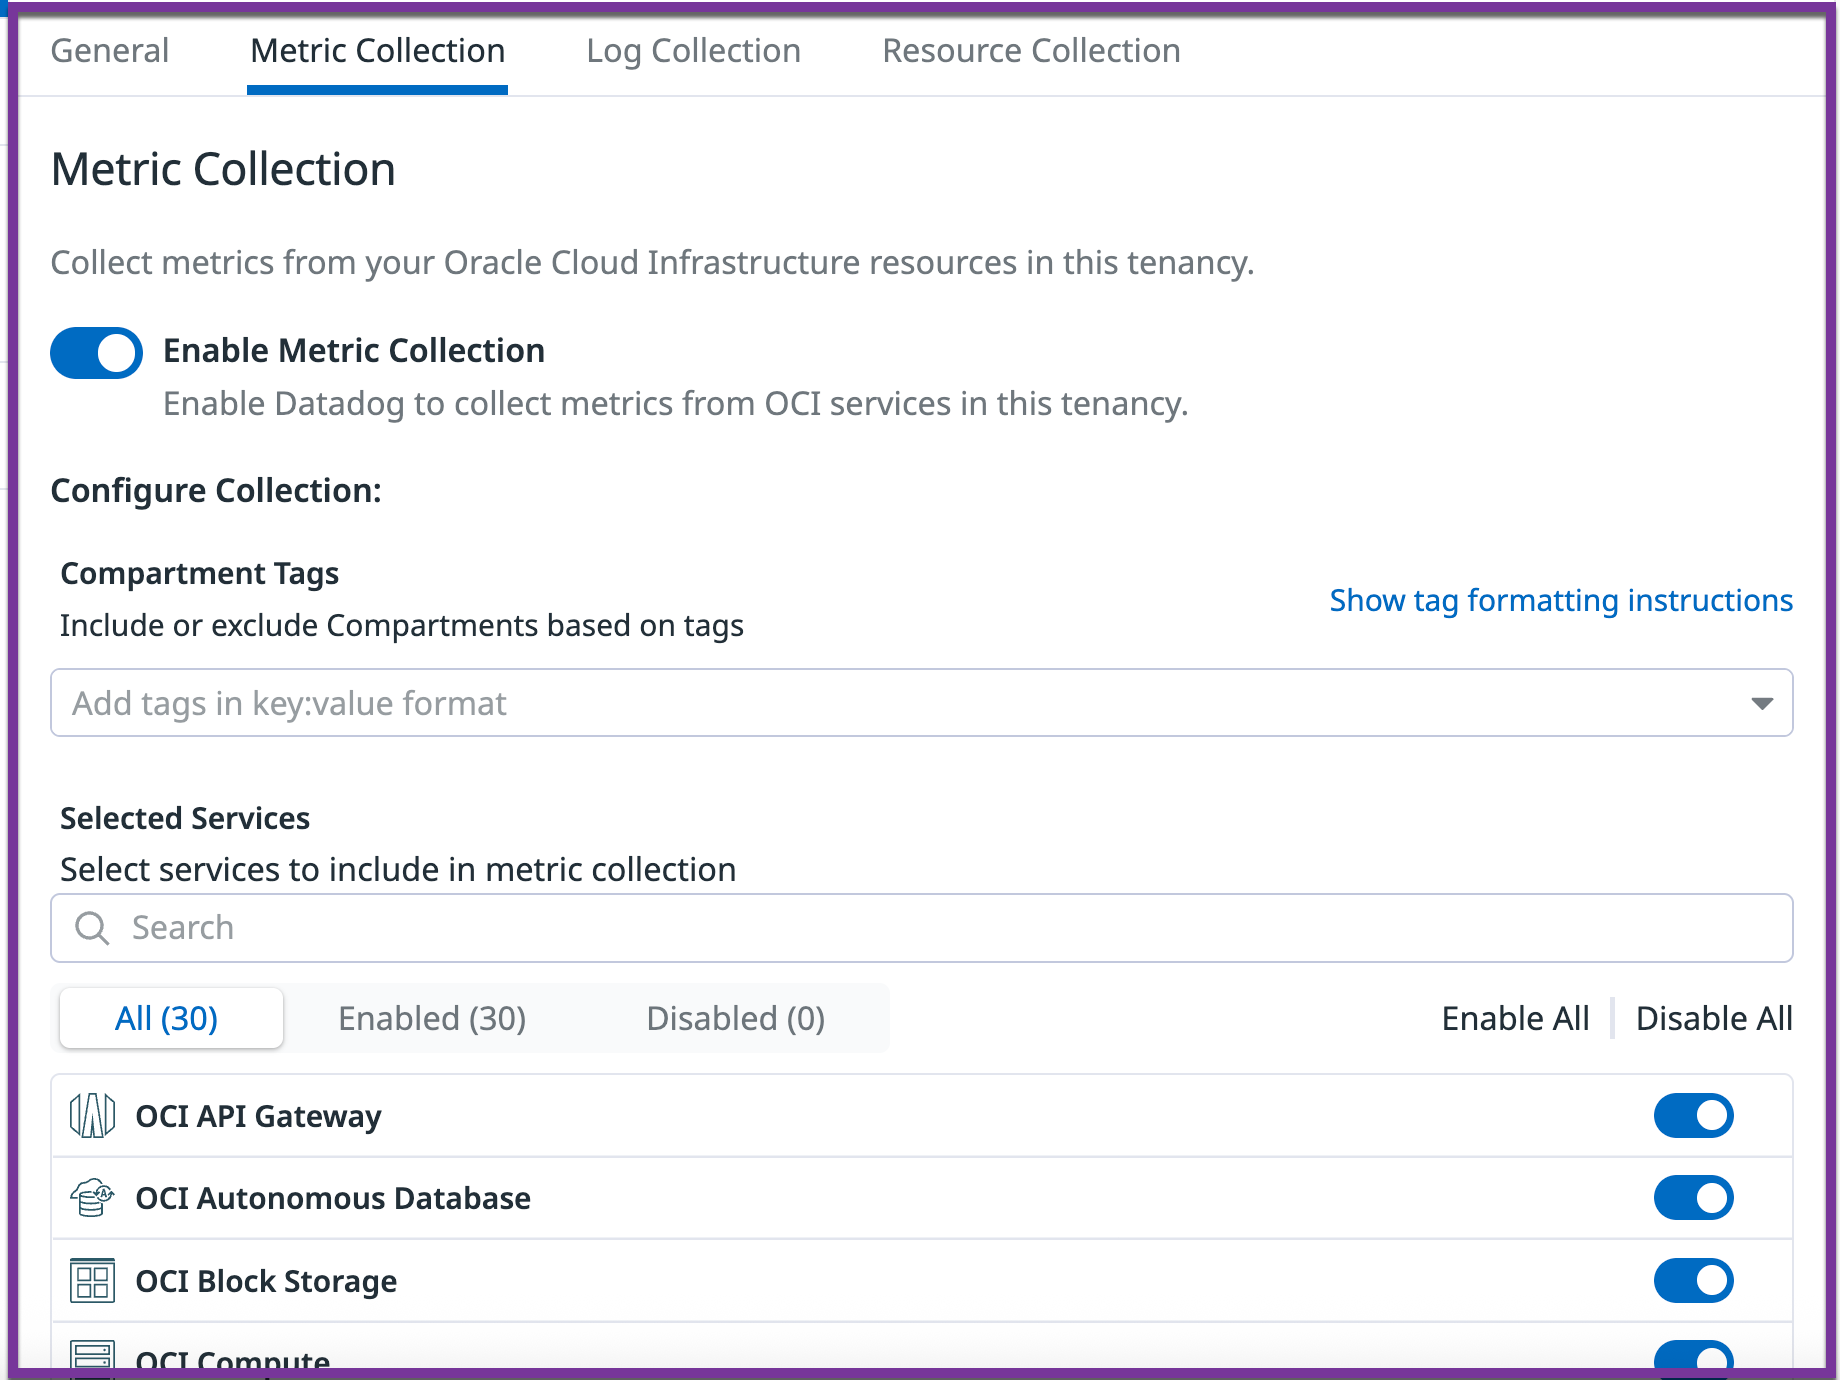
Collecte de métriques et de logs
Utiliser les onglets Metric collection et Log collection pour configurer les métriques et les logs envoyés à Datadog :
- Activer ou désactiver la collecte de métriques ou de logs pour l’ensemble de la tenancy
- Inclure ou exclure des compartiments spécifiques en fonction des tags de compartiment au format
key:value. Par exemple :datadog:monitored,env:prod* inclut les compartiments si l’un ou l’autre de ces tags est présent!env:staging,!testing exclut les compartiments uniquement si les deux tags sont présentsdatadog:monitored,!region:us-phoenix-1 inclut les compartiments qui ont à la fois le tag datadog:monitored et n’ont pas le tag region:us-phoenix-1
- Activer ou désactiver la collecte pour des services OCI spécifiques
Remarques :
- Après avoir modifié des tags dans OCI, les modifications peuvent prendre jusqu’à 15 minutes pour s’afficher dans Datadog
- Dans OCI, les tags ne sont pas hérités par les compartiments enfants ; chaque compartiment doit être tagué individuellement
Collecte de ressources
Dans l’onglet Resource Collection du carré d’intégration OCI Datadog, cliquez sur le bouton Enable Resource Collection. Les ressources sont visibles dans le Catalogue de ressources Datadog.
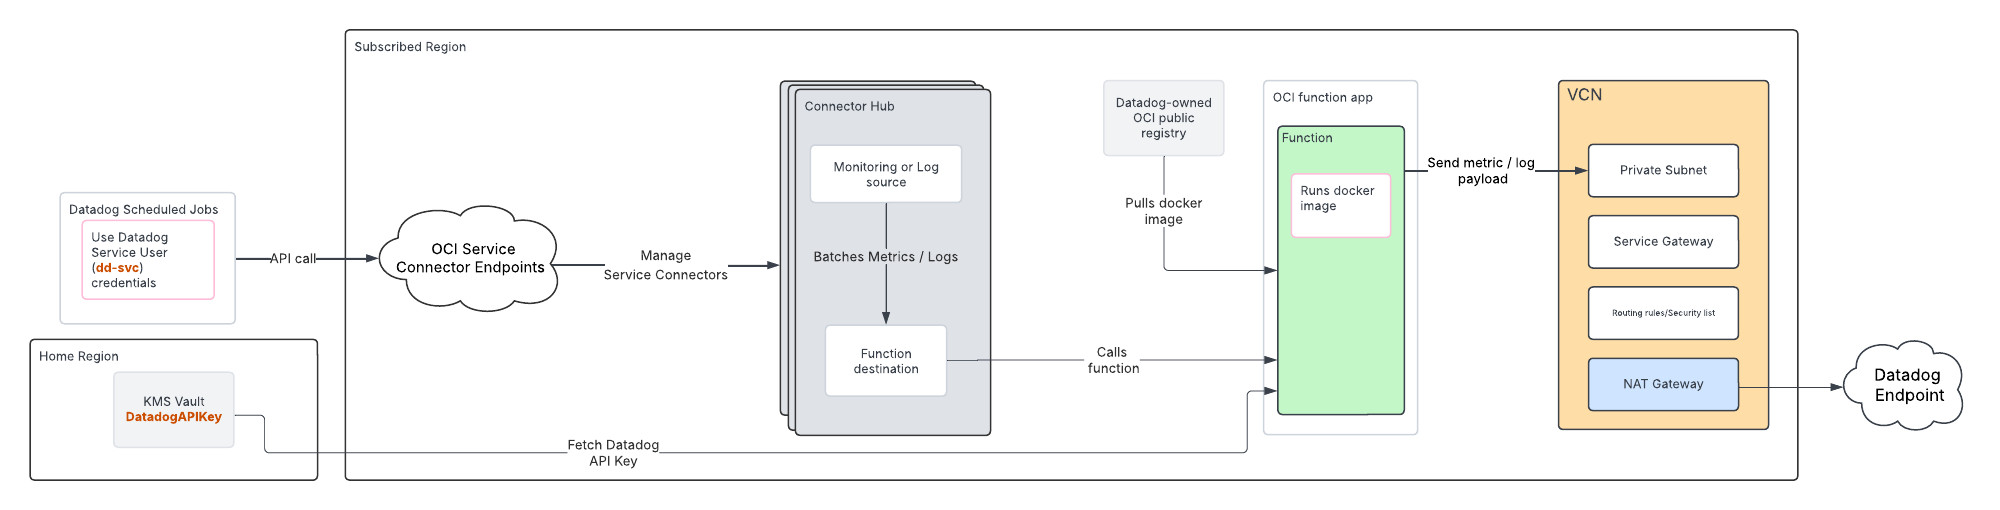
Pour transférer vos métriques OCI vers Datadog :
Pour une représentation visuelle de cette architecture, consultez la section Architecture.
- Votre compte utilisateur OCI doit disposer du rôle Cloud Administrator pour effectuer ces étapes
- OCID de la tenancy
- Région d’origine
Saisissez l’OCID et la région d’origine de la tenancy que vous souhaitez surveiller dans le carré d’intégration OCI Datadog.
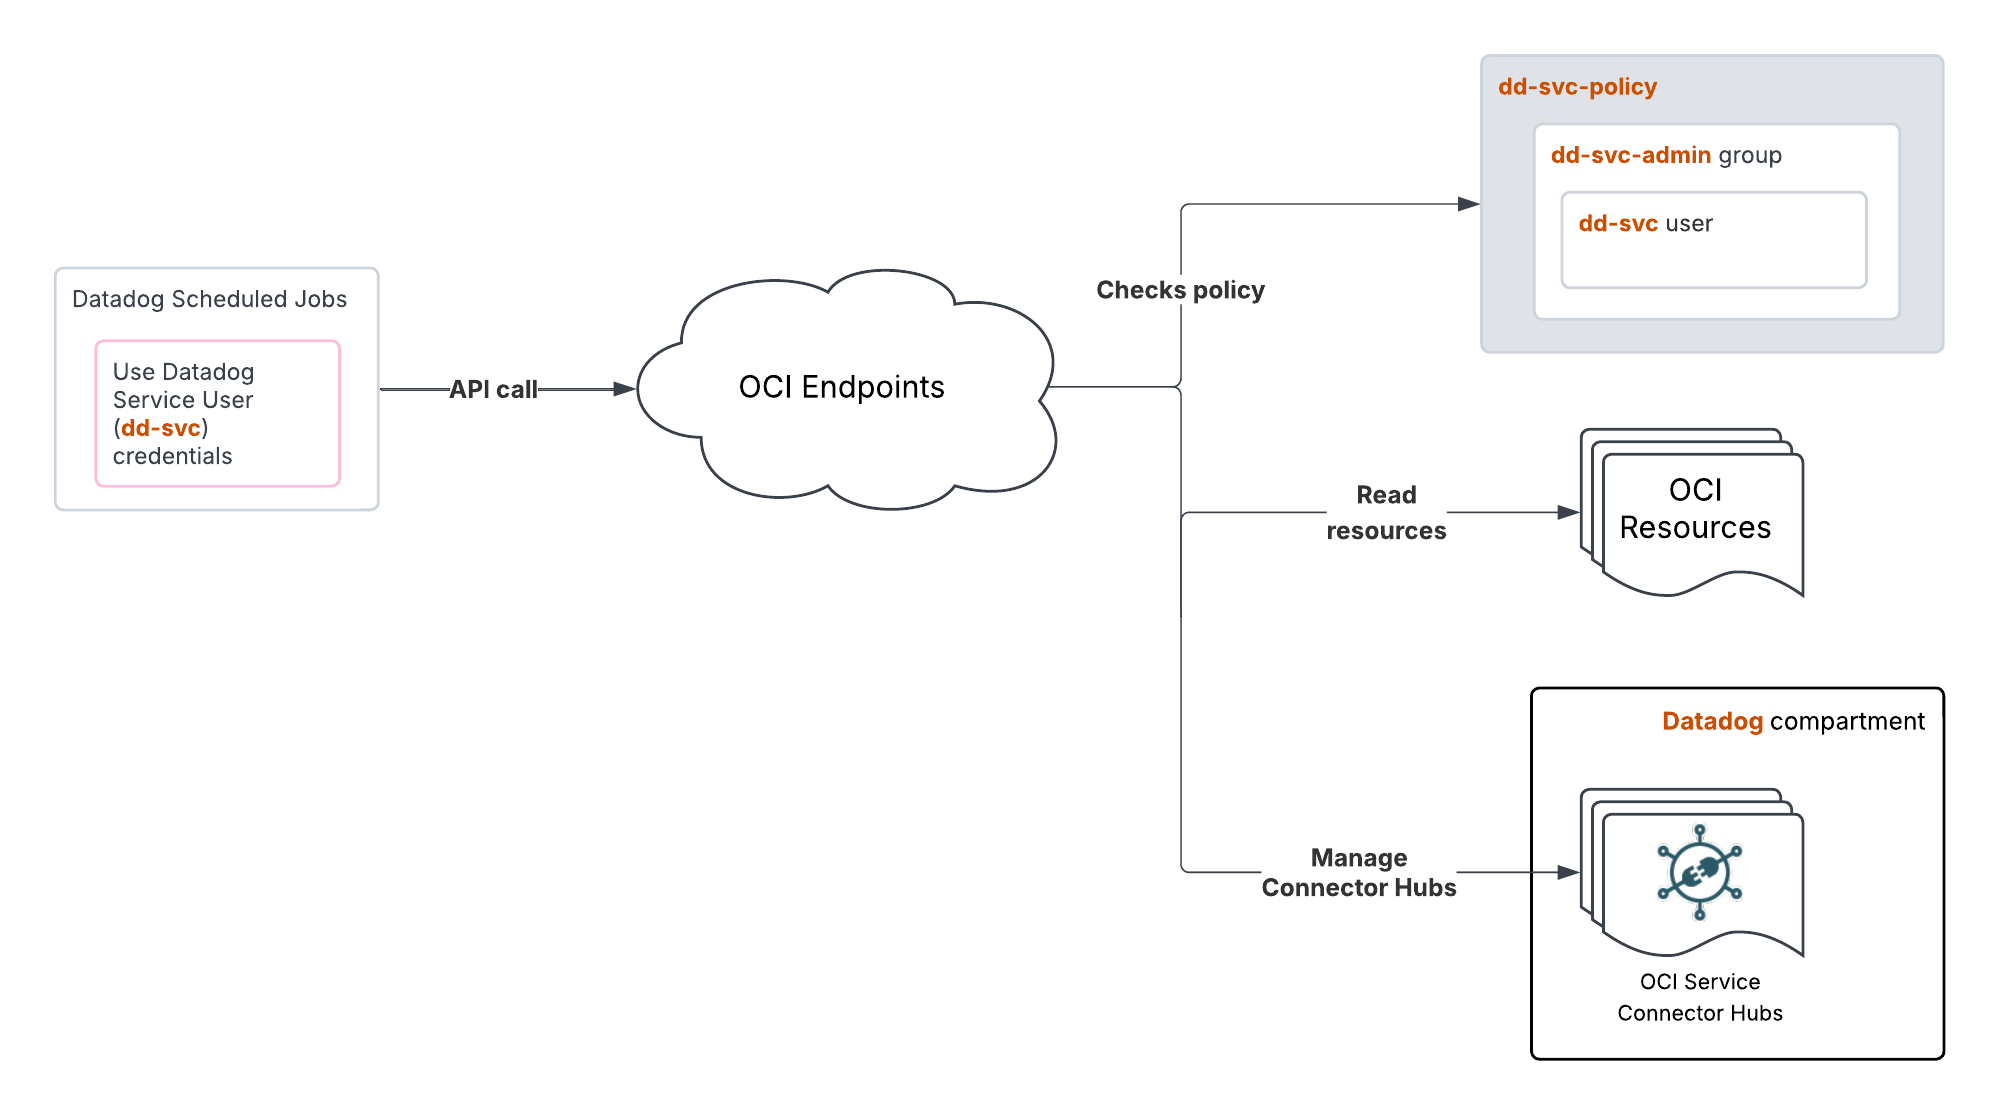
Créer une stack de stratégies OCI
Assurez-vous que la région d'origine de la tenancy est sélectionnée en haut à droite de l'écran.
Cette stack de stratégies Oracle Resource Manager (ORM) ne doit être déployée qu’une seule fois par tenancy.
- Cliquez sur le bouton Create Policy Stack dans le carré d’intégration OCI Datadog.
- Acceptez les conditions d’utilisation d’Oracle.
- Laissez l’option d’utilisation de fournisseurs Terraform personnalisés décochée.
- Utilisez le nom et le compartiment par défaut de la stack, ou indiquez éventuellement votre propre nom descriptif ou compartiment.
- Cliquez sur Next.
- Laissez les champs de tenancy et d’utilisateur actuel tels quels.
- Cliquez sur Next.
- Cliquez sur Create.
- OCID de
DatadogROAuthUser - Clé d’API OCI et valeur d’empreinte
- Dans la barre de recherche de la console OCI, recherchez
DatadogROAuthUser et cliquez sur la ressource User qui s’affiche. - Copiez la valeur OCID de l’utilisateur.
- Collez la valeur dans le champ User OCID du carré d’intégration OCI Datadog.
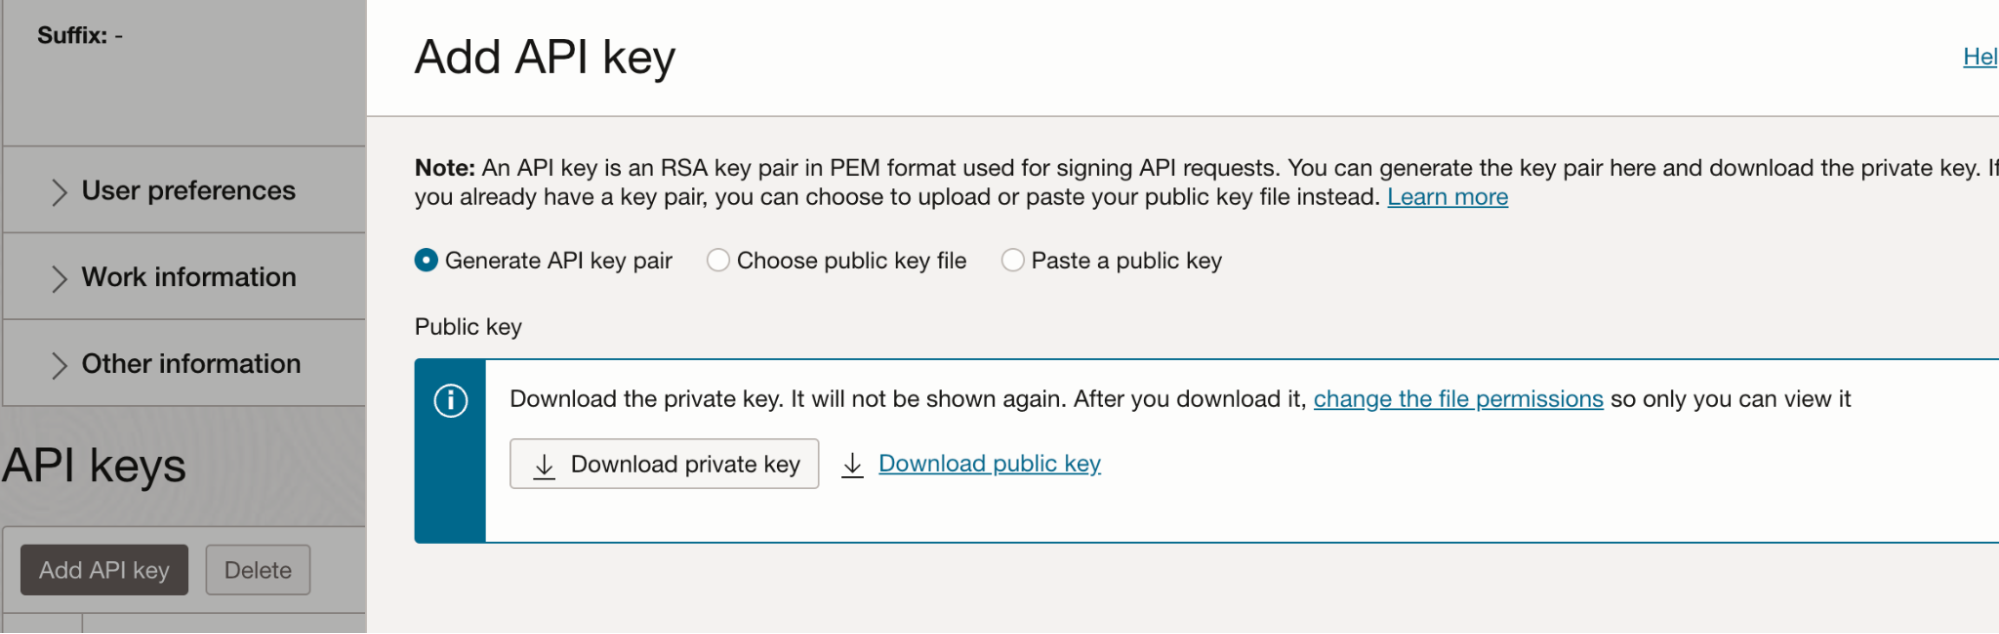
- De retour dans la console OCI, générer une clé d’API en suivant ces étapes :
a. Dans le coin inférieur gauche de l’écran, sous Resources, cliquez sur API keys.
b. Cliquez sur Add API key.
c. Cliquez sur Download private key.
d. Cliquez sur Add.
e. Une fenêtre contextuelle Configuration file preview s’affiche, mais aucune action n’est nécessaire. Fermez cette fenêtre.
- Copiez la valeur de l’empreinte et collez-la dans le champ Fingerprint du carré d’intégration OCI Datadog.
- Copier la valeur de la clé privée en suivant ces étapes :
a. Ouvrez le fichier de clé privée
.pem téléchargé dans un éditeur de texte, ou utilisez une commande de terminal telle que cat pour afficher le contenu du fichier.
b. Copiez l’intégralité du contenu, y compris -----BEGIN PRIVATE KEY----- et -----END PRIVATE KEY-----. - Collez la valeur de la clé privée dans le champ Private Key du carré d’intégration OCI Datadog.
Créer une stack de transfert de métriques OCI
- Votre compte utilisateur OCI doit pouvoir créer des ressources dans le compartiment
- Valeur de la clé d’API Datadog
- Nom d’utilisateur et token d’authentification pour un utilisateur disposant des autorisations
REPOSITORY_READ et REPOSITORY_UPDATE pour extraire et envoyer des images vers un référentiel Docker
Remarque : pour vérifier que la connexion au registre Docker est correcte, consultez Connexion à Oracle Cloud Infrastructure Registry.
La stack de transfert de métriques doit être déployée pour chaque combinaison de tenancy et de région à surveiller. Pour une configuration plus simple, Datadog recommande de créer toutes les ressources OCI nécessaires avec la stack Oracle Resource Manager (ORM) fournie ci-dessous. Vous pouvez également utiliser votre infrastructure réseau OCI existante.
Toutes les ressources créées par la stack ORM de Datadog sont déployées dans le compartiment spécifié et pour la région actuellement sélectionnée en haut à droite de l’écran.
- Cliquez sur le bouton Create Metric Stack dans le carré d’intégration OCI Datadog.
- Acceptez les conditions d’utilisation d’Oracle.
- Laissez l’option Custom providers décochée.
- Nommez la stack et sélectionnez le compartiment dans lequel la déployer.
- Cliquez sur Next.
- Dans le champ Datadog API Key, saisissez la valeur de votre clé d’API Datadog.
- Dans la section Network options, laissez l’option
Create VCN cochée.
Si vous utilisez un réseau cloud virtuel (VCN) existant, l’OCID du sous-réseau doit être fourni à la stack. Assurez-vous que le VCN :
- Est autorisé à effectuer des appels HTTP sortants via la passerelle NAT
- Est capable d’extraire des images du registre de conteneurs OCI via la passerelle de service
- Dispose des règles de table de routage pour autoriser la passerelle NAT et la passerelle de service
- Dispose des règles de sécurité pour envoyer des requêtes HTTP
- Dans la section Network options, décochez l’option
Create VCN et saisissez les informations de votre VCN :
a. Dans le champ vcnCompartment, sélectionnez votre compartiment.
b. Dans la section existingVcn, sélectionnez votre VCN existant.
c. Dans la section Function Subnet OCID, saisissez l’OCID du sous-réseau à utiliser.
- Dans la section Metrics settings, supprimez éventuellement des namespaces de métriques de la collecte.
- Dans la section Metrics compartments, saisissez une liste d’OCID de compartiments à surveiller, séparés par des virgules. Les filtres de namespaces de métriques sélectionnés à l’étape précédente sont appliqués à chaque compartiment.
- Dans la section Function settings, sélectionnez
GENERIC_ARM. Sélectionnez GENERIC_X86 si vous effectuez un déploiement dans une région japonaise. - Cliquez sur Next.
- Cliquez sur Create.
- Revenez au carré d’intégration OCI Datadog et cliquez sur Create Configuration.
Remarques :
- Par défaut, seul le compartiment racine est sélectionné et tous les espaces de nommage de métriques de l’étape 8 présents dans le compartiment sont activés (jusqu’à 50 espaces de nommage sont pris en charge par connector hub). Si vous choisissez de surveiller des compartiments supplémentaires, les espaces de nommage qui leur sont ajoutés sont une intersection des espaces de nommage sélectionnés et des espaces de nommage présents dans le compartiment.
- Vous devez gérer les personnes ayant accès aux fichiers d’état Terraform des stacks du gestionnaire de ressources. Pour plus d’informations, consultez la section Terraform State Files de la page Securing Resource Manager.