- Principales informations
- Getting Started
- Agent
- API
- Tracing
- Conteneurs
- Dashboards
- Database Monitoring
- Datadog
- Site Datadog
- DevSecOps
- Incident Management
- Intégrations
- Internal Developer Portal
- Logs
- Monitors
- OpenTelemetry
- Profileur
- Session Replay
- Security
- Serverless for AWS Lambda
- Software Delivery
- Surveillance Synthetic
- Tags
- Workflow Automation
- Learning Center
- Support
- Glossary
- Standard Attributes
- Guides
- Agent
- Intégrations
- Développeurs
- OpenTelemetry
- Administrator's Guide
- API
- Partners
- Application mobile
- DDSQL Reference
- CoScreen
- CoTerm
- Remote Configuration
- Cloudcraft
- In The App
- Dashboards
- Notebooks
- DDSQL Editor
- Reference Tables
- Sheets
- Alertes
- Watchdog
- Métriques
- Bits AI
- Internal Developer Portal
- Error Tracking
- Change Tracking
- Service Management
- Actions & Remediations
- Infrastructure
- Cloudcraft
- Resource Catalog
- Universal Service Monitoring
- Hosts
- Conteneurs
- Processes
- Sans serveur
- Surveillance réseau
- Cloud Cost
- Application Performance
- APM
- Termes et concepts de l'APM
- Sending Traces to Datadog
- APM Metrics Collection
- Trace Pipeline Configuration
- Connect Traces with Other Telemetry
- Trace Explorer
- Recommendations
- Code Origin for Spans
- Observabilité des services
- Endpoint Observability
- Dynamic Instrumentation
- Live Debugger
- Suivi des erreurs
- Sécurité des données
- Guides
- Dépannage
- Profileur en continu
- Database Monitoring
- Agent Integration Overhead
- Setup Architectures
- Configuration de Postgres
- Configuration de MySQL
- Configuration de SQL Server
- Setting Up Oracle
- Setting Up Amazon DocumentDB
- Setting Up MongoDB
- Connecting DBM and Traces
- Données collectées
- Exploring Database Hosts
- Explorer les métriques de requête
- Explorer des échantillons de requêtes
- Exploring Database Schemas
- Exploring Recommendations
- Dépannage
- Guides
- Data Streams Monitoring
- Data Jobs Monitoring
- Data Observability
- Digital Experience
- RUM et Session Replay
- Surveillance Synthetic
- Continuous Testing
- Product Analytics
- Software Delivery
- CI Visibility
- CD Visibility
- Deployment Gates
- Test Visibility
- Code Coverage
- Quality Gates
- DORA Metrics
- Feature Flags
- Securité
- Security Overview
- Cloud SIEM
- Code Security
- Cloud Security Management
- Application Security Management
- Workload Protection
- Sensitive Data Scanner
- AI Observability
- Log Management
- Pipelines d'observabilité
- Log Management
- CloudPrem
- Administration
Bits AI Kubernetes Remediation
Cette page n'est pas encore disponible en français, sa traduction est en cours.
Si vous avez des questions ou des retours sur notre projet de traduction actuel, n'hésitez pas à nous contacter.
Si vous avez des questions ou des retours sur notre projet de traduction actuel, n'hésitez pas à nous contacter.
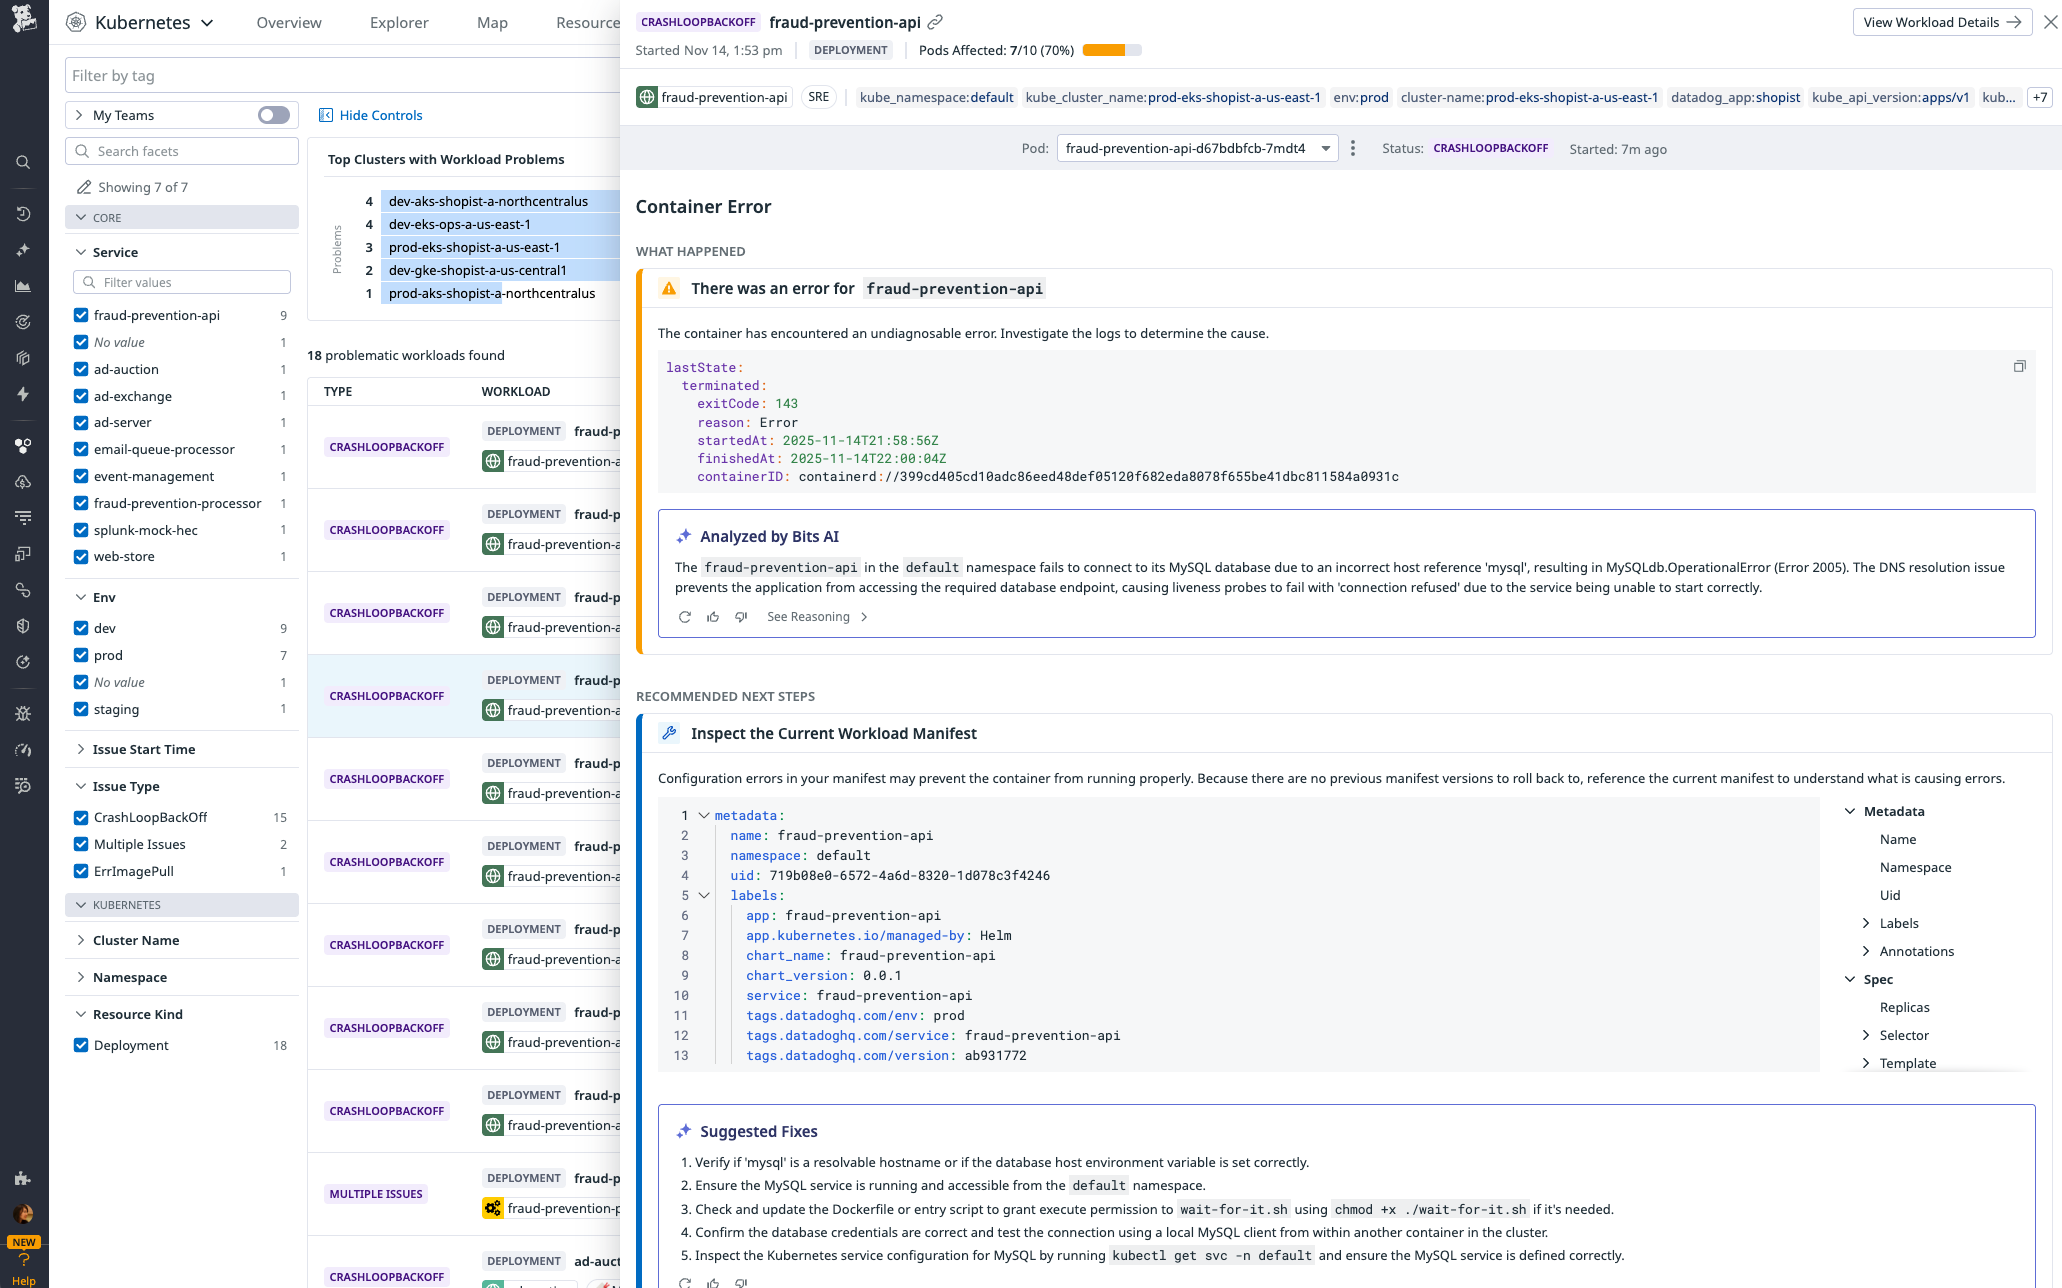
Bits AI Kubernetes Remediation analyzes and fixes Kubernetes errors in your infrastructure.
The following Kubernetes errors are supported:
CrashLoopBackOffErrImagePullImagePullBackOffOOMKilledCreateContainerErrorCreateContainerConfigError
Usage
You can launch Bits AI Kubernetes Remediation from multiple locations within Datadog:
- From a Kubernetes monitor: In the Troubleshooting section, select a workload under Problematic Workloads.
- From Kubernetes Explorer: Hover over a pod status with an error to see more information about the alert and the affected workload(s), and click Start Remediation.
- From the Kubernetes Remediation tab: Select a workload from the list.
Any one of these actions opens a Remediation side panel that displays:
- An AI-powered explanation for root cause, based on collected telemetry and known patterns
- Recommended next steps, which you may be able to perform directly from Datadog
- Related information on an adjustable timeframe: recent deployments, error logs, Kubernetes events, etc., including relevant metrics based on specific issue type
Remediate from Datadog
Join the Preview!
Automated fixes from Bits AI Kubernetes Remediation is in Preview. To sign up, click Request Access and complete the form.
Request AccessIf your repositories are connected to Datadog, and an error can be fixed by changing code in one of these connected repositories, then you can use Bits AI to perform the remediation action directly from Datadog. For other problem scenarios, Bits AI provides a detailed list of remediation steps to follow.
Example: Increasing memory limit for a deployment
Example: Increasing memory limit for a deployment
When a pod is terminated because the memory usage exceeded its limit, you may be able to fix the error by increasing your container’s memory limit.
- Click Edit Memory Limit.
- Adjust your limit so that it is higher than what your container normally uses.
- Click Fix with Bits AI.
- On the next page, select the repository where your deployment is defined, and review the proposed changes. Click Fix with Bits to create a pull request.
- You are redirected to a Bits Code Session, where you can verify that the Bits AI Dev Agent identified the specific configuration file where your memory limits are defined. Click Create Pull Request to initiate the creation of the pull request.
- Click View Pull Request to view the pull request in GitHub.
Further reading
Documentation, liens et articles supplémentaires utiles:

