- Essentials
- Getting Started
- Agent
- API
- APM Tracing
- Containers
- Dashboards
- Database Monitoring
- Datadog
- Datadog Site
- DevSecOps
- Incident Management
- Integrations
- Internal Developer Portal
- Logs
- Monitors
- Notebooks
- OpenTelemetry
- Profiler
- Search
- Session Replay
- Security
- Serverless for AWS Lambda
- Software Delivery
- Synthetic Monitoring and Testing
- Tags
- Workflow Automation
- Learning Center
- Support
- Glossary
- Standard Attributes
- Guides
- Agent
- Integrations
- Developers
- Authorization
- DogStatsD
- Custom Checks
- Integrations
- Build an Integration with Datadog
- Create an Agent-based Integration
- Create an API-based Integration
- Create a Log Pipeline
- Integration Assets Reference
- Build a Marketplace Offering
- Create an Integration Dashboard
- Create a Monitor Template
- Create a Cloud SIEM Detection Rule
- Install Agent Integration Developer Tool
- Service Checks
- IDE Plugins
- Community
- Guides
- OpenTelemetry
- Administrator's Guide
- API
- Partners
- Datadog Mobile App
- DDSQL Reference
- CoScreen
- CoTerm
- Remote Configuration
- Cloudcraft (Standalone)
- In The App
- Dashboards
- Notebooks
- DDSQL Editor
- Reference Tables
- Sheets
- Monitors and Alerting
- Service Level Objectives
- Metrics
- Watchdog
- Bits AI
- Internal Developer Portal
- Error Tracking
- Change Tracking
- Event Management
- Incident Response
- Actions & Remediations
- Infrastructure
- Cloudcraft
- Resource Catalog
- Universal Service Monitoring
- End User Device Monitoring
- Hosts
- Containers
- Processes
- Serverless
- Network Monitoring
- Storage Management
- Cloud Cost
- Application Performance
- APM
- Continuous Profiler
- Database Monitoring
- Agent Integration Overhead
- Setup Architectures
- Setting Up Postgres
- Setting Up MySQL
- Setting Up SQL Server
- Setting Up Oracle
- Setting Up Amazon DocumentDB
- Setting Up MongoDB
- Connecting DBM and Traces
- Data Collected
- Exploring Database Hosts
- Exploring Query Metrics
- Exploring Query Samples
- Exploring Database Schemas
- Exploring Recommendations
- Troubleshooting
- Guides
- Data Streams Monitoring
- Data Observability
- Digital Experience
- Real User Monitoring
- Synthetic Testing and Monitoring
- Continuous Testing
- Product Analytics
- Session Replay
- Software Delivery
- CI Visibility
- CD Visibility
- Deployment Gates
- Test Optimization
- Code Coverage
- PR Gates
- DORA Metrics
- Feature Flags
- Security
- Security Overview
- Cloud SIEM
- Code Security
- Cloud Security
- App and API Protection
- Workload Protection
- Sensitive Data Scanner
- AI Observability
- Log Management
- Observability Pipelines
- Configuration
- Sources
- Processors
- Destinations
- Packs
- Akamai CDN
- Amazon CloudFront
- Amazon VPC Flow Logs
- AWS Application Load Balancer Logs
- AWS CloudTrail
- AWS Elastic Load Balancer Logs
- AWS Network Load Balancer Logs
- Cisco ASA
- Cloudflare
- F5
- Fastly
- Fortinet Firewall
- HAProxy Ingress
- Istio Proxy
- Juniper SRX Firewall Traffic Logs
- Netskope
- NGINX
- Okta
- Palo Alto Firewall
- Windows XML
- ZScaler ZIA DNS
- Zscaler ZIA Firewall
- Zscaler ZIA Tunnel
- Zscaler ZIA Web Logs
- Search Syntax
- Scaling and Performance
- Monitoring and Troubleshooting
- Guides and Resources
- Log Management
- CloudPrem
- Administration
Live Debugger
This product is not supported for your selected Datadog site. ().
Overview
The Live Debugger enables you to add logpoints—auto-expiring, non-breaking breakpoints—to your runtime code to collect information for debugging. The logpoints are set dynamically in running systems, so there is no need to redeploy your code to investigate and resolve issues. Logpoints are grouped into sessions and you can activate, edit, deactivate, or delete sessions (or individual logpoints) at any time. All sessions and logpoints automatically deactivate after 48 hours.
Live Debugger tab
The Live Debugger tab in the Datadog tool window shows the current session, its logpoints, and the data captured by the selected logpoint:
The panel has three sections:
- The current session and its logpoints (left side)
- The status and events for the selected logpoint (center)
- The runtime data for the selected logpoint event (right side)
Current session
The session view shows the current session and its logpoints. Use the selector to choose another session or start a new one.
Activate, deactivate, or delete the session, using the controls in the toolbar at the right of the selector. You can also open the session in the Datadog UI from here.
Select any logpoint to display its status and recently generated events, or to enable, disable, edit or delete it. To navigate to the source code location for a logpoint, double-click it or right-click and select Jump to Source.
Logpoint status and events
The central section displays the status and recent event information for the selected logpoint. The list shows up to 50 events from within the past 24 hours. Select an event to view the generated log message, the captured variables, and the runtime stacktrace for the event.
At the top-right of the panel, View logs in Datadog opens the Log Explorer in Datadog to explore all log events for the selected logpoint.
Runtime data for debugging
The right section displays data for the selected logpoint event, including captured variables and the stacktrace for the event. This runtime context is invaluable for understanding issues and reasoning about your source code.
The Captures tab shows a tree view of variable values captured at runtime for the logpoint. Nested values are captured up to the depth limit defined in the logpoint. The data is fully searchable and you can copy selected items to the clipboard.
The Stacktrace tab shows the runtime path execution leading up to the logpoint. Double-click any frame in the stack trace to open the corresponding source file location.
Source editor
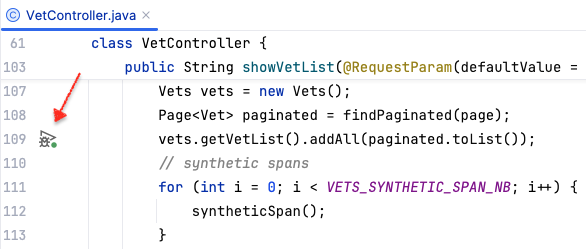
In the source editor, an icon is shown in the gutter for any line that has a logpoint defined in the current session:
Click the icon to open the Datadog tool window and show the selected logpoint. Right-click the icon for options to enable, disable, edit, and delete the logpoint.
Managing logpoints
Add a logpoint
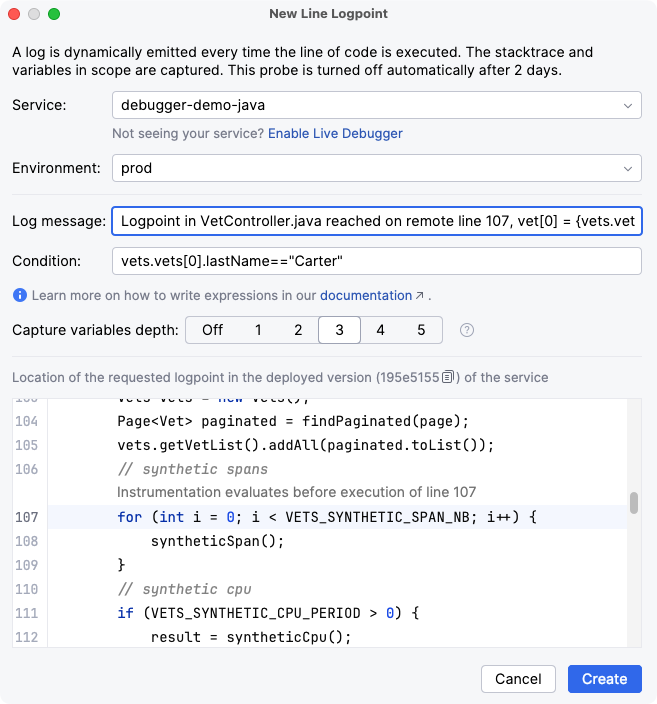
To add a logpoint, right-click a line of code in the source editor and select Datadog Live Debugger > Add Line Logpoint or Add Method Logpoint. New logpoints are added to the current session or, if required, a new session is created.
A dialog appears where you can enter the service name, the environment, a template for the log message to be emitted at runtime, a logpoint condition expression (optional), and the variable capture depth:
The log message field accepts a log template that contains descriptive text and variable references—see the Dynamic Instrumentation expression language documentation for details. The log message is generated using the runtime state immediately prior to the line of code being executed. Generated log messages automatically pass through the Dynamic Instrumentation Sensitive Data Scanner.
When a condition is defined, log events are generated only when the condition evaluates to true. Use conditions to capture events based on runtime state (for example, a particular transaction or product identifier).
The Capture variables depth controls how deeply hierarchical data structures are traversed when capturing runtime values. Higher values provide more useful information but require more capacity.
Logpoints expire automatically after 48 hours. Logpoint events are rate-limited to 1 execution per second.
Local and remote versions
Notice that the remote code may be a different version compared to the source code in the IDE. The New Logpoint dialog displays the version of the code that is deployed remotely, if it can be detected, so that you can see exactly where the logpoint is being placed. This requires that your application or service is tagged with Git information.
Tip: Checking out this revision locally shows you the same code in your IDE that is running remotely, which simplifies the live debugging experience. However, this is not required as the Datadog plugin maps local line numbers for logpoints to remote line numbers based on Git commit information.
Edit a logpoint
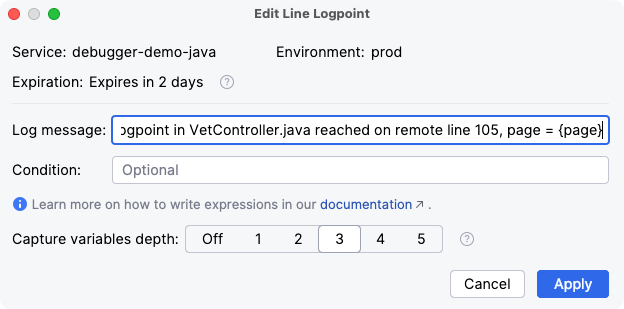
To modify the log message for a logpoint, right-click the logpoint and select Edit:
You can update the log message, the logpoint condition, and the capture depth. Changing the service or environment requires deleting the logpoint and creating a new one.
Applying changes to the logpoint also extends the expiration time to 48 hours.
Delete a logpoint
You can delete logpoints by right-clicking the icon in the gutter of the source editor, or the entry in the tool window, and selecting Delete from the context menu.
Deleting a logpoint does not delete the events already generated by the logpoint.
When a session is deleted, all the logpoints in the session are deleted. This cannot be undone.
Enable and disable a logpoint
You can enable or disable logpoints by right-clicking and selecting the appropriate context menu item. The icon changes to indicate the current state of the logpoint:
| Icon | Description |
|---|---|
| Active: Log events will be generated when the line of code is about to be executed. | |
| Disabled: The logpoint is inactive, either because it automatically expired or the user disabled it manually. | |
| Error: The logpoint is not generating log events due to an error. | |
| Warning: The logpoint may not be generating log events. |
Disabling then re-enabling a logpoint extends its expiry time to 48 hours.
Prerequisites
The Live Debugger feature in the IDE supports Java and Python and is subject to the same setup requirements as Live Debugger.
Further reading
Additional helpful documentation, links, and articles:


