- Essentials
- Getting Started
- Agent
- API
- APM Tracing
- Containers
- Dashboards
- Database Monitoring
- Datadog
- Datadog Site
- DevSecOps
- Incident Management
- Integrations
- Internal Developer Portal
- Logs
- Monitors
- Notebooks
- OpenTelemetry
- Profiler
- Search
- Session Replay
- Security
- Serverless for AWS Lambda
- Software Delivery
- Synthetic Monitoring and Testing
- Tags
- Workflow Automation
- Learning Center
- Support
- Glossary
- Standard Attributes
- Guides
- Agent
- Integrations
- Developers
- Authorization
- DogStatsD
- Custom Checks
- Integrations
- Build an Integration with Datadog
- Create an Agent-based Integration
- Create an API-based Integration
- Create a Log Pipeline
- Integration Assets Reference
- Build a Marketplace Offering
- Create an Integration Dashboard
- Create a Monitor Template
- Create a Cloud SIEM Detection Rule
- Install Agent Integration Developer Tool
- Service Checks
- IDE Plugins
- Community
- Guides
- OpenTelemetry
- Administrator's Guide
- API
- Partners
- Datadog Mobile App
- DDSQL Reference
- CoScreen
- CoTerm
- Remote Configuration
- Cloudcraft (Standalone)
- In The App
- Dashboards
- Notebooks
- DDSQL Editor
- Reference Tables
- Sheets
- Monitors and Alerting
- Service Level Objectives
- Metrics
- Watchdog
- Bits AI
- Internal Developer Portal
- Error Tracking
- Change Tracking
- Event Management
- Incident Response
- Actions & Remediations
- Infrastructure
- Cloudcraft
- Resource Catalog
- Universal Service Monitoring
- End User Device Monitoring
- Hosts
- Containers
- Processes
- Serverless
- Network Monitoring
- Storage Management
- Cloud Cost
- Application Performance
- APM
- Continuous Profiler
- Database Monitoring
- Agent Integration Overhead
- Setup Architectures
- Setting Up Postgres
- Setting Up MySQL
- Setting Up SQL Server
- Setting Up Oracle
- Setting Up Amazon DocumentDB
- Setting Up MongoDB
- Connecting DBM and Traces
- Data Collected
- Exploring Database Hosts
- Exploring Query Metrics
- Exploring Query Samples
- Exploring Database Schemas
- Exploring Recommendations
- Troubleshooting
- Guides
- Data Streams Monitoring
- Data Observability
- Digital Experience
- Real User Monitoring
- Synthetic Testing and Monitoring
- Continuous Testing
- Product Analytics
- Session Replay
- Software Delivery
- CI Visibility
- CD Visibility
- Deployment Gates
- Test Optimization
- Code Coverage
- PR Gates
- DORA Metrics
- Feature Flags
- Security
- Security Overview
- Cloud SIEM
- Code Security
- Cloud Security
- App and API Protection
- Workload Protection
- Sensitive Data Scanner
- AI Observability
- Log Management
- Administration
Custom Allocation Rules
Overview
Custom allocation rules let you split and assign shared costs to any available tags, such as teams, projects, or environments, supporting accurate showback and chargeback.
The following allocation methods are available:
| Allocation Method | Description | Use Case | Example |
|---|---|---|---|
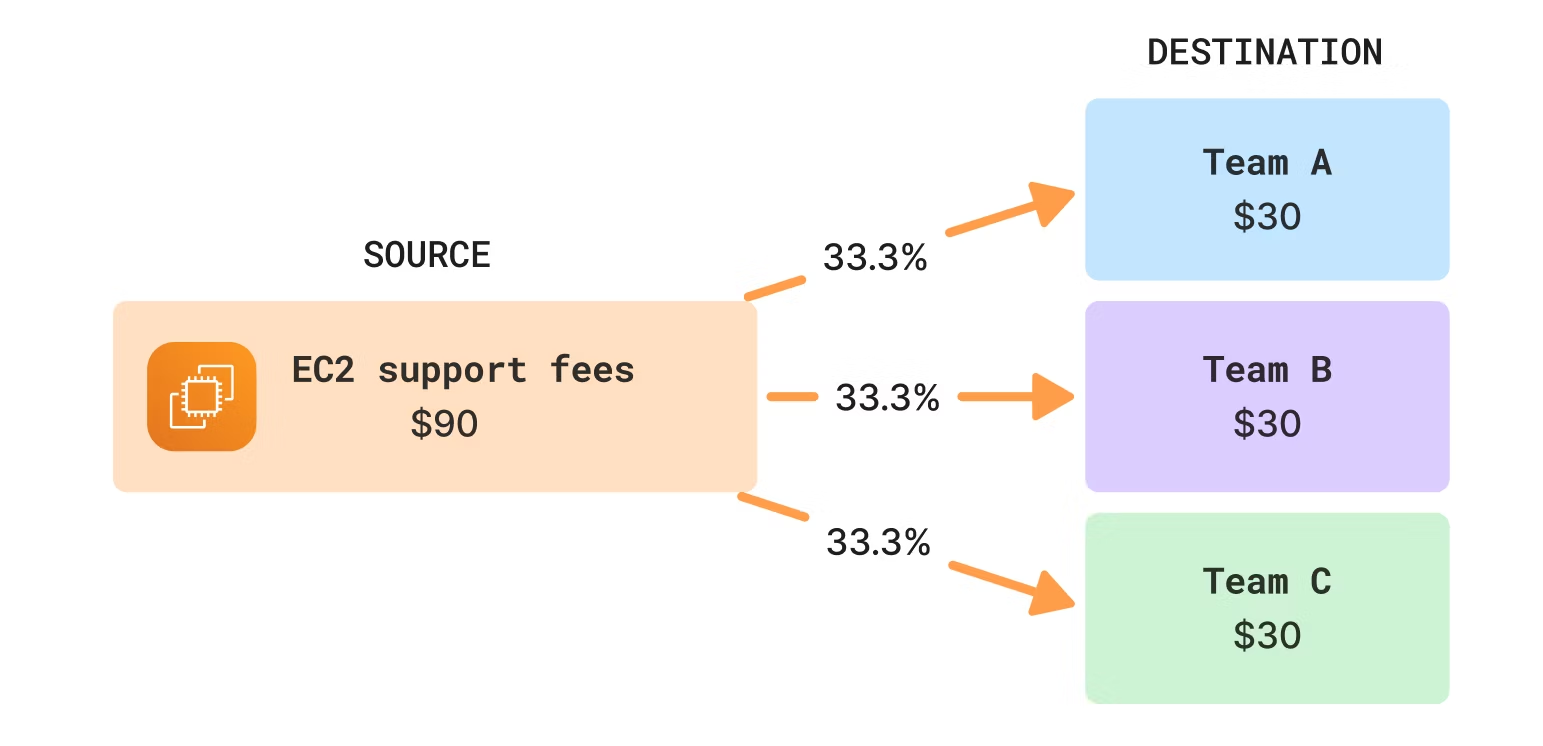
| Even | Split costs evenly among all destinations. | Scenarios where each team, project, or environment should be charged the same amount for a shared cost. | Untagged support costs are allocated evenly to teams teamA, teamB, and teamC. |
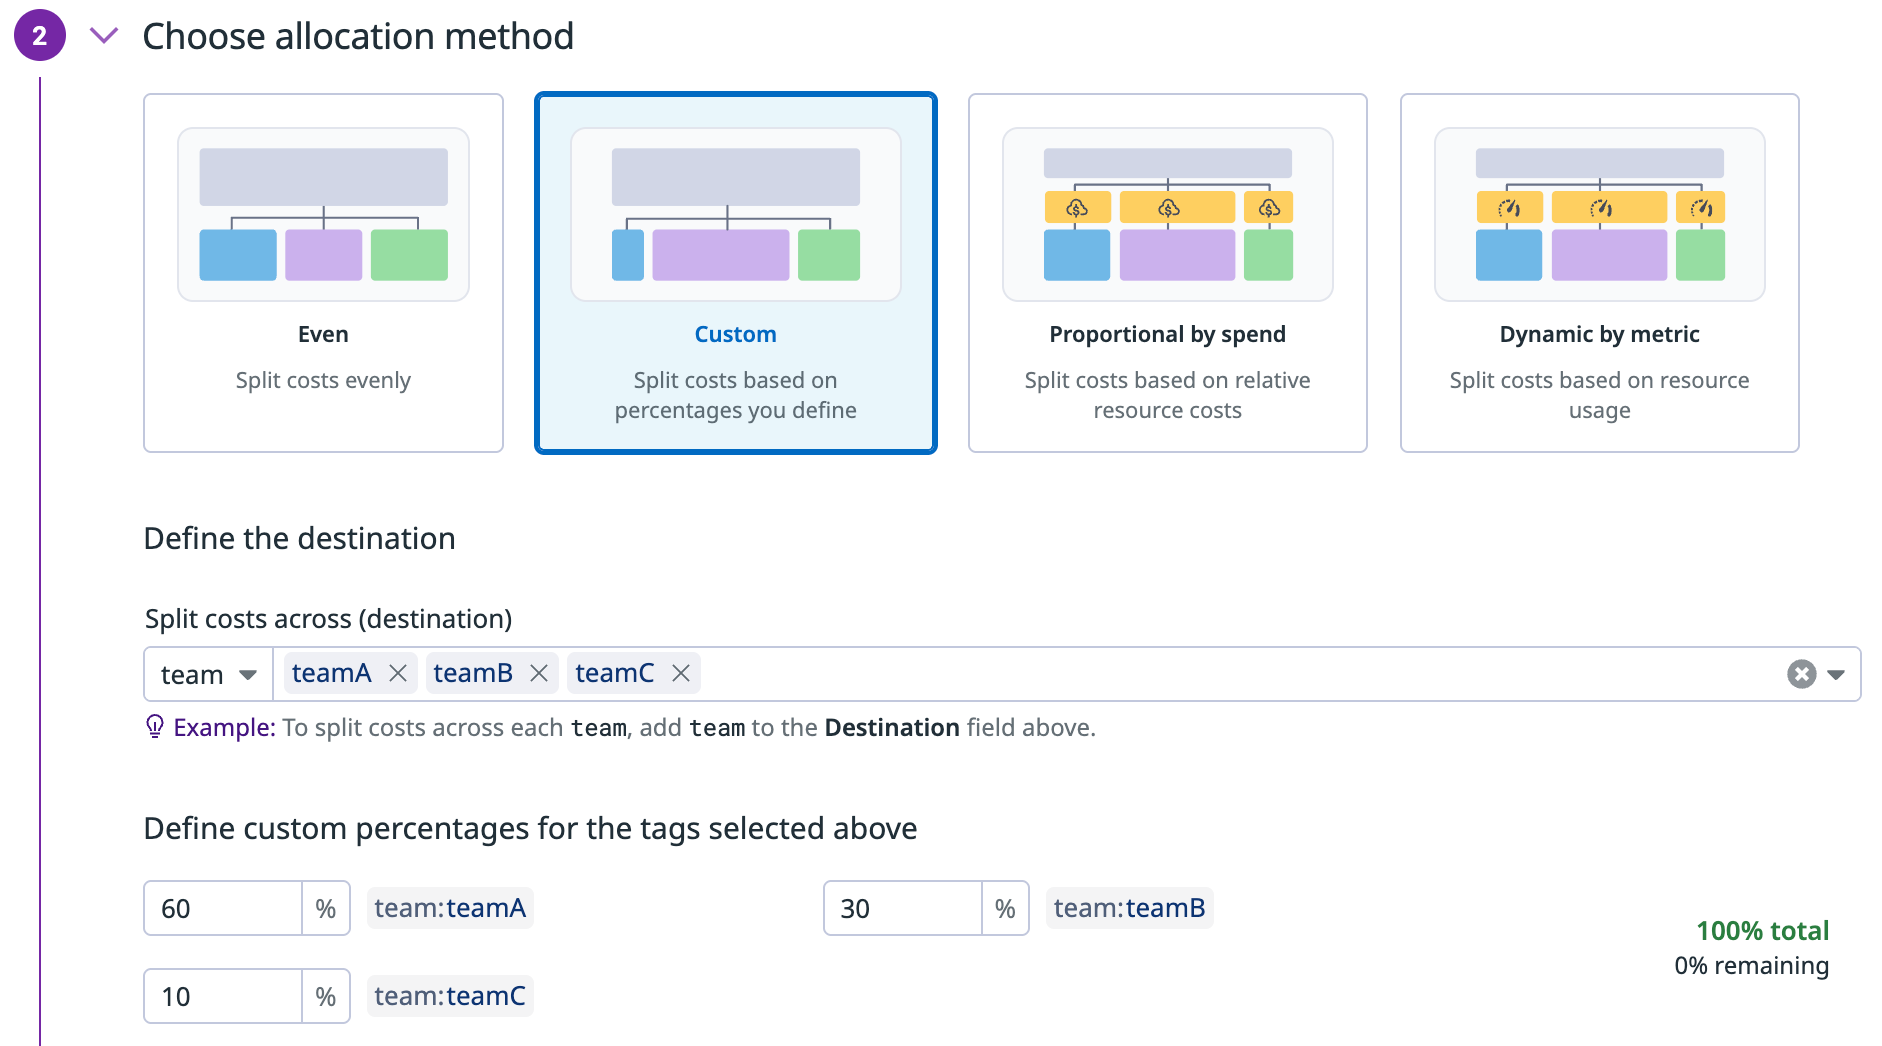
| Custom | Split costs to each destination based on percentages you define. | Scenarios where business rules or agreements dictate how much each team should pay. | Untagged support costs are allocated 60% to teamA, 30% to teamB, and 10% to teamC. |
| Proportional by spend | Split costs based on each destination’s share of total spend. | Scenarios where teams should pay in proportion to their actual spend. | Untagged support costs are allocated to teams teamA, teamB, and teamC based on their proportion of total spend on Amazon EC2. |
| Dynamic by metric | Split costs based on each destination’s share of total usage. | Scenarios where teams should pay in proportion to their actual usage. | Shared PostgreSQL costs are allocated by total query execution time per team. |
Custom allocation rules run after Tag Pipelines, enabling cost allocations on the latest user-defined tags. Costs are allocated on a daily basis. Cost allocations can be applied to AWS, Google Cloud, and Azure costs.
You can manage custom allocation rules using the API, Terraform, or directly in Datadog by following the instructions below.
Create a custom allocation rule
Step 1 - Define the source
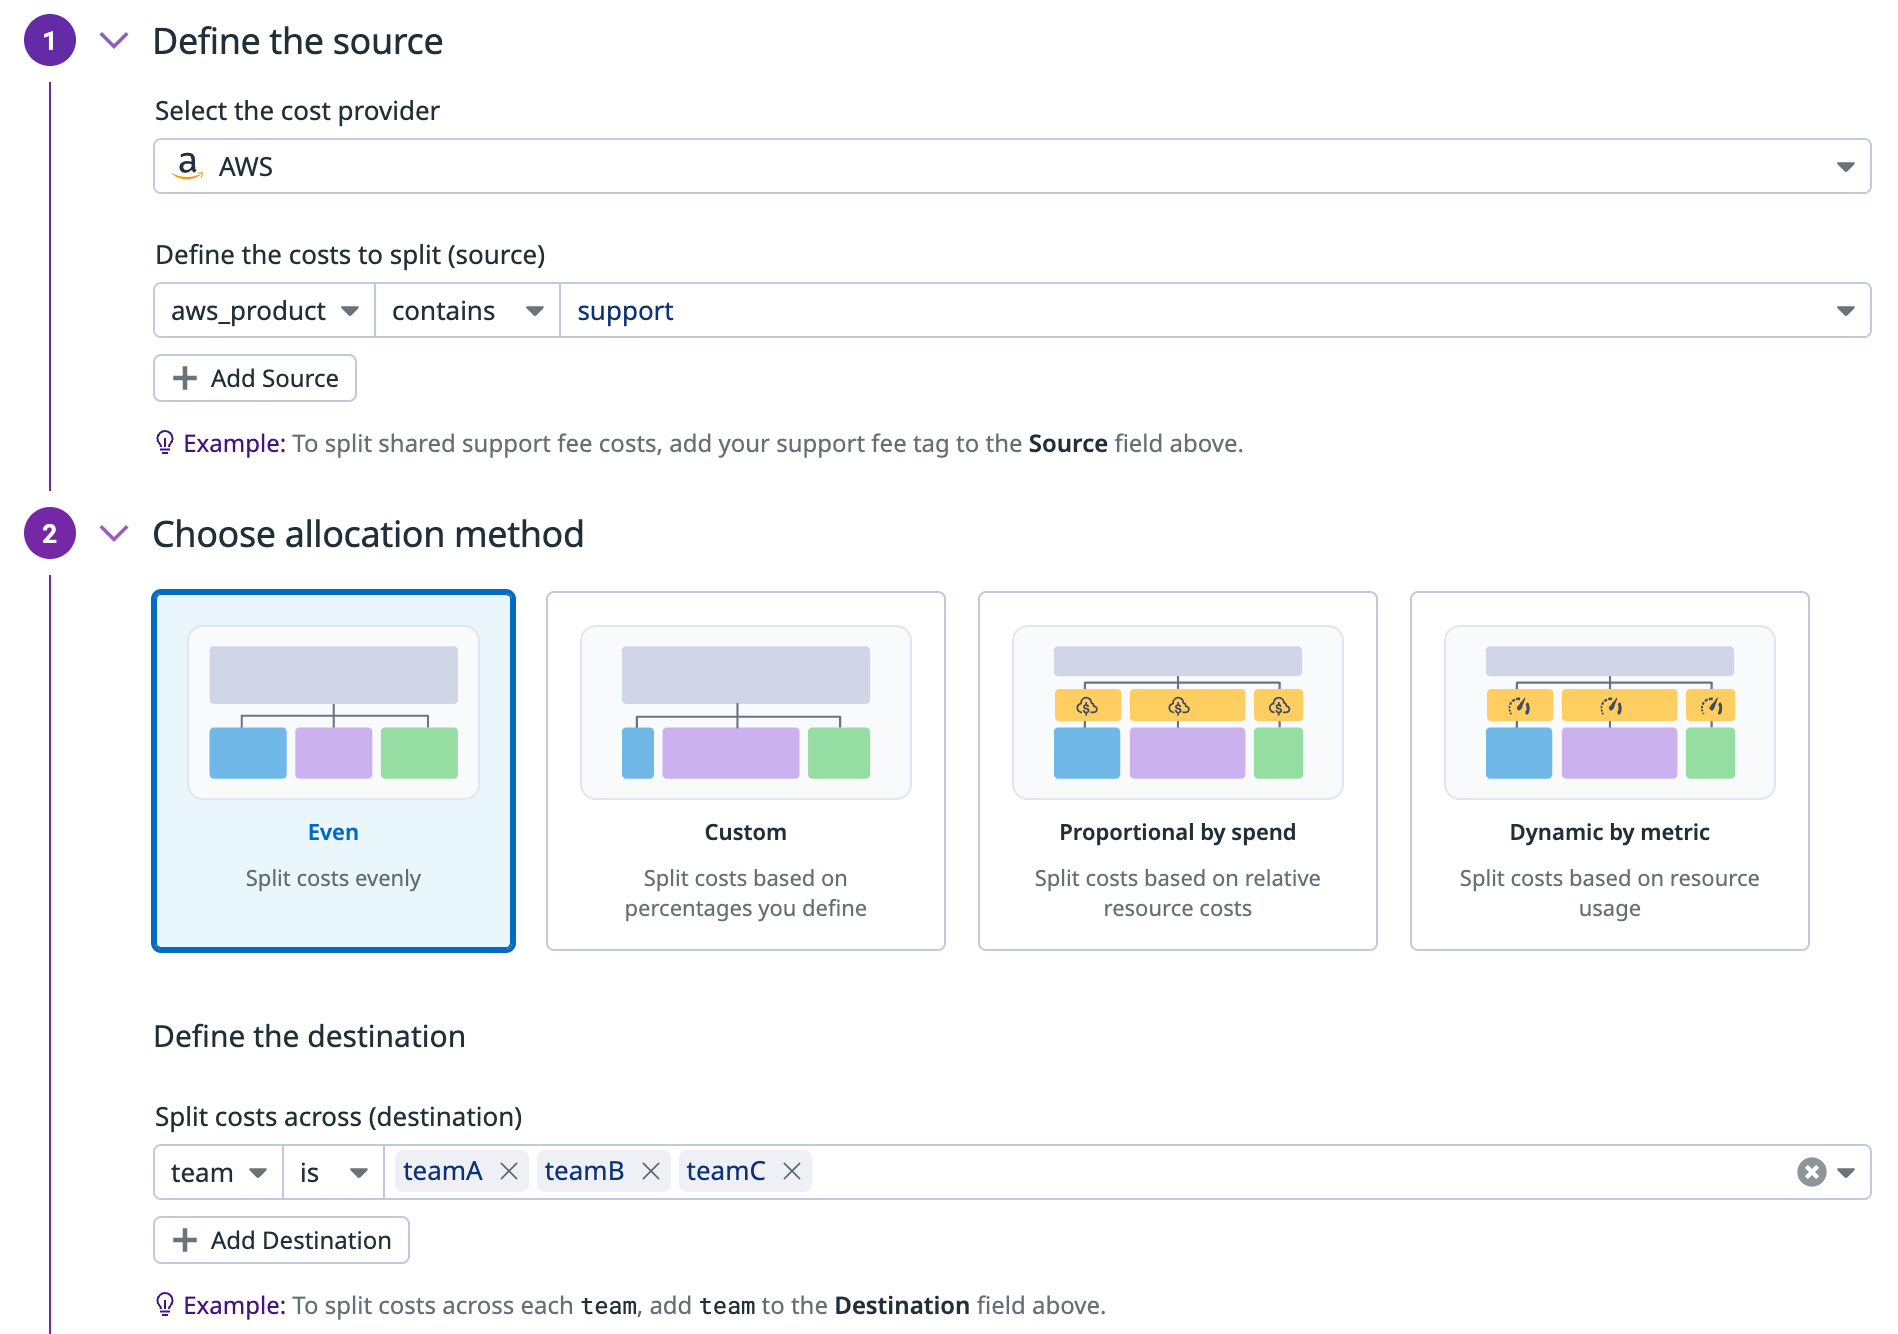
Navigate to Cloud Cost > Settings > Custom Allocation Rules and click Add New Rule to start.
From the dropdown, select the shared costs you want to allocate.
Example: Untagged support costs, shared database costs.
Step 2 - Choose an allocation method
Below is a description of how each allocation method works with examples.
With the even strategy, costs are allocated evenly towards your destination tags. Apply a filter to refine which part of the bill determines the proportions.
With the custom percentage strategy, you can define static custom percentages for the destination tags you select. For example, if you have 3 destinations (teamA, teamB, teamC) you can allocate 60% to teamA, 30% to teamB, and 10% to teamC.
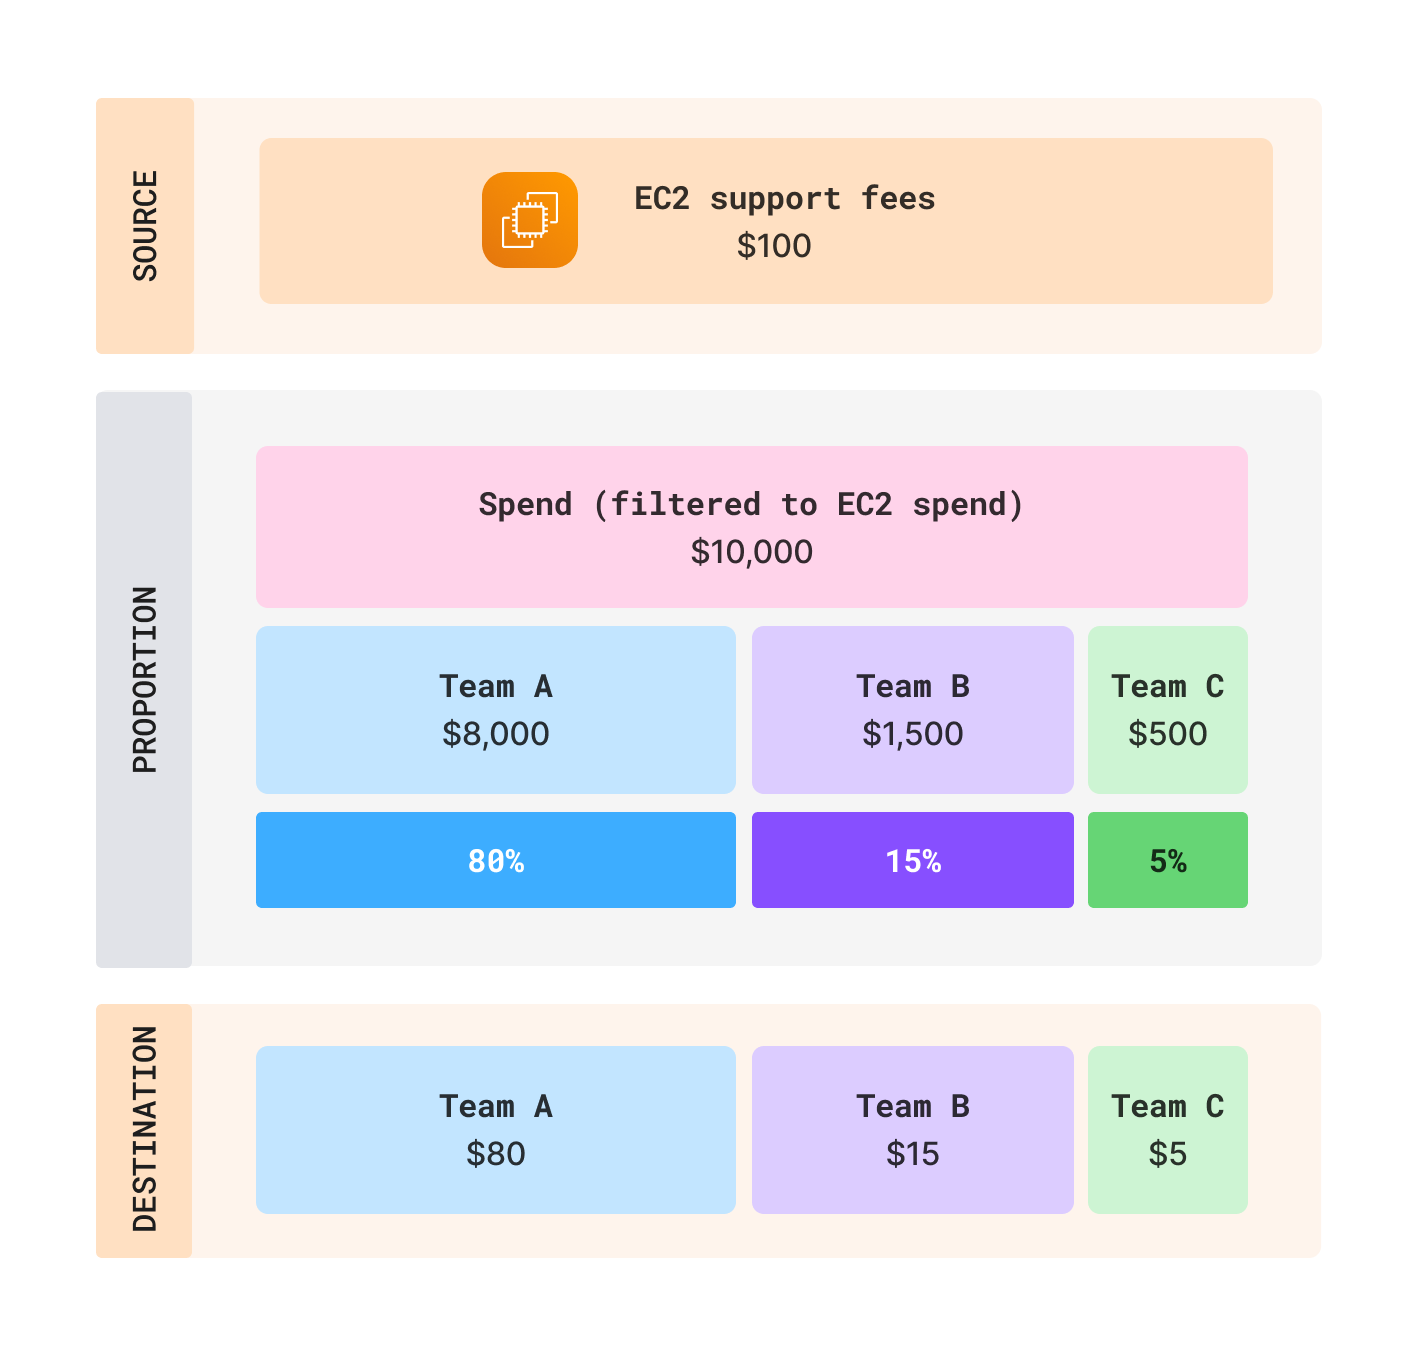
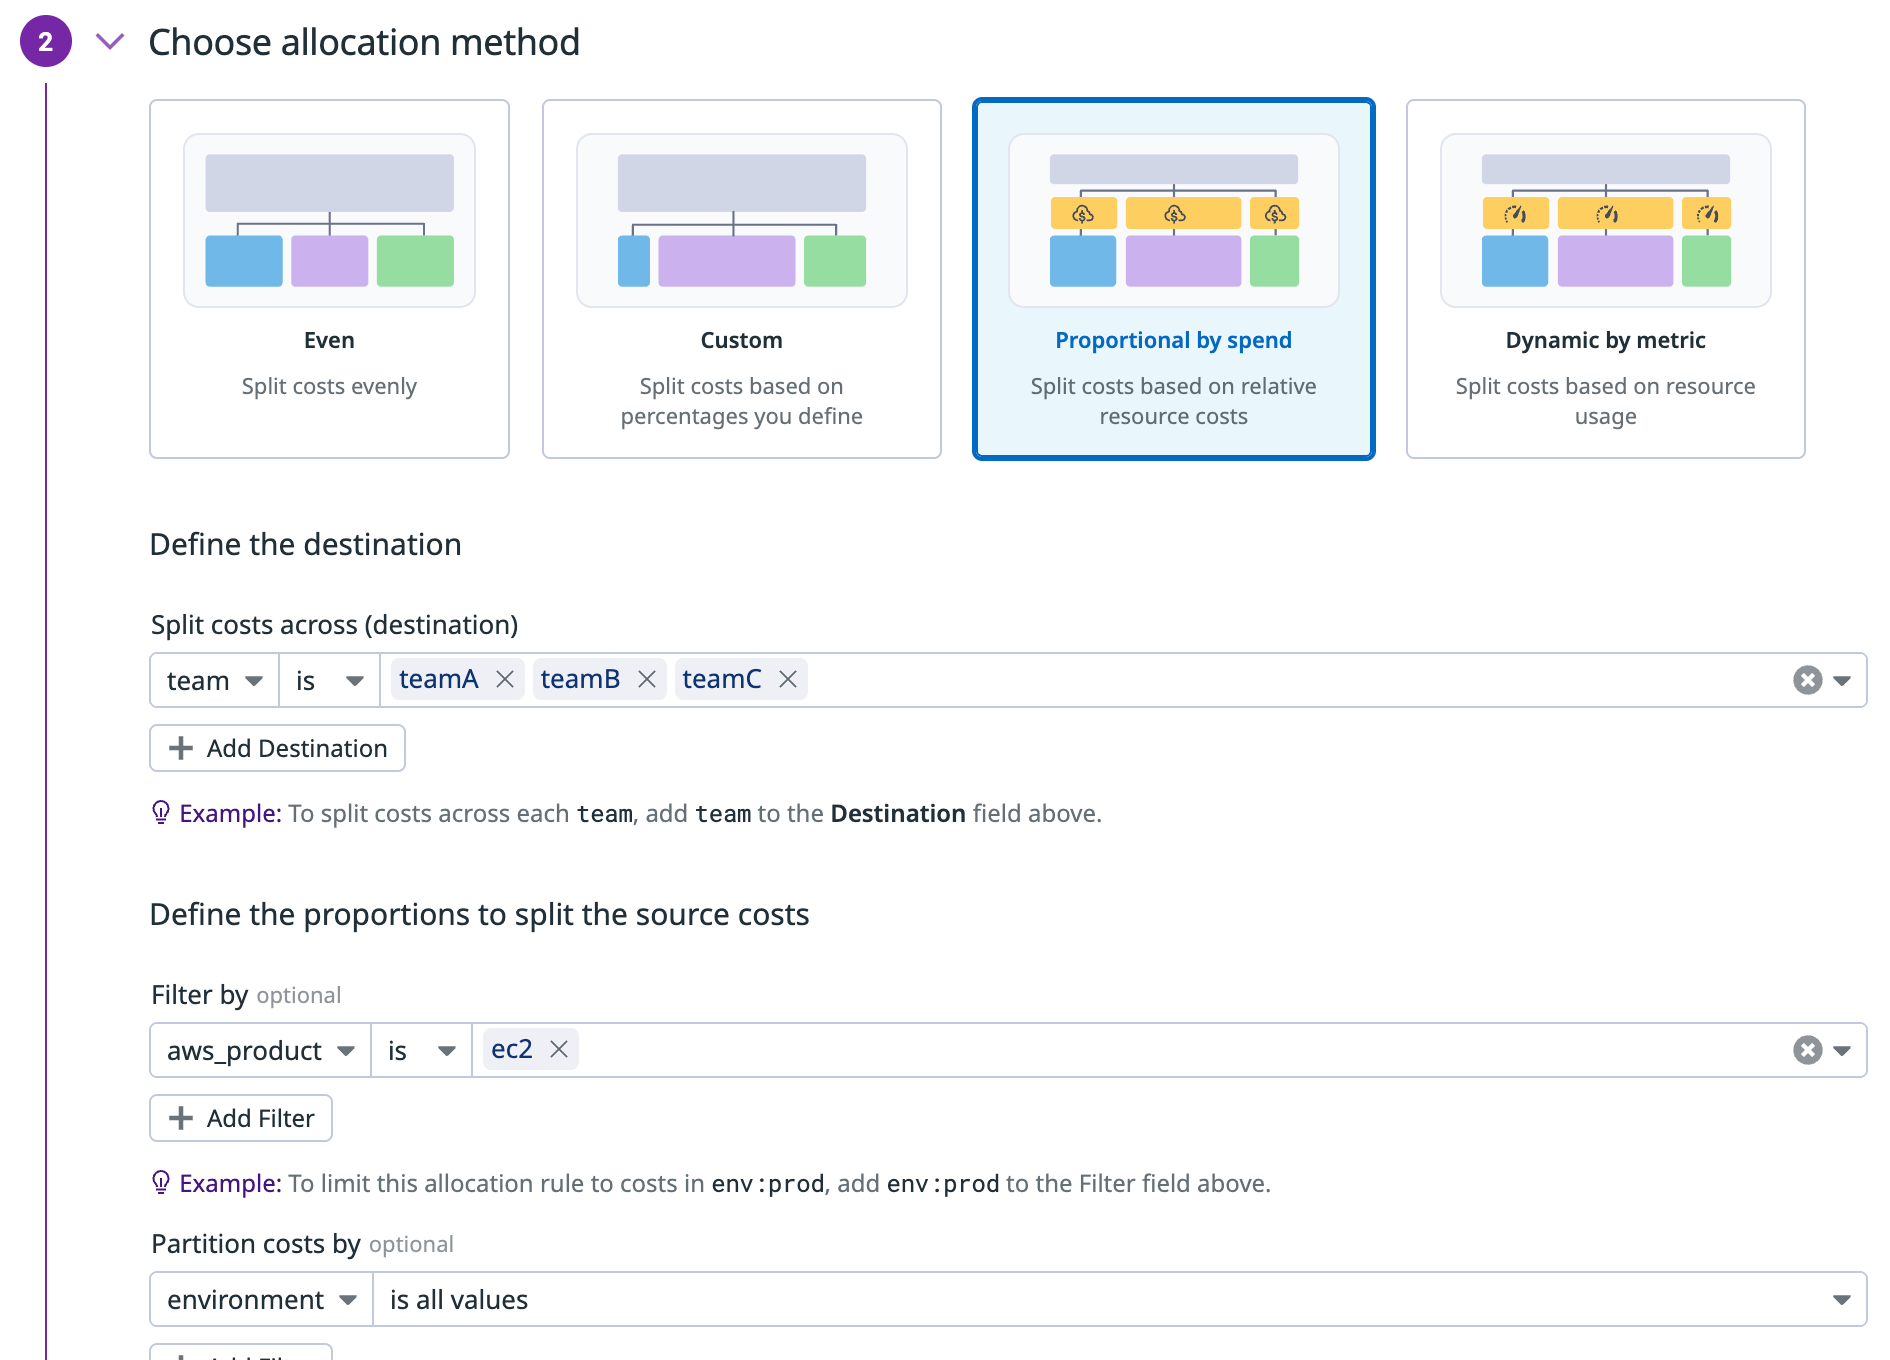
Costs are allocated based on the proportional spend of destination values. Similarly to even allocation, you can further customize your allocation by setting filters and partitions.
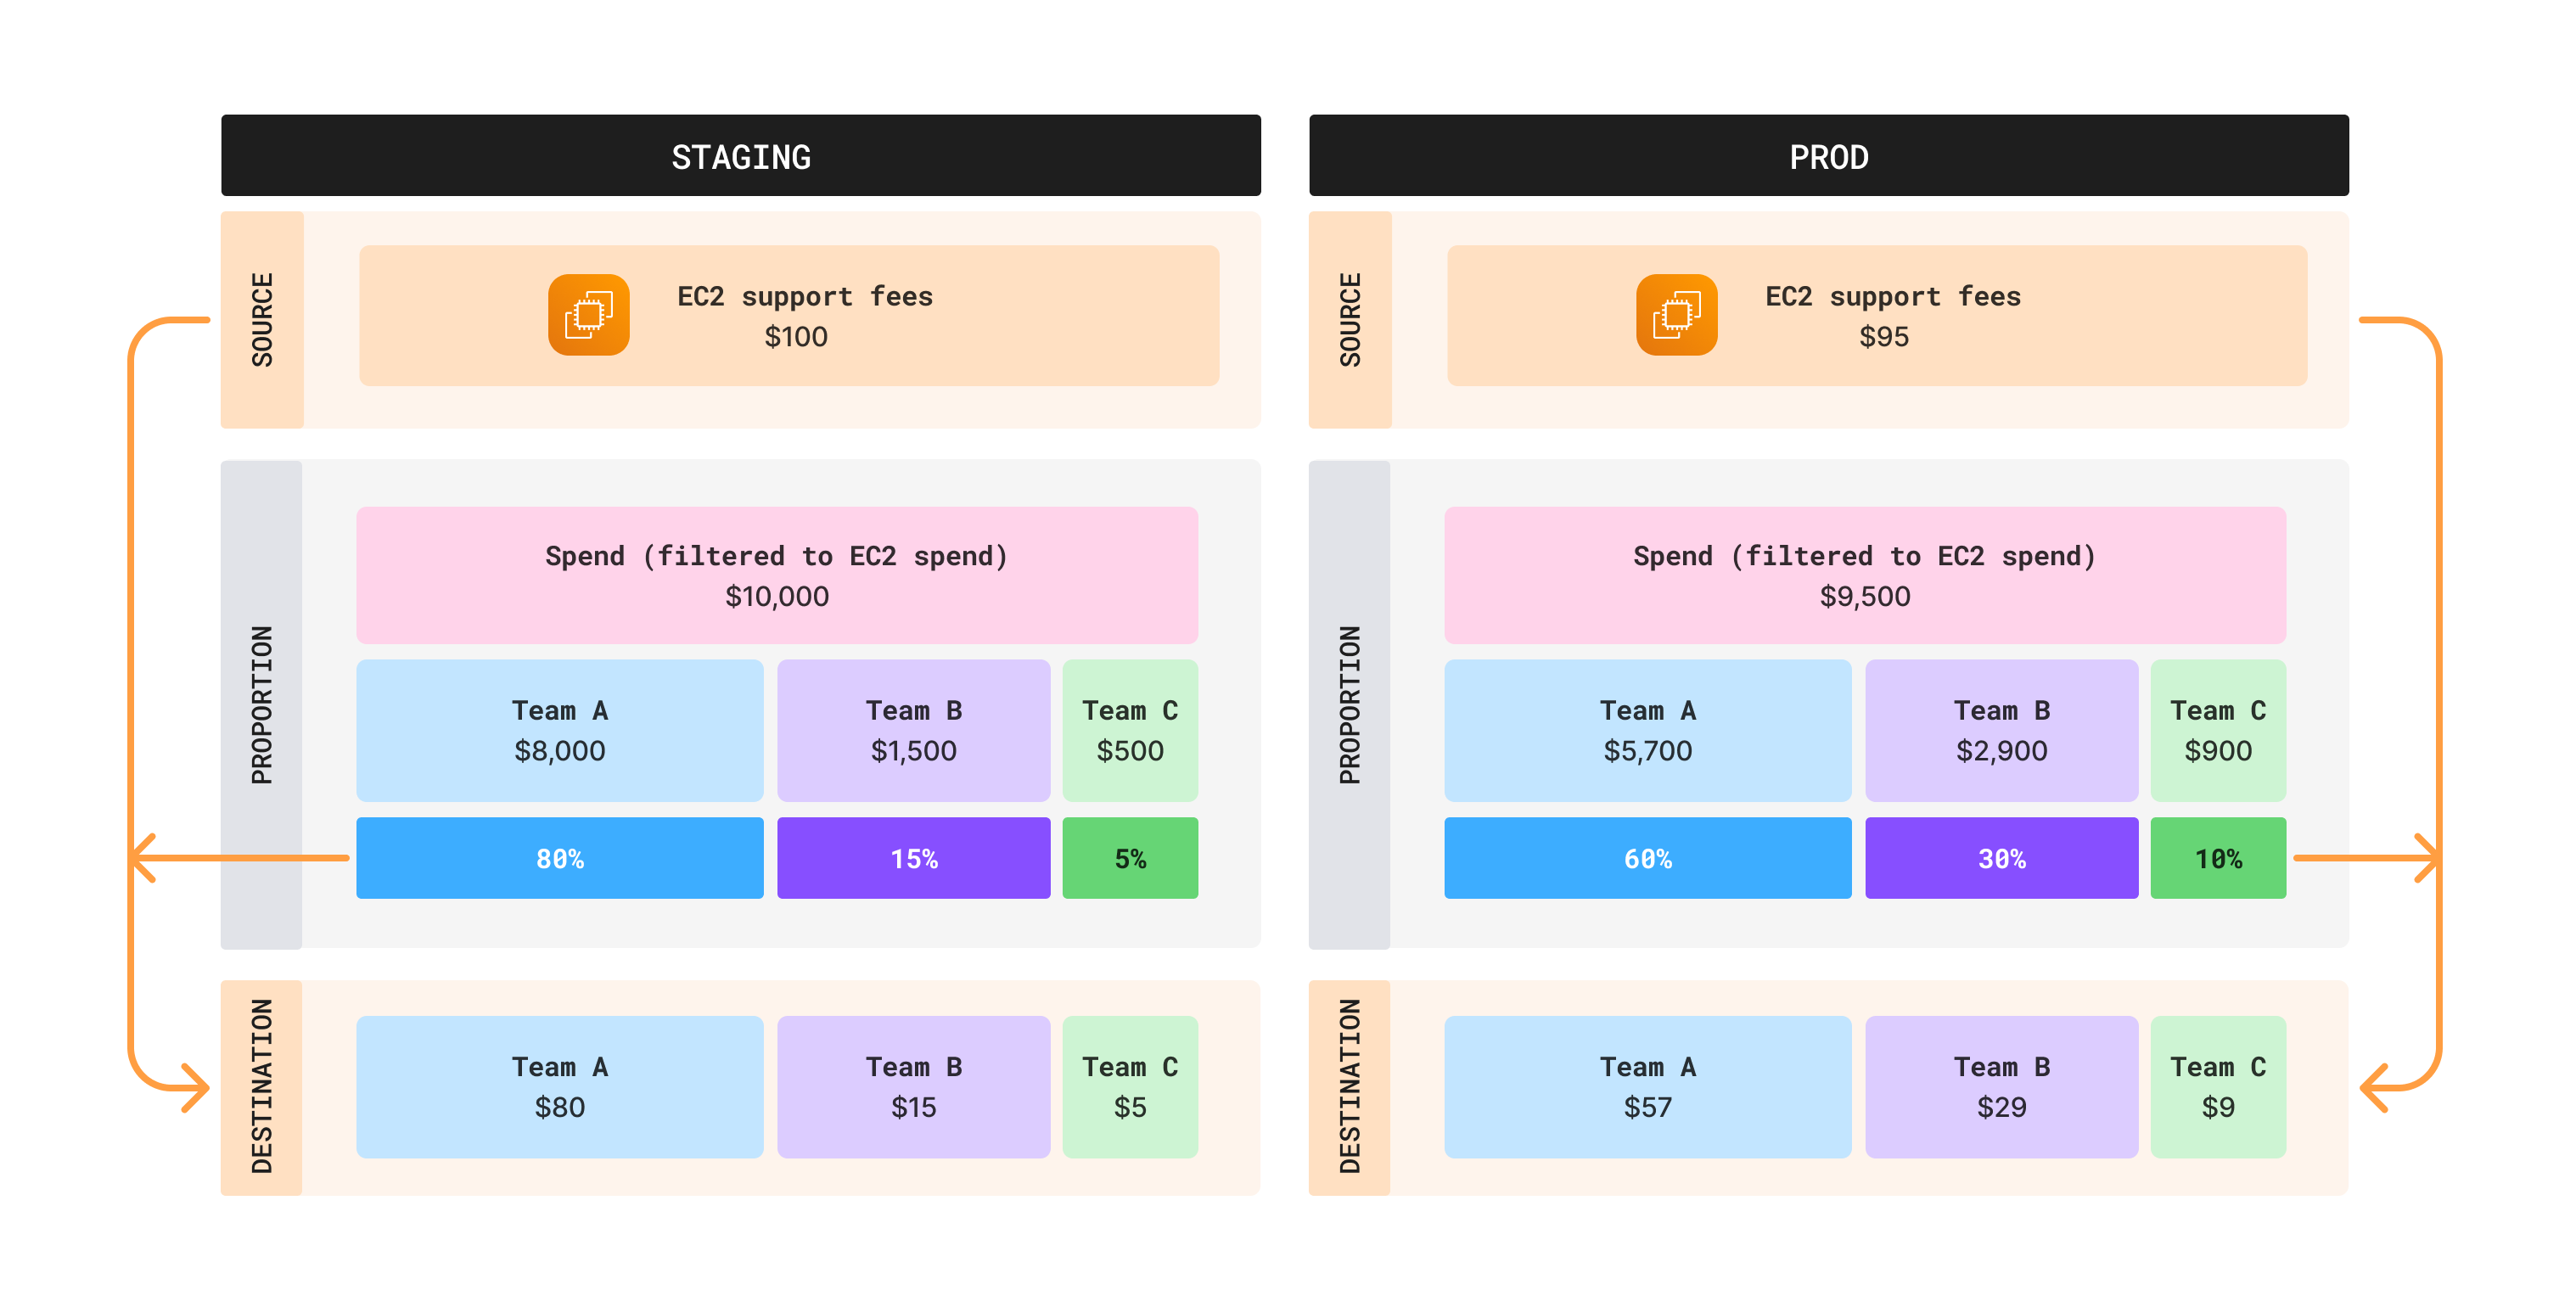
In the preceding diagram, the pink bar represents a filter on the cost allocation. With this filter applied, EC2 support fees are split across teams based on each team’s share of overall EC2 spend.
To create a rule for this allocation, you can:
- Define the costs to allocate (source): EC2 support fees (
aws_product:support). - Choose the allocation method: Proportional by spend.
- Choose the destination tag to split your costs by: User (
User A,User B,User C). - Refine the allocation by applying filters: EC2 (
aws_product:ec2). - Create suballocations by partitioning the allocation rule: environment (
env).
You can also specify how cost proportions should be partitioned to ensure segment-specific allocations. For example, if you partition your costs by environment using tags like staging and production, the proportions are calculated separately for each environment. This ensures allocations are based on the specific proportions within each partition.
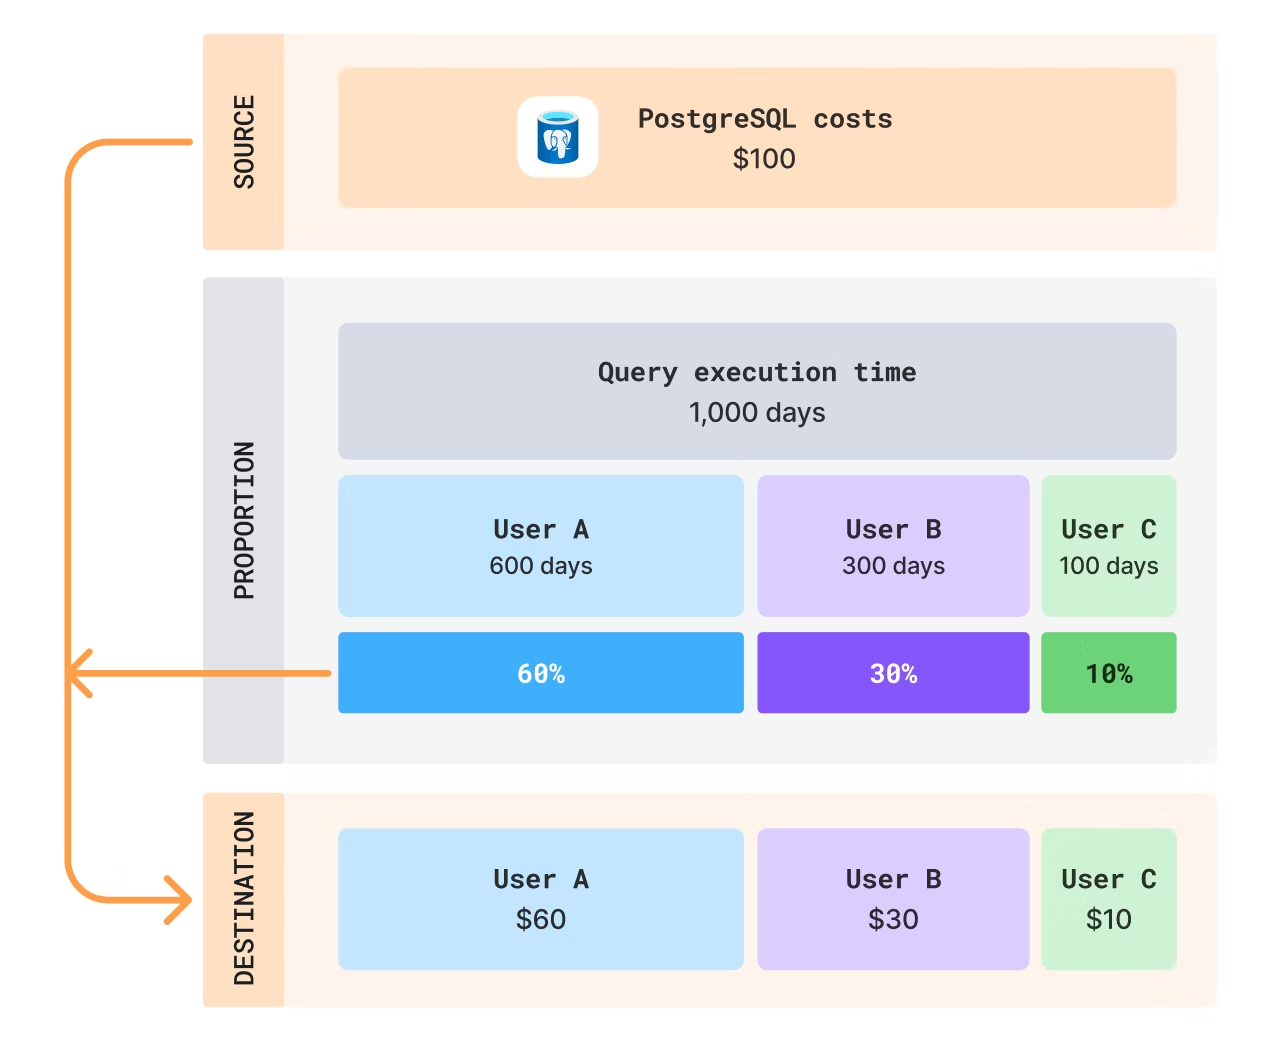
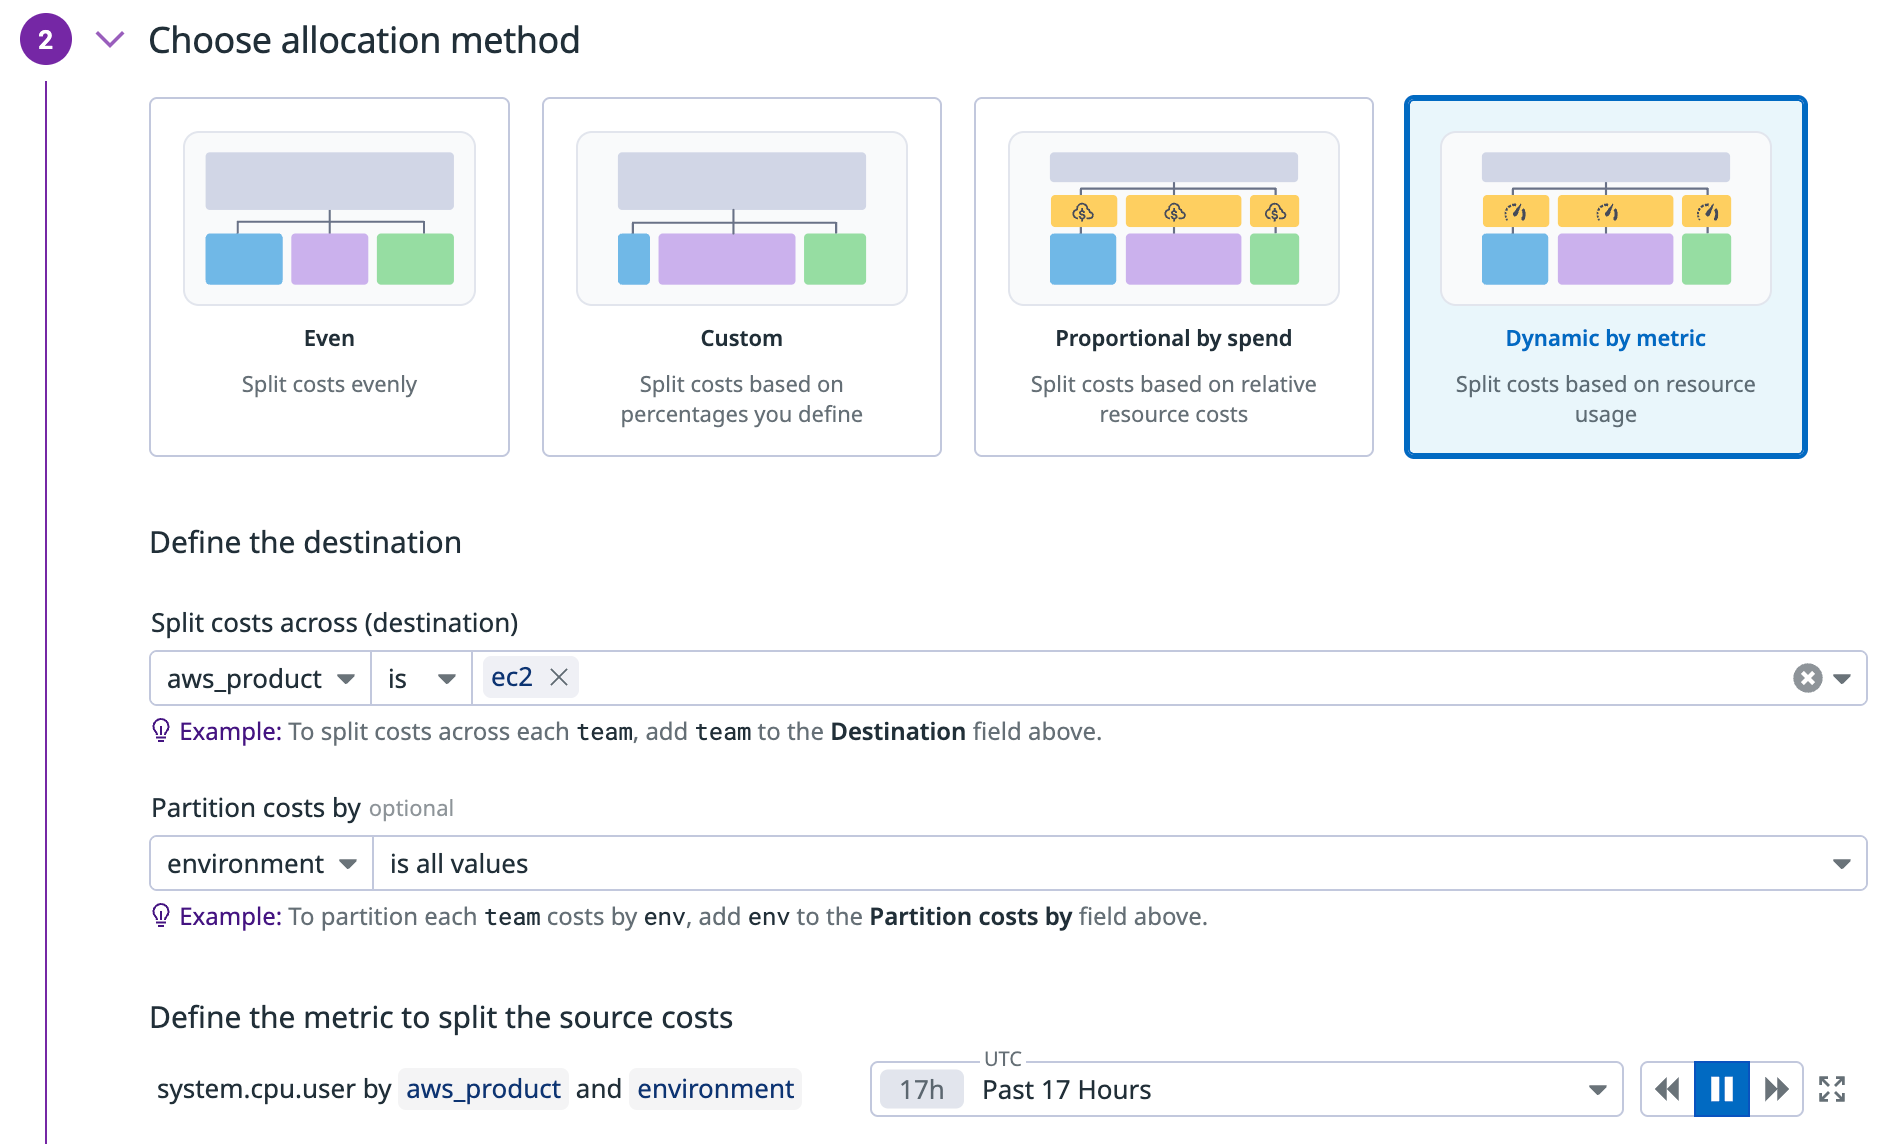
Metrics-based allocation provides the ability to split up costs based on Datadog’s metrics queries. By using performance metrics to allocate expenses, you can more accurately allocate costs based on application usage patterns.
For example, this PostgreSQL metrics query sum:postgresql.queries.time{*} by {user}.as_count() tracks the total query execution time per user. The relative values are then used to determine what proportion of total PostgreSQL costs should be allocated to each user.
To create a rule for this allocation, you could:
Define the costs to allocate (source): PostgreSQL costs (
azure_product_family:dbforpostgresql).Choose the allocation method: Dynamic by metric
Choose the destination tag to split your costs by: User (
User A,User B,User C).Define the metric query used to split the source costs: Query execution time per user (
sum:postgresql.queries.time{*}by{user}.as_count).Create suballocations by partitioning the allocation rule: environment (
env).
Step 3 - Define the destination
Decide which dimensions, such as team, department, or service, receive the allocated costs. For example:
You can select multiple values for your destination tag. For instance, if you select the team tag, you can choose specific teams like teamA, teamB, and teamC to receive the allocated costs.
Step 4 - (optional) Apply filter(s)
Apply a filter across the entire allocation rule. Filters help you target the allocation rule to the relevant subset of your cloud spend.
Example: Only apply cost allocation where environment is production.
- Proportional by spend: Let’s say you allocate shared costs to the team tag, proportional to how much each team spends. You can add a filter, creating a cost allocation that is proportional to how much team spends on
aws_productisec2. - Dynamic by metric: Let’s say you allocate shared PostgreSQL costs to the service tag, proportional to the query execution time of each service. You can add a filter, creating a cost allocation that only applies where
environmentisproduction.
Step 5 - (optional) Apply a partition
Partitioning allows you to split a single allocation rule into multiple sub-allocations. For example, instead of creating separate rules for each environment (like production and staging), you can create one rule that is partitioned by environment. Each partitioned sub-allocation uses the same allocation structure, but applies only to costs matching that tag value.
Note: For Dynamic by Metric, the tag you select to partition by must exist in both your cloud cost and metric data.
With this partition, the same even allocation rule is applied to each environment.
With this partition, the same proportional allocation rule is applied to each environment.
With this partition, the same dynamic by metric allocation rule is applied to each environment.
Managing rules
Rules can be modified and deleted in the Custom Allocation Rules section of the Cloud Cost settings page. All fields except for the rule name can be reconfigured.
When you delete a custom allocation rule, the associated allocation is automatically removed from the current month and prior month’s data within 24 hours. To remove allocations from older data, contact Datadog support to request a backfill.
You can also disable a custom allocation rule without deleting it.
Rules are applied in the same order as shown in the list.
Visualize your allocations
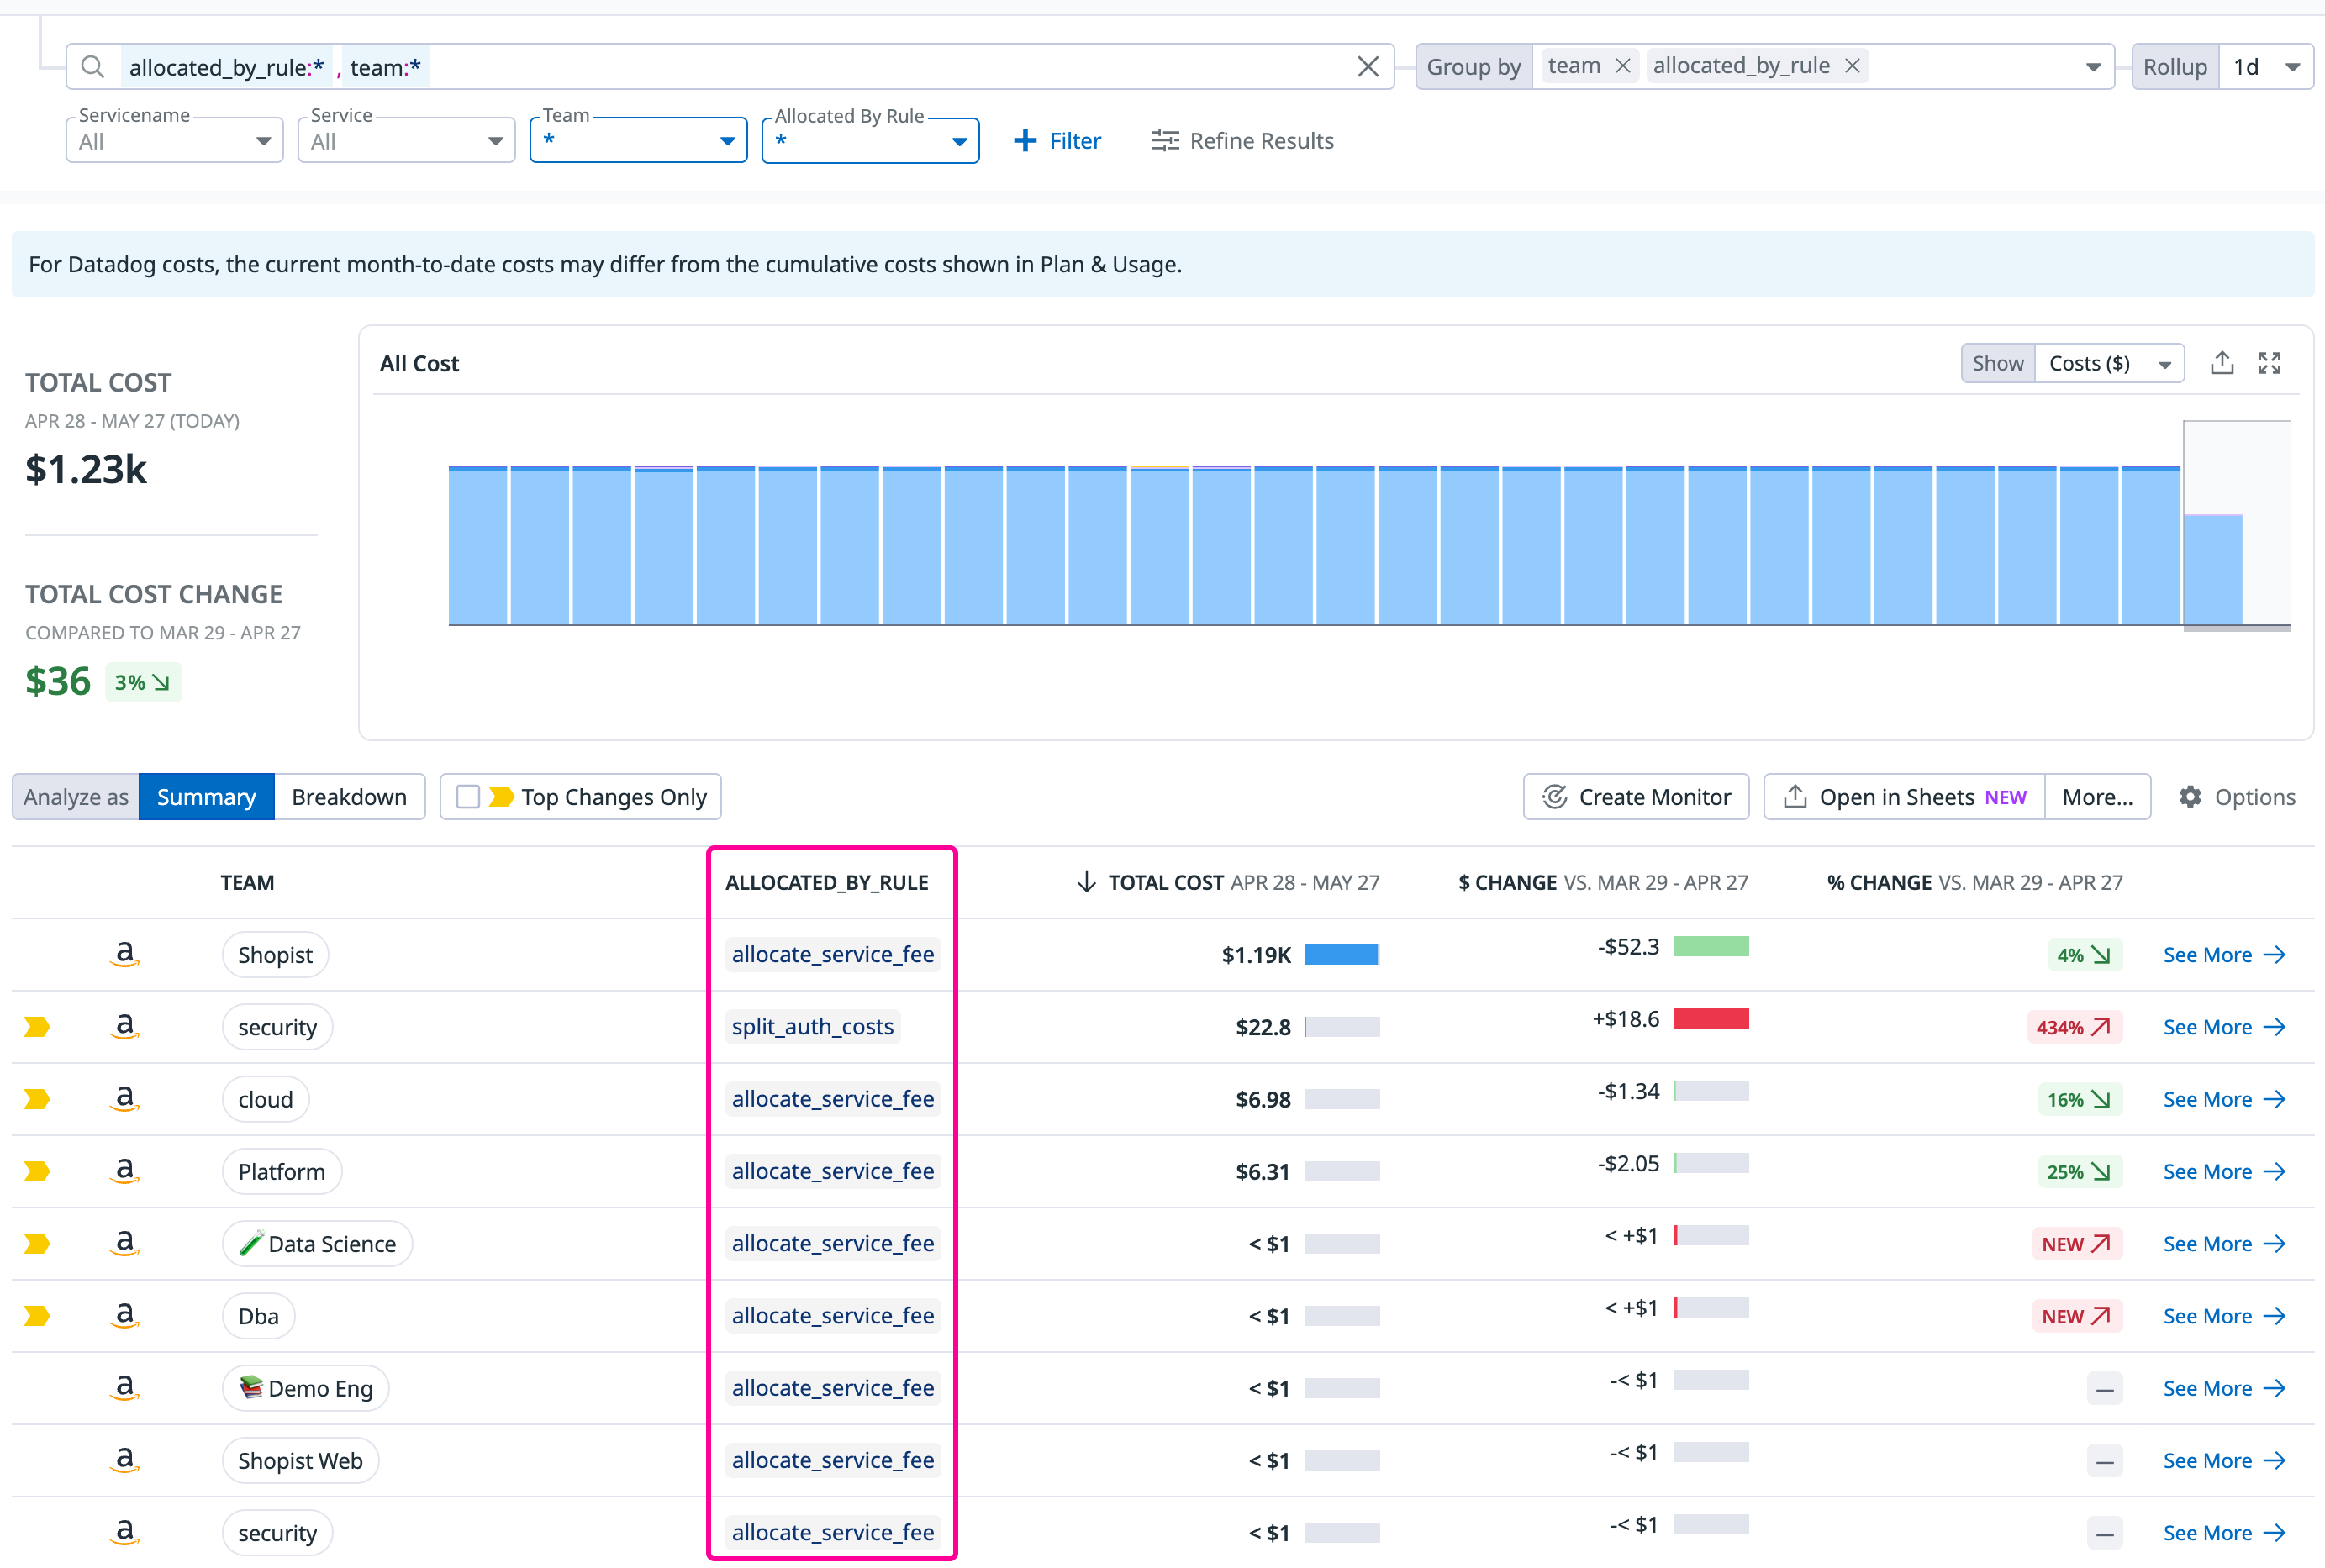
Changes to custom allocation rules may take up to 24 hours to be applied. After being applied, the new allocations can be seen throughout Cloud Cost Management. Custom allocated costs also include an allocated_by_rule tag, denoting the rule name that applied the allocation.
Further reading
Additional helpful documentation, links, and articles:
